MapBox and Your Data
in this lesson
In addition to creating your own custom layers within CalTopo, you can also bring in outside data. The methods to do this are using MapSheets, Mapbox, and other Custom Sources.
This lesson will focus primarily on the MapBox method, and also touch on MapSheets - though MapSheets has its own entire unit. The methods in this lesson may require some tech savviness. If you have any specific questions, remember you can always contact us through our Support Forum.
Topics on this Page:
- Map Sheets (some features require Pro or higher subscription.)
- MapBox Tileset (Desktop or higher subscriptions.)
- Other Custom Sources are in the next lesson. These require a pro or higher subscription.
Map Sheets
Formerly called Geospatial Images, Map Sheets are any image that can be referenced to a place on the surface of the earth. Supported file types include JPG, TIFF, or PDF files. Map Sheets can be viewed and stacked just like base layers in the map viewer, although they are more limited in geographic scope. This is a great solution for displaying local data, such as a map of campsite and boat launches or state park trail systems, in CalTopo.
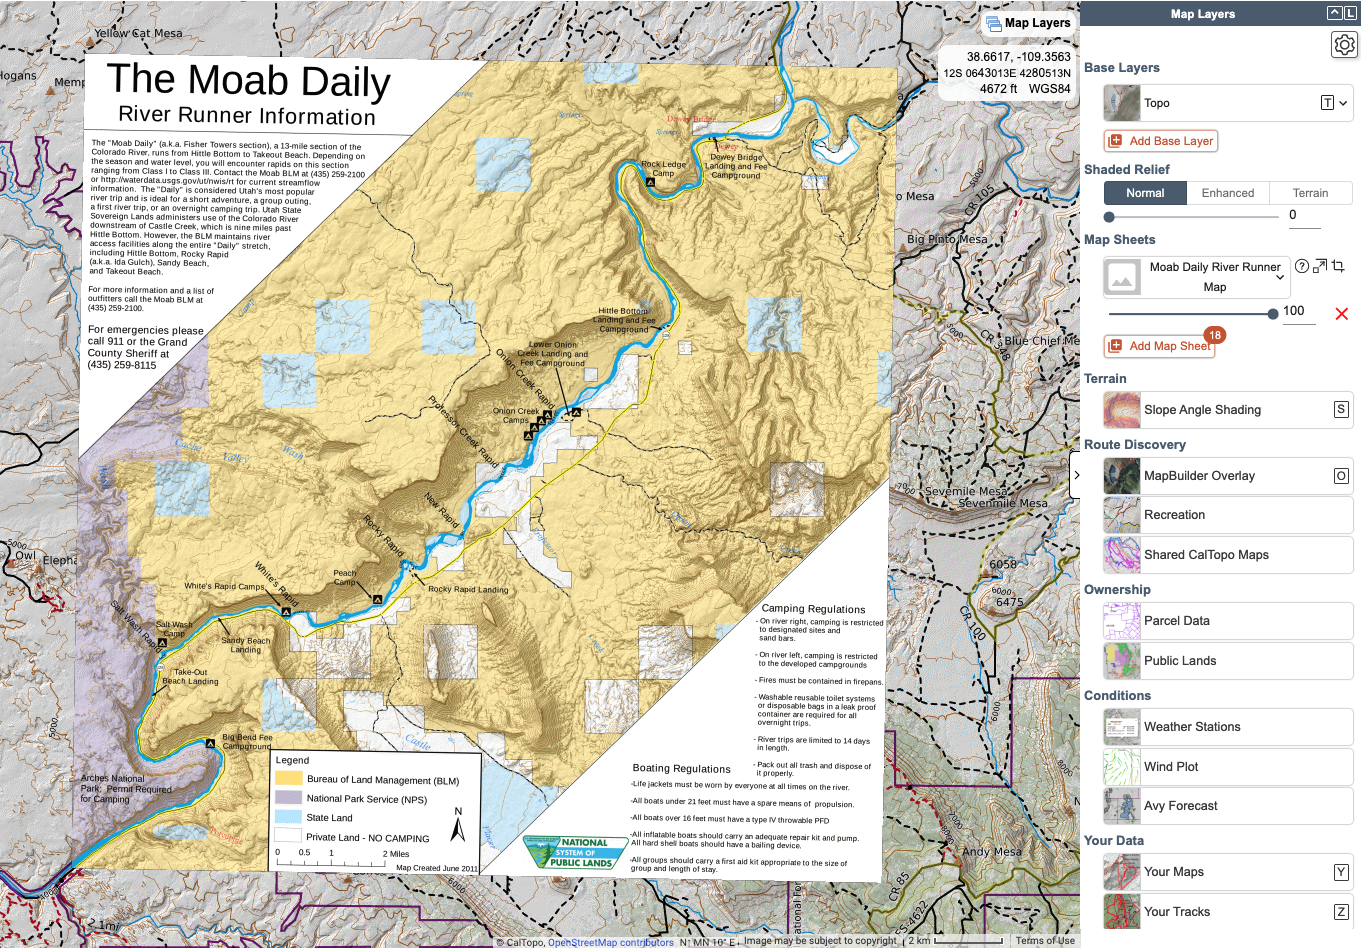
If you have a pro, desktop or team account, you can import map sheets directly into CalTopo using the Add New Layer menus.
However there is so much going on with Map Sheets that we have dedicated an entire lesson to the topic. Please go there to learn more.
Mapbox Tileset
Desktop, Team, or Enterprise Subscription Required.
For advanced users, you can transform images or shapefiles into a custom layer using the program MapBox that you can then view in CalTopo. This does require you to create an account on MapBox since shape data needs to be converted to a tileset in order to display it as a layer.
Note: MapBox usernames cannot have a dash - in it. We cannot support dashes in the username at this time.
The process is a bit involved but if you can navigate it, you can create some really unique custom layers, such as a base layer composed of drone images.
How to Create a Custom Layer from Shapefiles using MapBox
Below are instructions for how to use MapBox to transform shapefile data into a custom layer that you can view on CalTopo or SARTopo. We will walk through an example using publicly available shapefiles from the Colorado Parks and Wildlife that contain data on the boundaries and numbers of game management units across the state.
To start with, register for an account at MapBox under the pay-as-you-go plan.
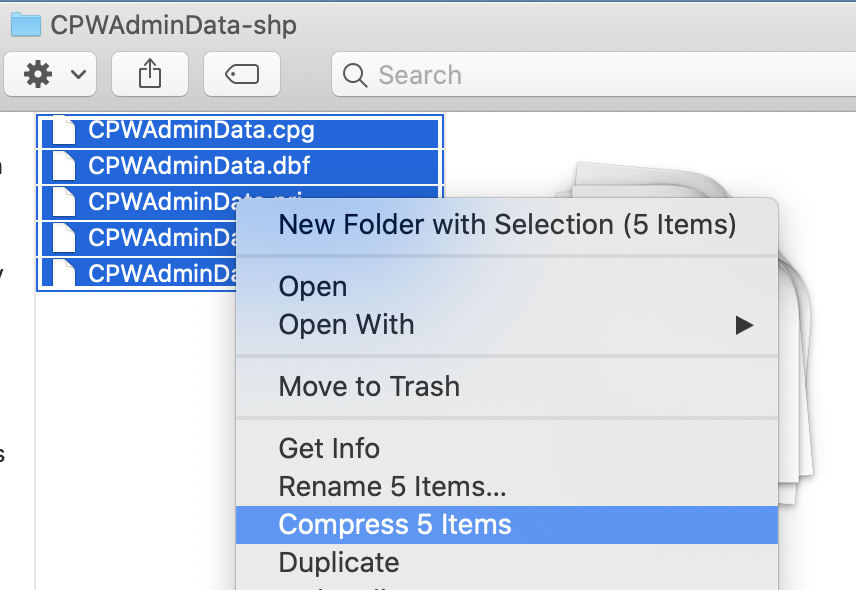
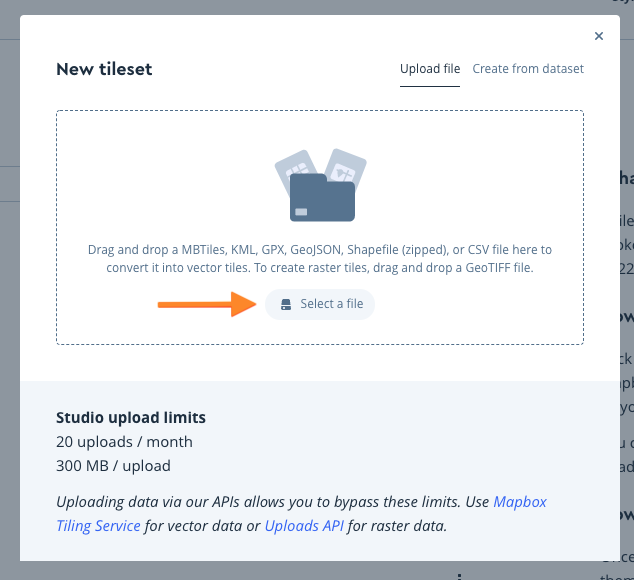
Shapefiles consist of several files with the same name, but different extensions - typically at least .shp, .prj and .dbf. MapBox requires you to upload these files zipped together with only one shapefile per zipfile:
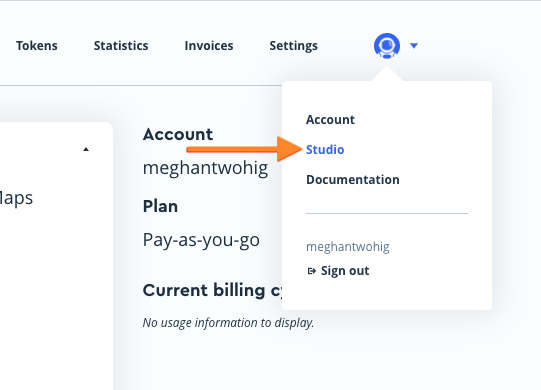
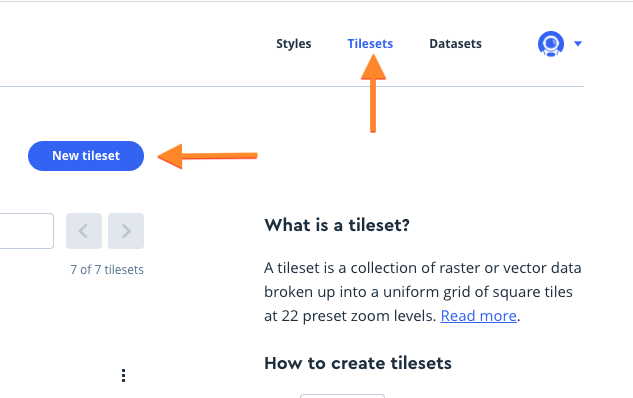
Click on the Studio link at the top right, then Tilesets, then New tileset.
The New tileset dialog will appear. Either drag and drop or click Select a file to upload the zipped shapefile.
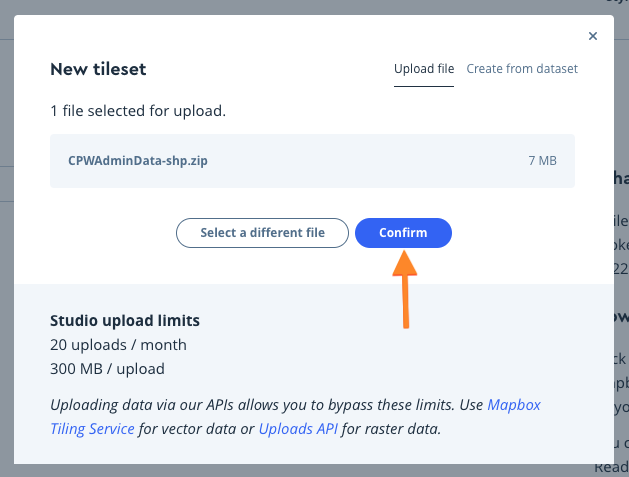
The uploaded file will be displayed along with the file size. Click Confirm to upload the file.
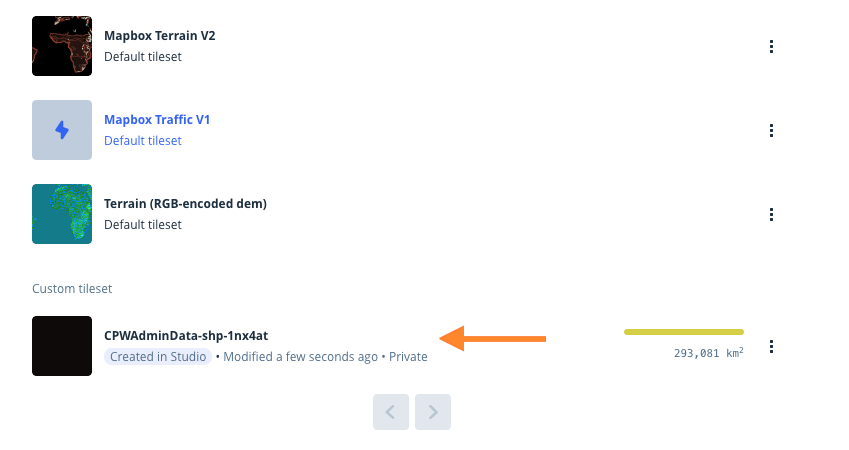
A notification will show at the bottom right of the screen showing the upload progress. Once complete, your tileset will show below the list of standard MapBox tilesets.
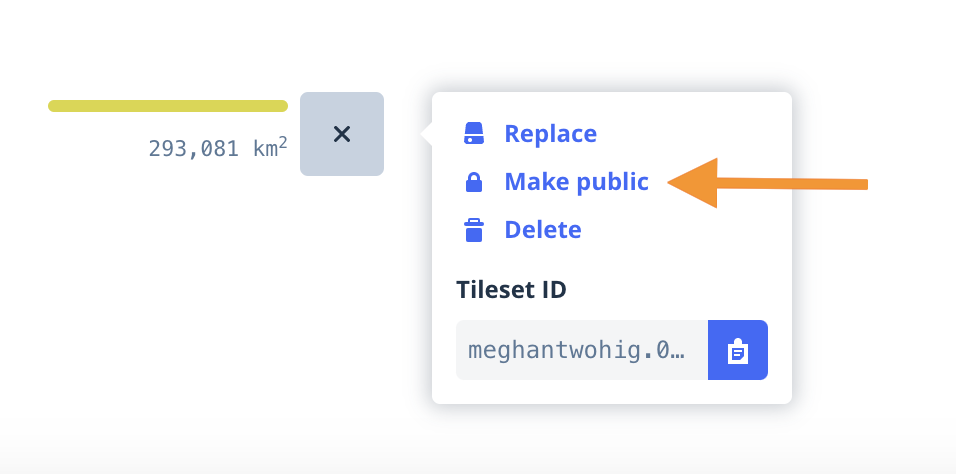
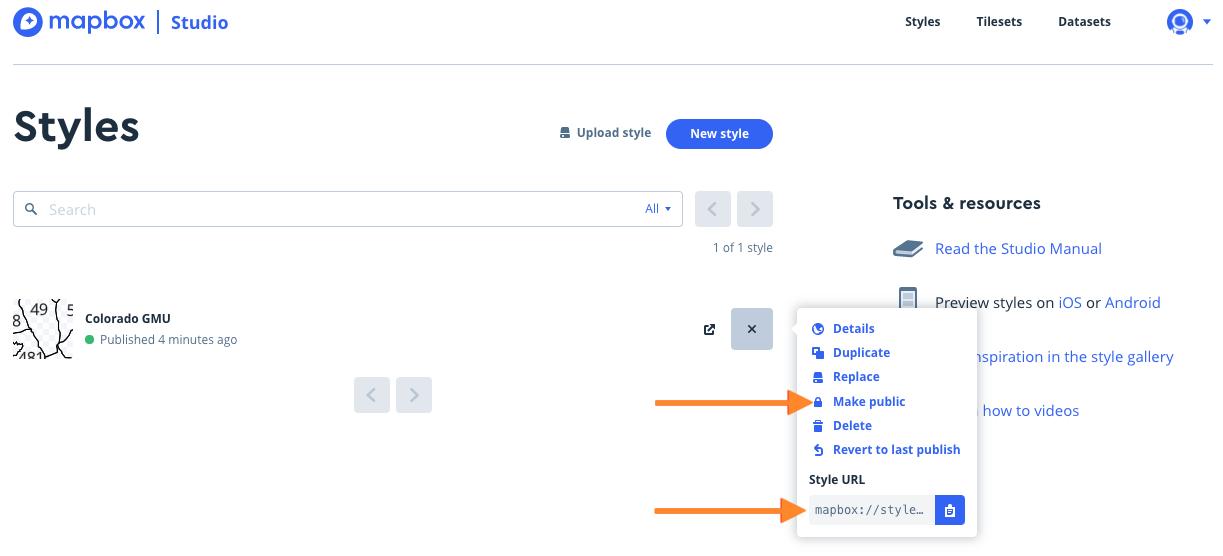
By default, the uploaded tileset will be set to private. Your tileset must be public in order to view it in CalTopo. Click the 3 dots to the right of the tileset and select Make public from the dropdown menu that appears.
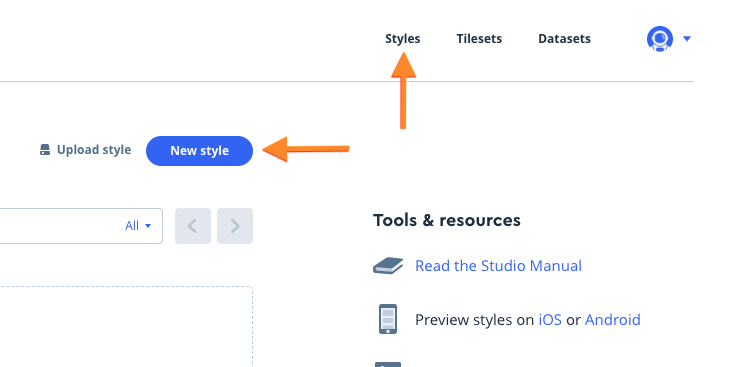
Now that you’ve uploaded your data and made it public, the next step is to add the tileset to a new style. Click on Styles at the top right then select New style.
Under Choose a template, select Blank and then click Blank to open up MapBox Studio with a blank style.
At this point you want to add your dataset twice, as both a line layer (to show the actual lines) and a symbol layer (to show labels). Click the Layers tab on the left hand side and then click the + icon to open the add new layer subtab.

Under Source, open the dropdown menu and scroll down to the tileset that you uploaded and click on it.
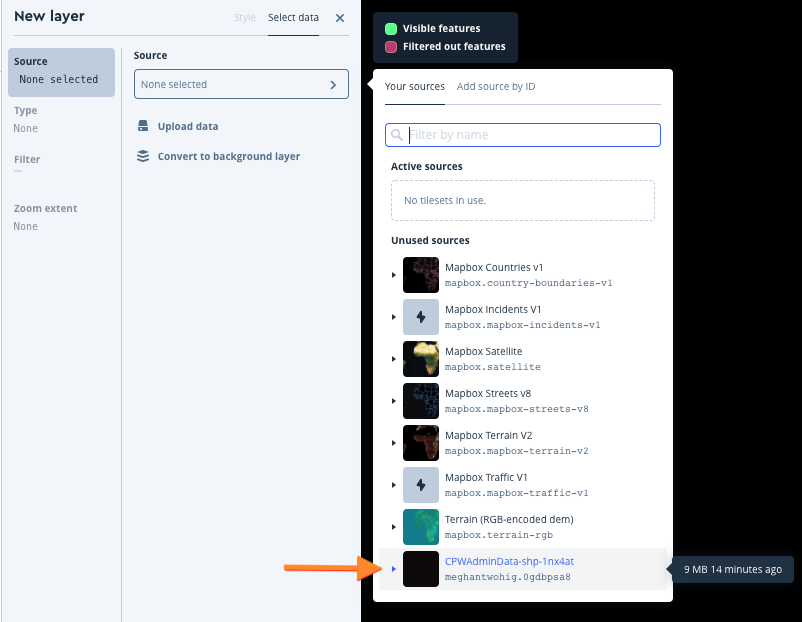
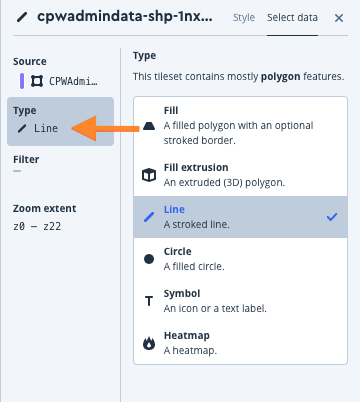
Under Type, make sure it is set to Line to add the layer as a line layer.
Press the X to close the new layer subtab. You should now see your layer listed under Layers.
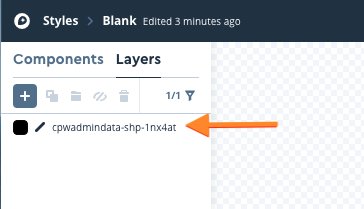
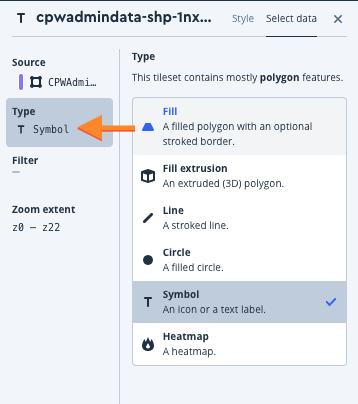
Repeat this process to add the symbol layer. This time, make sure to change the layer type to Symbol.
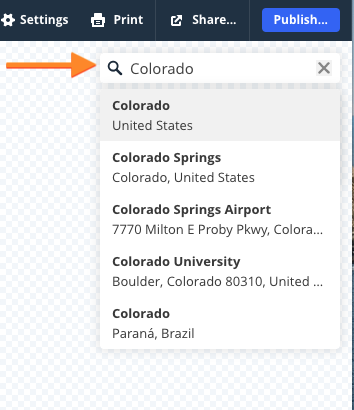
If necessary, use the location search tool at the top right of the screen to zoom in on your dataset and see how it is coming along.
Click on your symbol layer (look for the T icon to the left of the layer name), and the Text subtab should come up. Click on the icon below Insert a data field and use the popup to find the field you want to use as a label.
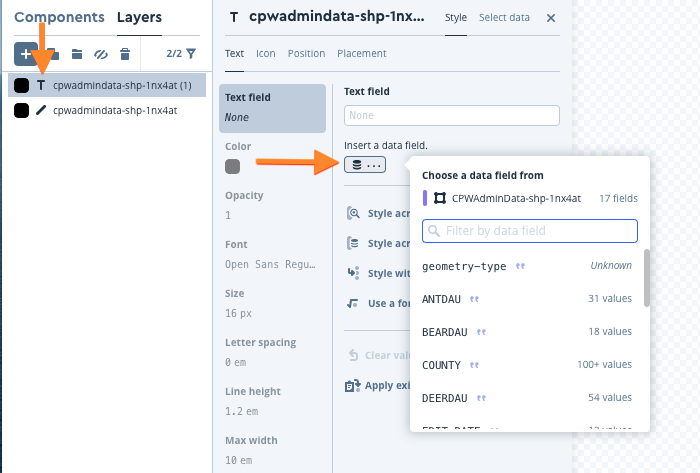
However, this inserts the field as a "formula", which has issues when rendering raster tiles for use with CalTopo. Make note of the field name, click Clear value and enter that field name surrounded by curly braces in the Text field box. For example, if the field you wanted to use for a label was GMUID, then you would enter {GMUID}.
Now you can do some tweaking, such as editing how the text is displayed, if desired.
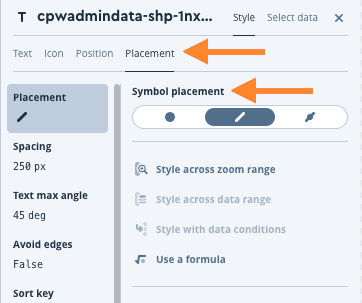
If you wish to change how labels are rendered, click on the Placement subtab and select how you want labels rendered under Symbol Placement. If you hover over a symbol, a dialog will appear describing how labels will be rendered with that option.
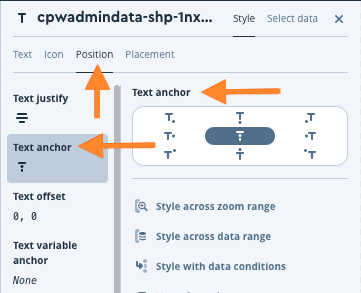
If you wish to change the position of labels (for example, if your labels are overlapping the lines), click on the Position subtab and select the text anchor icon that reflects how you want the labels positioned.
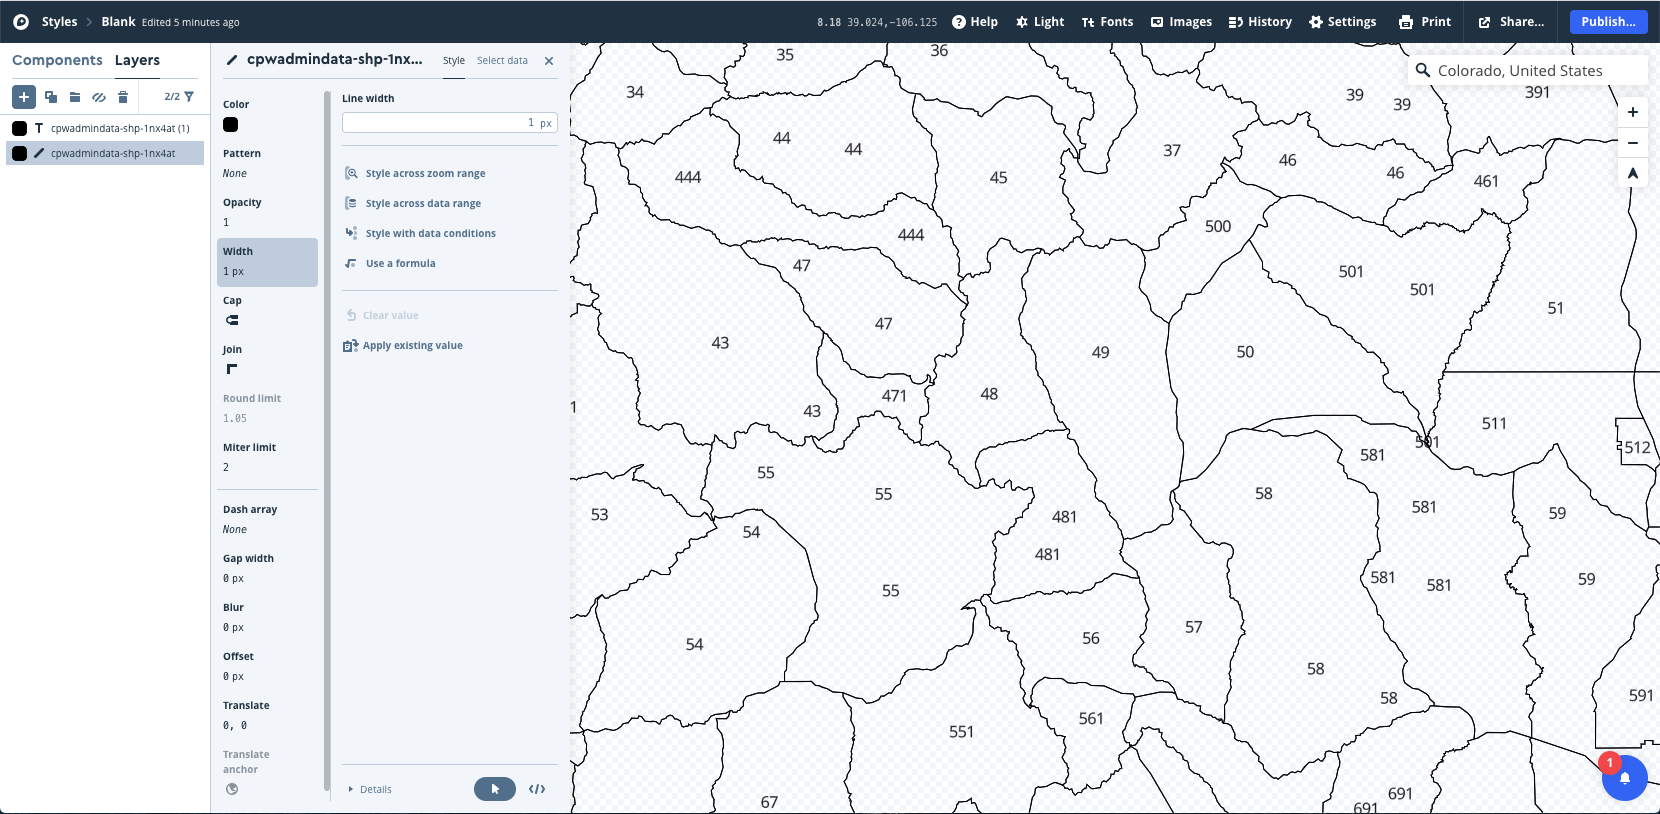
You can also edit line layer attributes like the width of the lines. Select the line layer from the Layers list and then change the desired attribute in the Style subtab that opens.
As you edit your style, your changes will be reflected in the viewer.
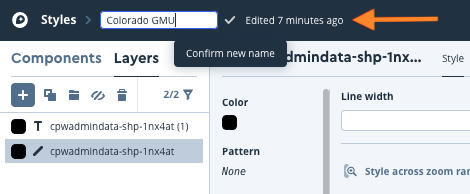
To name your style, click on Blank at the top left of the screen and give your style a new name.
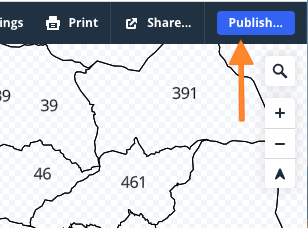
If you have multiple shapefiles, you can repeat these instructions to add additional shapefiles to the style. When you are happy with your style, click Publish… at the top right of the screen.
A dialog will appear with a preview of your style. If this is the first time you are publishing a style, select Publish. If this is an update to the style of a layer you've already been viewing in CalTopo, you may want to click Publish as new, which will create a new layer with a new ID that will prevent any previously-viewed tiles from being cached and displaying your old style.

A dialog will appear confirming that your style was successfully published.
Now you need to make a note of your style's ID. You can get this from the URL of the style editor.
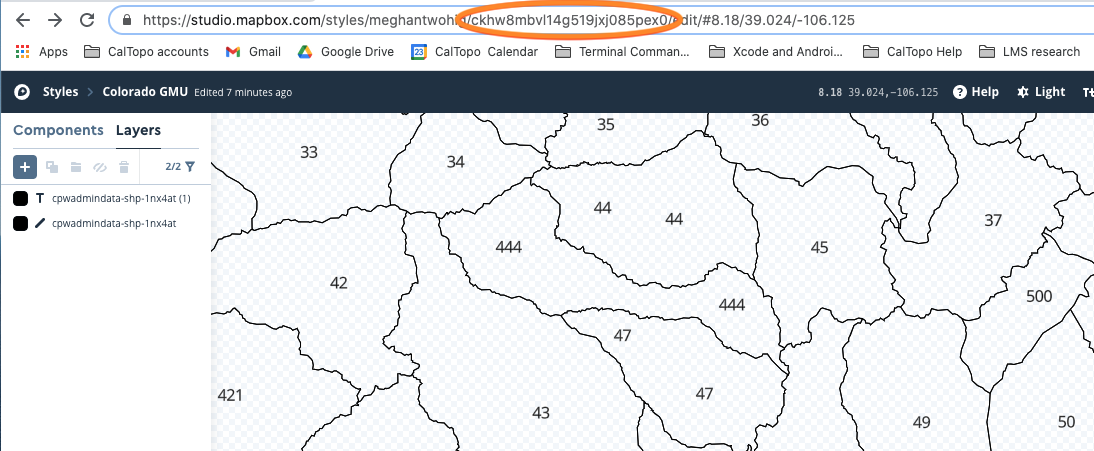
You can also get the style ID from the Style URL menu option on your Styles list. The Style URL is mapbox://style, your MapBox user ID, another slash slash, and then the style ID- for example mapbox://styles/meghantwohig/ckhw8mbvl14g519jxj085pex0. It is also important to make sure that the style is set to Public. Setting your tileset or style to public doesn't automatically share them with everyone in the world but it does mean that CalTopo can access it. If your tileset or style is set to Private, CalTopo will be unable to access it and you will not be able to display it in the mapviewer.
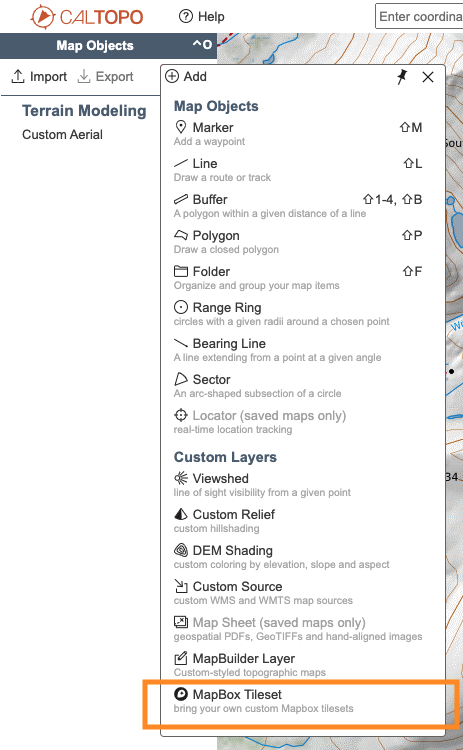
Now head to CalTopo, select Add New Layer and then choose MapBox Tileset.
Enter a name, and select whether you want the layer to be an overlay (shows up in the list of checkboxes) or a base layer (shows up in the layer drop down along with an opacity slider). For the Tileset ID, simply paste the style URL from MapBox into the field or enter it as:
your_mapbox_username/your_style_id
where your_mapbox_username is your MapBox username and your_style_id is the Style ID you previously noted:

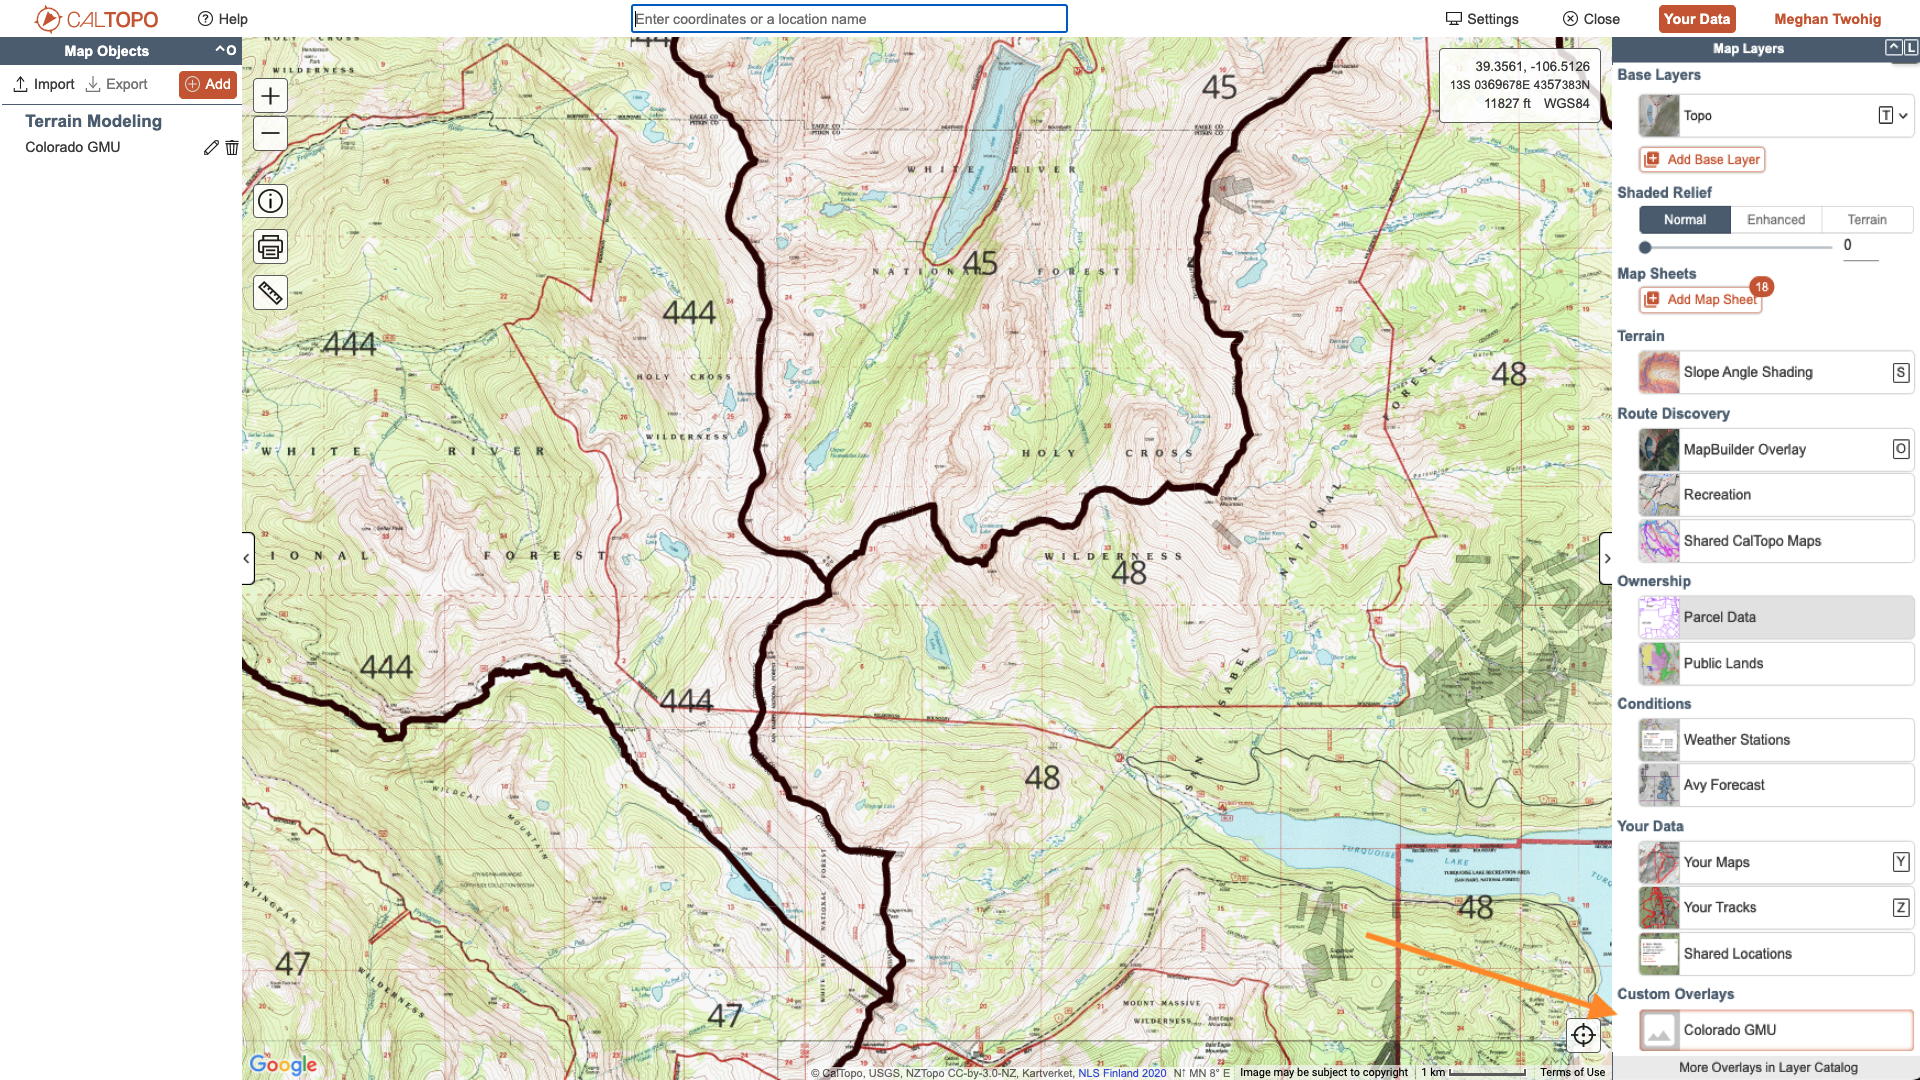
Now you will now see your layer overlaid in CalTopo!