Scaling up for Large Incidents
in this lesson
When your mission goes into multiple operational periods and/or starts to incorporate outside teams or agencies, things can get complicated.
CalTopo has integrated tools for managing large amounts of data, and there are best practices that have come through trial and error as we use the program and run missions.
Topics on this Page:
Basic large mission management starts at the map level with good organization. Folders, labeling and data management all contribute to this. As the mission grows and outside organizations get involved, you use an Event to incorporate those additional resources. Finally, when the incident reaches the level of being enormous, you start using multiple maps for field ops versus planning operations. Each of these builds on the assumption that the previous was managed and executed well.
Organizing Large Amounts of Data
Good labeling, organization via folders, and map cleanliness are the three key tools to keeping your mission map under control.
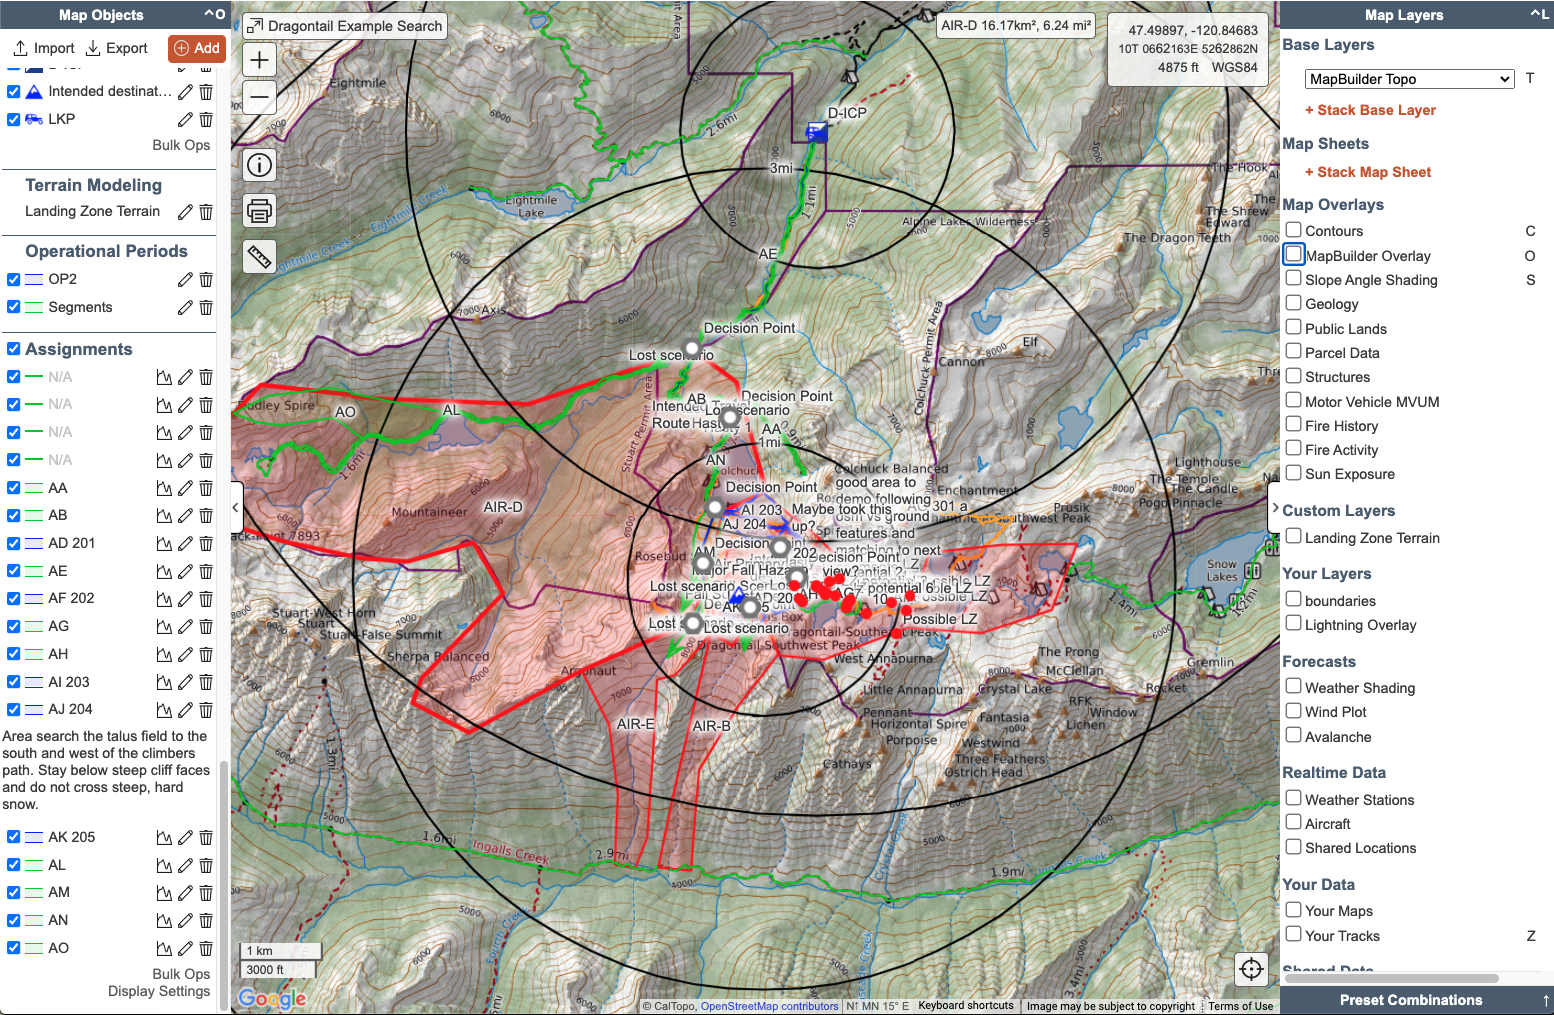
The segment-assignment approach covered earlier will go a long way towards keeping your mission well organized. In the last chapter we covered using a folder for the tracks for each operational period, but folders can serve many purposes. Your range rings can go in a folder. Other folder ideas include one for any hazards, for clues that were exploited and determined to be not relevant, for landing zones, for ingress and egress routes, for important mission objects such as the ICP and the PLS, for notes and reminders, for things that still need to be organized, and more.
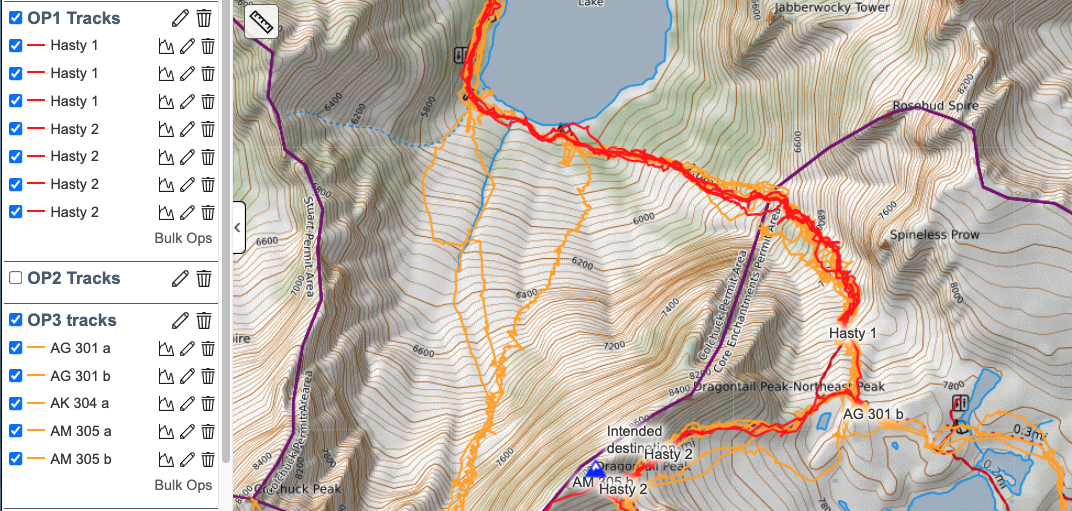
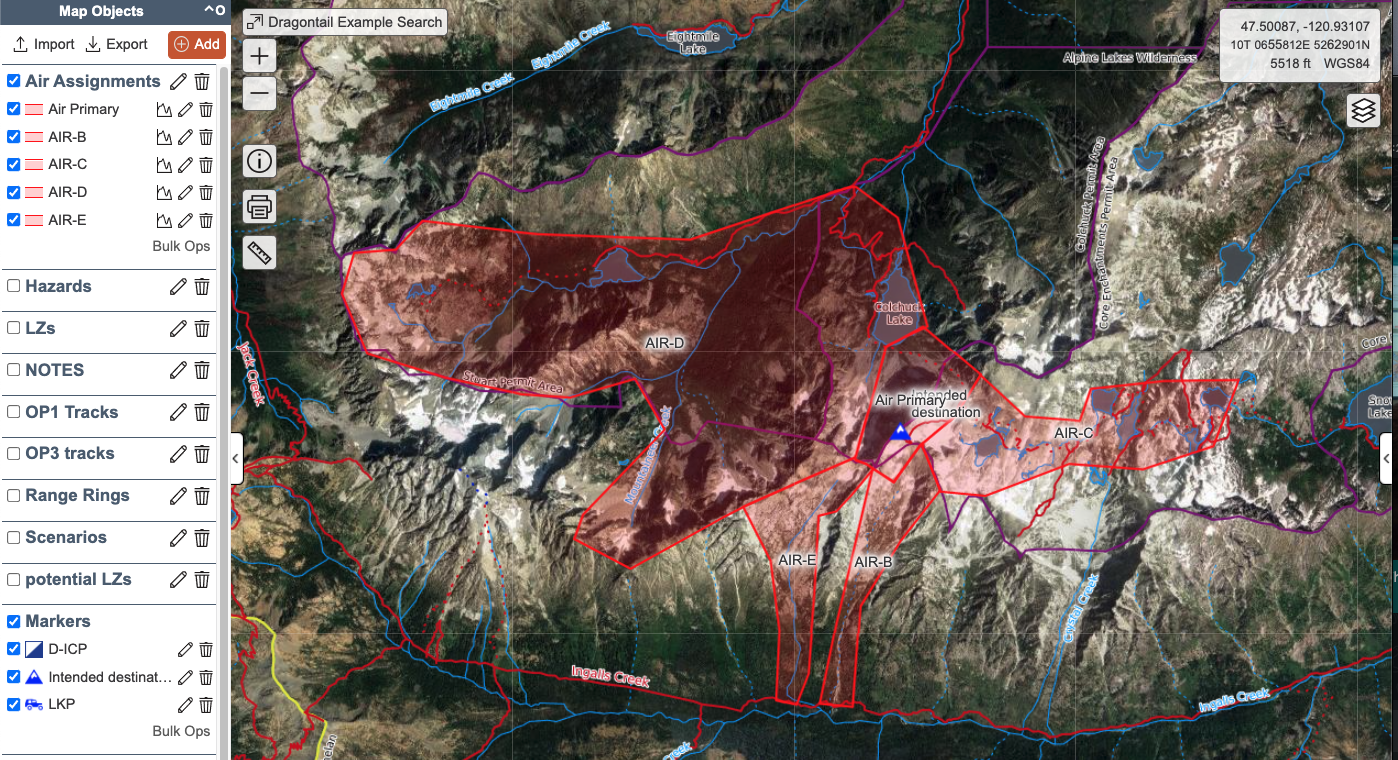
Different types of assignments get their own folders. Air ops assignments do not fit into the normal segmenting model, and usually overlay quite a few ground assignments. Separating these out of the assignments folder and putting them in their own folder is a good practice.
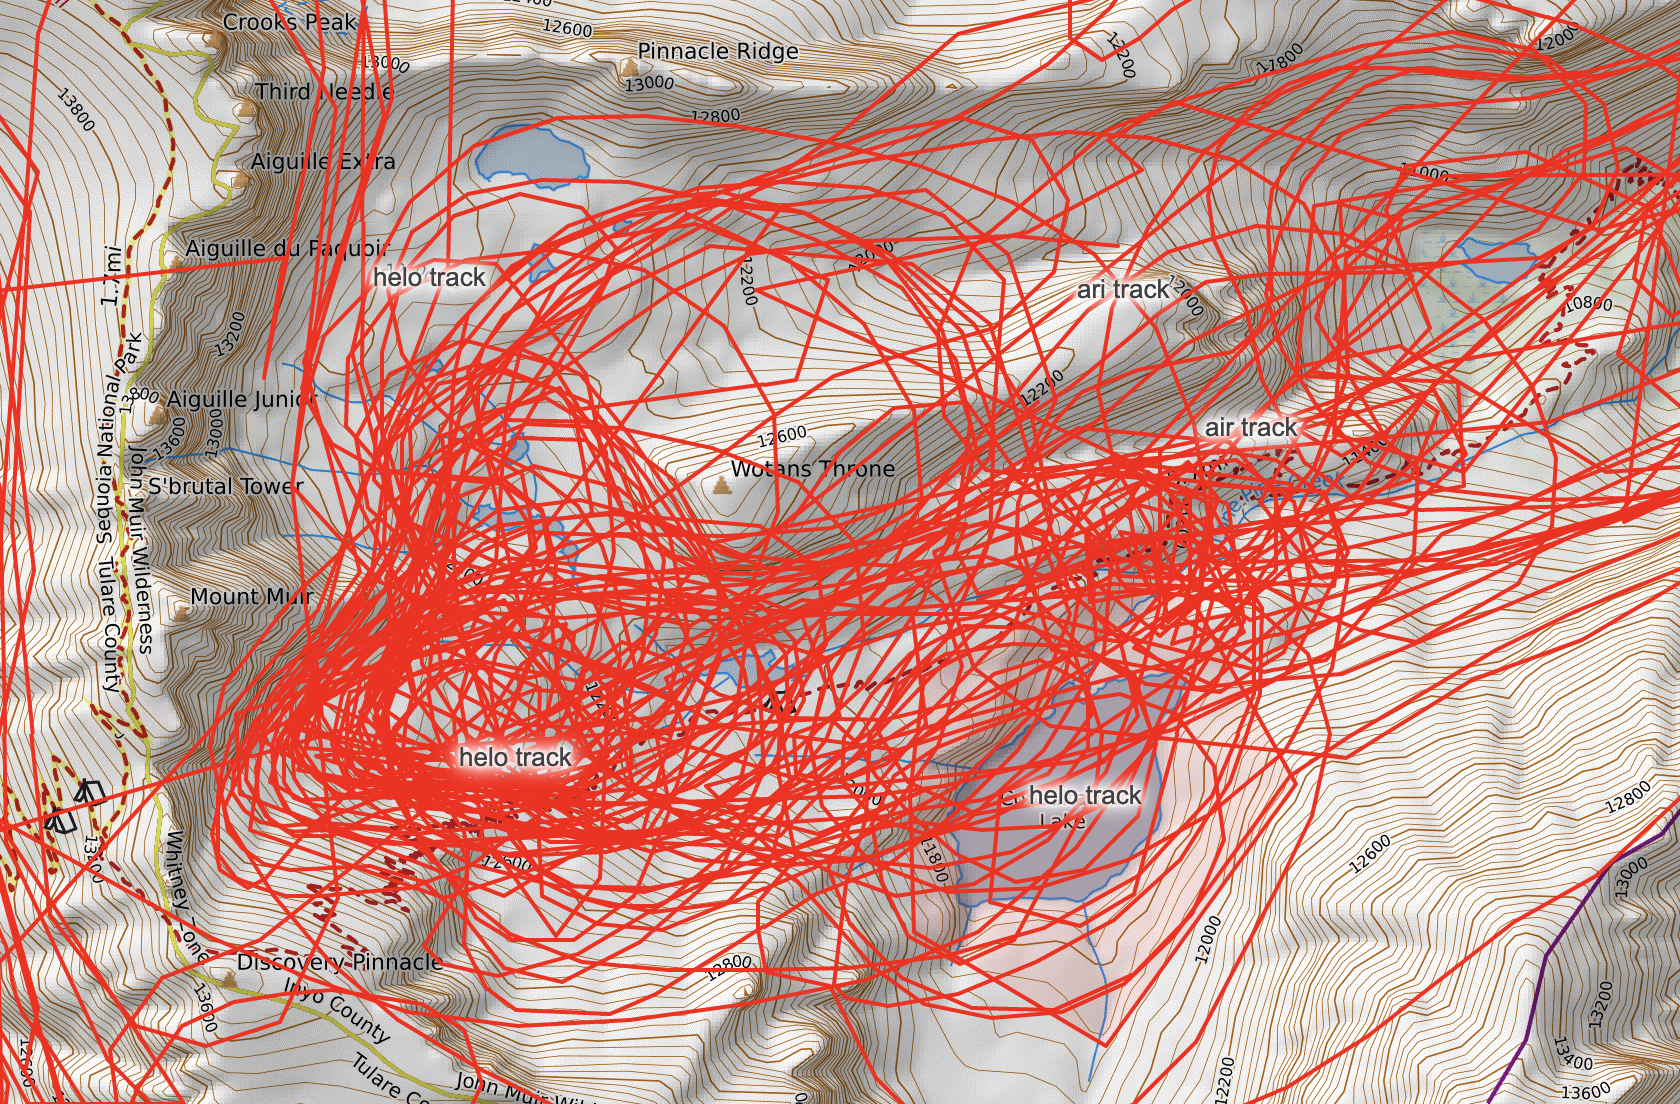
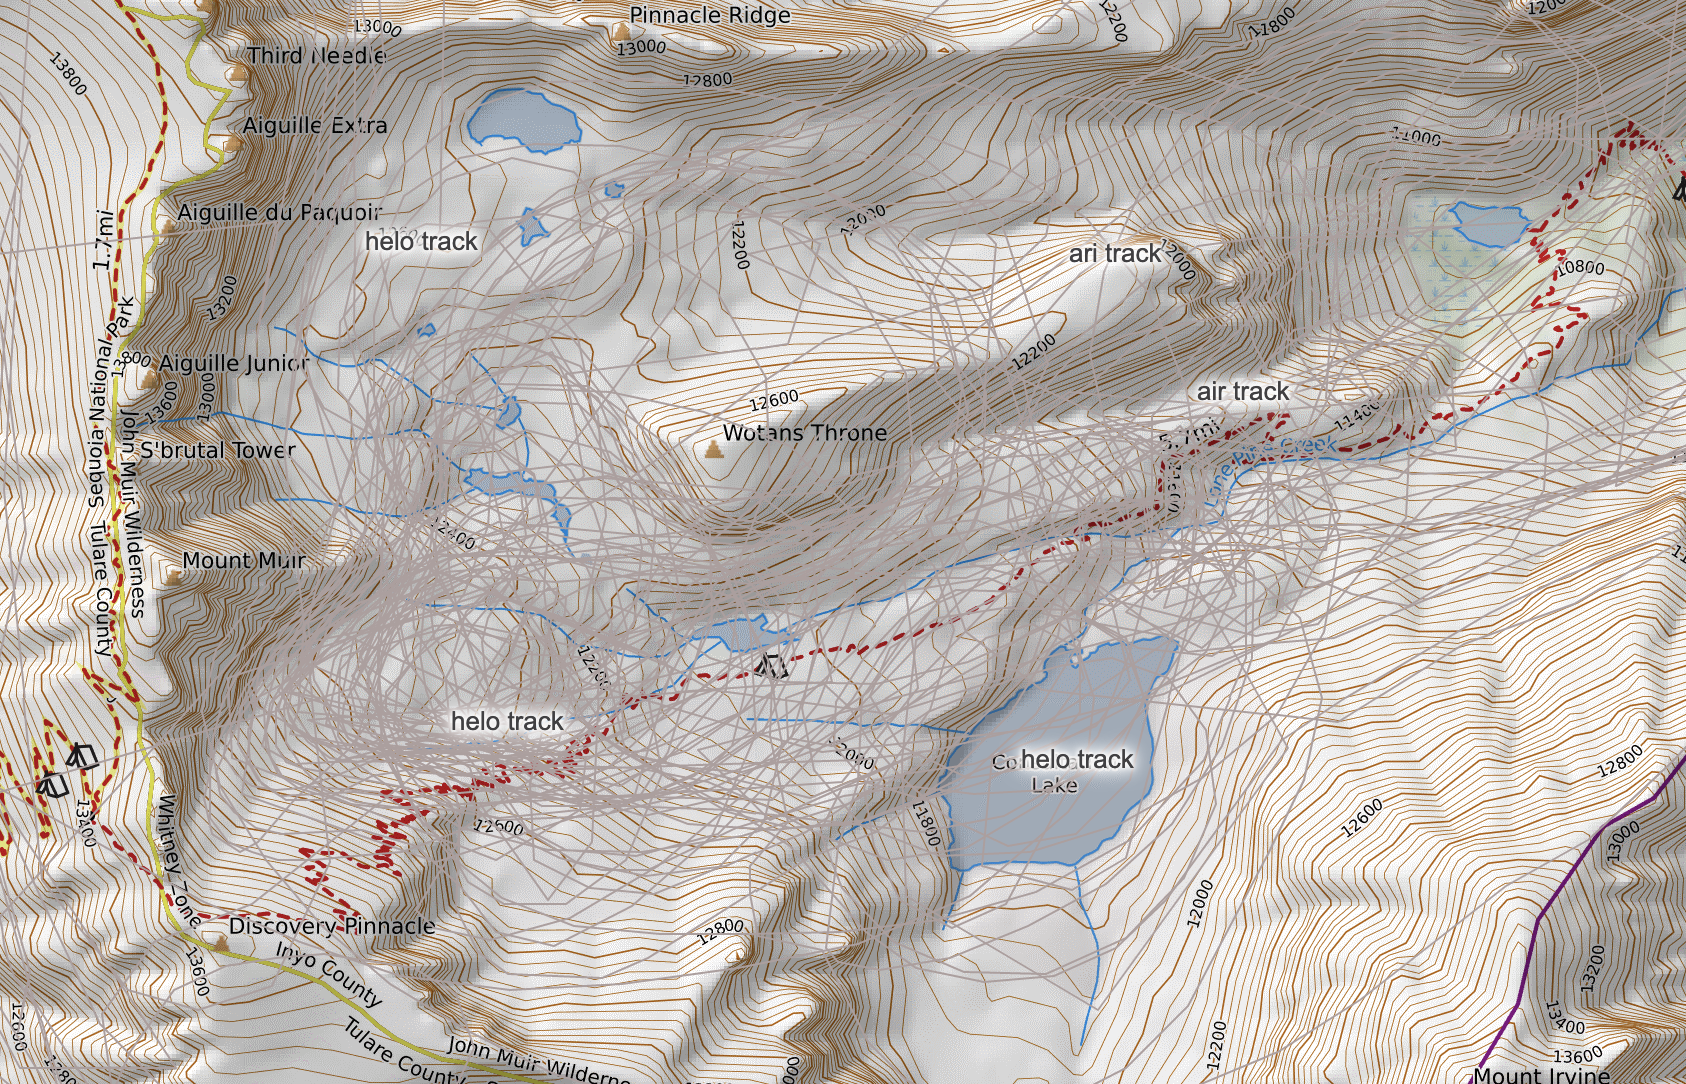
Air ops tracks also get their own folders. Air tracks will obliterate the usefulness of the map if you leave all of them turned on all the time or if they are overlaid with ground tracks. Furthermore for aircraft tracks, using bulk ops to make the lines narrower and change the color can help them be less intrusive.
Maximizing Map Performance
Maps with large amounts of data operate slowly. Several tips here will help you work on these maps that may run into performance issues.
1. Folders Off: Make use of the feature that allows you to set folders to not display when you reload the page. It’s much easier to turn on folders to see data when you need it rather than to wait for the page to catch up to or to have to turn off a bunch of folders to find what you need.

2. Labels Off: In the settings menu, set labels to "by folder" then at the bottom of each folder, choose whether or not to display the labels for that folder. Fewer labels = better performance, and also easier to view critical map items.
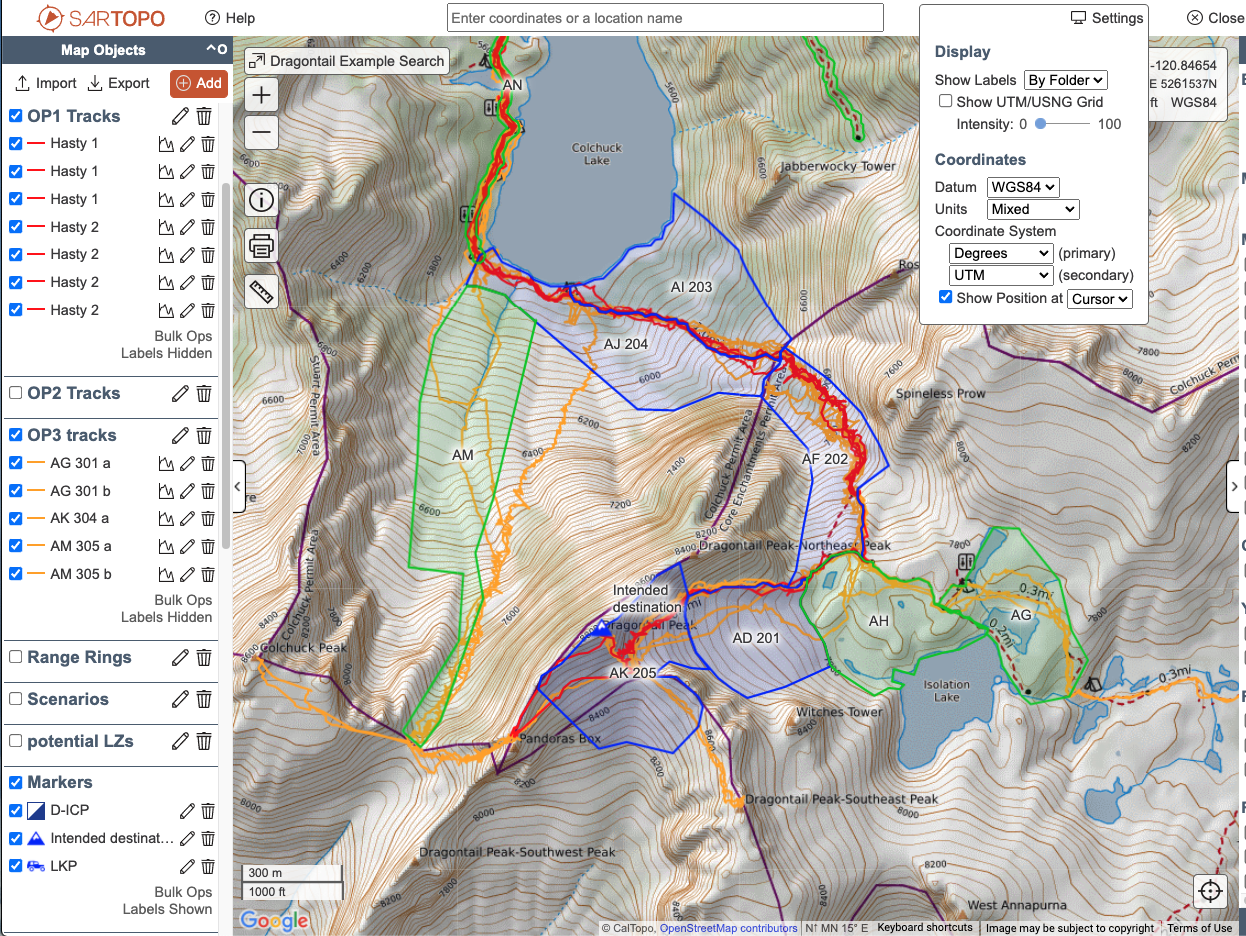
3. Use Caution with Special Line Types: Use all the line colors and weights that you want, but switching to dashed lines or anything else leads to slower maps.
4. Watch your Layers: Stacking layers is a great tool for planning and analysis. However, leaving those layers stacked and panning the map around means that each of those layers needs to load, even if the opacity is set to 0%. Turn them off if you don't need them.
5. Computer and Browser Memory: Remember your computer only has so much memory, and your browser may only be allocated part of that. If you have 80 tabs open, that could affect how much memory you have for your map. If you're working with a really large map, empower your browser to have its best chance at working well for you, and close some of those other tabs and processes.
Using Mutual Aid Incidents (Events) to Grow your Response
When your mission starts to involve mutual aid and searchers or others from outside your own team, with your team account you can scale up your team for a limited time to include additional users. There are three basic components to incorporating mutual aid users into your team account:
- Connect all responders to the same digital map or set of maps.
- Instruct responders on how to access the digital map.
- Brief responders on what type of data to record or share.
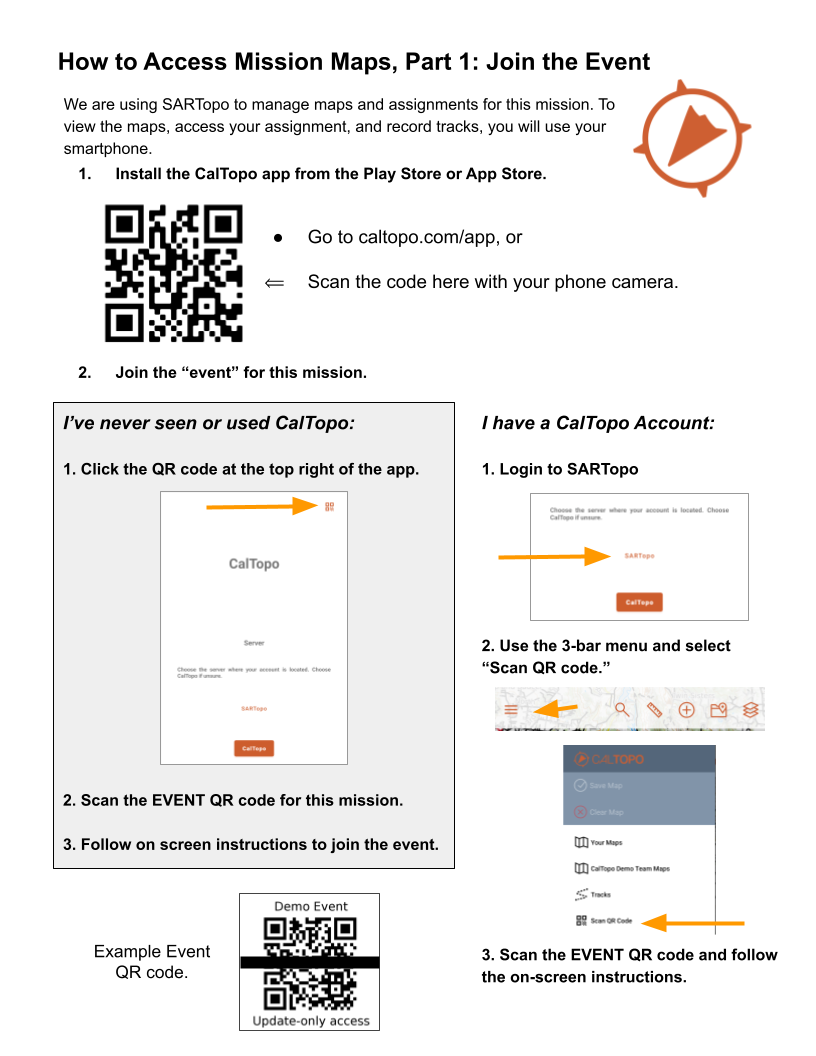
See the Quick Guides to review setting up Mutual Aid Incidents and/or download the guide.
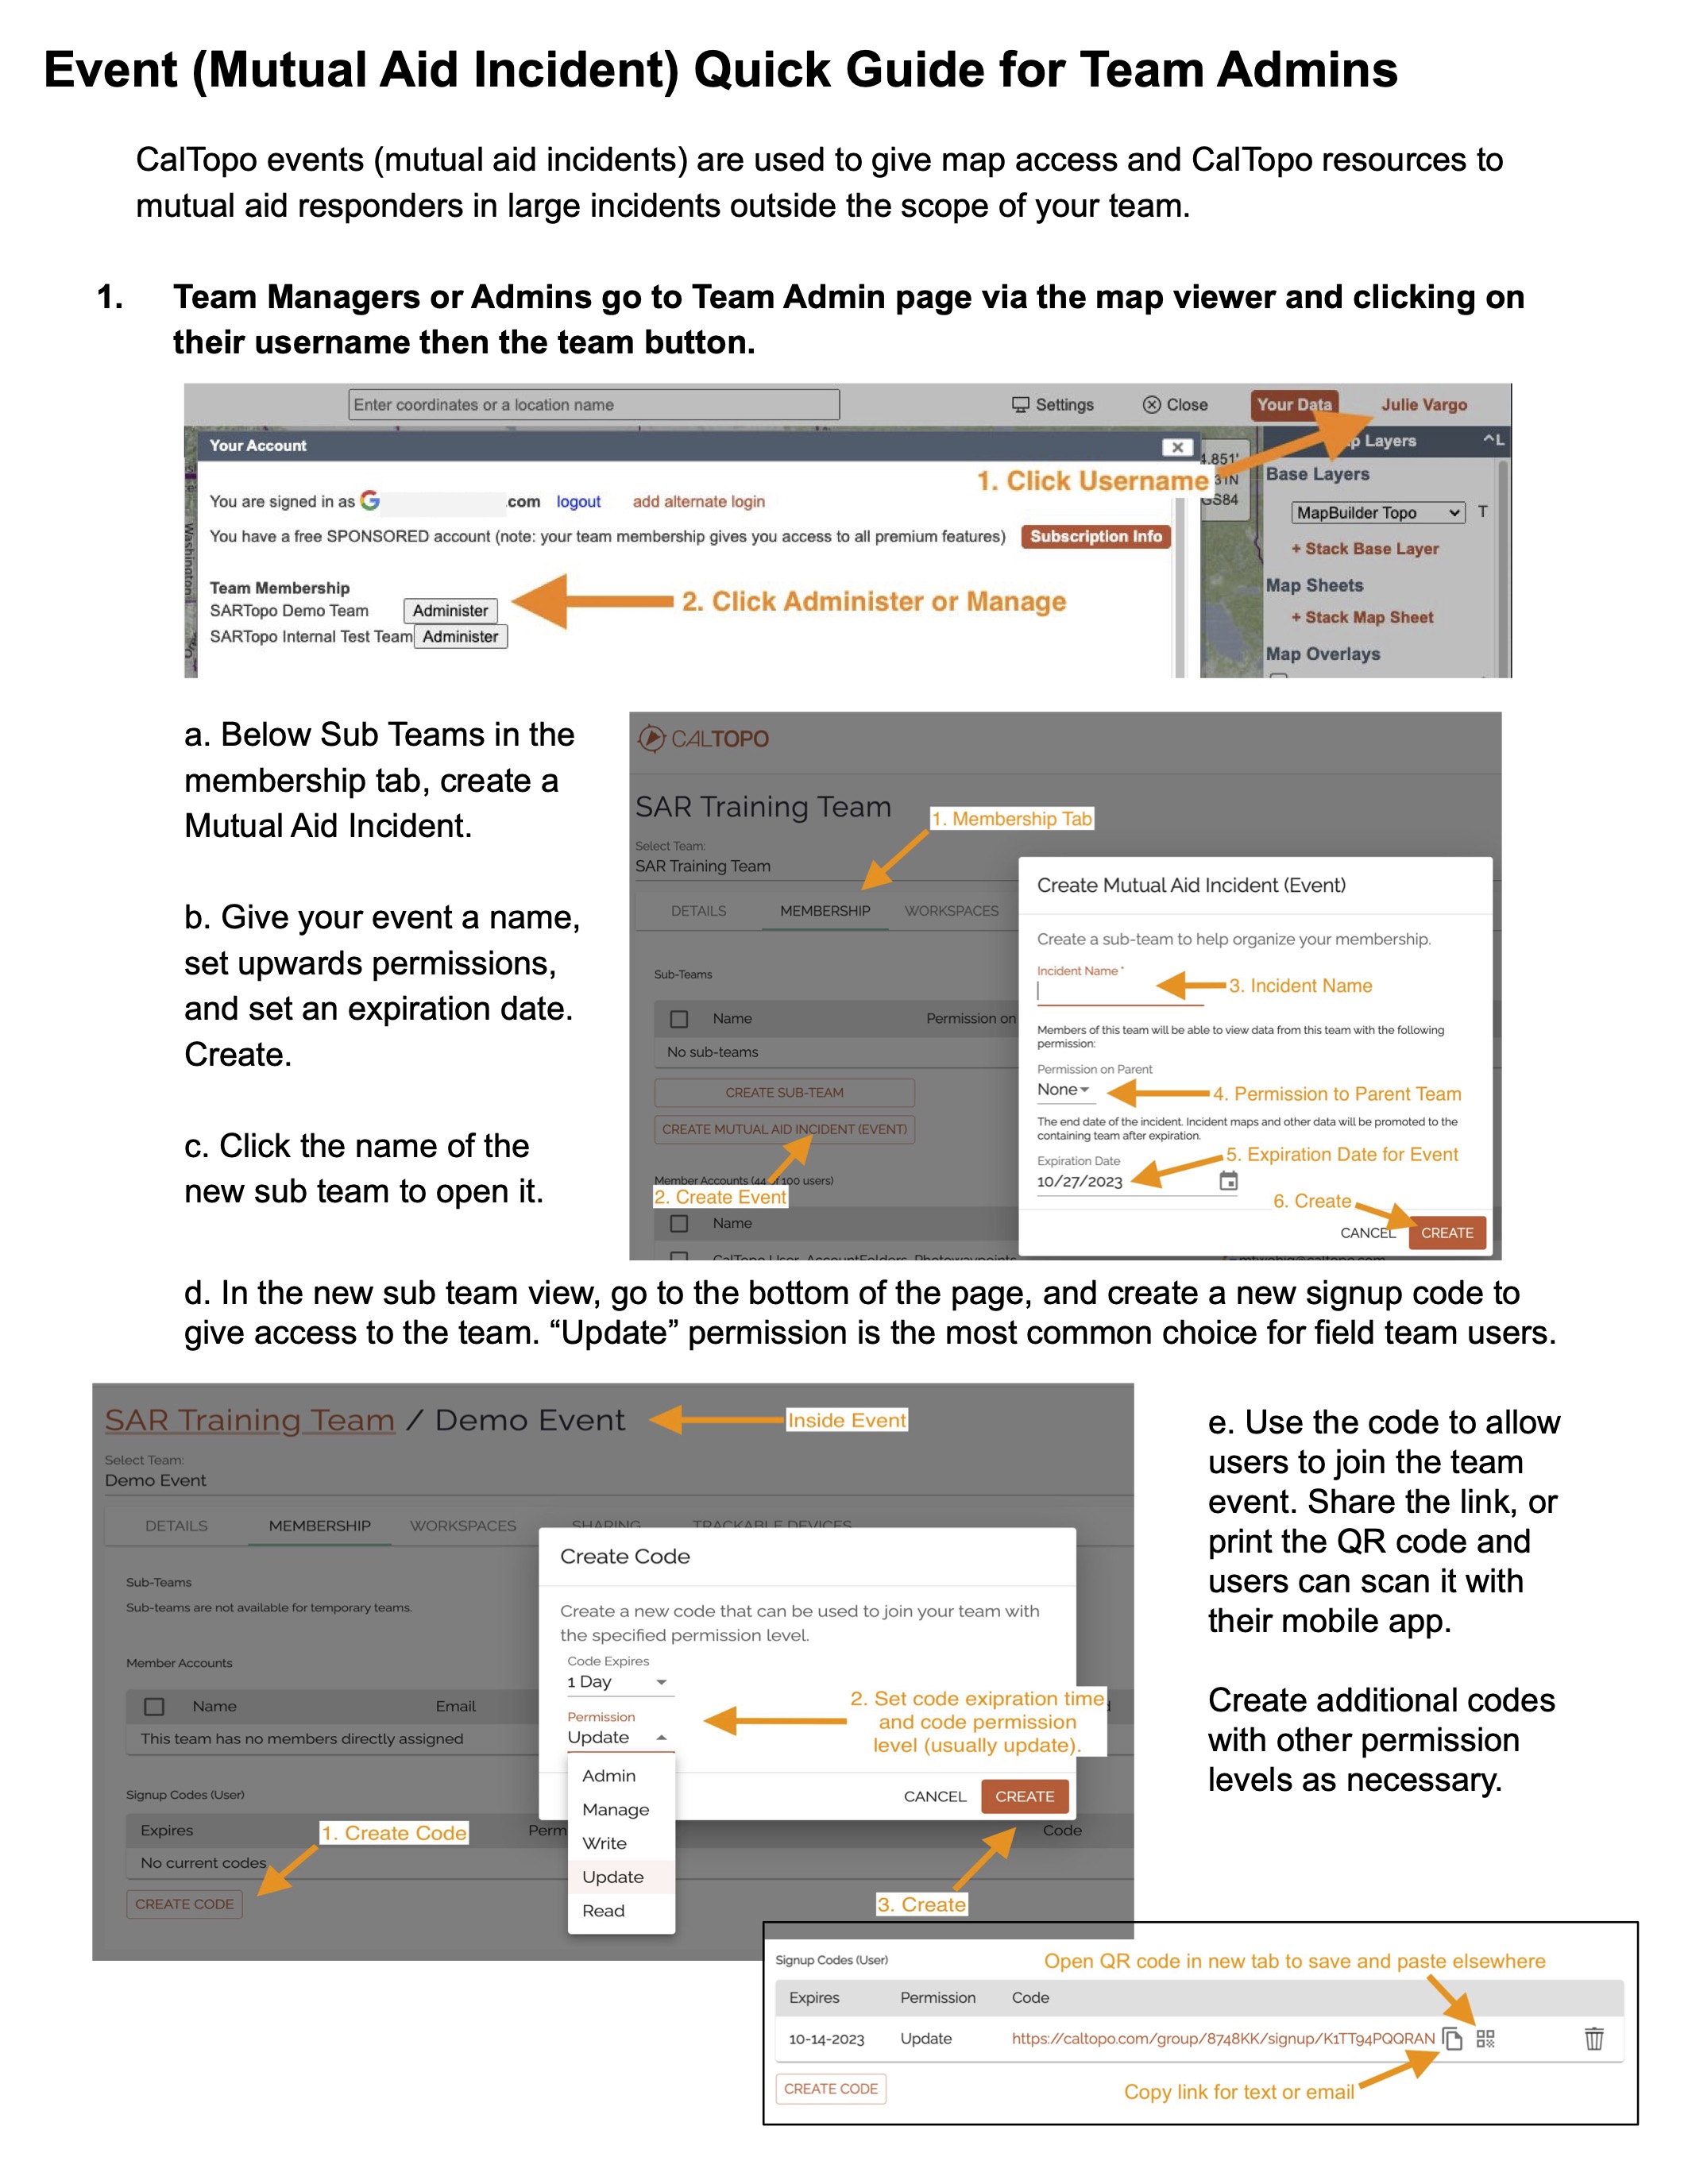
1. Connect all responders to the same map using a Mutual Aid Incident.
Mutual Aid Incidents are a powerful way to quickly integrate other responding agencies into your team. This allows them to view premium layers and download offline base layers — a critical component of backcountry searching. They also gain the ability to share their location with you live, if a cell network is available.
All responders should have some level of access to the map. This improves situational awareness and adaptability while in the field. You may want to give most field-based responders update-only access to the map. This allows them to add markers and their tracks to the map, without letting them edit the objects any other user adds.
- Create an event in your admin tool.
- Create a mission map.
- Move that map to your event folder.
- Set up your ICP in a place with cellular network service, OR, send information to responders before they arrive at base.
Some teams now have two ICPs — an initial one at a location that has cellular service and a second one at the final deployment site, such as a trailhead. This allows everyone to connect on the same map and have access to relevant search data, assignments, and more. They can also download base maps before entering areas without service. If the callout is for the next day, having team members get this data before they leave home is best.
Refer to the reference guides below or the user guide page for mutual aid incidents for full instructions.
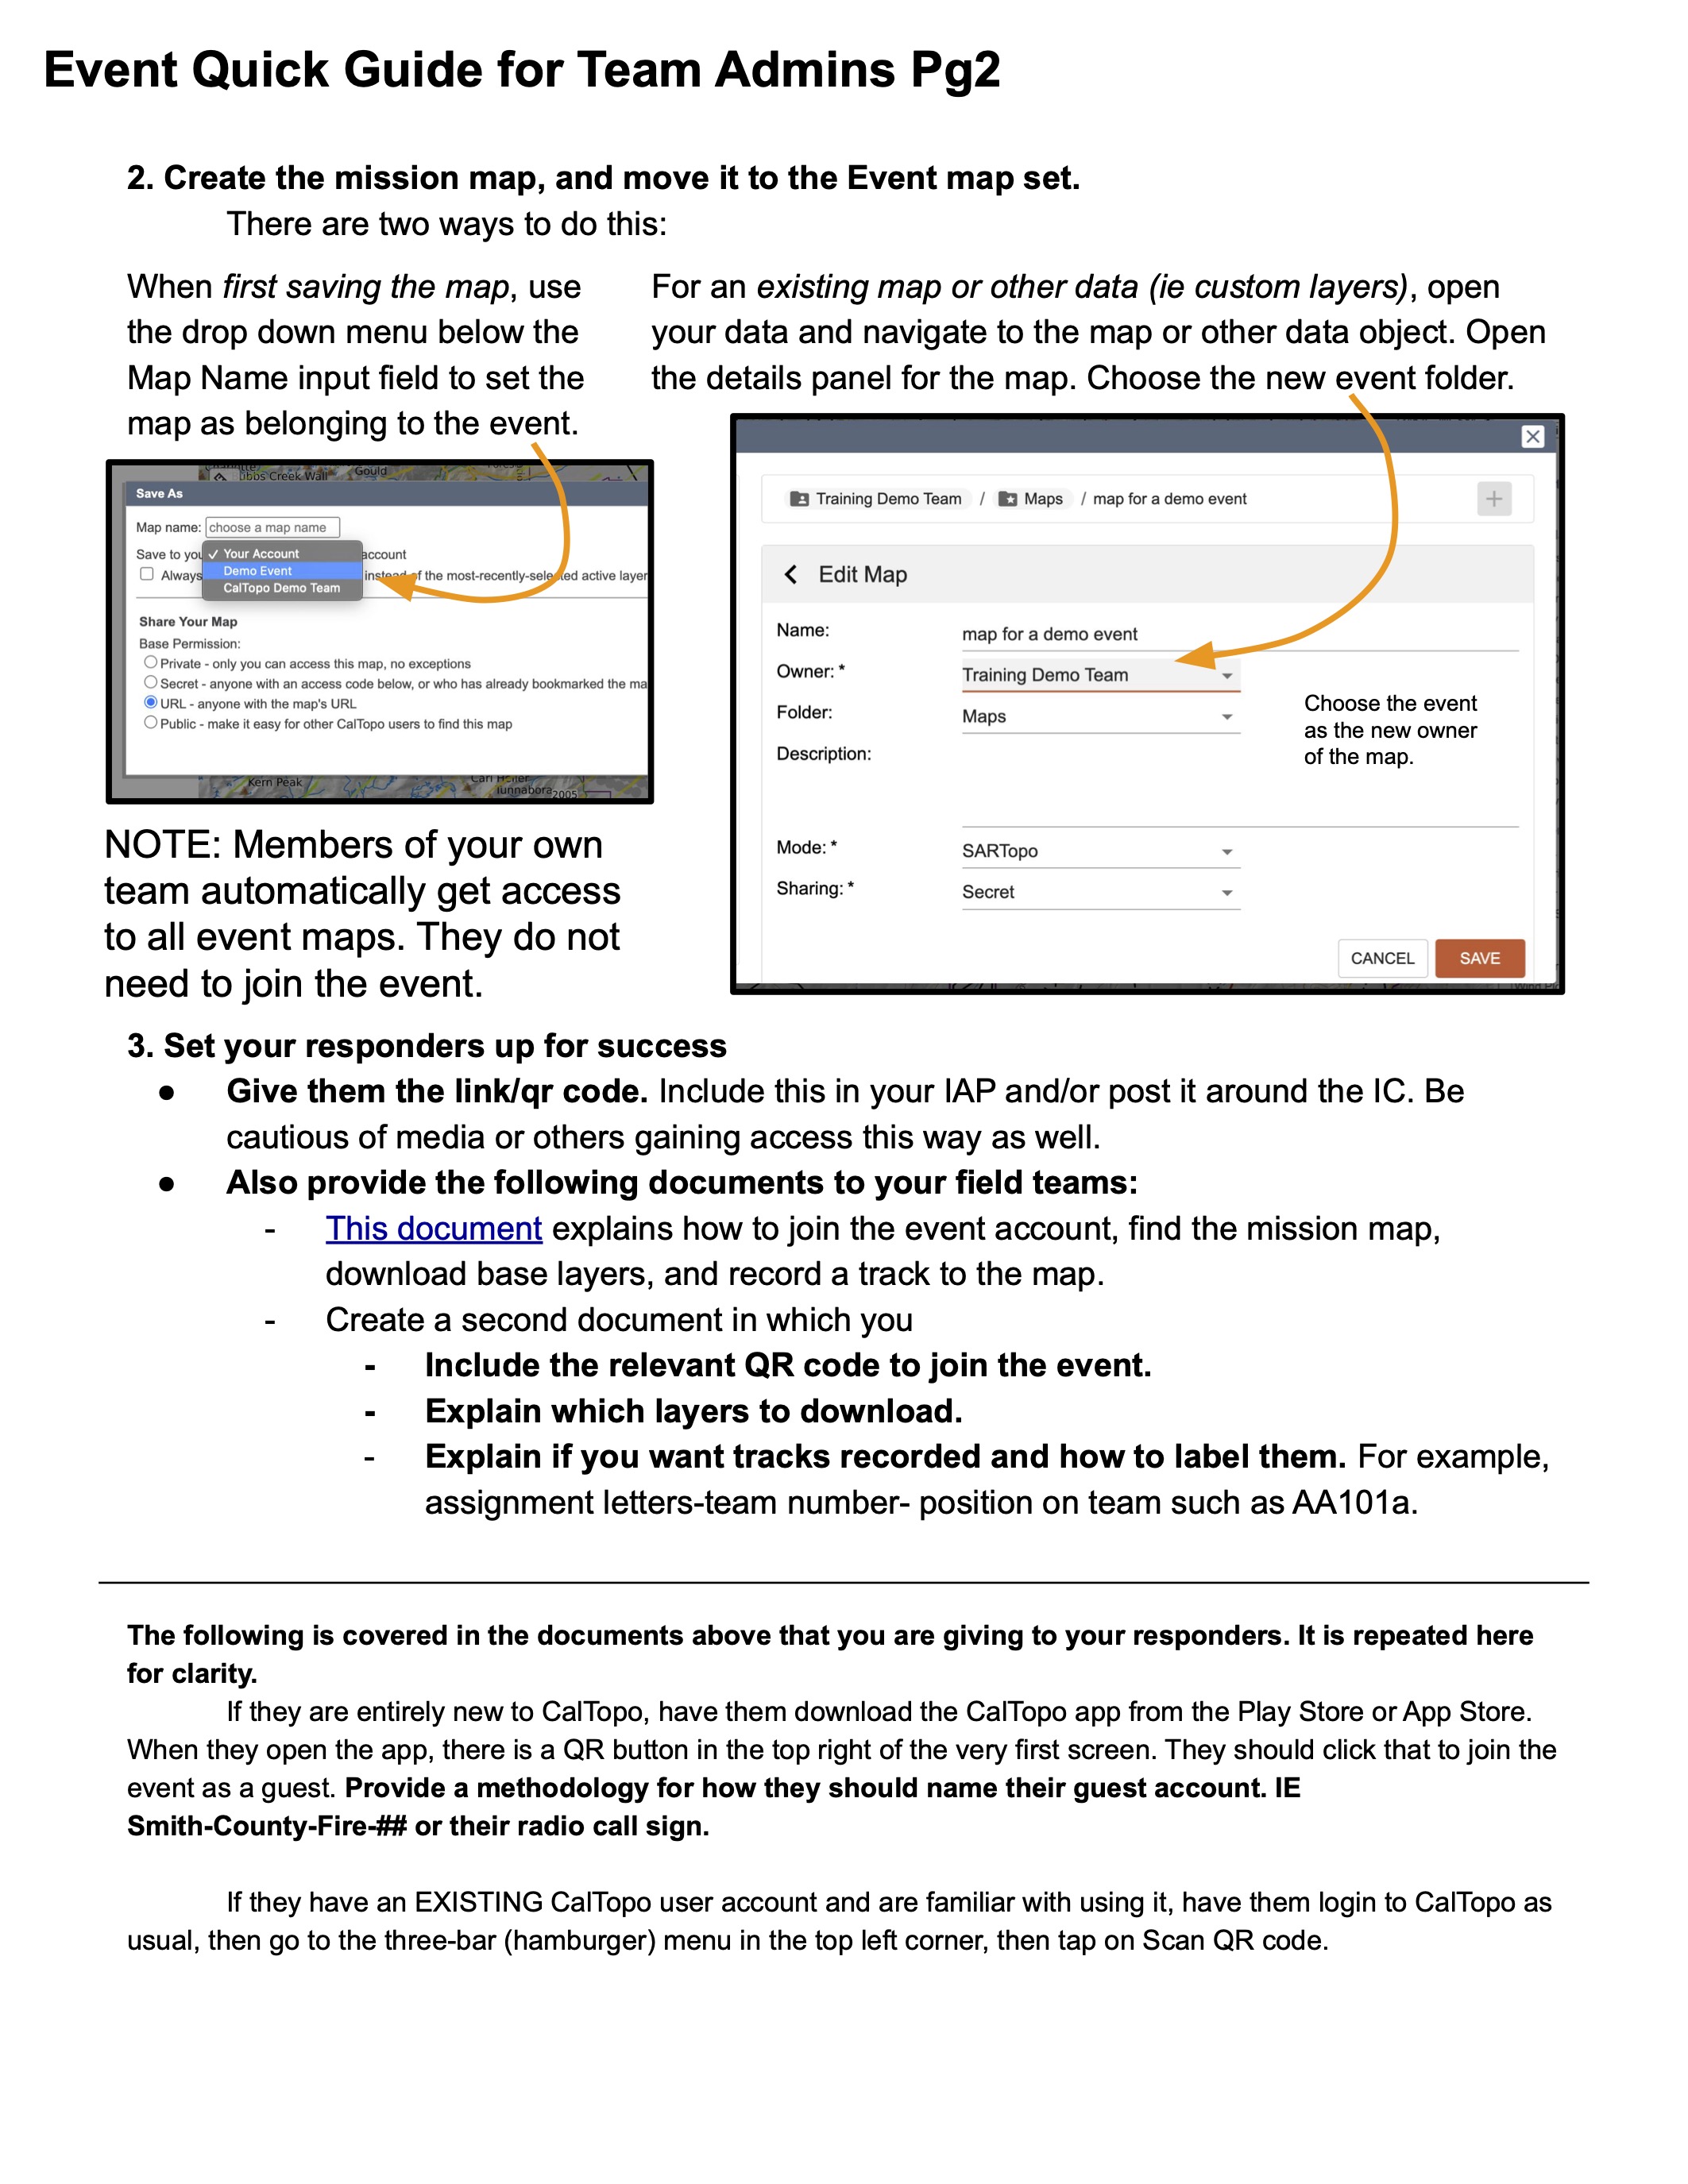
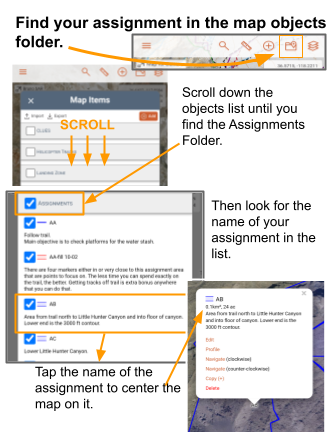
2. Instruct responders on how to access the map.
Responders will need to download the app, join the event, and find their assignment. They may also need to download base layers for offline use. New CalTopo users may need assistance to navigate the app and record a track.
- Instruct users to join the event. Have them download the app first if they don’t already have it.
- Show them how to open a map and find their assignment. Post these instructions or include them in the IAP.
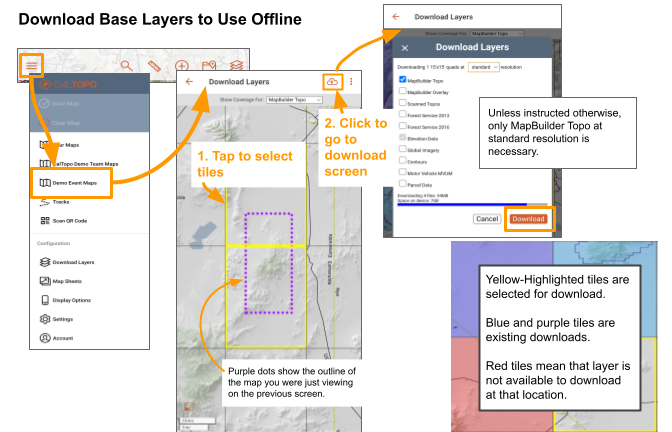
- Have them download relevant base layers for the mission unless the incident is in an area with reliable cell service.

3. Brief responders on how you expect them to use the map.
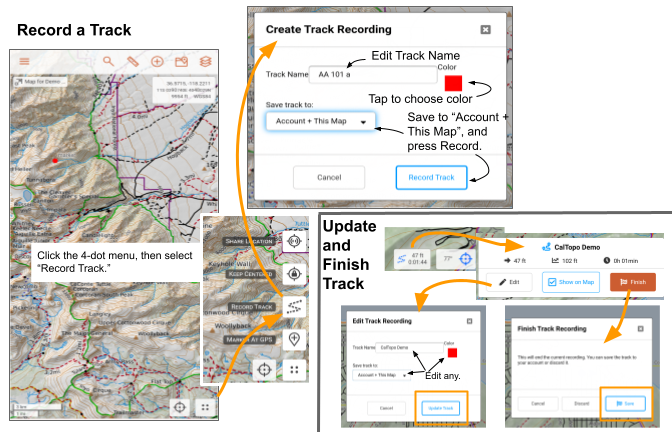
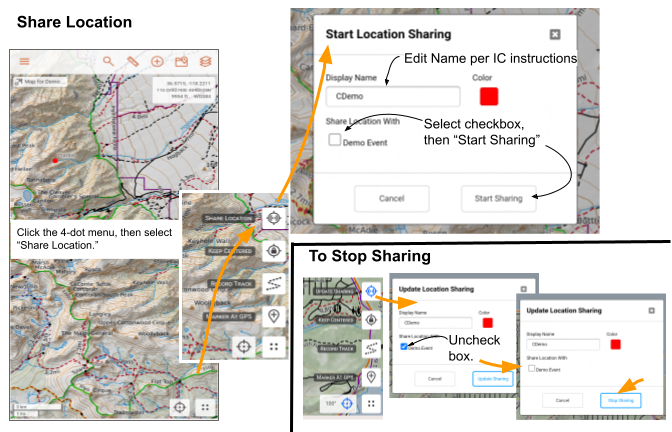
Should they be recording a track directly to the map via the mobile app? Should they be sharing their location live? Should they have the shared locations overlay turned on?
- How to record a track to the map and/or share their location.
- Don’t forget to include how you want the responders to label their tracks.
With the above steps, you’ll be able to connect multiple agencies to a single map or set of maps, and gather the data you need from them.
Using Multiple Incident Maps
As your mission grows in size - whether geographically, from adding personnel, or a very long series of OP periods - you can consider using multiple copies of the map to help manage data. With this method, you maintain one primary map that contains the full data set of the mission. This primary map would only get updated occasionally with data that is clean and processed, so it becomes the record of the full mission. By using the “copy to a new map” function in the export menu, you can create a working map for each day that has the relevant set of information for that operational period.
Let’s consider a situation where we might use this technique, and look at how it would play out. Consider the case of a small plane that went down during a winter storm, and the resulting search requires a wide search area of hundreds of square miles and hundreds of ground searchers over many days. Searchers need to be able to access the mission map in their mobile app, and to record tracks to the map so we don’t have to download as many gps units later. If we give them access to the entire set of data for the search, their app could be overwhelmed by all the map objects.
The ground teams need to have a complete representation of the mission and the day's objectives, any important clues, and ingress and egress routes. They probably do not need to see the last 8 operational periods worth of tracks. By making a daily operational map, we give ground teams a map they can work with without being overwhelmed.
Teams can record to the OP map and not the primary mission map. Meanwhile, the plans team can be working on a map that does not have active tracks being recorded to it. At the end of the day, a mapping team can clean up the recorded tracks, trimming them, renaming them, and making sure the data is clean before moving it to the primary incident map.
Exercise #18 Final Exam
Now that you’ve reached the end of the course, it’s time to revisit the skills you’ve learned and practice applying them to a new operational period, OP 3, which we will scale up to a larger size. For this exercise, assume you are expecting 35 ground searchers, 3 dog teams, and other resources such as OHVs and a helicopter.
To complete the exercise, you will work through the whole series from drawing additional segments to importing and cleaning tracks:
- Create an OP3 map object.
- Draw segments. Download this file and import it to your map. In it you will find buffer assignments labeled AH, AI, AJ, and AK. (You likely already have an object matching AH - you only need to keep one of them in that case.) These are the next set of boundaries for your new segments. They define an area of about 1,254 acres. Your task is to draw assignment objects that will divide this area into an appropriate number of segments. Your segments need to match all the criteria covered in the segmenting chapter, including but not limited to appropriate size, navigability, and cleanliness. Letter these segments starting with BA.
- Add two new folders: one for OHV (off highway vehicles) Assignments and one called Air Assignments. Create three segments for each of these resources and add them to the appropriate folder. Letter these starting with H for helicopter areas, and O for OHV areas. (Tip: Use the MVUM overlay to identify OHV access roads and trails.)
- Find the weather forecast and evaluate how that might affect helicopter use for OP3. Add a marker to your Air Assignments folder and write the forecast in the marker description.
- Identify 3 additional landing zones and put them in your Landing Zone folder. Label them as LZ4, LZ5, and LZ6.
- Choose which of your existing segments will become OP3 assignments based on the assumption that you will have 35 ground searchers, 3 dog teams, and 3 OHV teams. Convert the segments you choose to assignments by adding team numbers (301, 302, ...), the number of searchers for the assignment, ingress/egress transportation method (how do they get to and from their assignment area?), and designating them as OP3.
- After completing the previous task, generate a PDF map packet for OP3. Add a marker to your Incident Facilities folder with the link to your map packet for OP3. Remember that this will contain an overview page, and several pages that show limited groups of assignment areas. Refer back to Exercise 15 for more information.
- Create a folder for OP3 tracks. Then, download this file, import them to your map, and clean them as you did for the OP2 tracks.
- For both your OP2 Tracks and OP3 Tracks folders, edit the folder so that it will NOT load on page load. When we open your map to review it, we want these folders to not display until we open them.
Grading Criteria:
- The file with AH-AJ was imported and segments labeled BA have been drawn inside the boundaries defined by these A-segments. The B segments should match the criteria for good segmenting.
- OHV and Air Ops folders exist and have 3 assignments in each.
- OP3 Map object exists.
- Marker in air assignments folder includes weather forecast in description
- Landing Zone folder has LZ4, LZ5, and LZ6 and they are appropriate LZs.
- There are selected assignments with number 301 and up, attached to OP3, and indicating the number of searchers and the transportation type for each?
- OP3 map packet should be in a link in a marker description in the Incident Facilities folder. Map packet should fit the criteria and have the correct assignments relevant for op3 in it.
- OP3 Tracks folder exists and has imported, cleaned tracks from the file provided.
Submitting Your Map for Review
You have now completed all the tasks in this course!
You can submit the link to your Wally Sinclair mission map via NASAR's online learning platform. Then we will review it and provide feedback and issue your certificate if your map meets the basic criteria! Please note that reviews could take up to 4 weeks, but we hope to get back to you within one week of submission.
Tips for Ensuring you get your Certificate
You have put a lot of time and effort into your Wally Sinclair map at this point. Follow these tips to help be sure that you do not get a rejection email!
- Submit a .txt file that includes a link to your map. Not an image file, json, pdf, doc, rtf, or any other file type.
- Double check that you have completed all of the exercises.
- Take another look at your segments. Did you use snap to while drawing? Did you follow terrain features? If you have a bunch of nice rectangles as your segments, we will send your map back to you for edits.
- Take yet another look at your segments. Do they overlap each other? Are they an appropriate size? Would they make sense to someone walking around on the ground without requiring that searcher to check their GPS every 10 steps to make sure they are within their boundary?
- Did we mention that you should review your segments?
Conclusion, and What To Do If You Can't Do It All
Large missions are complicated by nature. Don’t panic! Stay as organized as you can. Practice your systems before a mission so you know how you want to label segments, keep track of operation periods, and assign teams. Get everyone on the same map, even if that isn’t your final or full mission map. Record tracks, and communicate as much as you can to your ground teams.
Good maps require organization, and that starts with good labeling of map objects and folders for organizing them. From there, you can scale up as much as necessary to meet your needs.