Blank, Draft and Saved Maps
in this lesson
CalTopo has three basic types of maps: blank, draft (also known as unsaved) and saved maps. While you can share a blank map from the web, only saved maps can be both shared and accessed again at a later time. We recommend that you make a habit of saving maps to your account as soon as possible in order to prevent the accidental loss of data.
Topics on this Page:
Blank Maps
When you first open up the map viewer, you'll see a blank map. Blank maps do not yet contain any data (markers, lines and polygons), but may contain custom layers. Since the entire map state is stored in the URL, nothing is actually saved to CalTopo's server.
A blank map will have a URL that contains /map.html, possibly with a bunch of extra information, e.g. /map.html#lI=39.4617,-106.46438&z=16&b=mbt&o=r2&n=0.52. To share a blank map from the web app, use the Details/ Sharing button on the left side of the map viewer.
The dialog that appears provides a URL for the map that can be given to other users in order to share the blank map. Below is an example of a sharing URL for a blank map that contains a custom DEM layer.
Since the sharing URLs are often quite long, you can click on the Shorten link in the dialog to produce a shorter URL for easy sharing, e.g. /l/7GHH.
Again, it is important to note that blank maps are NOT saved to your account. The map state is simply stored in the URL.
Draft or Unsaved Maps
If you add a marker or a line to your map, you now have a draft map. Draft (also called unsaved) maps are maps that contain markers, lines or polygons, but have not yet been saved to CalTopo. You can still access most features, including exporting and printing, but your data will be lost as soon as you leave the page. This is why it is important to save your map as soon as possible to prevent the loss of data.
When you add your first object to your map, a Save As dialog will automatically appear if you are already logged into your account. If you are not logged in, you will be prompted to log into your existing account or create a new account.
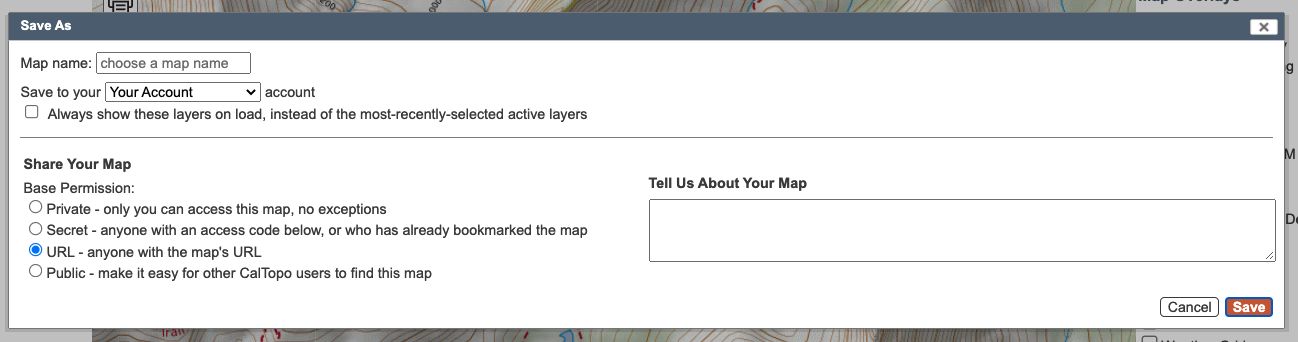
Name your map, decide whether you want to show the layers you selected or the most recently-selected layers on map load, designate the base permission for the map (this is covered in the next lesson) and add in any comments. Clicking Save will save the map to Your Maps under Your Data and return to the map in the map viewer.
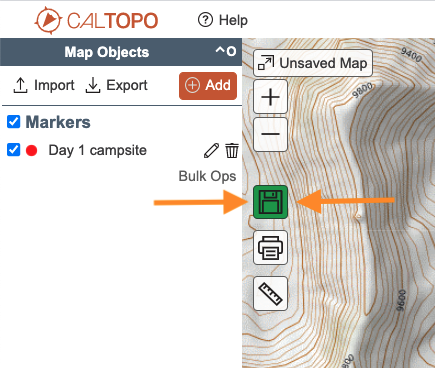
Alternatively, you can exit the Save As dialog without saving your map by clicking Cancel or clicking anywhere outside the dialog. You can then save your map at a later time by clicking the green Save button that appears in place of the Details/Sharing button on the left side of the map viewer.
However, do not forget to save your map if you wish to access it again! If you try to close a draft/unsaved map, you may see a dialog warning you that you will lose any unsaved changes if you close the page. Clicking Yes, Close Page or closing the browser page in another manner will result in the loss of any data that was added to your map.

Saving Maps in the Mobile App
You cannot share a blank map from the mobile app. If you wish to share a map from the mobile app, you must save the map first.
To save a map on the mobile app, first add a map object to the map. Unsaved Map will appear in the upper left hand corner. Click the 3 bar main menu and then select Save Map. Type in a name for your map and then press Save Map.


Saved Maps
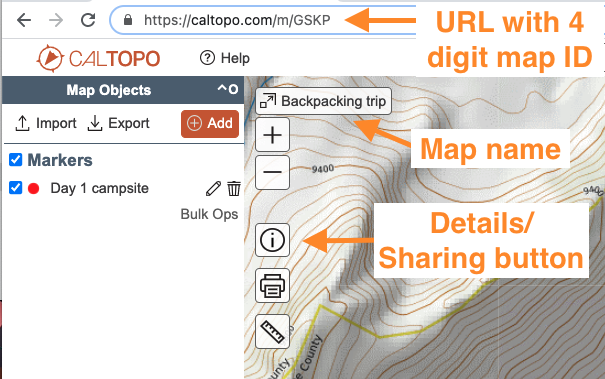
Saved maps are maps where the data has been saved to CalTopo. On a saved map, the URL is m followed by a 4-digit code that is a unique combination of letters and/or numbers, e.g. caltopo.com/m/GSKP. The name of the map will appear in the upper left hand corner. Notice that the Details/Sharing button will also be visible again on the left side of the map viewer.
You may have noticed that once you save a map, there is no longer a Save button visible in the map viewer. In a style similar to other online editors such as Google Docs, changes made to a saved map are automatically synced. Anyone with access to the map will also see any changes made as long as they have a data connection.