Local APRS with Desktop
let's begin
The Desktop program is capable of receiving data from a radio and mapping the coordinates onto CalTopo. It operates using APRS data received from another radio. While the shared location system typically relies on APRS radios accessing an iGate, the Desktop eliminates this need. Instead, data can be directly collected by a radio connected to a computer.
Topics on this Page:
Initial Set Up
With the CalTopo Desktop program, you have the ability to monitor APRS traffic by utilizing a radio equipped with a Terminal Node Controller (TNC), which can either be integrated into the radio itself or be an external accessory. All radios equipped with TNCs, whether internal or external, can be connected to your computer. However, a serial connection may be required for older TNCs, necessitating the use of appropriate cables and dongles to establish the connection.
The first goal once you connect your radio/TNC to your computer is to determine the serial/COM port it is using. The next goal is to ascertain the baud rate the TNC uses. Many use a baud rate of 1200, but there are quite a few that use 9600; some can be configured to use either. To find the serial/COM port, you can use the Device Manager on a Windows computer or you can use a terminal command to get a list of devices on a Mac.
On Windows, open the Device Manager in the device manager window and expand the Ports (COM & LPT) category.
On a Mac, open a Terminal window and use this command:
ls /dev/{tty,cu}.*The baud rate can be obtained from the radio/TNC documentation.
Once you have identified the serial/COM port and baud rate, the next step is to edit the CalTopo Desktop properties file. When you downloaded the Desktop program onto your computer, a file named CalTopo was created. You will find this file in one of the following locations, unless you have moved it elsewhere:
Macs
/users/myusername/CalTopo
Windows
c:\Users\myusername\CalTopo
Inside that file, you'll find a topo.properties file. This file can be opened with a text editor like Mac's TextEdit or Windows' Notepad. Typically, the file is blank, so you will need to add the following lines:
sarsoft.location.aprs.local.enabled=true
sarsoft.location.serial.{your COM port} = {your baud rate},8,1,0
Important: Whenever you edit the topo.properties file, you must fully restart the Desktop application for those changes to take effect. This requires closing the CalTopo Desktop terminal window and then reopening the Desktop application.
Certain TNCs, such as TNC-X and Mobilinkd, operate in "Keep It Simple Serial" (KISS) mode. While CalTopo supports KISS mode, it needs to be activated.
So for Windows where you found the COM port to be 8 and the baud rate 1200, you would add this:
sarsoft.location.aprs.local.enabled=true
 sarsoft.location.serial.COM8=1200,8,1,0
If your TNC is using KISS mode with the above COM port and baud rate, you would have 3 lines:
sarsoft.location.aprs.local.enabled=true
 sarsoft.location.serial.COM8=1200,8,1,0
 sarsoft.location.serial.COM8.kiss=true
On a Mac the lines will look a bit different. Here is an example for a Mac, including the KISS sentence.
sarsoft.location.aprs.local.enabled=true
 sarsoft.location.cu.usbmodem12345678=1200,8,1,0
 sarsoft.location.serial.cu.usbmodem12345678.kiss=true
On Windows you can utilize a terminal program like PuTTY to verify the presence of APRS traffic on the serial port. Most TNCs transmit messages in plain text, although some messages may contain unusual characters.
On a Mac, you'll need to rely on the CalTopo terminal window to view the APRS traffic data while using the logger sentences found below in the debugging section.
To see some examples of topo.properties configurations for radios and TNCs, you can visit this section of the Locations Integrations page.
Meshtastic
Meshtastic uses the APRS system in CalTopo to report location. Beyond the set up that you need in CalTopo that is outlined above there are some specific things you need to do within your Meshtastic radios for this integration. For more information about Meshtastic, you can visit this section of the Locations Integrations page to find additional information and links.
Viewing Local Traffic on a Map
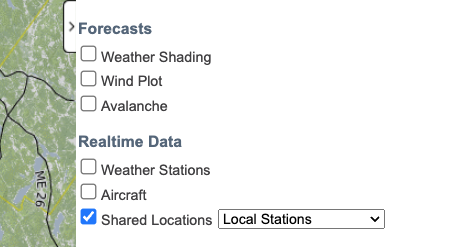
To view the data received from the radio connected to your computer, you need to check the Shared Locations overlay in the Desktop. If your Desktop is connected to the internet and you only wish to observe local traffic (exclusively received by the radio), then you should select 'Local Stations' from the Shared Locations dropdown menu. Alternatively, if you select 'All' or any specific teams or sub-teams from the list, and those teams or sub-teams have APRS listed in the Trackable Devices list, you may observe APRS stations reported via an iGate. Using Local Stations is particularly important during the initial set up phase to ensure the local system is functioning correctly.
Just like with other devices that show up in the Shared Locations overlay in the web program, you can click a local station that is reporting and record that device. How to record to a map is covered in the Live Team Tracking page. If your CalTopo Desktop is online and the saved map is syncing with the online server, any local station you record to a map will appear on that map for users of both the mobile app and the online program.
DeBugging Your Set Up
Typically, the CalTopo Desktop Terminal Window remains inactive after you open the Desktop. However by adding some logger sentences to the topo.properties file, the CalTopo terminal window will display data that can assist in debugging issues. Including these logs will not only provide information about the serial ports and APRS but can also aid in resolving other issues, albeit in rare cases. There is no need to add these logs if everything is functioning correctly. However, in situations where things are not working as expected, the data generated by these loggers can be crucial for problem-solving.
Add these to the topo.properties file to display additional data in the CalTopo Terminal window:
log4j.logger.location.name=org.sarsoft.location
 log4j.logger.location.level=DEBUG
 log4j.logger.aprsengine.name=org.sarsoft.location.service.APRSLocalEngine
 log4j.logger.aprsengine.level=DEBUG
Once you add the logging sentences, you will observe a substantial amount of data in the CalTopo terminal window. What's crucial is that the data includes callsign and location information, as illustrated below:
2024-03-12 13:34:55 APRSLocalEngine [INFO] Serial data: N1WBU-7>APDR16:=4311.78N/07221.230W[157/000/A=000459 hi. 2024-03-12 13:34:55 SimpleLocationDispatcher [DEBUG] Location report LOCAL:N1WBU-7 @ 44.09633,-71.15383 2024-03-12 13:34:55 LocalLocationsService [DEBUG] Local location report LOCAL:N1WBU-7 @ 43.19633,-72.35383 2024-03-12 13:34:55 ForwardLocationsService [DEBUG] LOCAL:N1WBU-7 @ 43.19633,-72.35383
Forwarding Locally Heard Radio Traffic
You can forward locally heard traffic to the Shared Locations overlay of your team account if your Desktop program is online. This means that any station your radio can receive will appear when others on your team check their Shared Locations overlay (as long as they have an internet connection). This feature allows others to use and record received stations on maps. However, the downside is that any radio that the Desktop "hears" will show up, even if that radio operator is not working on that particular mission. In situations with a lot of APRS traffic, this can cause overcrowding on the Shared Locations overlay. Nonetheless, this feature is very useful in a remote unmanned situation, where you can set up a Desktop to report locations it receives.
To set this up, add the following sentence to the topo.properties file:
sarsoft.location.shareWith={team_API_key}
To find the Team API Key, you need to have Manage or Admin level access. When you navigate to the team admin page where you can see the list of team members, check the URL in your browser. There you'll find:
https://caltopo.com/group/{team_API_key}/admin/members