Deployment and Incident Action Plans
in this lesson
Here we move from taking assignments that we created to producing documentation for, and communicating to search teams about their tasks.
This chapter addresses are two major methods of deployment, creating forms and printing maps, and/or setting up field teams with the mobile app or gpx data. Not all teams or incidents will require both methods.
CalTopo brings the data entered into the assignment objects and populates it into a series of standard ICS forms.
Secondly, using the CalTopo app, responders can be directly integrated into the search plan with significantly increased situational awareness and the ability to switch assignments easily if one is completed early, or if a clue leads to a significant change in priorities.
The techniques and products in this chapter are aimed at OP2 and beyond for a mission, though you may find you like to use some of the tools for the hasty portion of the mission as well. At the end of this lesson, you should be able to do the following:
- Set your team up with the CalTopo app for real time updates and/or offline use during the mission.
- Produce efficient and comprehensive map and assignment packets for field teams.
- Produce, explain, and use the CalTopo forms for deployment.
Jump to Section:
Taking it to the App
The CalTopo mobile app eliminates the need for printed maps to a large extent. Team members have access to the incident map via the team account, and can view and navigate to their assignments via the mobile app. They also record tracks directly to the map using the mobile app, reducing the need for retrieving GPS tracks from devices and importing them to CalTopo at the end of the day.
There are three basic steps to taking your field teams into the digital world. First, team members should be connected to the team account so they can access all maps. Second, responders need to access the app and download relevant base layers before going out of cell service. Finally, responders need to know what data you expect them to record to the map and how to do so.
The visual guides included below are available to download as pdf files in the Mutual Aid Incident Quick Guide Page.
1. Maps go in the Team Account.
Your incident map should be in the team account, and all your team members should be connected to the team account. In order to record tracks to the map, team members need at least Update level access to the team.
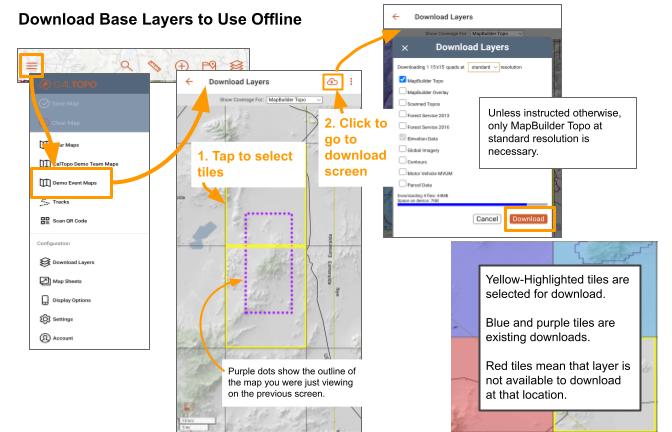
2. Responders access the map and download relevant base layers.
Instruct responders on how to access the map and how to download base layer tiles, and which ones to download. If responders are new to SARTopo, they will need some help to learn their way around the app and find their assignment and record a track. If working in areas without cell service, they will also need to have base layers saved to their devices so they can see the background maps offline.
- See the small unit, Field Team Readiness for guided practice.
- If you have no cell service in the field, ensure that responders download base layers to their mobile device before deploying. If the callout is for the following operational period, having team members get this data before they even leave home is the best option. Set up your ICP in a place with cellular network service, OR, send information to responders before they arrive at the base. Some teams now have two ICPs - an initial one at a location that has cellular service and a second one at the final deployment site, such as a trailhead. This allows for everyone to get connected on the same map and thus have access to the relevant search data, assignments, and more.
3. Brief responders on how you expect them to use the map.
They will need to know what you need from them including:
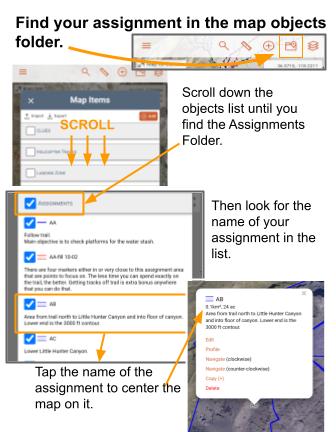
- How to find their assignment and its description.
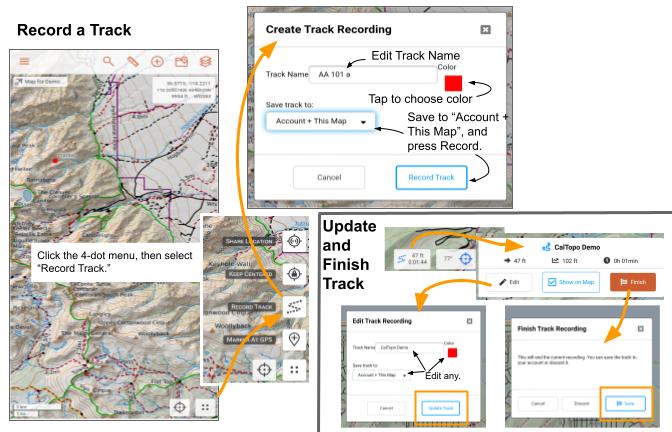
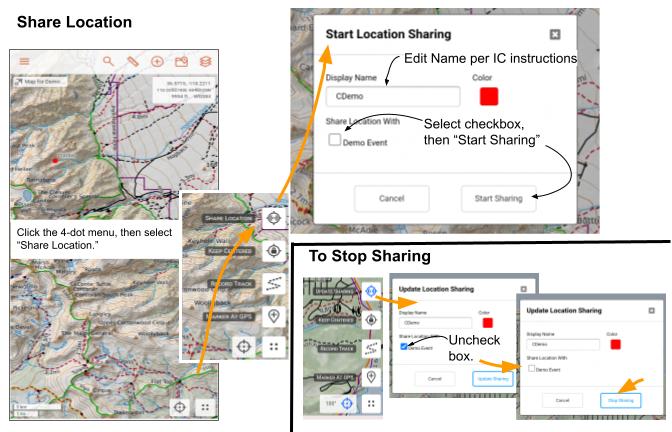
- How to record a track to the map and/or share their location. If teams have a cellular or network connection, their tracks will populate to the map in real time. Responders will also see each other's tracks or location on the map. Otherwise, they will sync to the map when they return to network service.
- Include instructions for how you want the responders to label their tracks. A good option is to ask for the team number and a last name or position on the team. IE tracks from team 203 would be 203a, 203b, 203c. The team number lets you know which operational period and which team within that OP recorded the track.
Live Tracking Your Field Teams
Live tracking allows real time situational awareness in areas where a network connection is available or where some other type of location reporting system is connected to SARTopo.
CalTopo includes various tools to keep track of your teams. We covered track recording and sharing locations above as tools for when cellular service is available. When it is not available, other systems such as InReach satellite communications and APRS can be integrated into the trackable devices list for the team and viewed on the Shared Locations Overlay. The details of setting these up are beyond the scope of this course, but you can find additional information on the Live Team Tracking Page.
Exercise #13
Open the mobile app and load your map for Wally’s search. With the search map open, record a track with your mobile device. Label the track with your last name and the date you are recording. (Do not worry if your track is not anywhere near the search area.) Finish and save your track.
Grading Criteria:
- User recorded a track to the map using the CalTopo mobile app, and labeled it with their last name and the date.
Reference Links:
IAP Forms
The available forms include the SAR104 assignment form, the 104s summary form, and the 104d deployment form. The basics of creating these forms are covered in the SAR Objects chapter.
Operations, or whomever is assigning teams to segments, benefits from the information on the 104d (deployment) form. With this they can see segments sorted by priority, number of personnel needed, and resource type.
Field teams should be equipped with as much information as possible, in as compact a format as possible. The mobile app can provide the majority of the information about an assignment. Additionally, you can print assignment packets that include the 104s (summary) and map packets (covered below). Finally, consider including the standard 104 form for a particular assignment.
104d - The Deployment Form
The 104d form summarizes the needs for the day’s assignments to aid the overhead team in determining how to allocate resources. In a small and simple search, assigning individuals to assignments may be a small and simple task, but in a larger operation with a lot of moving parts, the 104d simplifies this complex task. The 104d puts a focus on which segments are the most important and shows how many of what type of resource(s) the segment requires in order to achieve the assigned tasks.
Here is a possible form generated from the KY incident. First, the form is divided by high, medium, and low priority segments. Each assignment shows the number of personnel requested for that assignment. Here, numbers are already assigned to segments, but that could be done later when we know which segments will actually be filled with searchers.
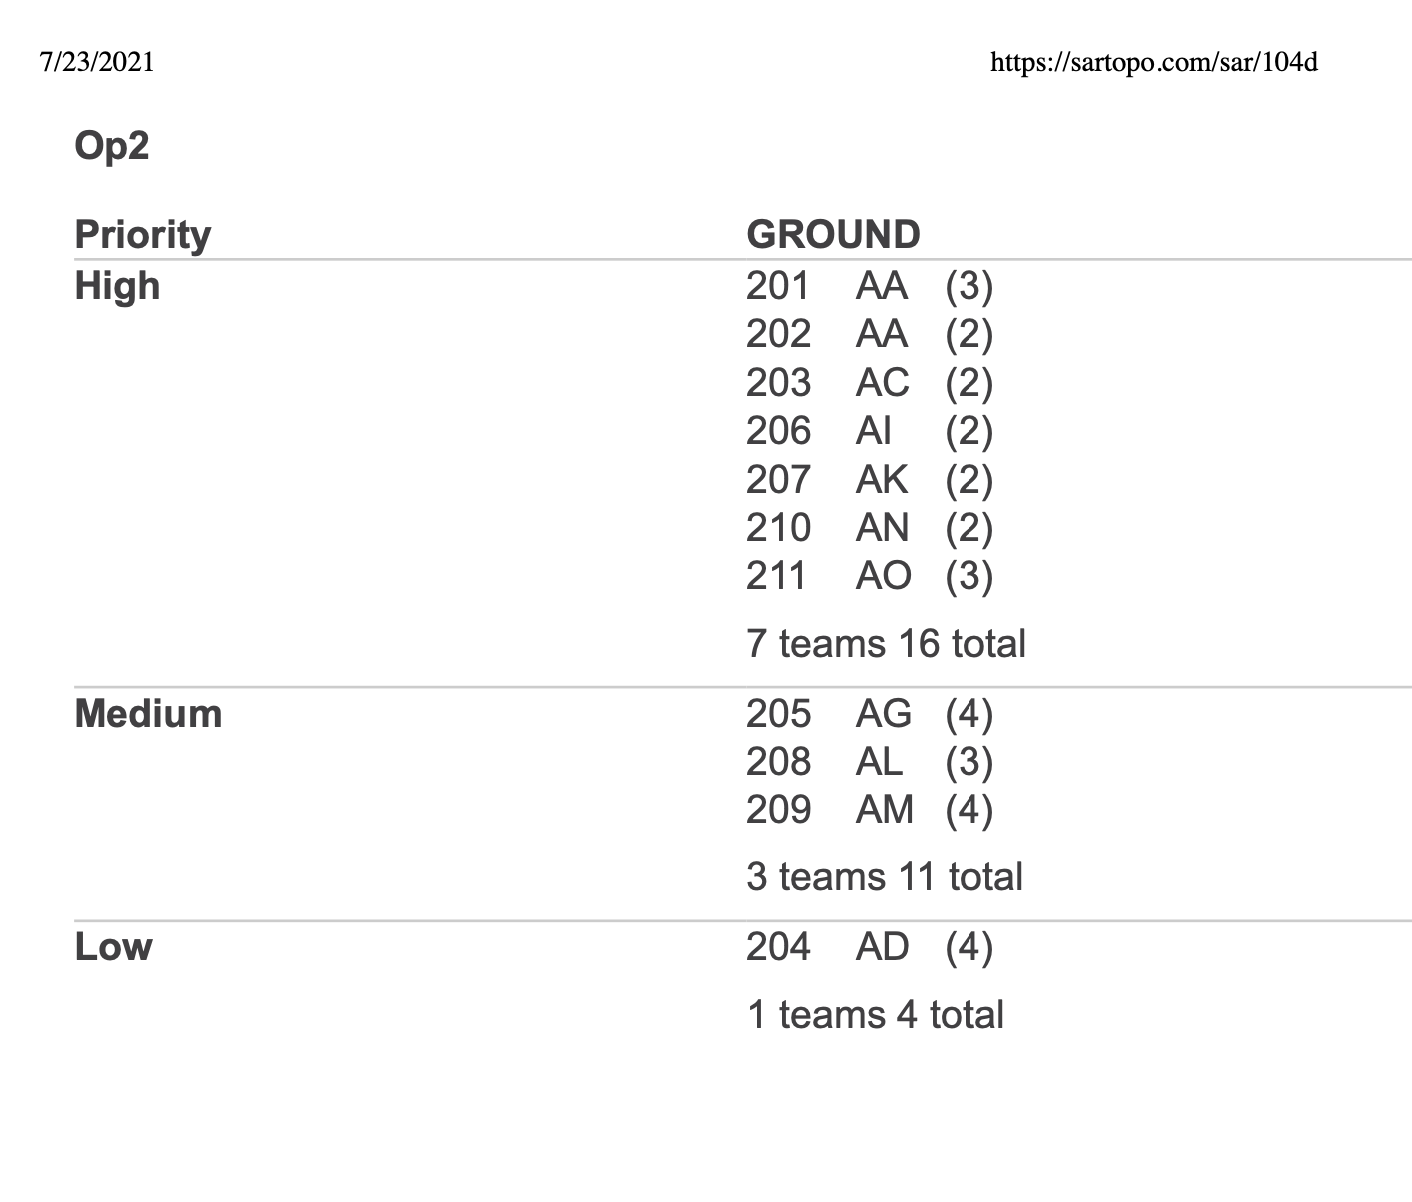
One this page, the segments are sorted by the resource type required. They are all labeled “ground” in this example, perhaps assuming that all responders are the same type of ground team. If you are in a mountain environment, ground-1 vs ground-3 may be critical, whereas in an urban area you could probably list all the teams as ground and not worry about the typing of the responders. Resource type may also be categorized by dog teams, ohv, etc.
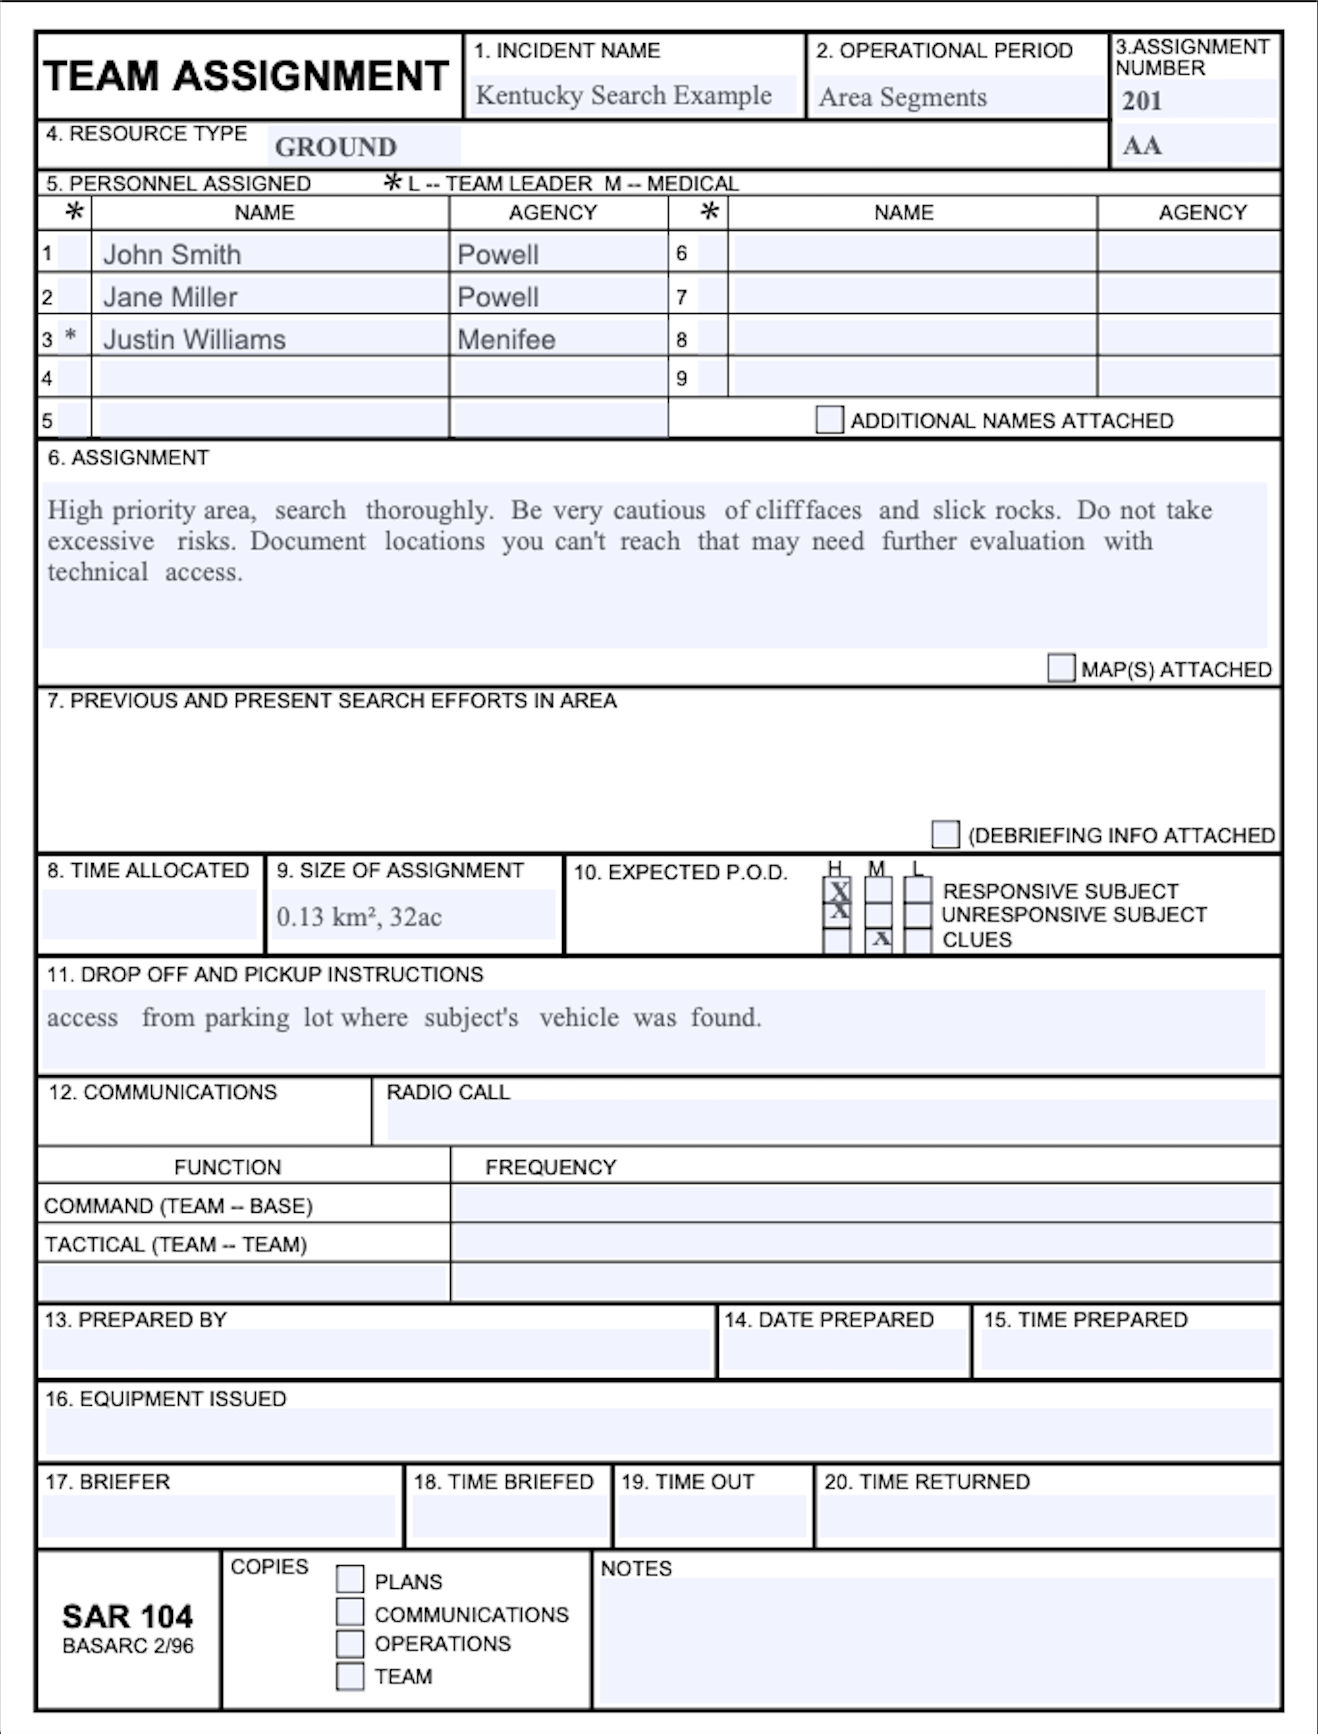
Forms 104 and 104S
Most teams are familiar with the 104 assignment form, or something similar. This form directly ties to the data stored in each assignment object. You can generate these from the bulk ops at the bottom of the assignment folder to generate a selection of them at once. Or, to print an individual form for a single assignment, click on the assignment on the map or in the objects menu, and select the SAR104 form from the menu that appears. The generated forms are editable before saving/printing them; however this data does NOT link back to the assignment data in the CalTopo map.
CalTopo does not store these forms for you after they are generated. You must save them to your computer to preserve them, or generate them again if needed.
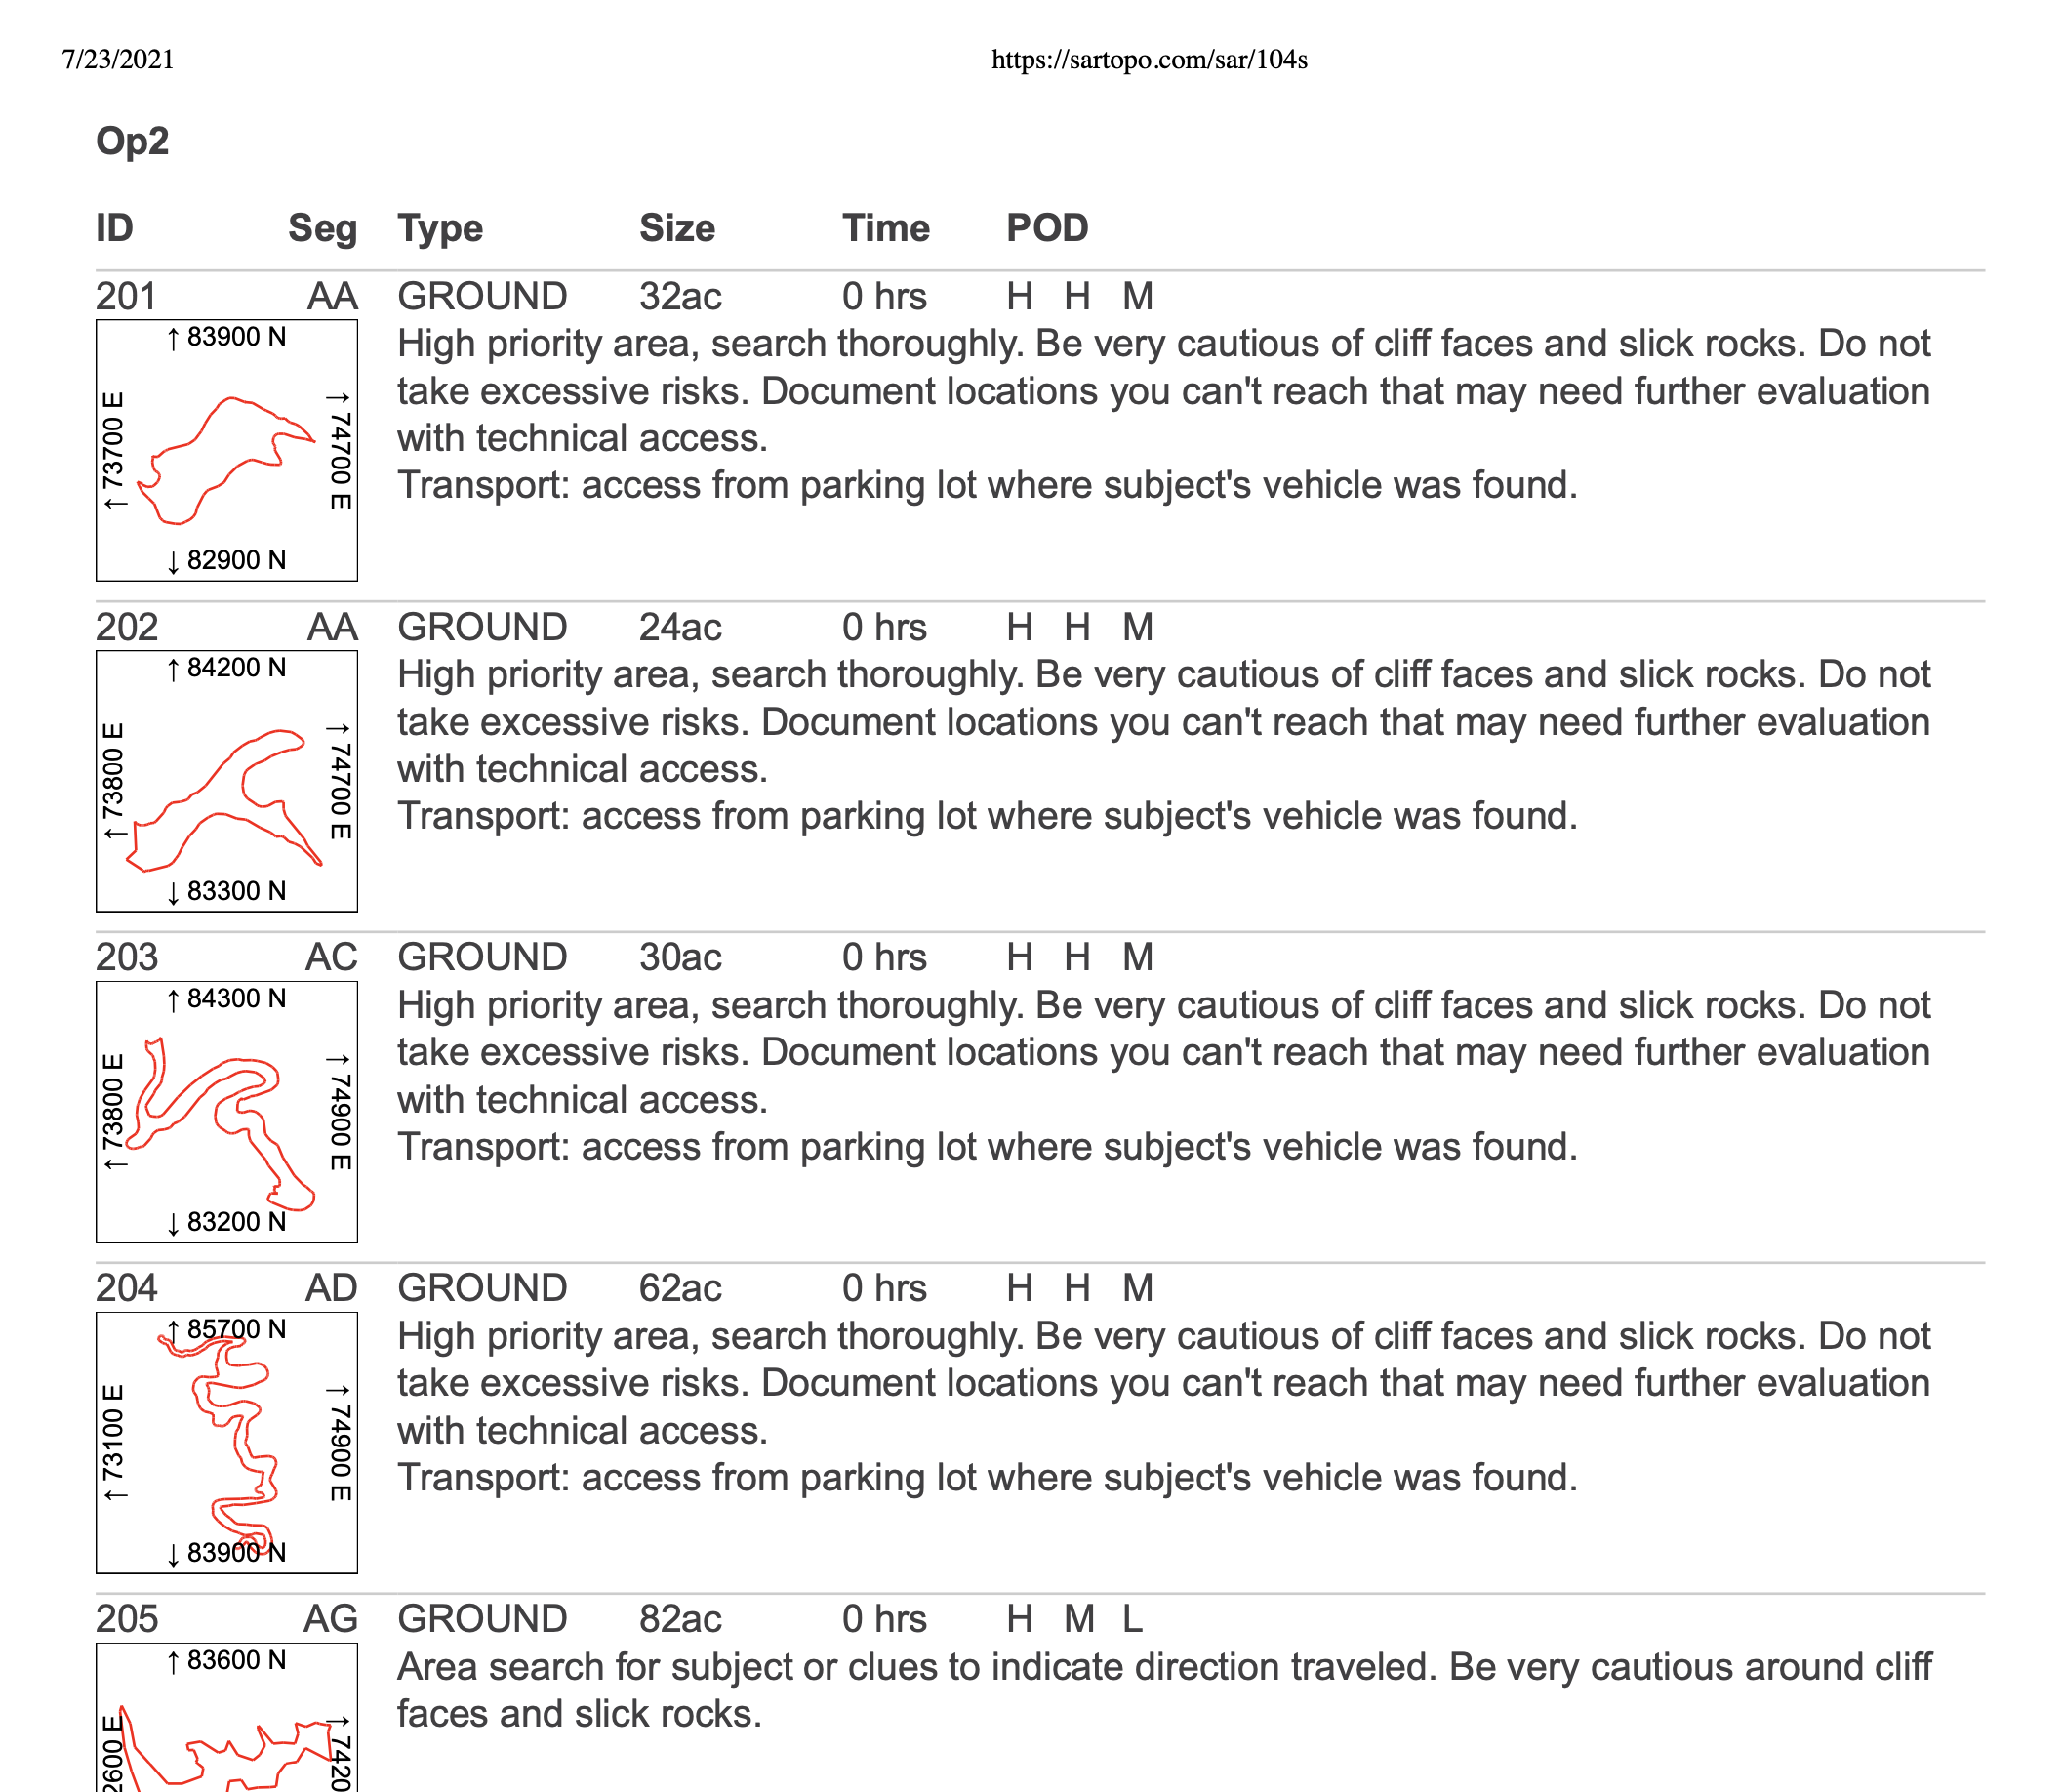
You may not need to print 104 assignment forms at all, thanks to the mobile app and the 104s form. We have introduced the 104s to reduce the burden on your printer and to increase situational awareness in the field and among operations staff. The 104s is a summary form that you produce from Bulk Ops at the bottom of the assignments folder.
When you send teams into the field, they rarely have a way to store that packet of information you give them during the briefing. It’s large, thick, unwieldy, and immediately gets stuffed somewhere hard to access to keep it out of the way. The more sheets of paper you include in the packet, the more likely they are to be ignored. Now imagine you deploy your teams via helicopter into the mountains, or send them away via OHVs. When they finish their assignment early, or you get a new clue and need to redirect resources, or there is a hazard in one area making the original assignment unfeasible, it’s impractical to bring the team all the way back to the IC, give them a new packet, and redeploy them.
The 104s brings the information of the 104 assignment sheet into a compact format. In this way, every team receives information about all of the assignments in a concise format, enabling field re-deploys and better situational awareness because teams have access to what the other assignments are and where they are. Combined with a map packet, the mini maps help field teams pick out the other assignments from the packet, and have a visual cue for what they are looking for.
This is also helpful for an IWI scenario. If a team member is injured and other teams and resources need to respond to help, they can easily find the area where the problem occurred and start heading that way (without having to write down coordinates, enter them, confirm them, etc.)
Use bulk ops to create the 104s for the segments that are relevant. Don’t forget to include extra segments so that you have backup plans at the ready for your field teams to redeploy from the field. Review the draft to make sure that all the necessary information is included. Then print/save the file. CalTopo will not automatically keep these pdf files the way that it will for map pdfs.
Exercise #14
Generate forms 104, 104s, and 104d for OP2. Ensure that all forms display the appropriate information. To indicate that you did this task, add a marker to your Incident Facilities folder and label it as OP2 104 forms completed.
Grading Criteria:
- Marker present in Incident Facilities folder that indicates that they created their 104 forms.
Reference Links:
Building your Map Packet
Single assignment maps are out, and map packets are in! To complement the 104s form, current best practice suggests making a series of standard maps that all teams receive in place of sending teams out with a single map for any one assignment.
The map packet consists of two parts: an overview map of the entire search area, and detail maps that focus more on smaller sections.
The overview map provides context for the whole mission or op period, whereas the detail maps show multiple segments to provide boundaries as well as context for the surrounding area. Detail maps should have some overlap with other nearby sections so they can be referenced to each other.
This concept is best shown with examples rather than explained, so let’s continue looking at the KY example during a theoretical OP2 deployment.
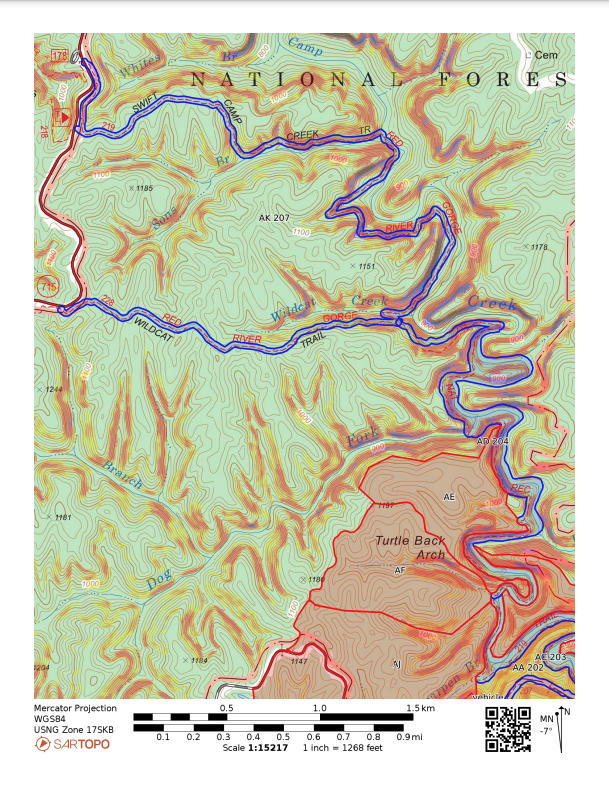
1. Overview Map This map shows the entire mission area for the day. It also includes key roads to access the assignments to the north.
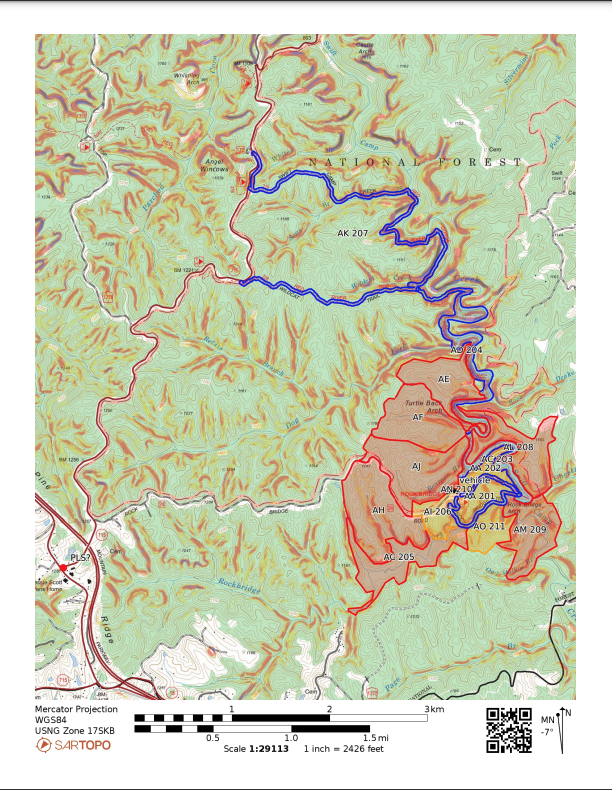
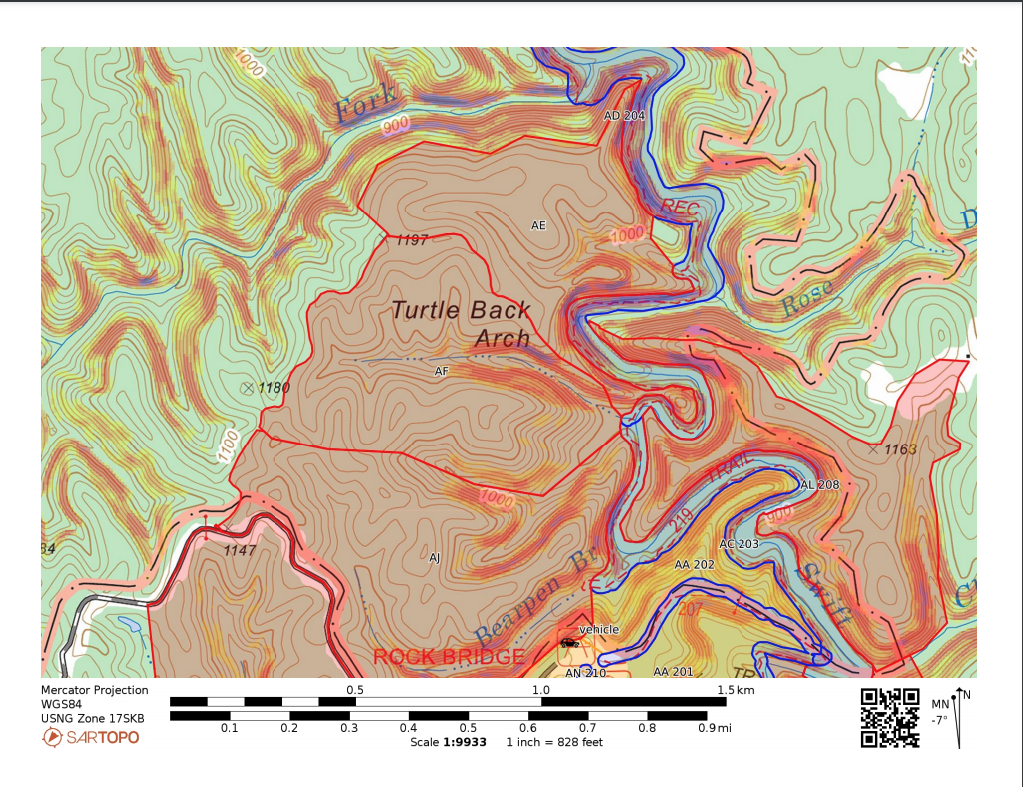
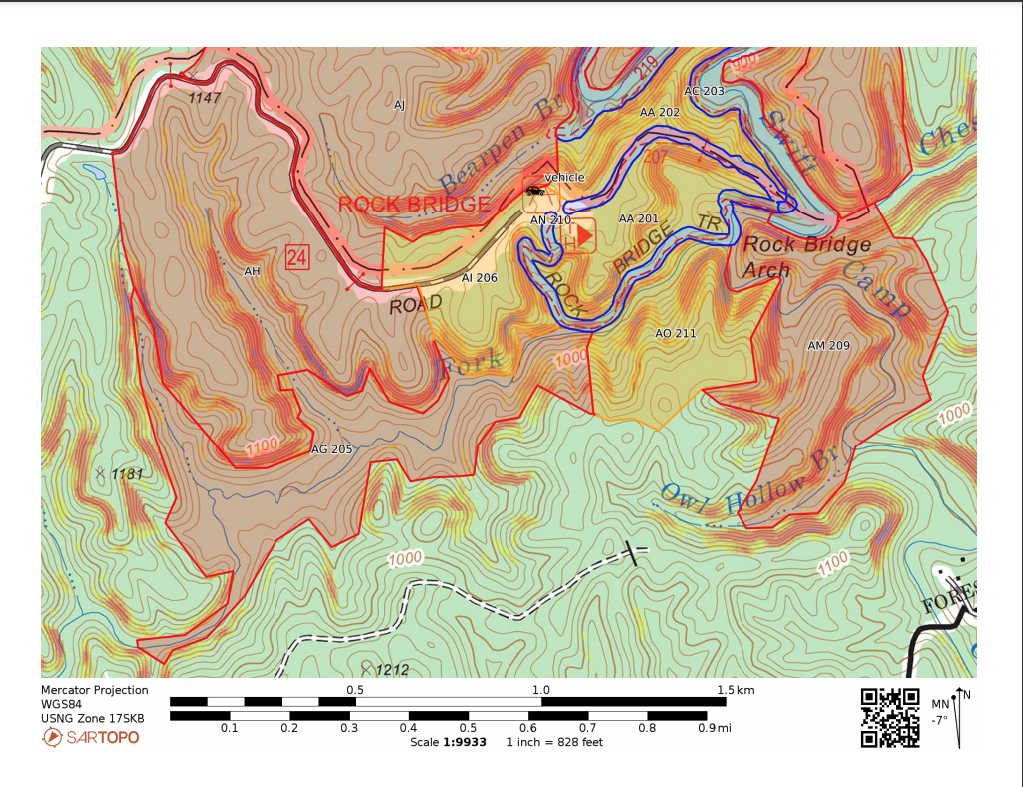
2. Area Maps These maps show smaller collections of assignments clear enough that the searcher can see relevant geographic information to navigate the assignment. They also show the searcher nearby assignments for situational awareness. We divided the search area into three sections for these PDFs, as shown below.
This set of four maps plus the 104s form for the entire map packet, which all teams receive if you are distributing printed maps.
Exercise #15
Produce a map packet, including an overview map, and area maps for OP2 using the guidance described above. You will need an overview page showing both the ICP and the R-lettered assignments. Then two more pages that show the top and bottom half of the area that contains the R-assignments. You should create a single PDF by using the "add page" function in the PDF generator (see the reference link below for more information about generating PDFs). On the print settings page, set your map to save to your account for at least 90 days*. Here is an example of what we expect.
To share your packet with us for grading, add a marker to your map and put it inside your Incident Facilities folder. In the description for this marker, include the link to your map packet. (caltopo.com/p/xxxxx or sartopo.com/p/xxxxx) If you do not set your PDF to save for at least 90 days, then we may not be able to find it to view it before it expires.
*If you do have a Pro account or Team account, you will need to email us to request a trial code to upgrade your account for this course.
Grading Criteria:
- The map packet is linked from a marker in the incident facilities folder.
- The map packet has one overview map showing the assignments in relation to the ICP, and two focused area maps that show the R-assignments.
Reference Links:
Conclusion
At this point, you should be able to print assignment and deployment forms and setup map packets for your IAP. You use these and the mobile app to communicate to your field teams about their assignments. Additionally, the mobile app live tracking and other live tracking options help you maintain situational awareness about teams on the ground while they are executing their assignments.
Next, we’ll cover how to manage the field data such as tracks when teams return from their assignments.