Team Collaboration
let's begin
Many teams and agencies work together on a regular basis and need an easy way to share maps, layers, and other data across both teams, while maintaining ownership of their own data. Groups with CalTopo Teams subscriptions can now connect to each other by directly connecting their workspaces.
Topics on this Page:
Who should use team collaboration?
Workspace sharing between team accounts is designed so that groups that regularly work together in mutual aid situations have a way to connect their accounts. For example, two neighboring SAR teams that often deploy on missions together may find it helpful to have each other’s maps at the ready. It can also be used for large CalTopo Teams accounts where a large agency purchases the account and uses subteams to divide units. An example of this may be a county that purchases an account and creates subteams for the sheriff’s office, fire, natural resources, and roads units. If the SO and Fire regularly work together, they could share workspaces with each other.
Before we can talk about how to share, we need to cover a few concepts of team structure and workspaces.
Team Account Structure
An organization purchases a Teams subscription. The account begins with a single administrator. That person adds other users and admins, and the organization personnel start to figure out how to structure the remainder of the users within the team account. From here there are a lot of potential scenarios, so we will start simple and build into more complexity.
Workspaces and Groups
Workspaces
A workspace is a way to designate and manage a set of data (maps, custom layers, mapsheets, pdfs, icons, etc.) One way to think of the workspace is to go to the Mapviewer and click the Your Data button. From there you can access the data in your personal workspace as well as any team workspaces. The maps, bookmarks, PDFs, mapsheets, custom layers, custom icons are all data that is stored in a workspace.
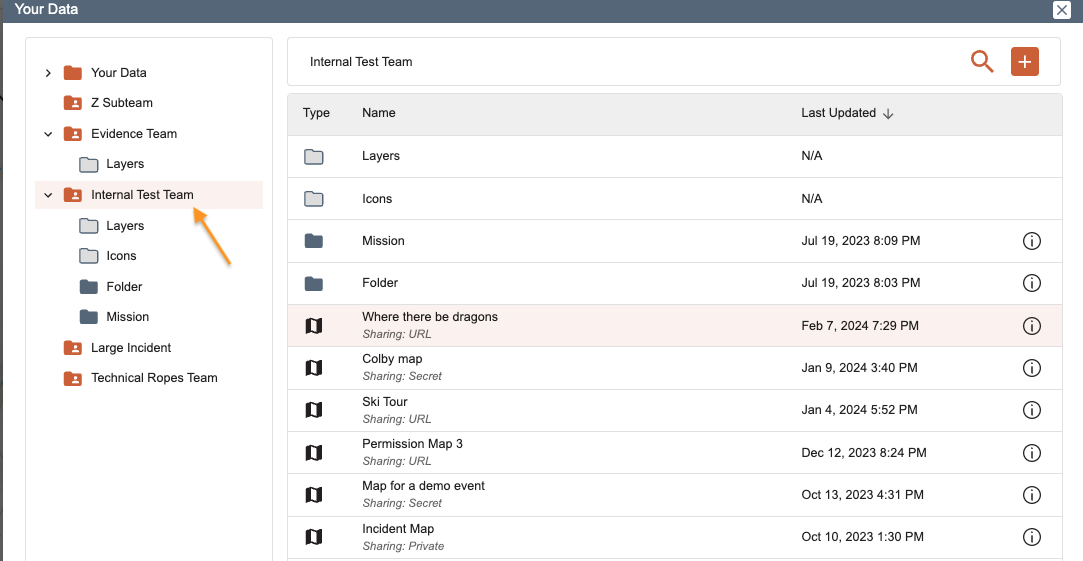
Each team, subteam, and/or mutual aid incident can have its own workspace.
Workspaces can be accessed directly by users of that same team or subteam. Other users outside the direct team can receive shared or inherited access to that workspace.
User Groups (Membership)
The users of a team constitute the User Group. They are reflected on the membership tab of the team admin page.
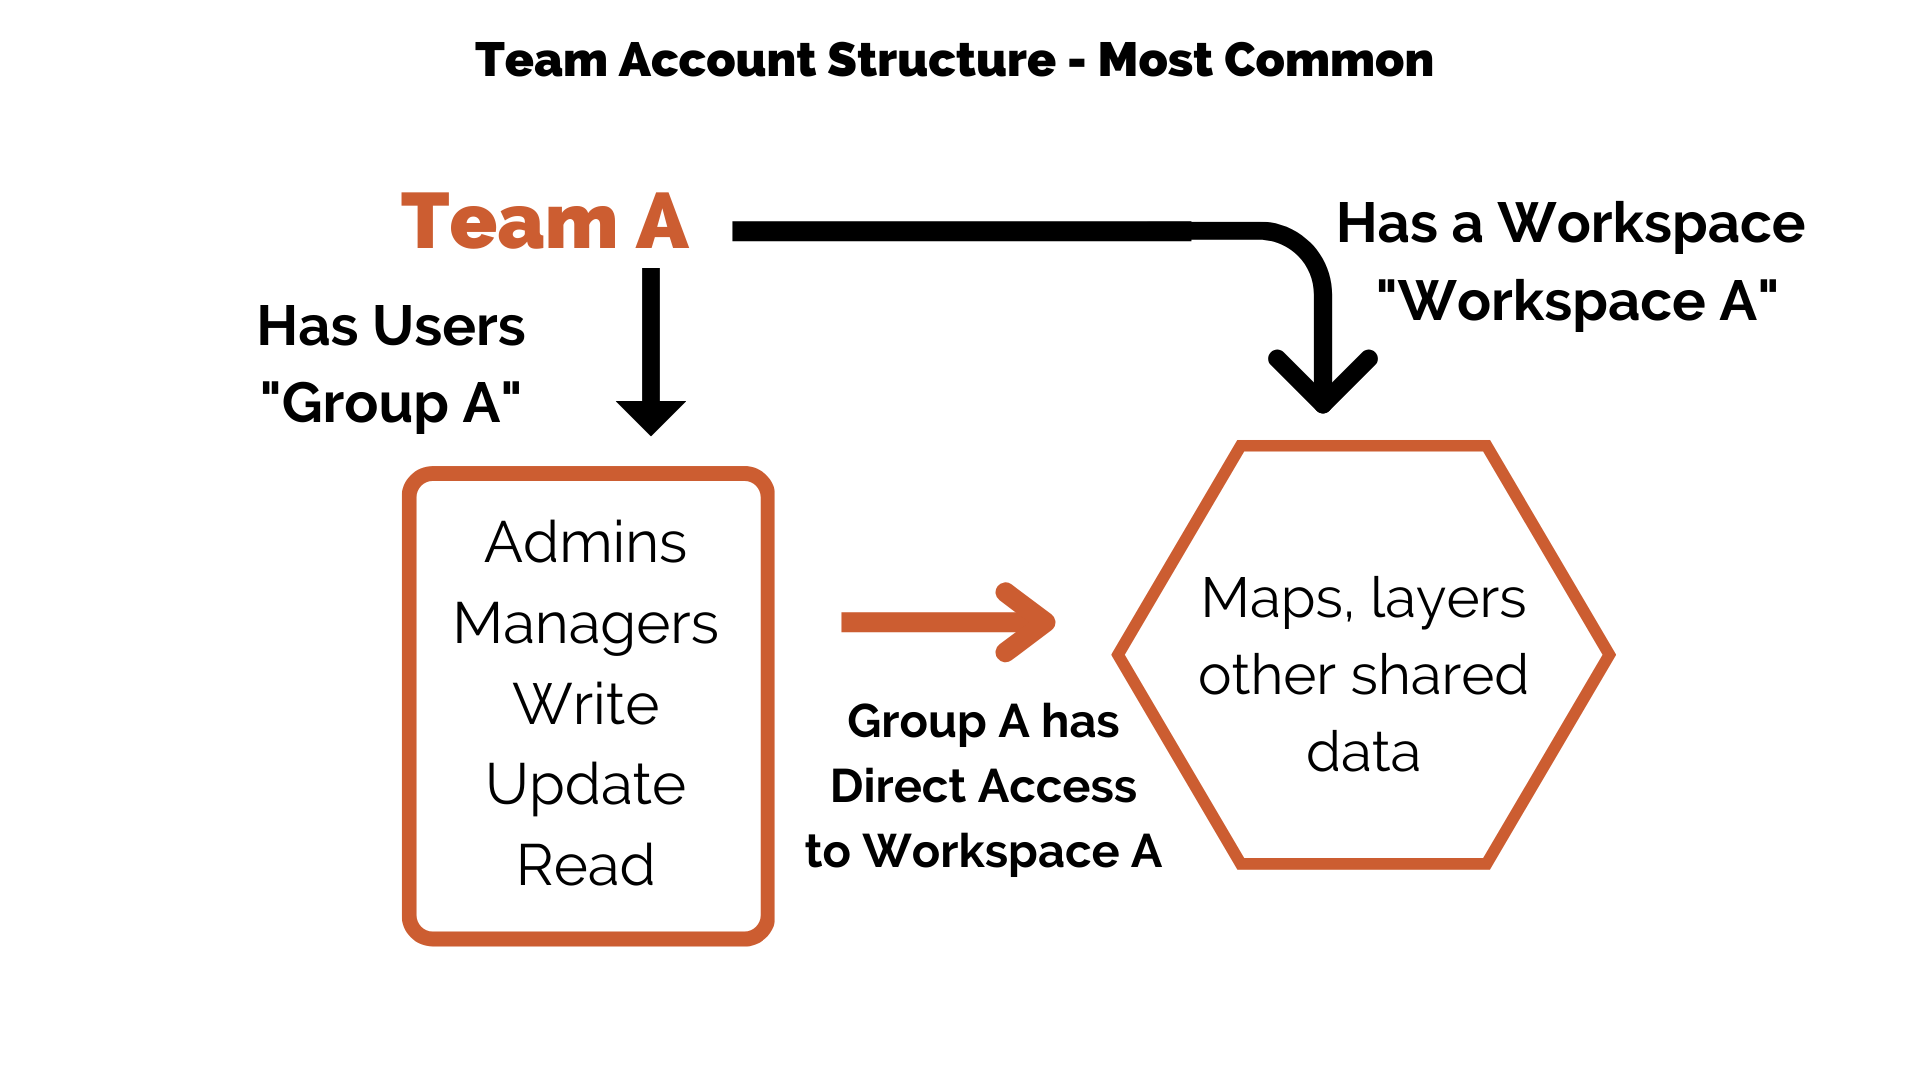
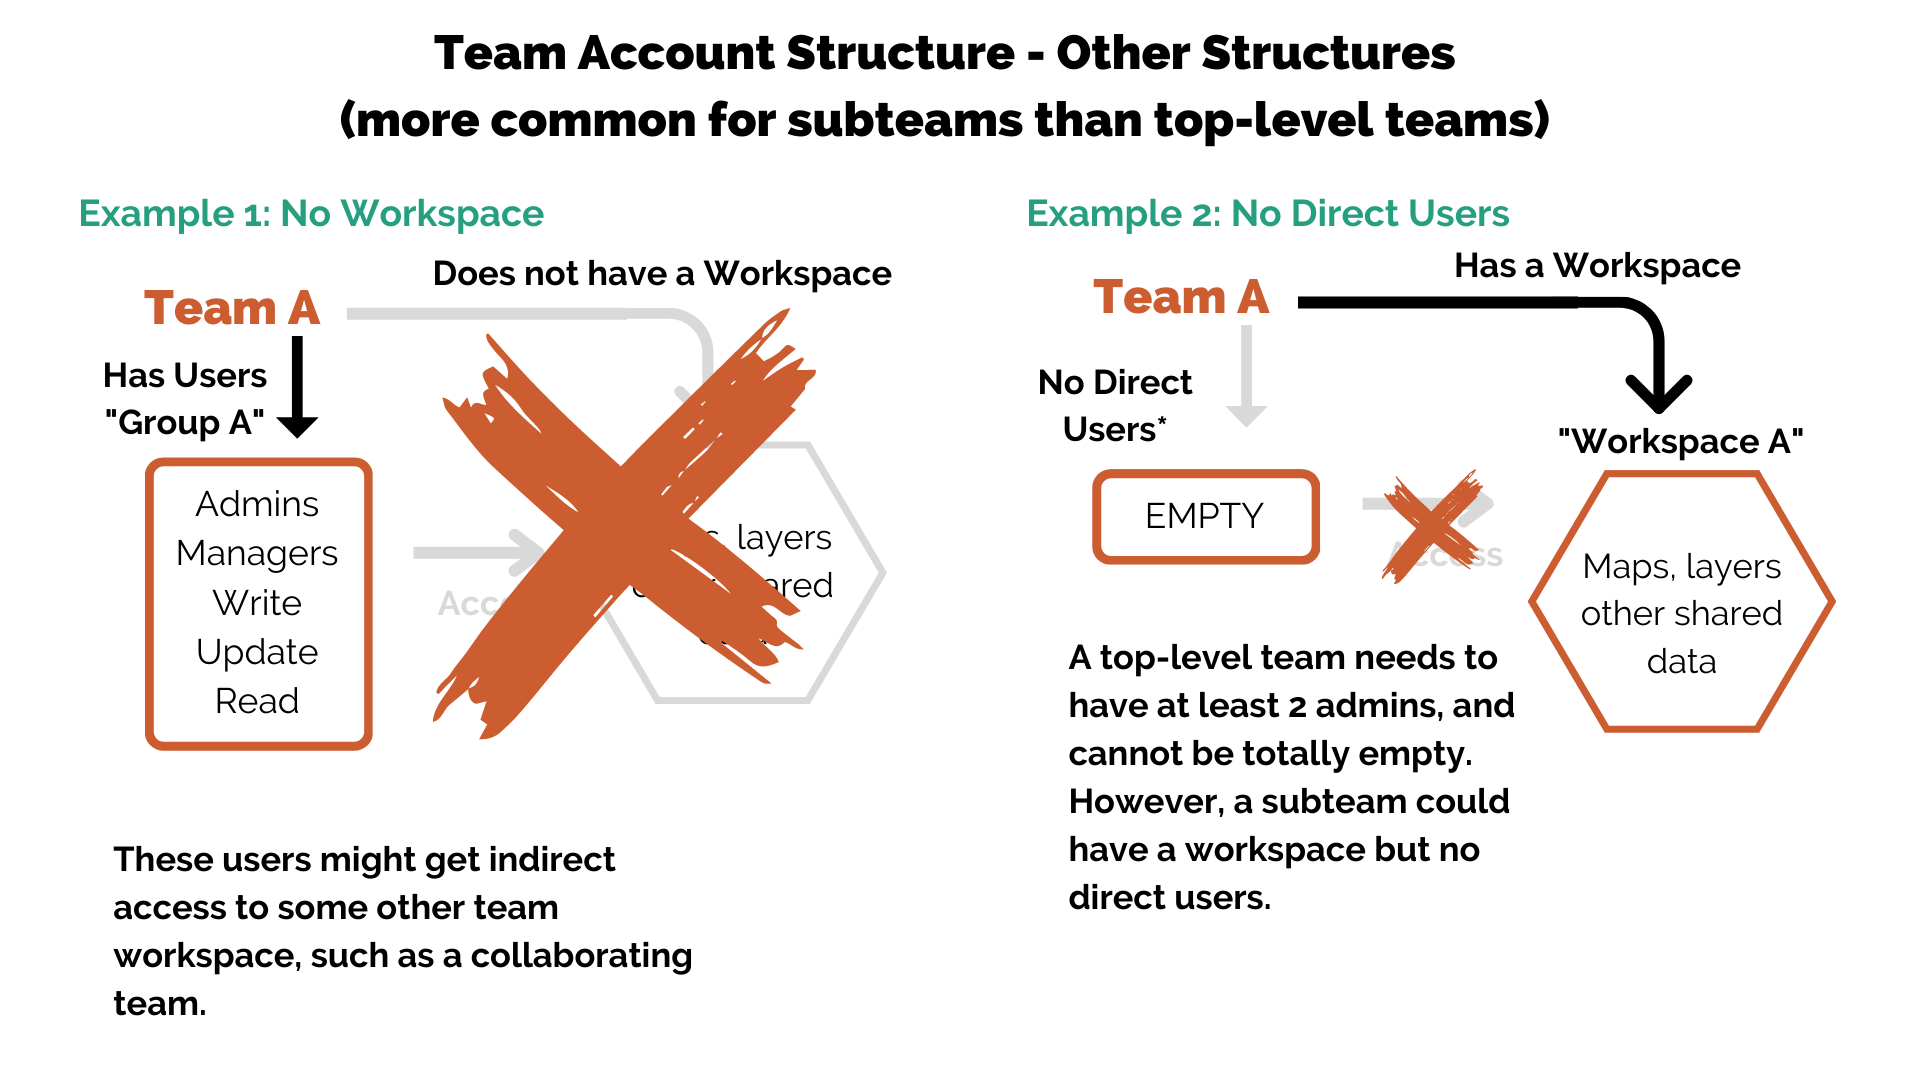
Not all teams will have both a workspace and user groups. By default, both of these are “on” for all teams, but when setting up the structure and workspaces within a team account, strategically sequestering data and users can help manage permissions and access. Note: It might not make sense yet why you would want subteams with only users or only a workspace. We’ll come back to that later!
Administrative Management of Workspaces and Sharing
Now that you understand the difference between a team workspace and a set of users for that team, let’s look at sharing data between teams that each have their own CalTopo Teams subscription.
For team administrators, in the team admin tool you will see tabs for “workspaces” and “sharing.” At the very top of the page is the name of the team for which you are viewing the admin portal. We will call this the “selected team.” In the following example, the selected team is “Training Demo Team.”
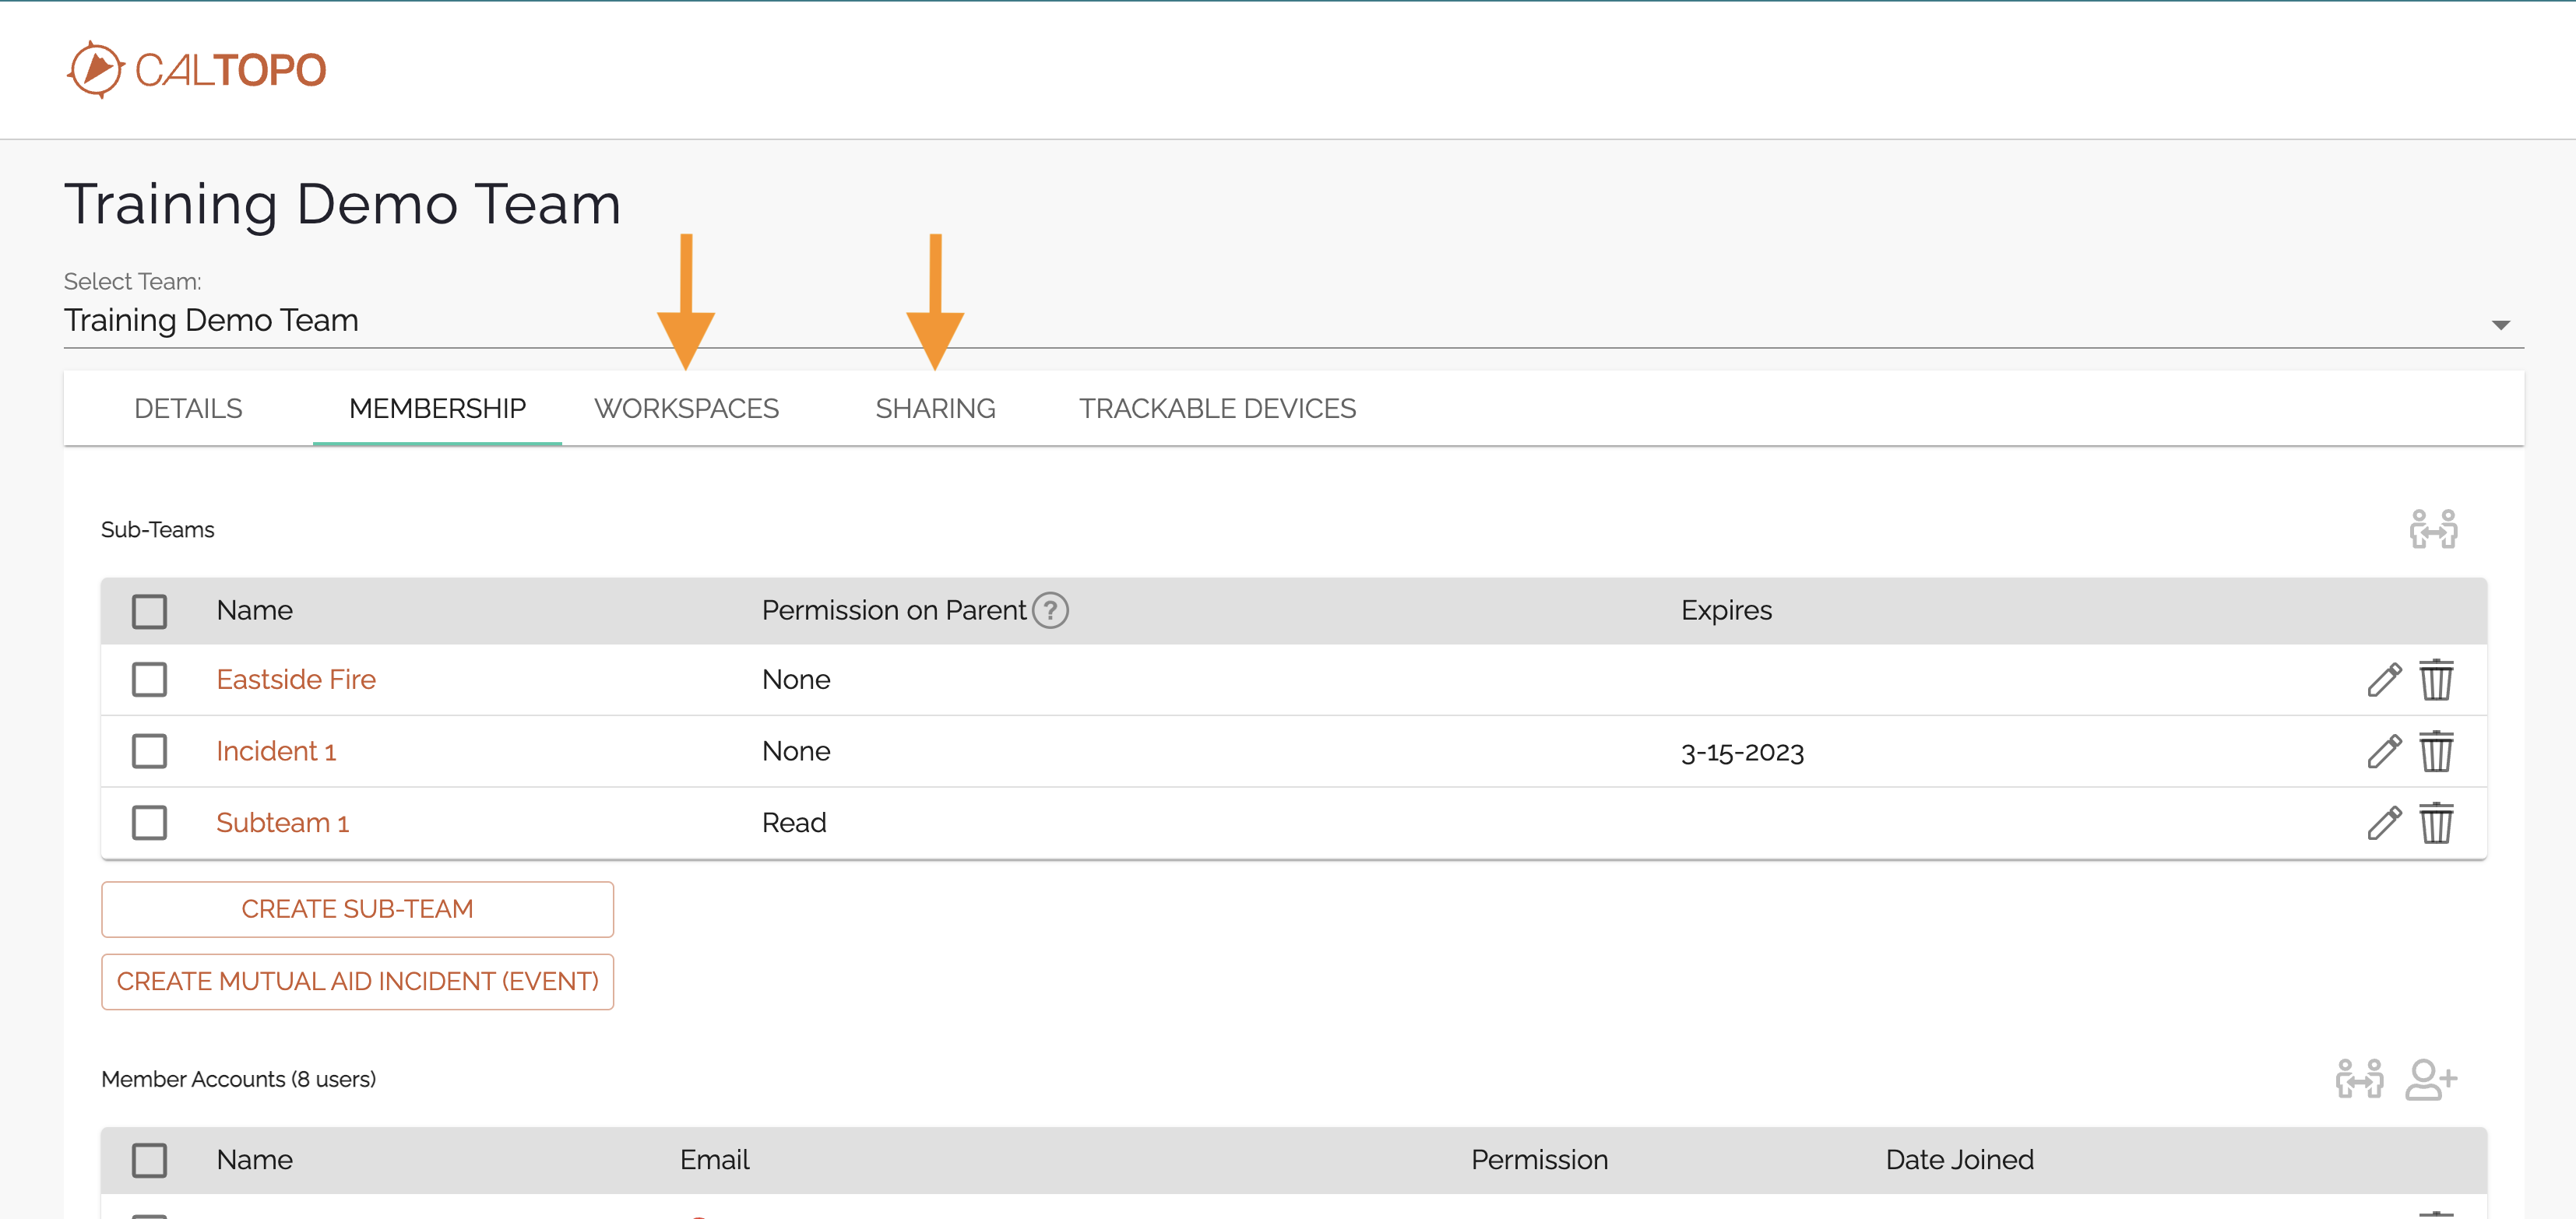
Notice in the image here that there are two subteams and 1 Mutual Aid Incident listed for this team; Eastside Fire, Incident 1, and Subteam 1. Now let’s look at what you can do with the Workspaces and Sharing tabs.
The Workspaces Tab
Think of this section as saying “I can see into the workspaces listed here.”
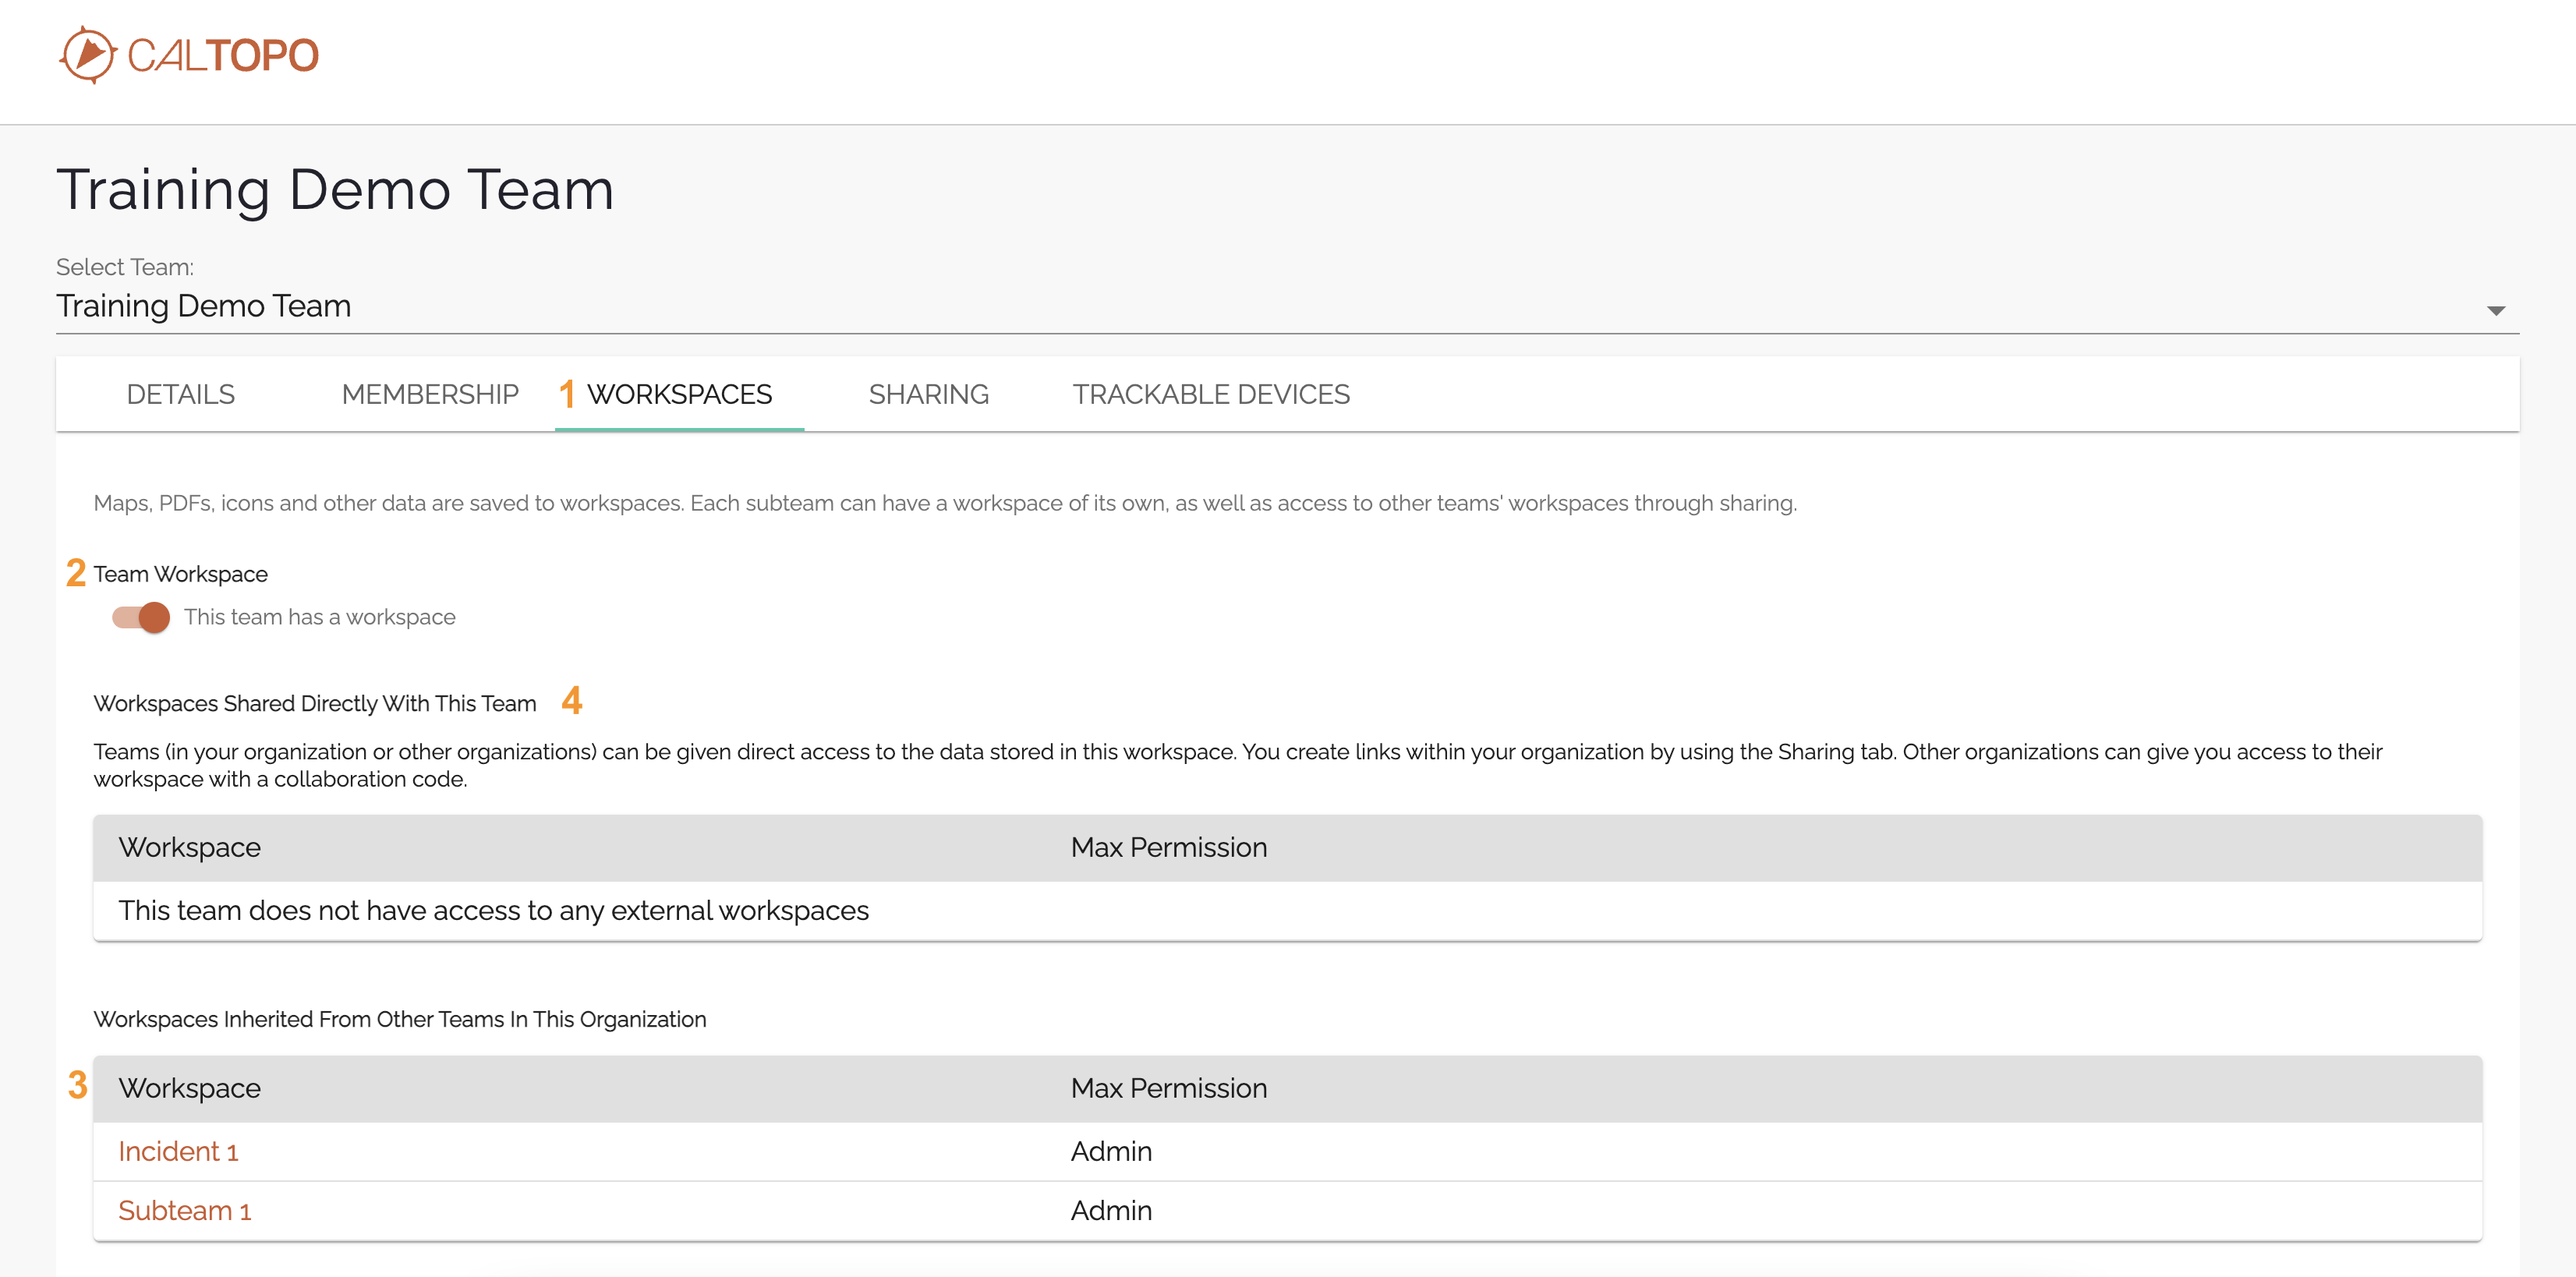
Refer to the image above. The Workspaces tab (1) lets admin users of the selected team (see top of the page) view a list of what other workspaces the selected team users can access. It shows whether or not the given team has its own workspace (2), a list of workspaces that this team can access through inherited permissions (3), and a section (4) listing of any linked workspaces that the team can access indirectly. Direct access means that the users belong directly to the same team as the workspace. Indirect access means that some sort of permission has been granted to an outside workspace that is not owned by the specific team.
Deactivating or (Re)Activating a Team Workspace (2)
- Use the toggle under the “team workspace” title to activate or deactivate a team workspace. The default setting is for the team to have a workspace, and thus this toggle is orange and set to the right in the ON position.
- It is easiest to deactivate the workspace on initial team creation. A workspace with any data cannot be deactivated. You must move all workspace data to a different workspace before you can delete the workspace itself. This has to be done from the MapViewer Your Data tab of CalTopo.
- A user group with no workspace for itself may still access other workspaces with inherited or direct permissions.
Inherited Access (3)
If a parent team has subteams or mutual aid incidents, and downward visibility is turned on for those substeams, then those workspaces are listed at position 3 on the workspaces tab. Similarly, if the Selected Team Notice in the example image that while the parent team contains 3 subteams (Eastside Fire, Subteam 1, and Incident 1), only Subteam 1 and Incident 1 are listed as inherited workspaces. This is because downward visibility into the Eastside Fire subteam is not allowed for the the parent team, the Training Demo Team. For more information about upwards and downwards visibility between subteams and parent teams, see the guide page for subteams.
Shared Workspace Access (4)
When another team invites you to their workspace and you accept, those work spaces will be listed here. These are teams that you do not have inherited or direct access to. The access is activated by way of a collaboration code, covered in the next section.
The Access Tab - Alert - Some Features Currently Disabled
We are making changes to collaborating and sharing between teams. While this is in progress, some features are disabled in the program. To connect teams to each other during this time, please EMAIL HELP@CALTOPO.COM and we will help set you up.
These features ARE still available on Mutual Aid Incidents.
Think of this tab as saying “Who else can see into THIS workspace?”
The Access tab is where team admins can view and control access to the selected team’s workspace. (The orange box in the image below.) There are three sections to this tab.
Teams With Shared Access to This Workspace (1)
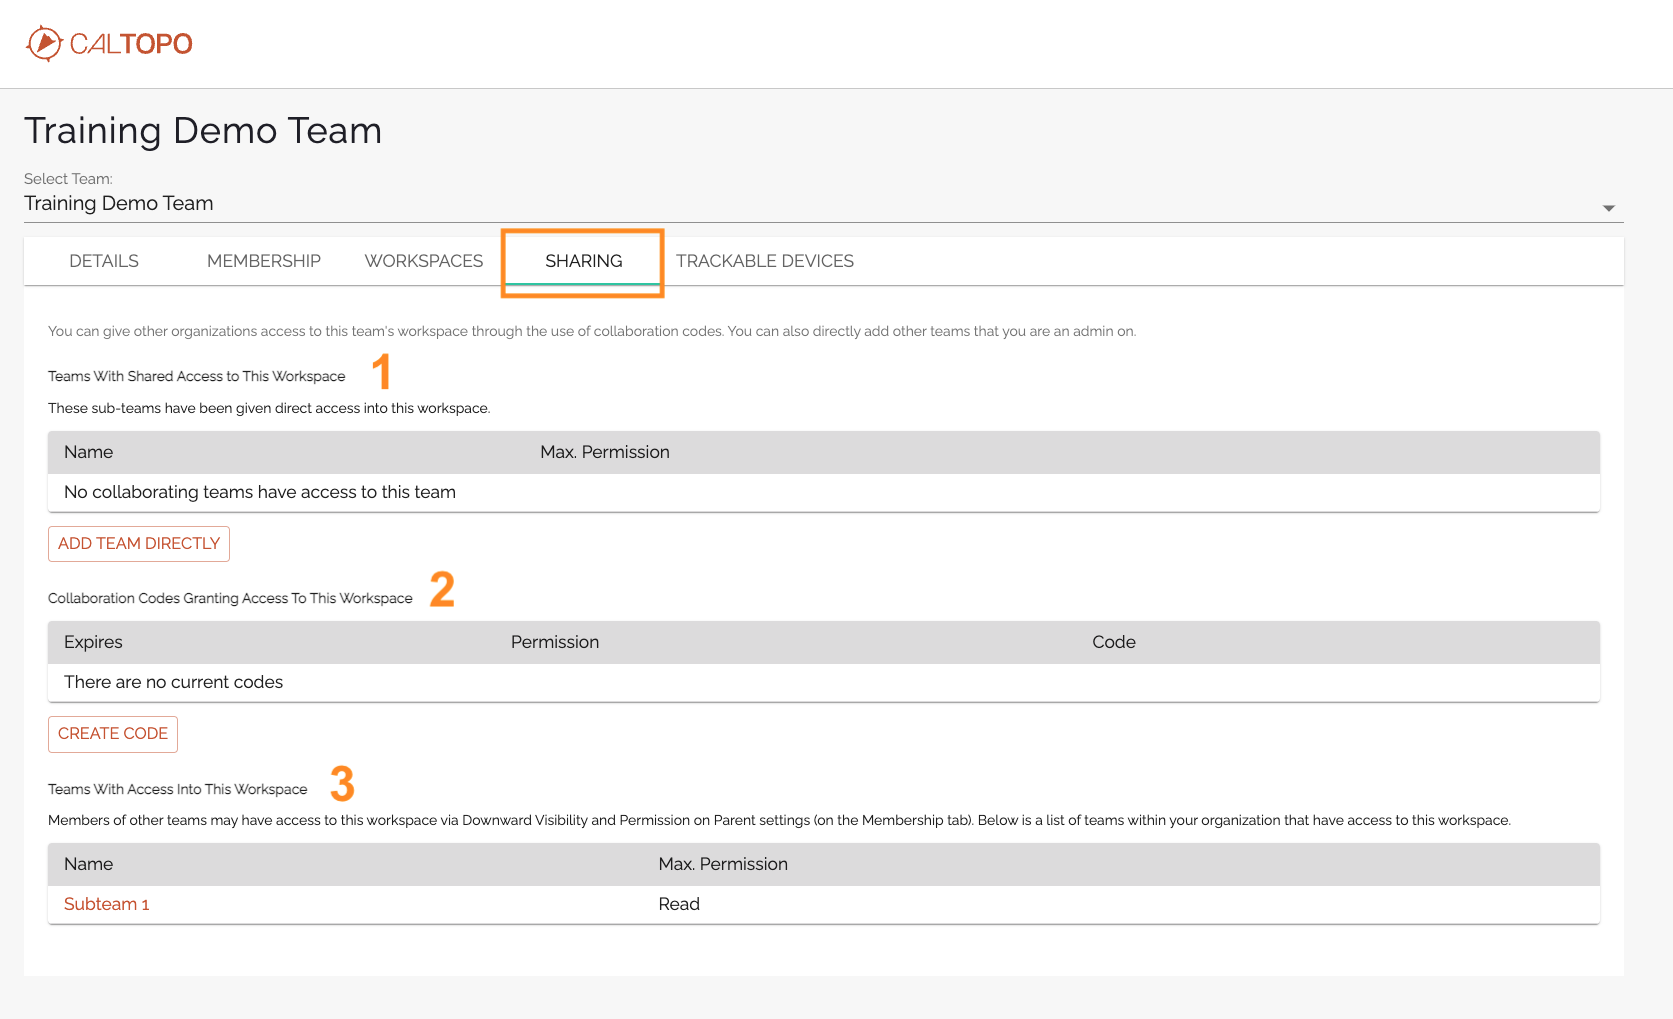
The first section, Teams With Shared Access to This Workspace, shows a list of any teams that are already connected via sharing. (Initially, there shouldn’t be any here, unless some other admin on your team already made the connection.)
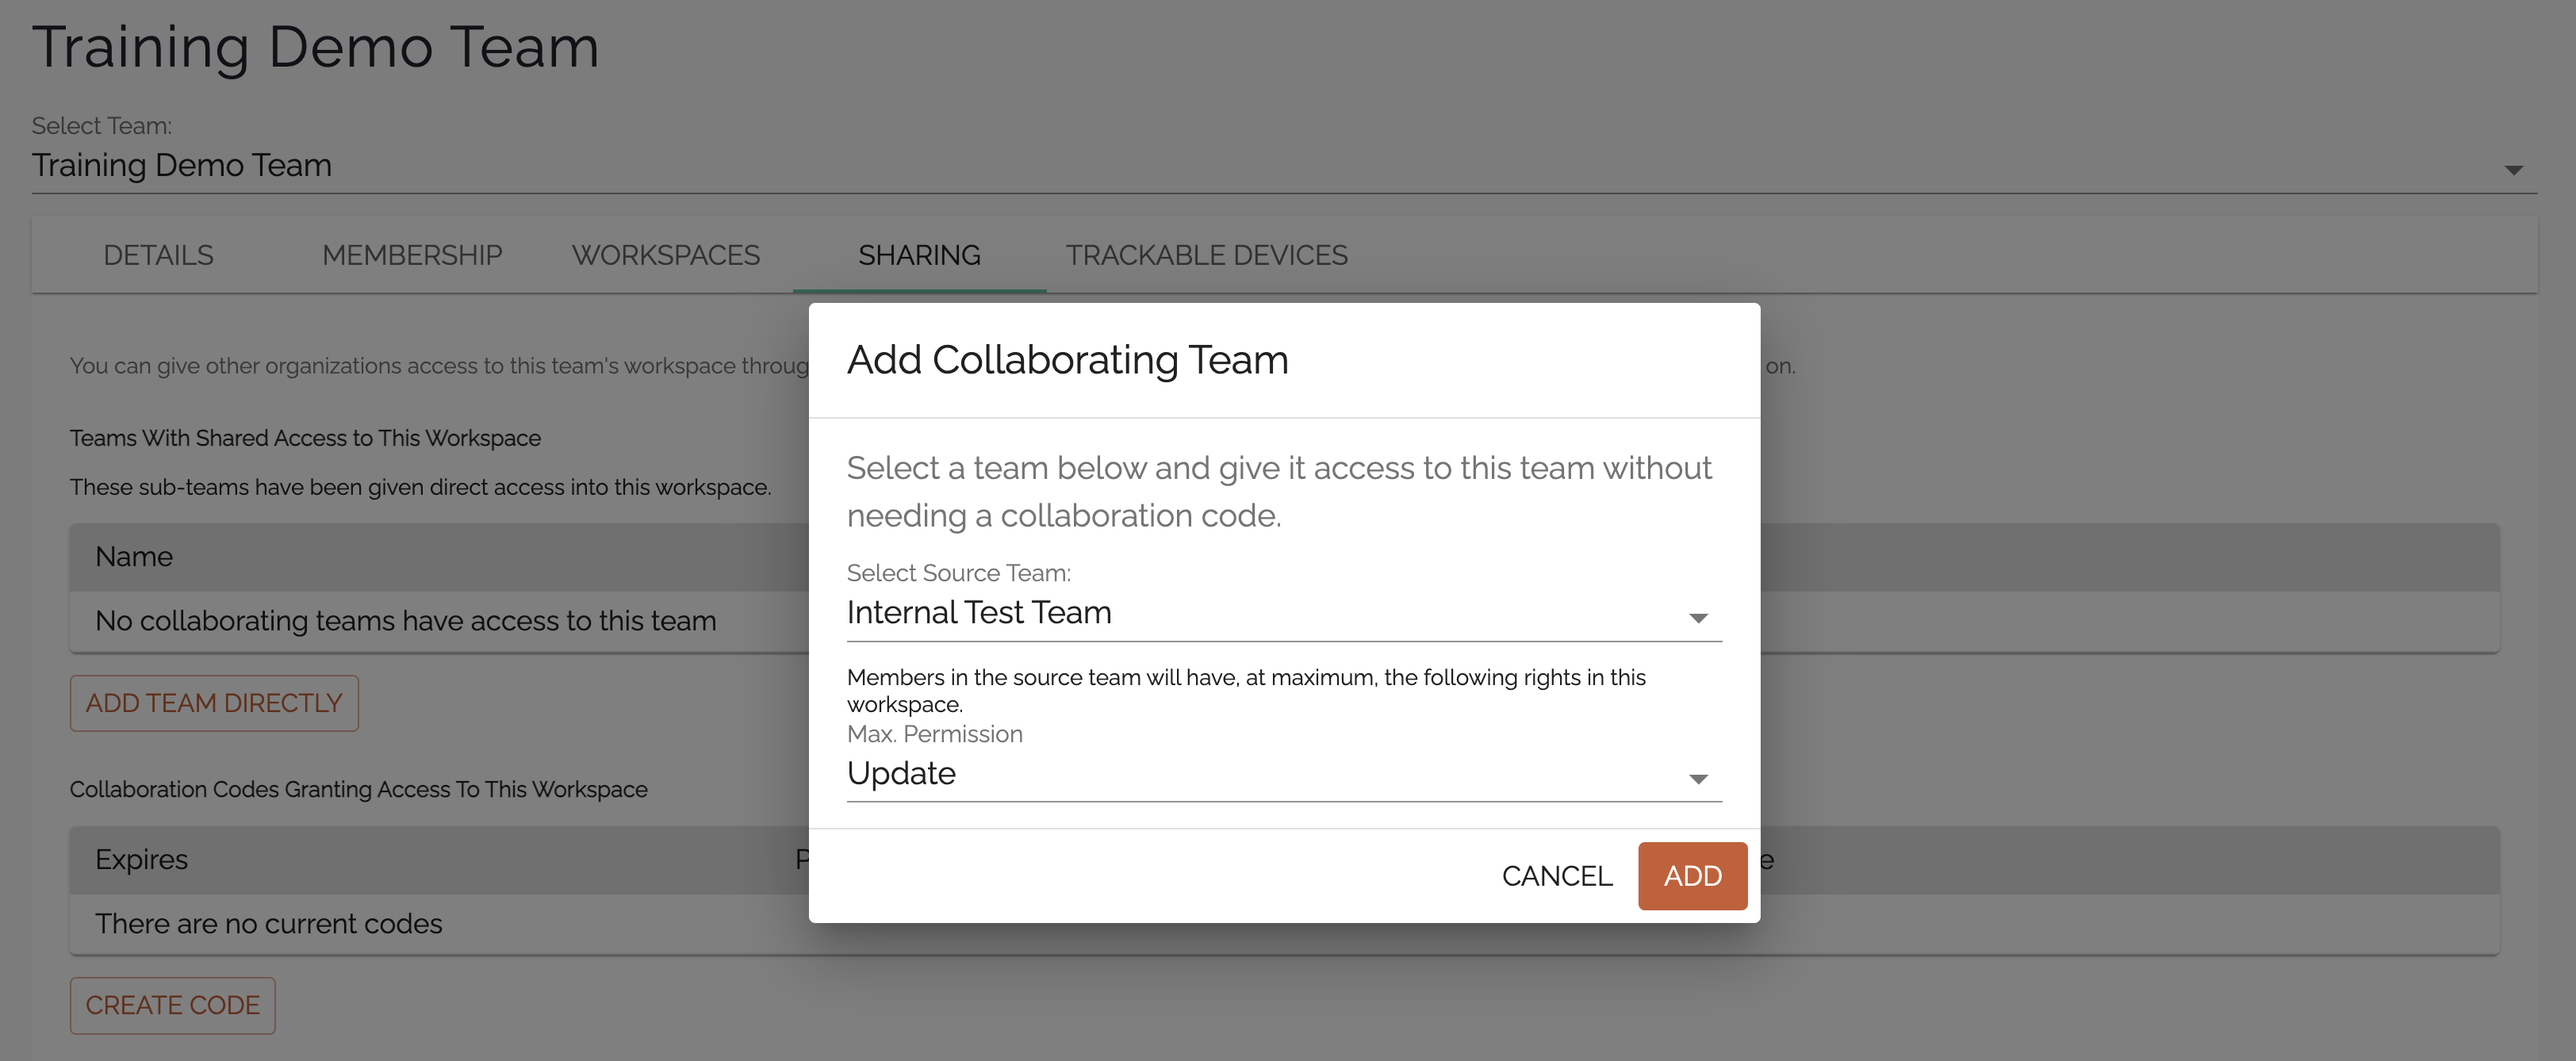
The button here to add a team directly is useful for anyone who is already an Admin on both teams. For example, if an admin of the Training Demo Team was also an admin on the Internal Test Team, that admin could click the button, choose the Internal Test Team, choose a permission level, and add the Internal Test Team.

Maximum Permission levels
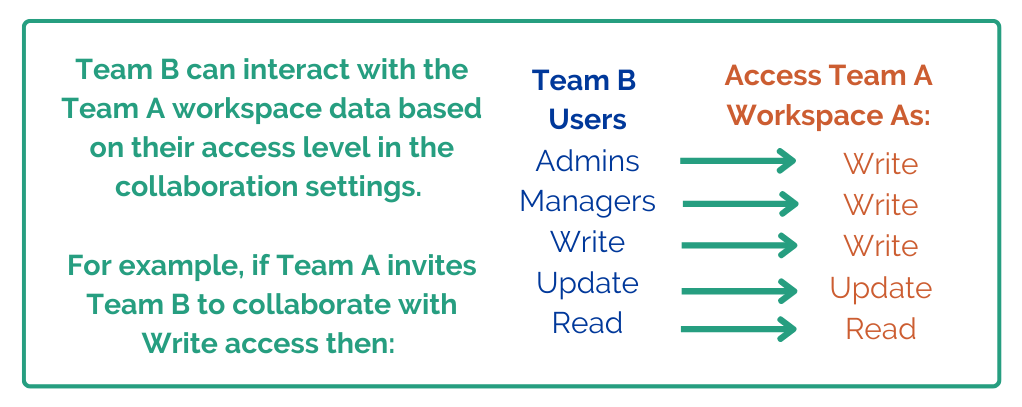
The permission levels are the same as other times you provide access to a team account or incident. The choices are Admin, Manage, Write, Update, and Read. The difference in this case is that since you are giving permission to a whole group of users and you are setting a maximum permission across the group, instead of setting it for every individual. If Team A is inviting Group B users to Workspace A via sharing, Team A might set a maximum permission level of Write for Team B to access workspace A. Group B has users in it with all 5 permission levels - Admin through Read. Thus, the result when users in Group B go to access Workspace A, any Admin, Manage, and Write users of Group B will have Write permissions to Workspace A. An admin from Group B does not get to act as an administrator in Workspace A.
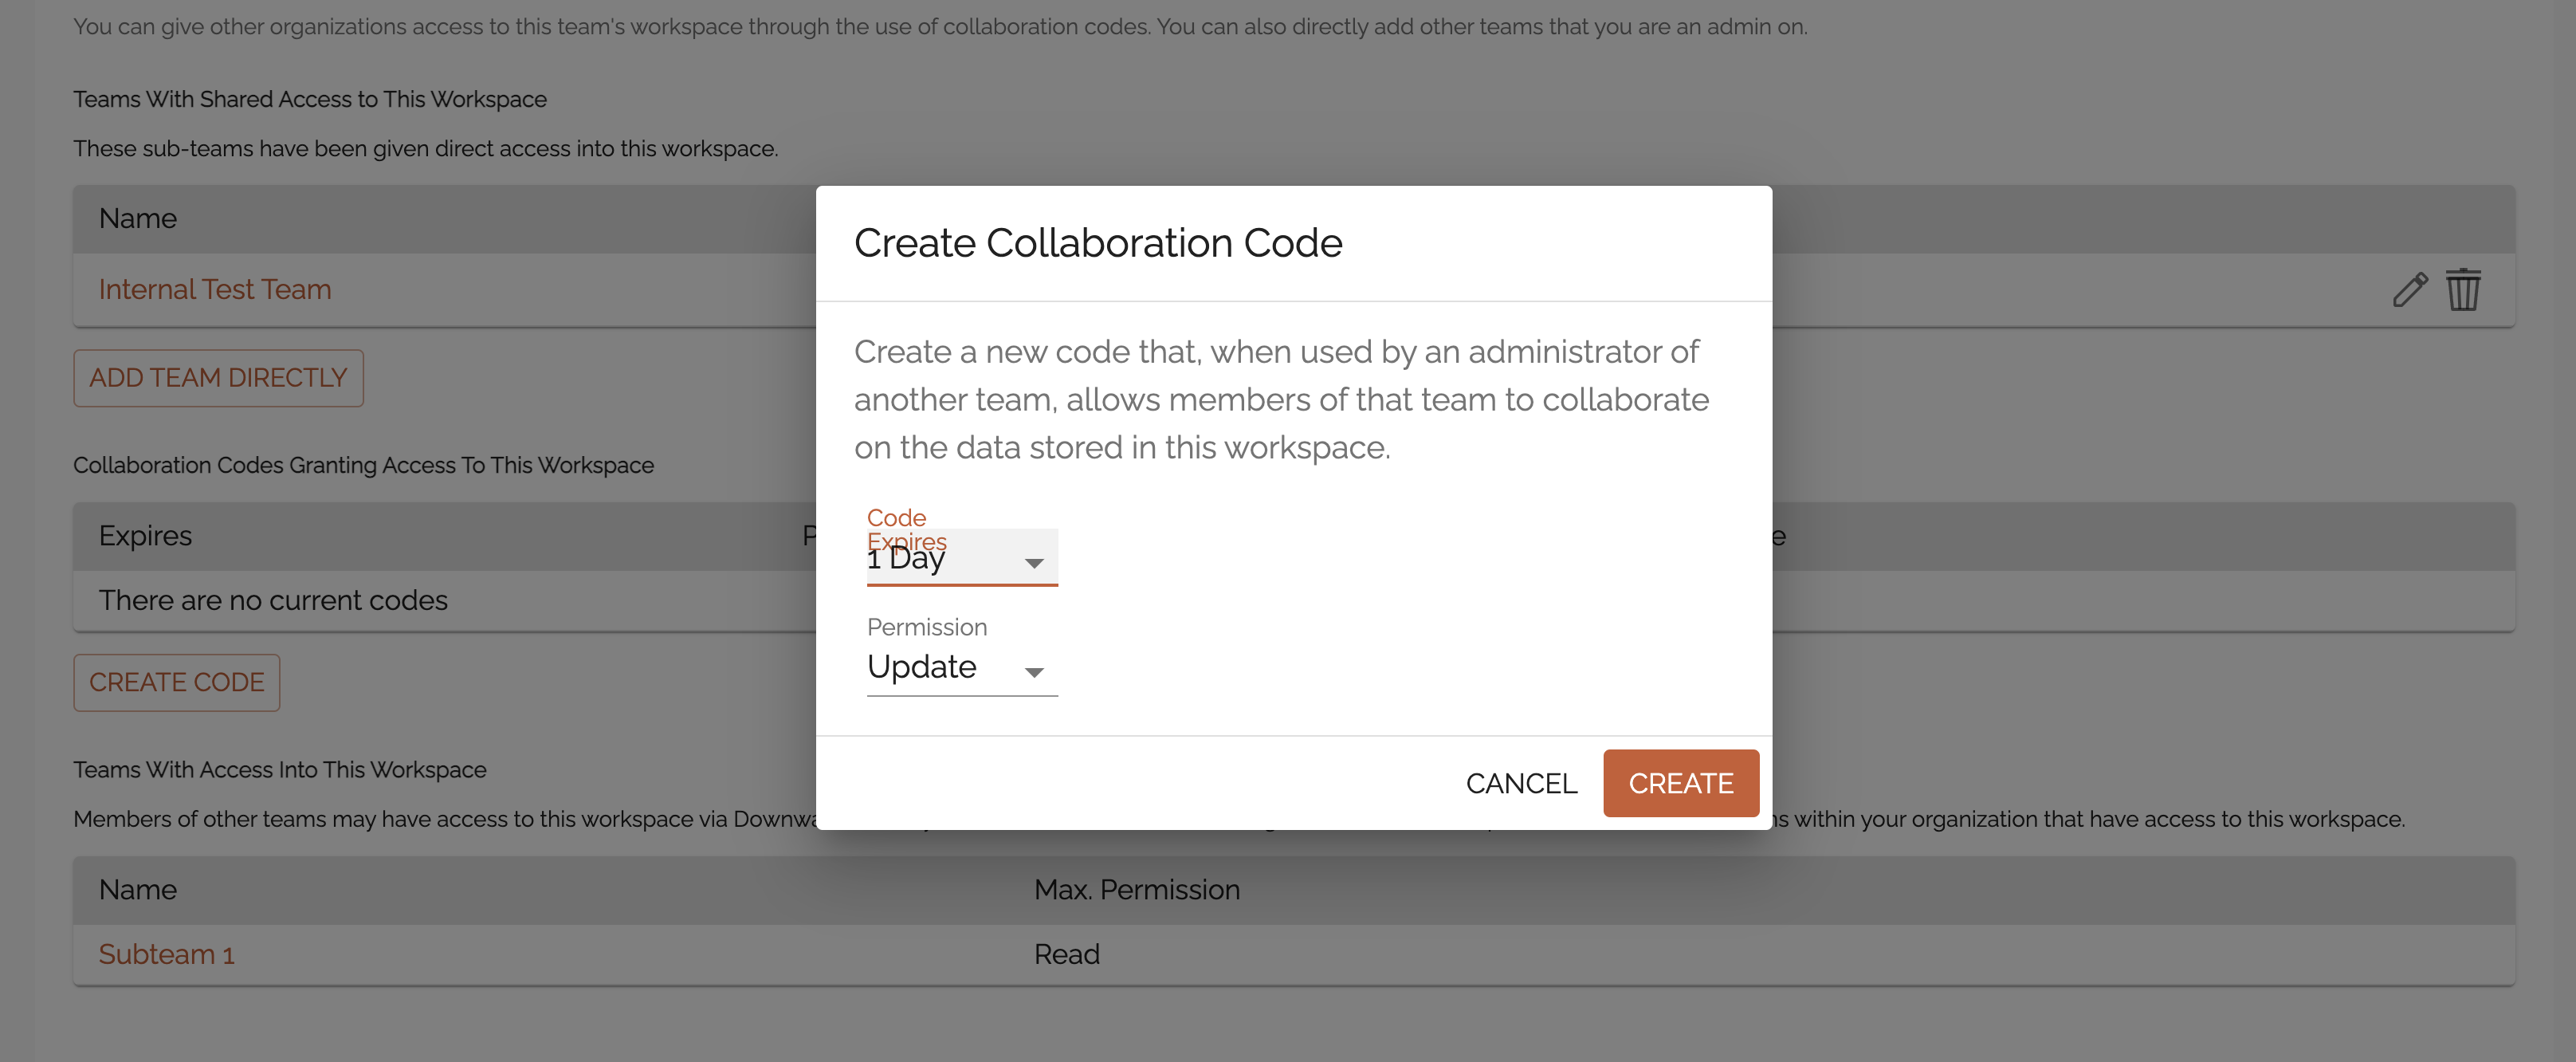
Collaboration Codes Granting Access To This Workspace (2)
Note: Only an administrator can use this code to join their own team to the outside workspace.
Collaboration codes are very similar to join links for users to join a team account. In this case, they allow a whole team to connect rather than an individual. As with individual join codes, here you choose an expiration date for the code, and set a permission level (in this case a maximum permission level.)

Teams With Access Into This Workspace (3)
This is an easy location to get an overall view of which groups have access to your workspace.
Sometimes Groups are able to access the selected team workspace through routes besides direct sharing. This would occur as a result of Parent-Child permissions between Teams and Subteams or Mutual Aid Incidents.
For example, in the demo account that we’ve been looking at, only Subteam 1 is listed as having access to this workspace. If we go back to the membership tab, Training Demo Team has three subteams or incidents. The other two, however, have Permission on Parent set to None. So those groups are not able to see into the Training Demo Team workspace.
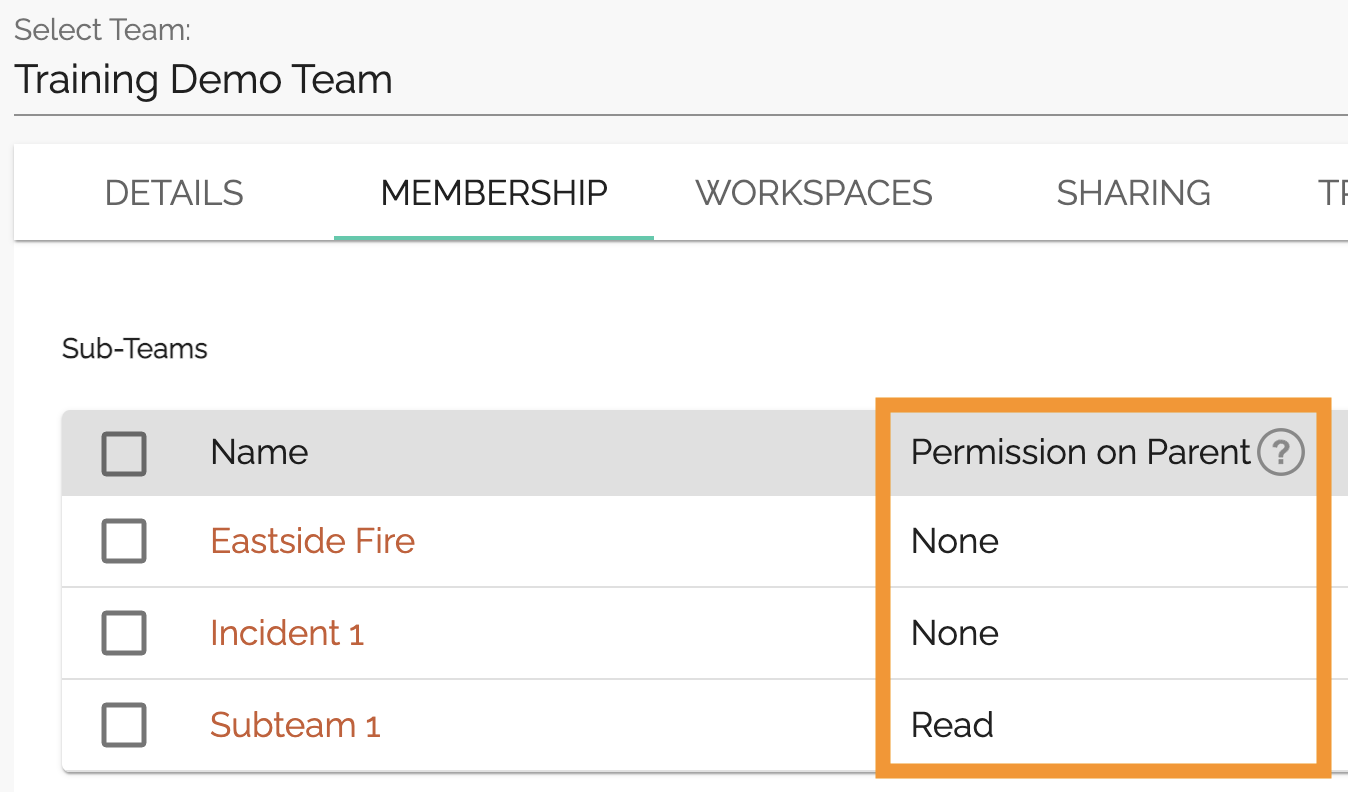
Only Subteam 1 has permission to view the parent workspace, so only Subteam 1 is listed on the Sharing tab.

Collaborating Teams
Now that we’ve covered the nuts and bolts of the sharing and workspace tools, let’s take a look at some of the potential sharing structures.
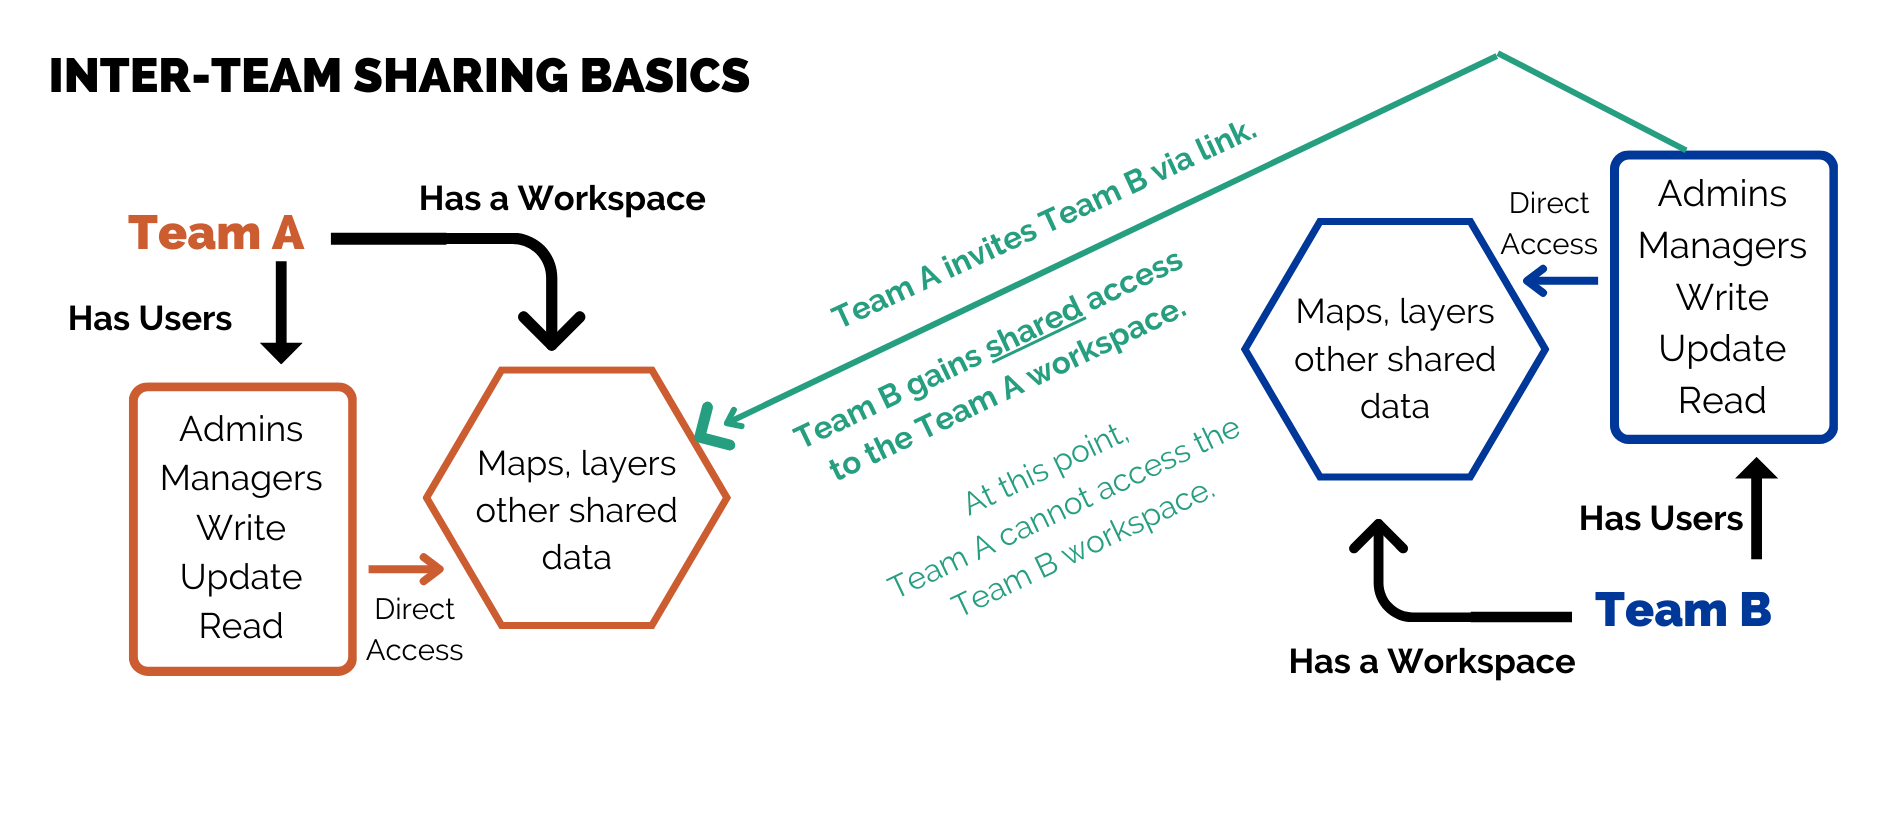
At the simplest level, two primary teams share their workspaces with each other. In these examples, we’ll use Team A and Team B, and refer to the users (Group A and Group B) and workspaces (Workspace A and Workspace B) for each.
In this example, Team A wants User Group B to be able to access Workspace A. An admin from Team A shares a collaboration code with an admin from Team B, who activates it. The result is that Group B users can interact with Workspace A data, including maps, bookmarks, icons, layers, and more.
Meanwhile Team B has NOT invited Group A users to access Workspace B. Sharing only works in one direction. To share in two directions between Teams A and B, sharing must be established separately for each direction.
The result here is that Teams A and B have shared access to Workspace A. Users from either group can, at a minimum, view maps in Workspace A.
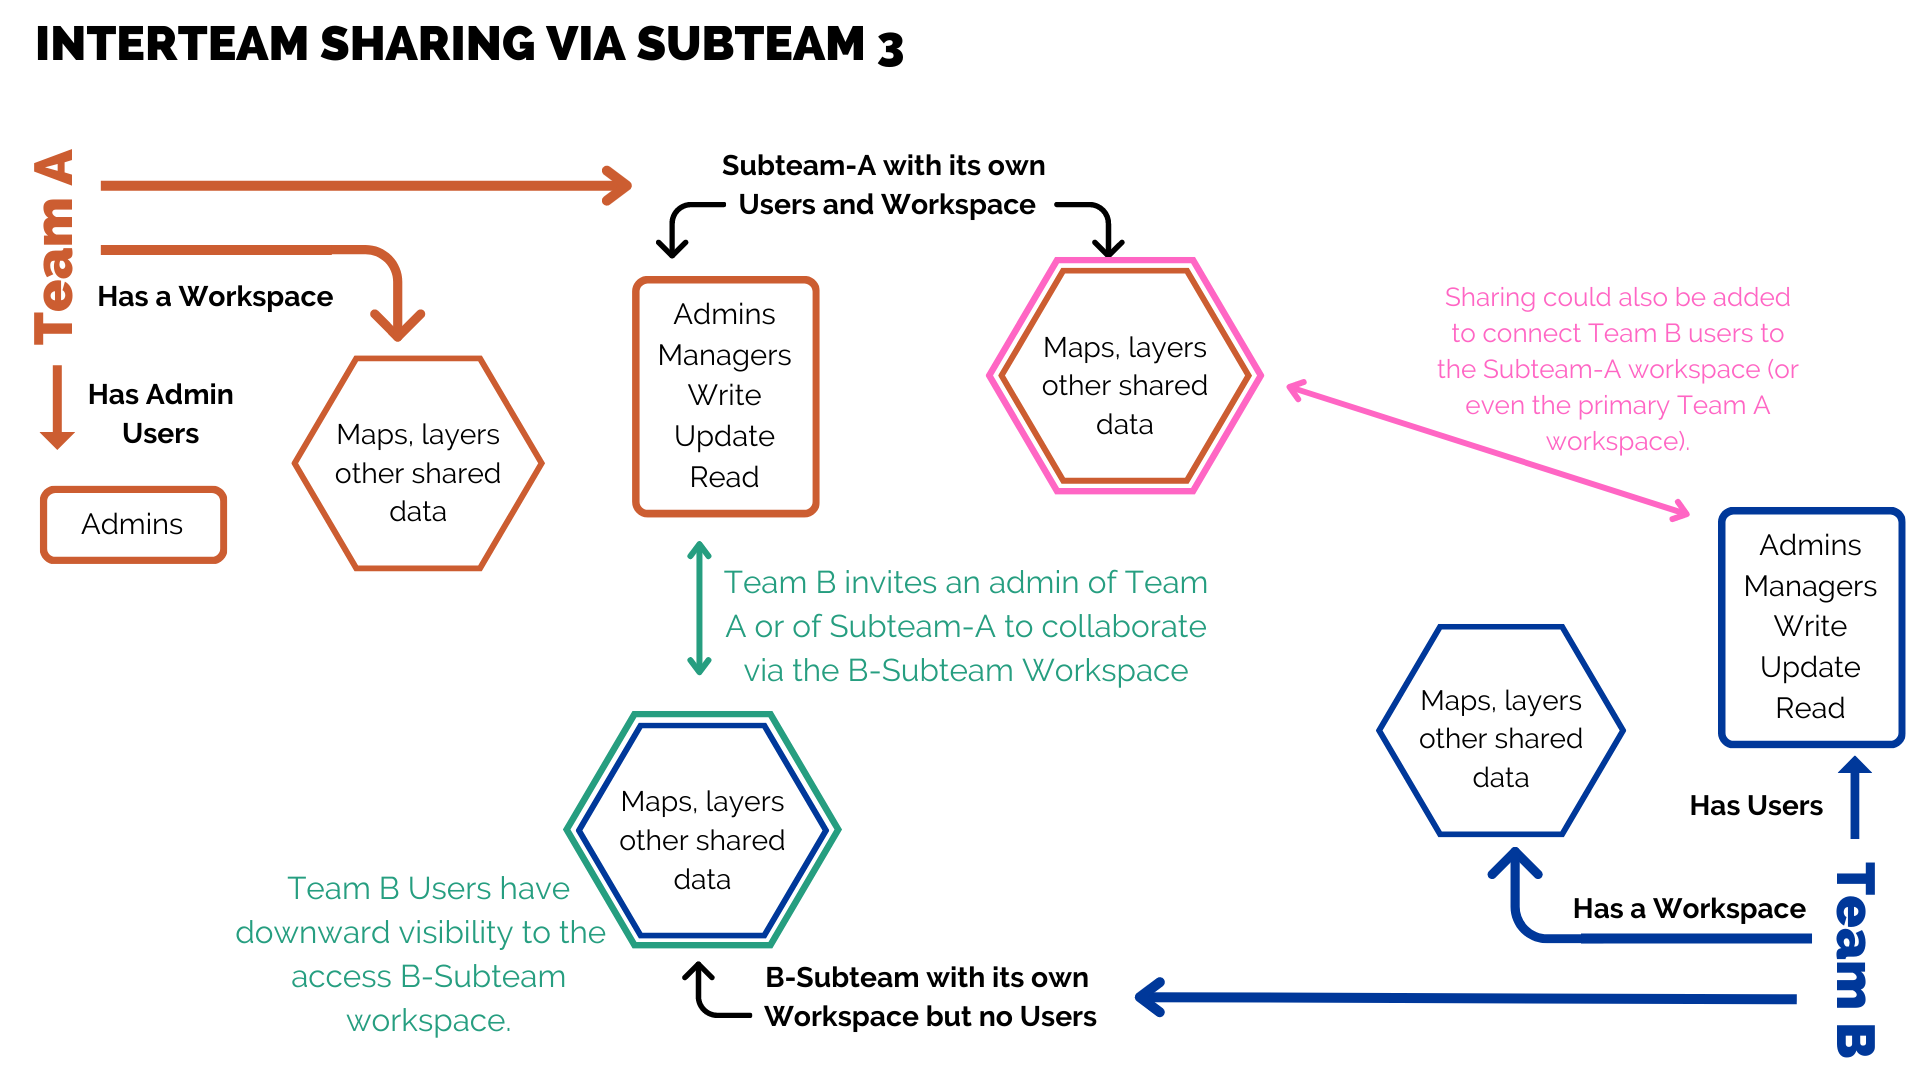
Using Subteams to Create Workspaces for Collaborative Work Between Teams
Collaboration is possible between any user group with any workspace. This means that subteams can share with parent-level teams, or with other subteams. Within the same parent account, two subteams could share with each other.
A common use case for sharing using subteams is two organizations that want to share some maps, but not all of their team account data. One team, Team A, can create a subteam for sharing, and invite Team B to collaborate on that subteam. Thus, the two teams have a shared space to access maps.

Note: Collaboration permissions are limited to a single workspace. In the example above, Team B does NOT get permissions to view upwards from the Subteam-A workspace into the Team A workspace.
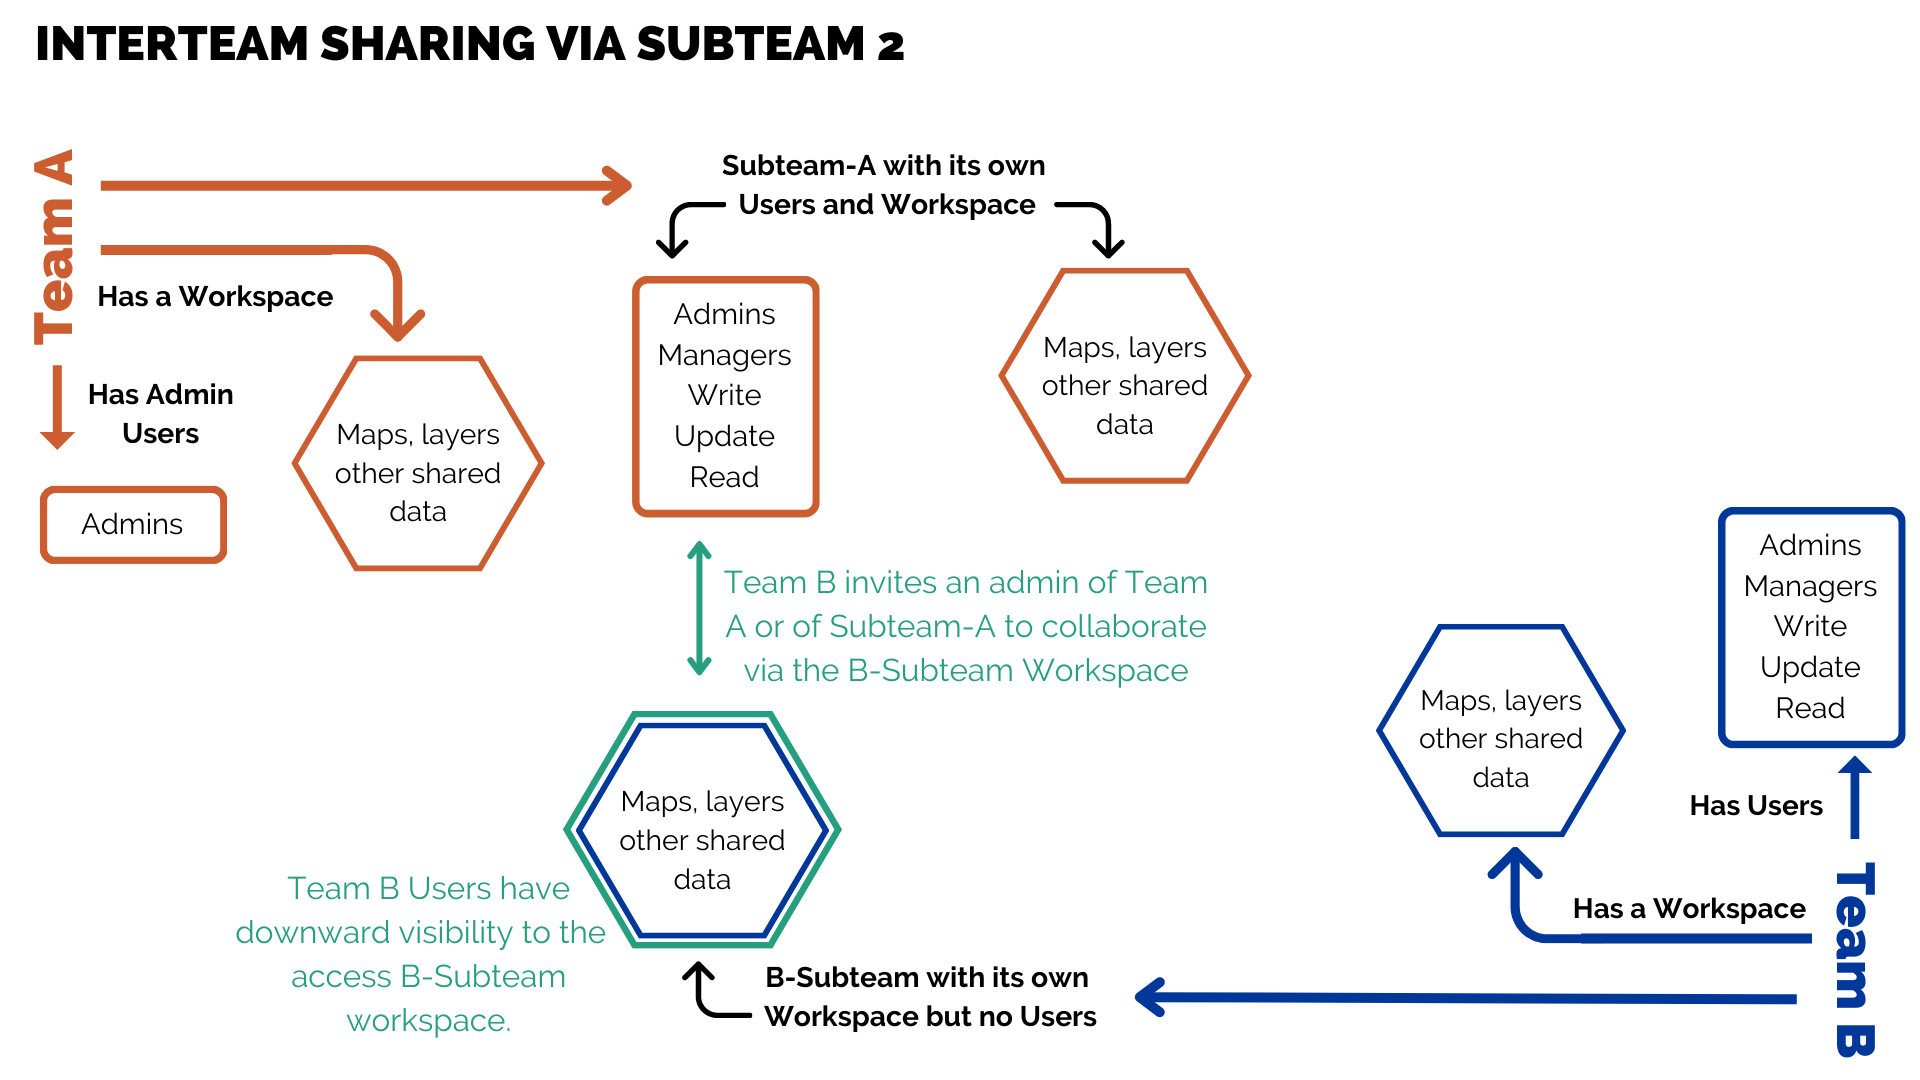
In the above example image:
Team A
- Has most of its members in a subteam called Subteam-A.
- Only a few admins are in the parent team
- Active group maps for Team A are in the Subteam-A workspace.
Team B
- Has a subteam called B-Subteam, where it can put maps and data
- All users remain in the parent Team B, and it’s primary workspace is the Team B workspace.
- The B-subteam workspace is used for sharing with Subteam-A. For shared incidents, Team B or Subteam-A save maps to the B-Subteam workspace.
Teams A and B can go one step further and connect the Team B user group to the Subteam A workspace. This may or may not be necessary, depending on the permission levels for Subteam-A users to the B-subteam workspace. If Team B is willing to provide permissions to Subteam-A users to manage maps in the B-Subteam workspace, then Team A users can add their own maps to the same shared workspace, and remove them if sharing is no longer needed on those maps.
However, if Team B does not allow high enough permissions, then for Team A to share maps with Team B, they may need to create a separate connection, as shown below in the image.
Bookmarks and Collaboration
Bookmarks are a tool for sharing the same map across multiple workspaces.
At the individual level, a bookmark is a way to save a link to a map that the individual does not own. At the team workspace level, this concept can be used to save a link to a map that the workspace itself does not own.
For example, if team A has a map that it wants its own members/user group to be able to have write access to, but it wants the B-subteam to be able to have Update access to that map, Team A can give an update sharing link for that map to someone on Team B. The Team B user bookmarks the map and then moves that bookmark to the B-Subteam workspace.
In this way, Team A can maintain top-level management of the map, while sharing it across mutliple workspaces.
A note of caution: bookmarking a map to the same team workspace that owns the map can cause permission level changes that you may not expect. Have a plan, have an admin available, and practice bookmarking with maps that are not mission critical in order to learn how to implement this tool.