Making your First Map
let's begin
Now that you have some familiarity with the map viewer and the tools available, let's take a look at the true beauty and power of CalTopo: making detailed and personalized maps.
The purpose of this training is to walk you through creating your first map on the web app, starting with the log in process and finishing with viewing your map on your mobile device.
Topics on this Page:
- Login or Sign Up
- Navigate to an area
- Add an Object such as a marker
- Save your Map to your account
- Change Base Layers and Overlays
- View your Map in the Mobile App
- Create and Save a Map in the Mobile App
- Print your Map to PDF or JPEG
How to Create Your First CalTopo Map
Turn up the volume so you don't miss any of the steps for creating your first map in this video! This video is from before we merged the servers- you no longer need to choose CalTopo or SARTopo when you log in. All users should use CalTopo to log into the program. All other steps are the same.
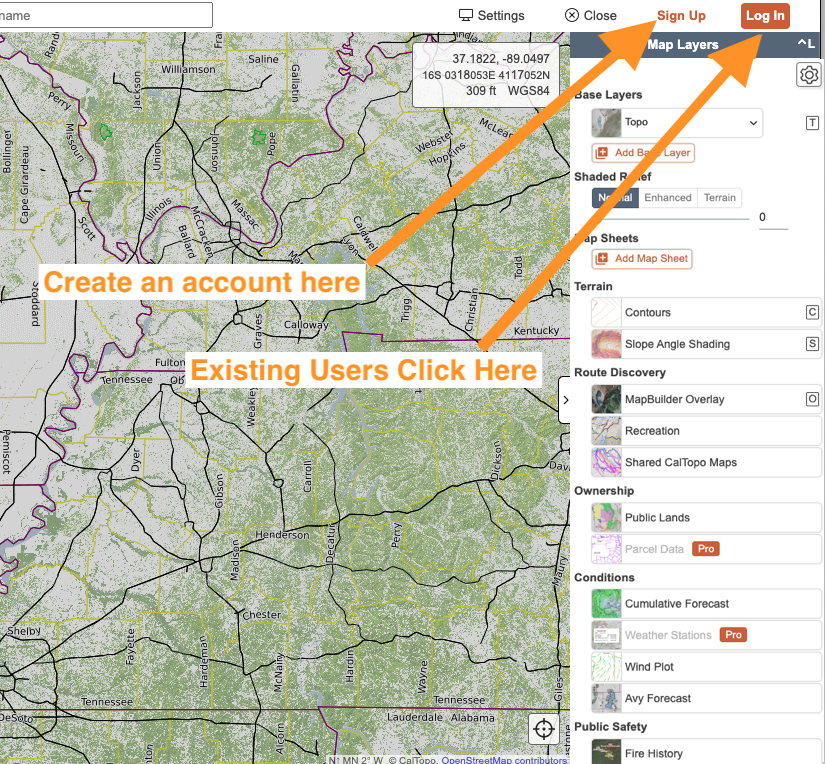
STEP 1: LOG IN OR SIGN UP
To get started, head to caltopo.com. While not strictly required to create a map or use the product, you will not be able to save your work unless you login.
If you have an existing CalTopo account, click the orange Log In button in the upper left to log into your CalTopo account.
If you do not have a CalTopo account, you can create a free account using an existing email address. Click the Sign Up button in the upper left to create your CalTopo account.
When logging in, it's important to use the same provider as you did previously. Logging in with Facebook when you used Google in the past will try to create a new account, even if it's the same email. If you aren’t sure what provider you used, you can find it in your welcome email from when you signed up for your new account.
For more information about CalTopo logins, visit the Account Creation and Login section.
First responder?
Are you a first responder and looking for the first responder tools? Since we merged the CalTopo and SARTopo servers in December 2021, first responders no longer need to log into SARTopo. All users (including first responders) now log into CalTopo and first responder tools (such as assignments and clues) are tied to the map mode, which is described below.
STEP 2: Navigate in the Map Viewer
You can search for specific areas or locations by using the search bar in the top of the mapviewer. Search for areas by their name or any coordinate system. For this lesson, let’s search for Capitol Peak (a 14,000 ft peak in Colorado). If you type “Capitol Peak” into the search bar and press enter , it will navigate to the peak.

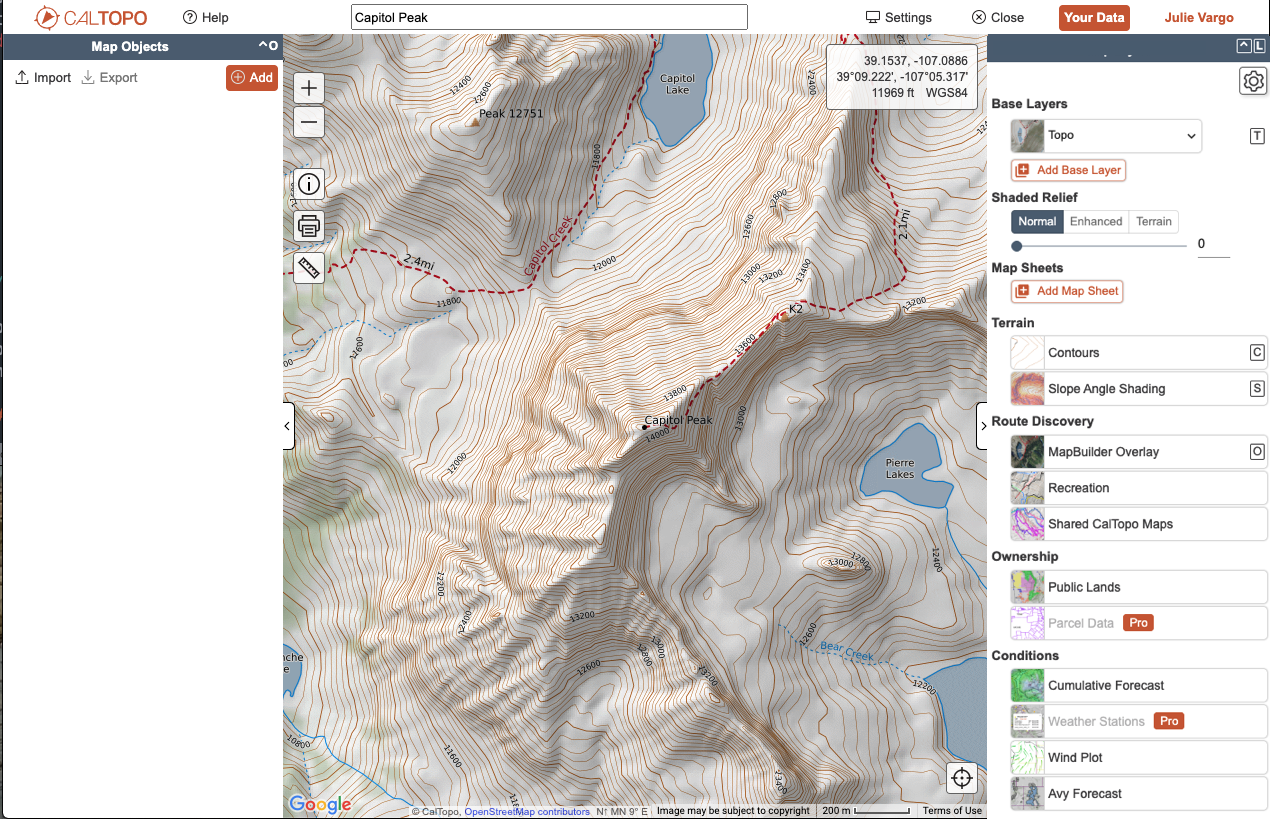
You should now confirm that you are viewing the correct area, especially if you search for an area with a really common name (Bridalveil Falls, anyone?). To confirm, zoom in and out a bit and move the map around until you are sure there are some nearby things that make sense for what you were looking for.
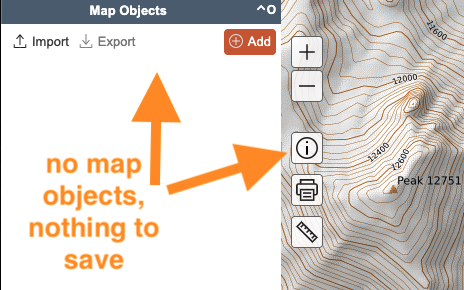
STEP 3: Add an Object
Before you can save a map, you have to add an object such as marker, line or polygon. This is really important so I’ll say it again: you CANNOT save a map until you’ve put an object on that map.
You can add objects three different ways:
- Use the +Add button in the Objects menu on the left side of the map viewer.
- Choose a location on the map with your mouse and right click on that point to get a dialog that includes the option to add a select number of objects, including markers and lines.
- Some objects have keyboard shortcuts. Use the keyboard shortcut shift+M for a marker, and the shortcut shift+L for a line.
For this example, I've made a new marker using the +Add button at the top of the objects menu. Markers are a great way to identify points of interest on your map. A marker will appear in the center of the map and a dialog will appear In the bottom left.

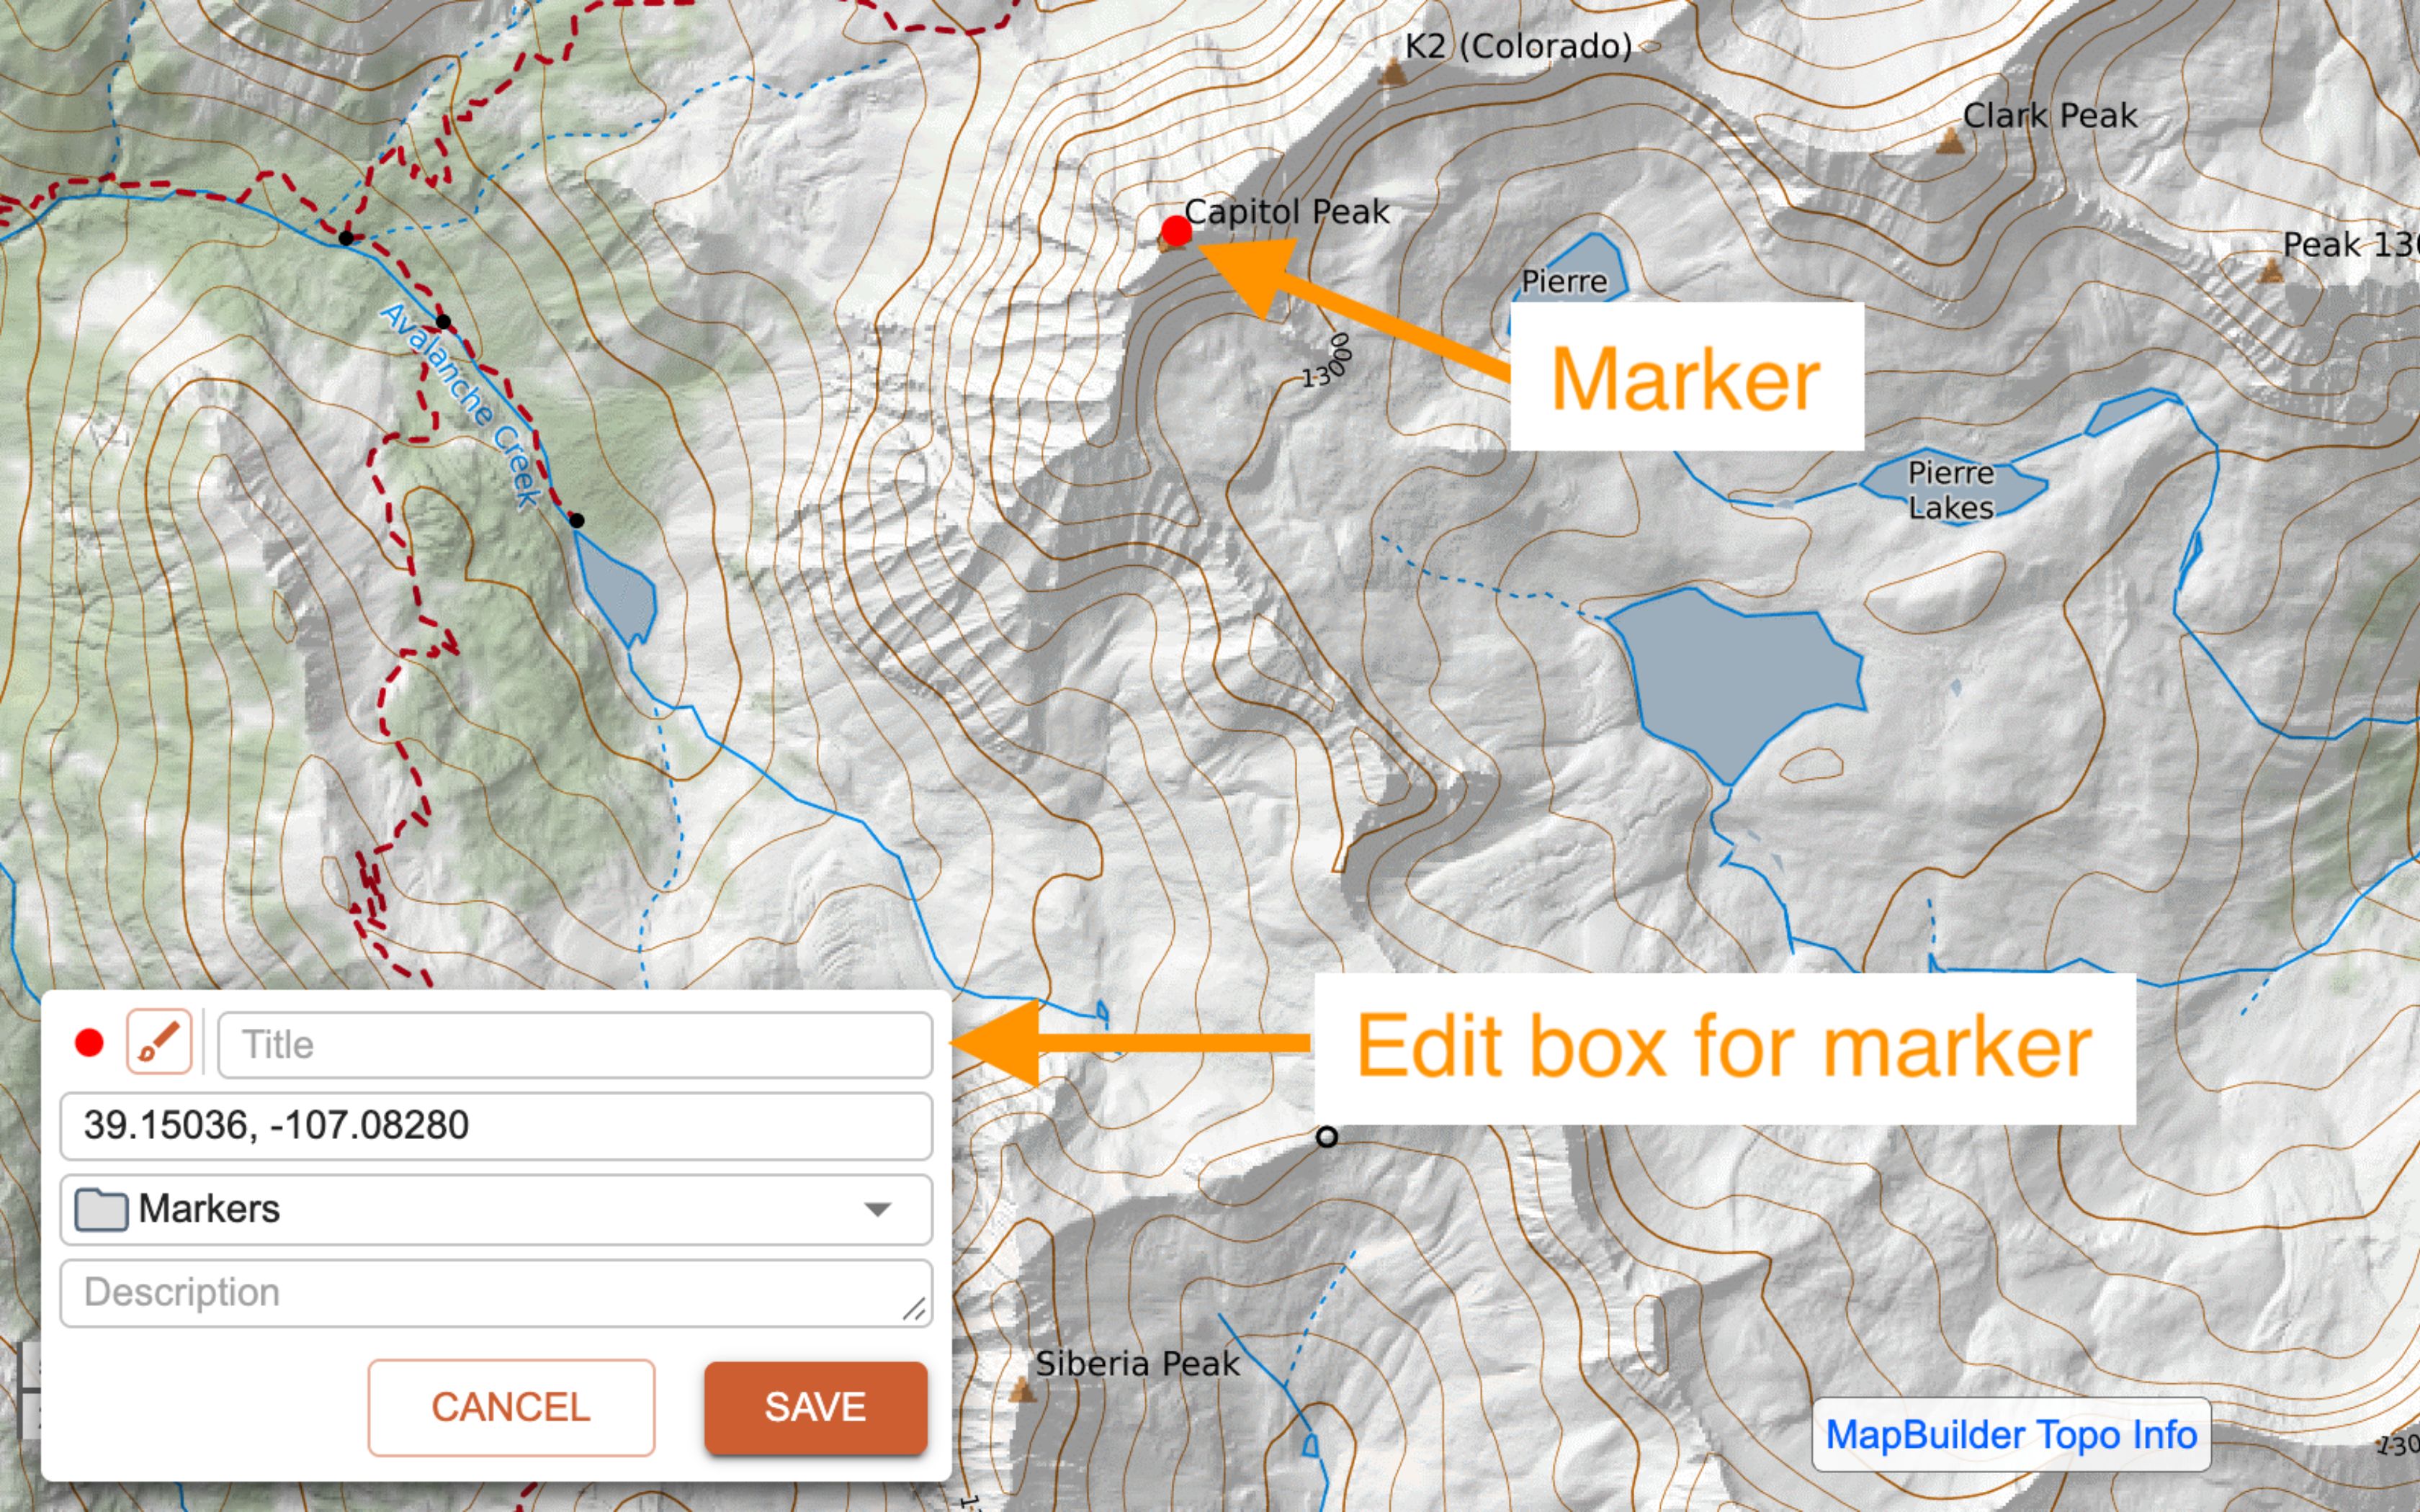
You can move the marker by either clicking and dragging the marker on the map to where you want it to be or entering in coordinates in the dialog box. You can also edit your marker using the dialog box.
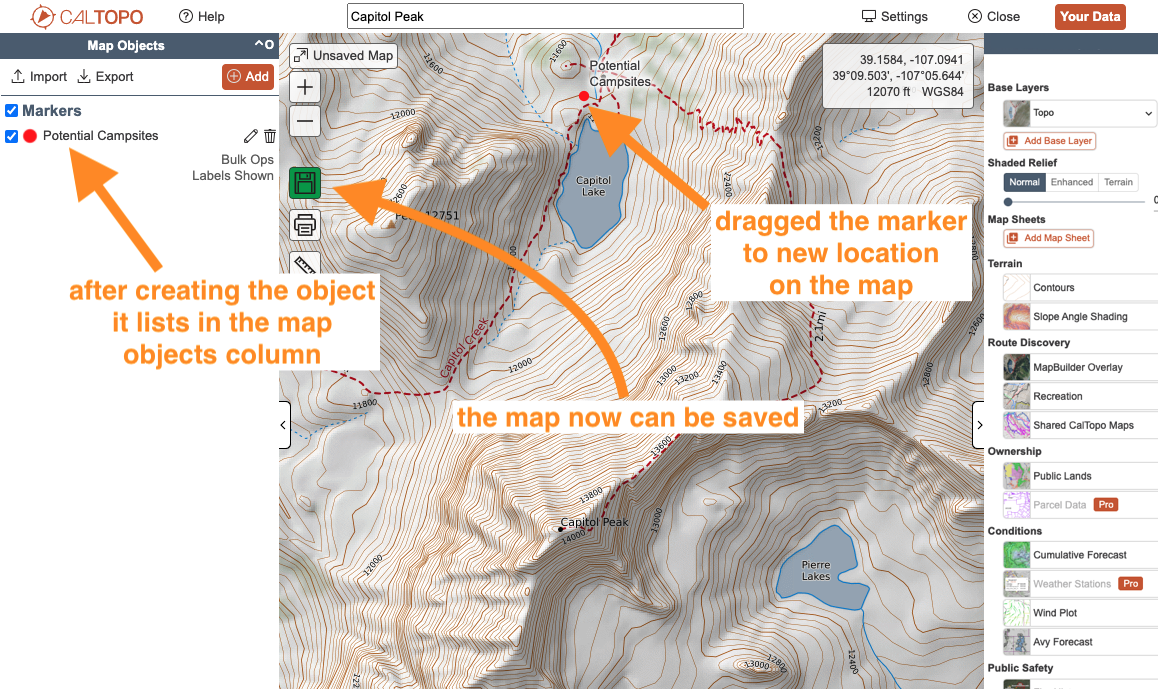
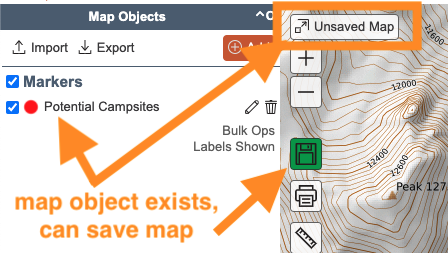
For this example, I clicked and dragged the marker to the north shore of Capitol Lake where I think there will be campsites. I named the marker “Potential campsites” by typing this into the Label field in the dialog box. Pressing OK then closes the dialog box and the marker now appears on the map with its label. The marker also appears in the *Objects menu in a folder called Markers**.
Markers and other objects have a huge amount of capability. They are fully explained in the Objects chapter.
STEP 4: Save Your Map
You can only save a map after you have added an object to that map. If you add objects to a map and then close the browser window before saving the map, your data will be lost. So make sure to save your map as soon as you can!
In this example we added a marker to our map so now the info button for the map becomes a green save button.
A Save As dialog will also appear automatically after you add your first object to the map. Alternatively you can click the green save button to bring up the Save As dialog on an unsaved map.
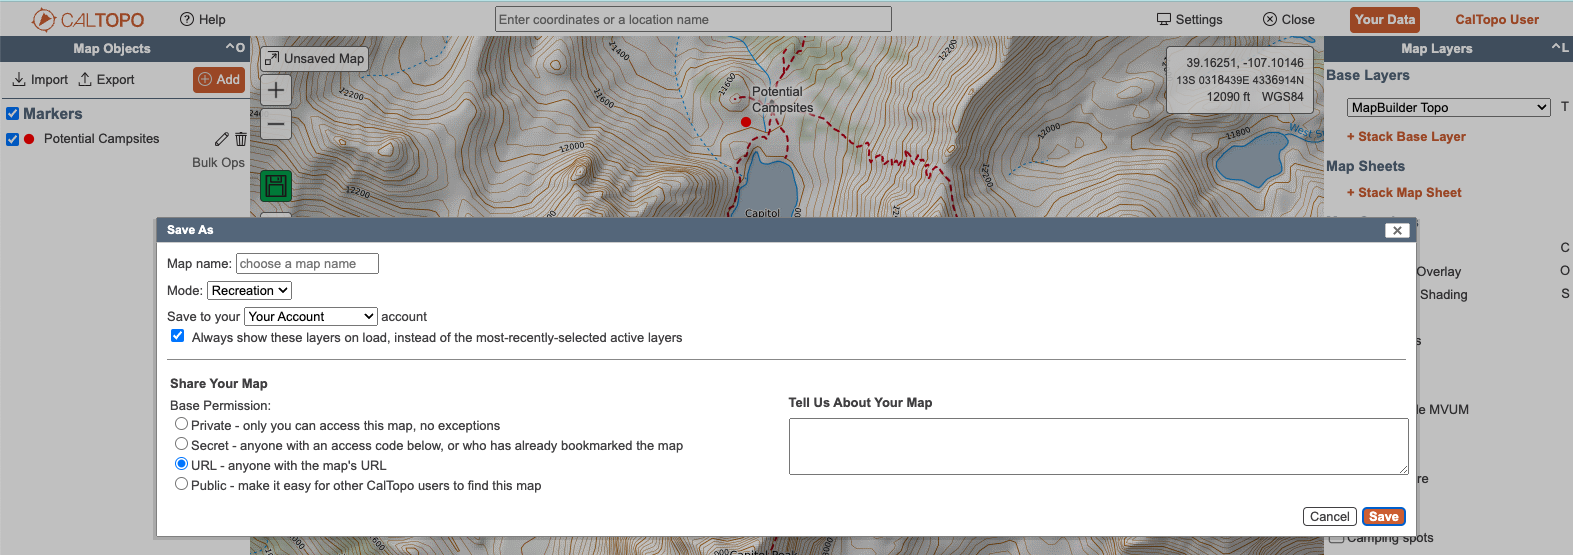
You can enter in the name of your map, designate where you want it saved, set base permissions (which will determine who can view your map and how) and add comments about your map. This is also where you can set the mode of the map, which controls the types of objects available in the Add menu. First responder? Choose “SAR” mode to include additional first responder specific tools (like assignments and clues) in the Add menu for anyone viewing the map. Everyone else? Choose “Recreation” mode.
For this example, let’s name our map “Capitol Peak Overnight” and leave everything else on the default options. You can always go back and edit these fields later if needed.
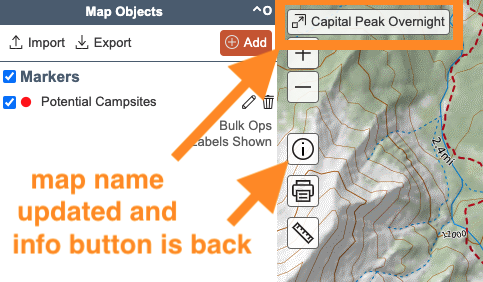
Click Save to save your map. After the page reloads, you’ll notice that the name of your map has replaced Unsaved Map in the upper left of the map viewer. With only one marker on the page, it may have zoomed way in on that marker. You can zoom out to see more of the map and get the view you want.
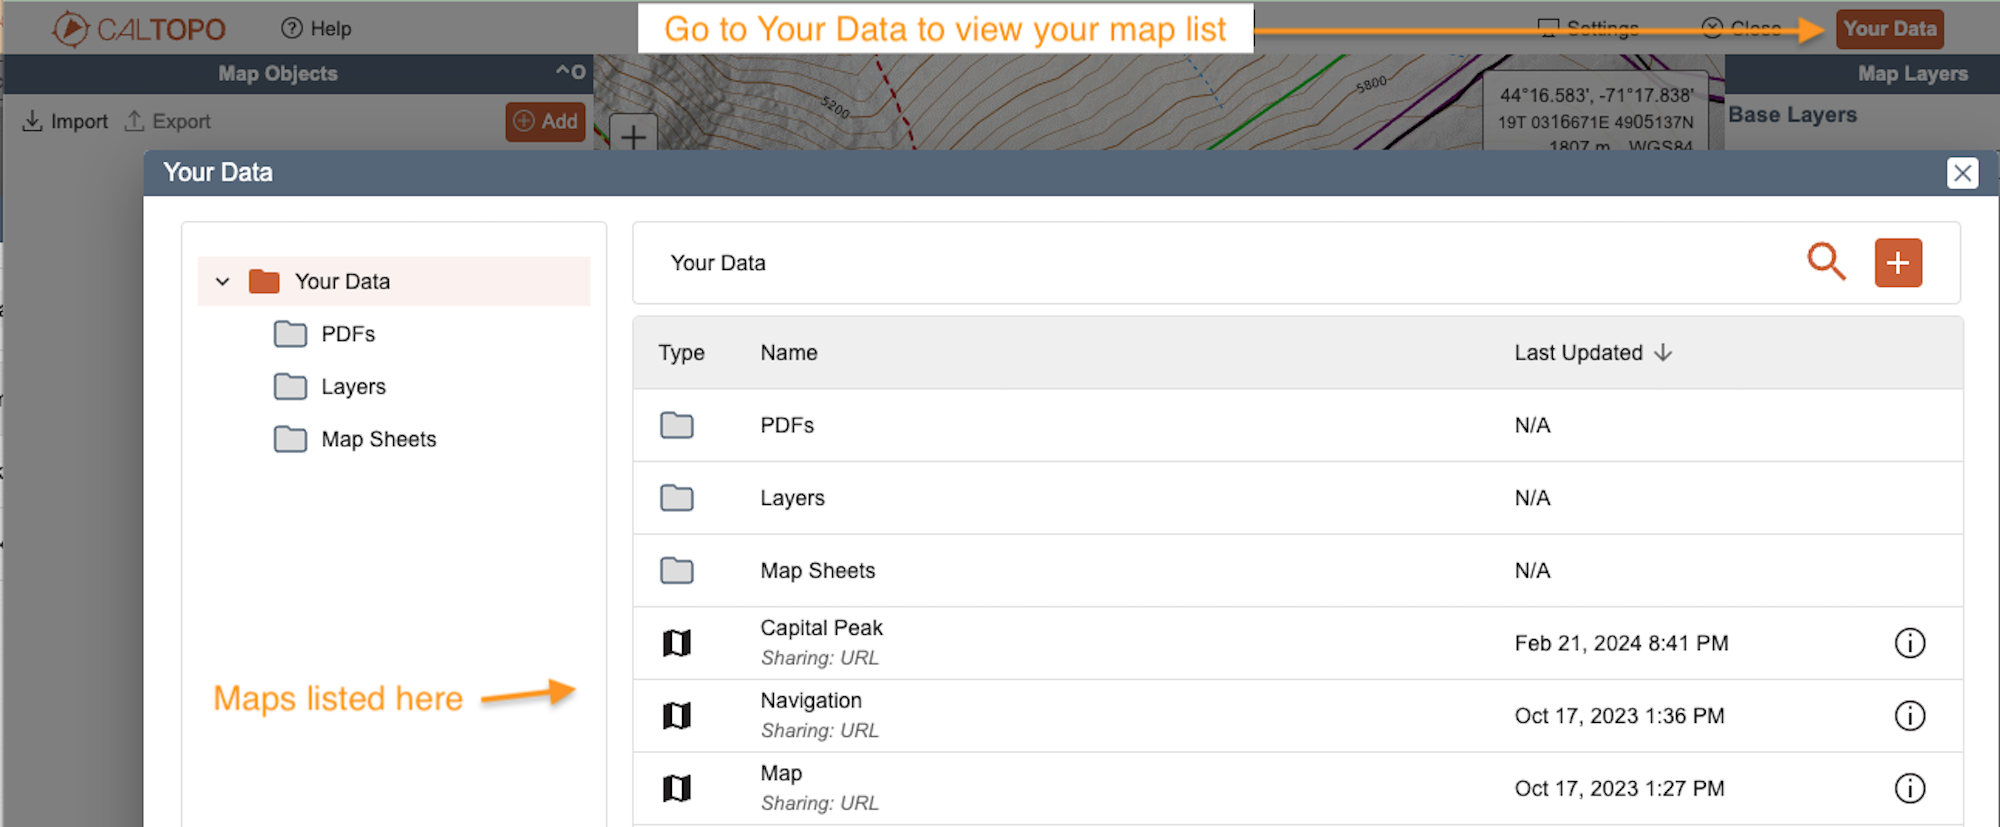
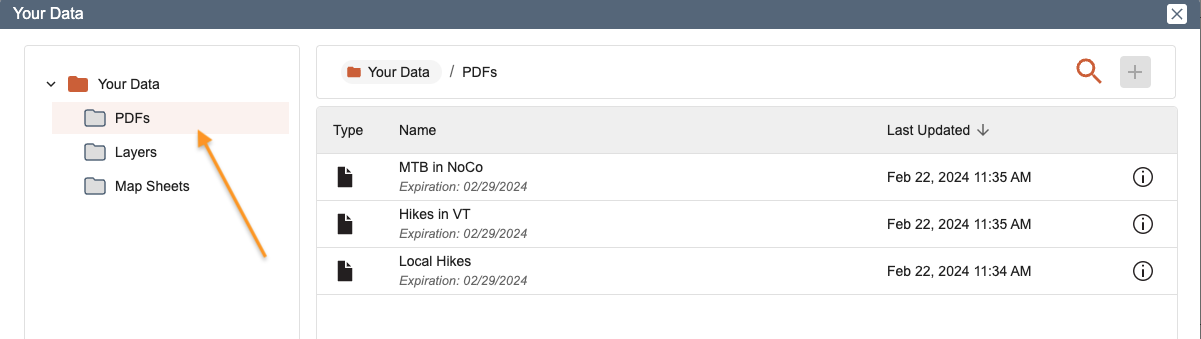
Your new map will also now appear under Your Maps in your account. To access this, click on the orange Your Data button in the top right corner of the page, which will open the Your Maps tab.
You may notice that once you save your map, there is no save option anymore. As long as you have a network connection, any changes or updates you make to your map will automatically sync, similar to Google docs.
STEP 5: Change Base Layers and Overlays
Base Layers
Base layers do exactly what their name implies- they form the base of the map and you add overlays and map objects on top of them. You can view one base layer or you can stack multiple base layers on top of each other.
To change which base layer(s) are on your map, click the base layer name at the top of the Map Layers menu on the right hand side of the mapviewer. A drop down layer menu will appear. Click the name of the base layer you'd like to add to your map.
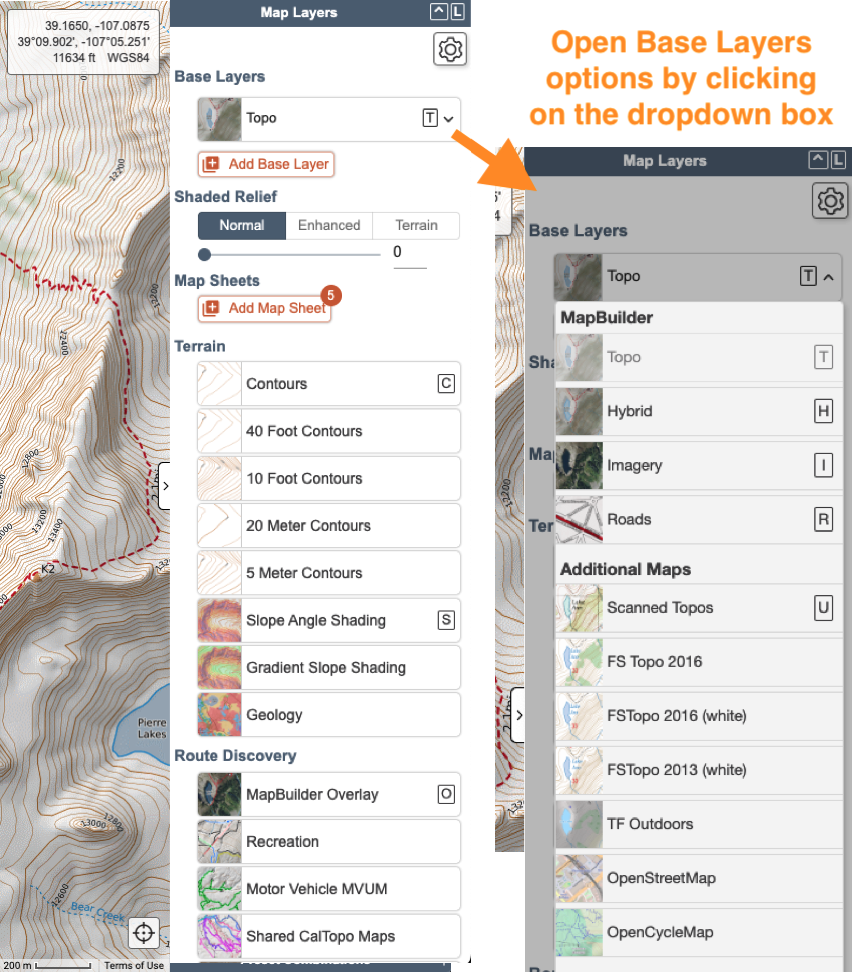
You can add additional layers on top of that base layer by clicking + Stack Base Layer and selecting the additional layer that you would like to add from the dropdown menu that appears.
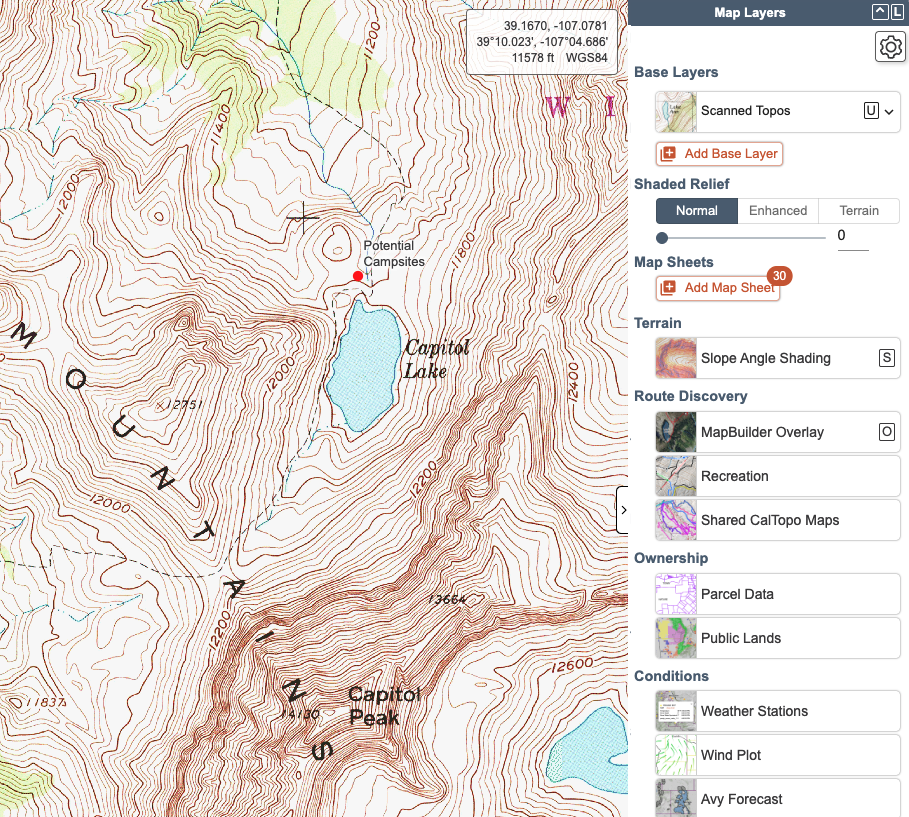
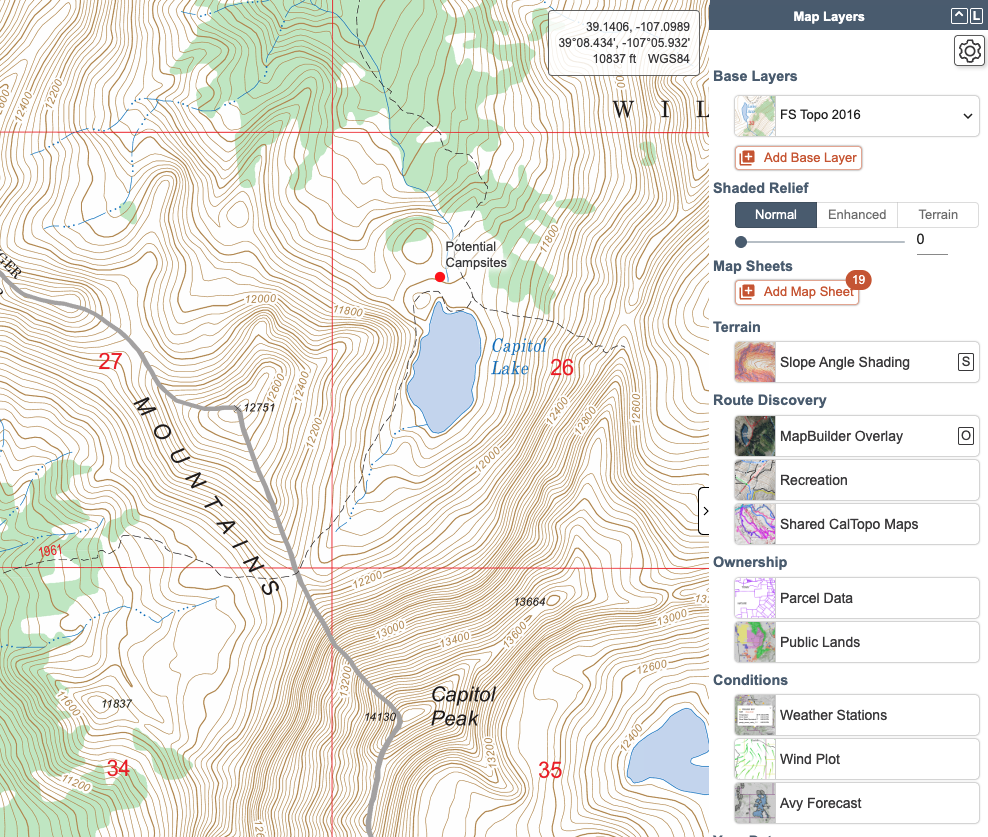
For this example we are going to keep it simple and only add one base layer to our map. Hover over the base layer name in the upper right hand corner of the mapviewer. Click on the Base Layer dropdown menu and select Scanned Topos. Notice that the base layer is added to your map and the objects already on your map are unaffected. Now choose Forest Service from the Base Layer dropdown menu. Again, the map objects already on the map are unaffected!
See the Base Layers Chapter for more details about using and stacking the different available base layers.
Overlays
Overlays provide additional data and go on top of the base layer(s) of your map. They can provide information on land ownership, weather conditions, motor vehicle use maps and much more!
Let’s add slope angle shading to our map, which is a popular overlay for planning backcountry travel routes. To add an overlay, you simply click the overlay name to display it on the map. Let’s click Slope Angle Shading and add it to our map.
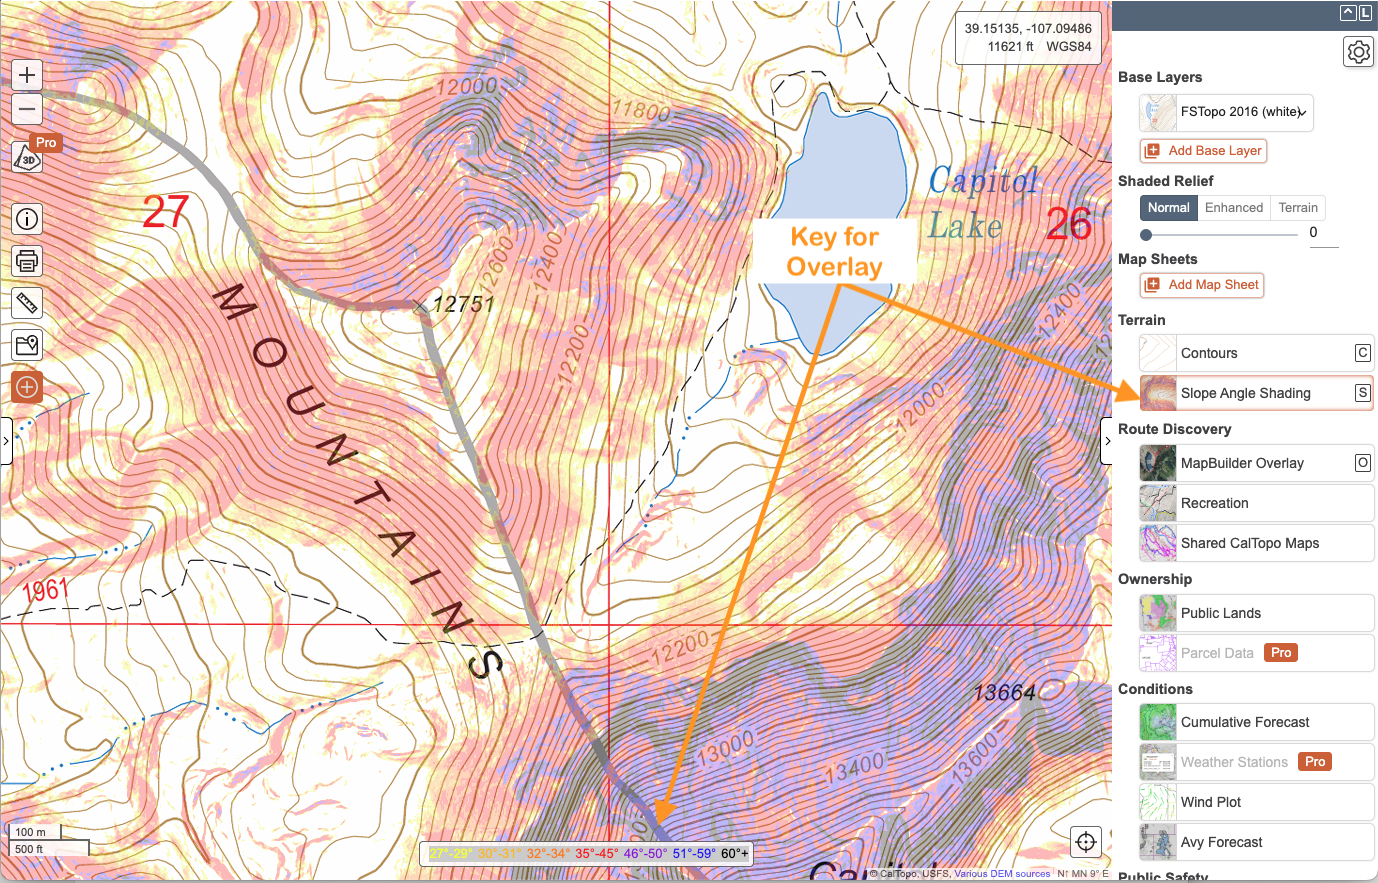
Notice that the slopes are now colored based on their slope angle. Keys for these colors appear in the lower left hand corner of the map viewer. For example, a slope that is shaded red on the map has a slope angle between 35°-45°. You can add as many overlays as you would like to a map.
The Overlays Chapter has more information about the different types of overlays offered.
STEP 6: View the Map on your Mobile Device
You can also access maps that you create on the web from your mobile device. In order to do this, download the CalTopo app for free on your mobile device from either the Google Play or Apple Store.
For this example I will be using an iOS mobile device but the steps would be the same for Android although some of the icons do differ. When you sign in, make sure to use the same login method as you did on the web so that you can access all your saved maps and as well as your subscription if you have one. If you don't have a CalTopo account yet, you can also create one by choosing "Sign Up".

To access the maps in your account, tap on the three bar menu in the upper left hand corner. Tap Your Maps and all the maps in your account will appear. To select a map, simply tap on the map name. As long as you have a data connection, this will load and open the map in the CalTopo mobile app. Let’s tap on the map we made “Capitol Peak Overnight” and voila! You should now see this map in the map viewer on the mobile app.


If you have a data connection, any changes you make to objects (add, edit or delete) in the mobile app will be automatically updated on the web. If you don’t have a data connection, changes will be updated once a data connection is reestablished.
You can also access your map offline by downloading base layers for offline use. Check out the Offline Use lesson in the Mobile Specific Functions and Tools chapter for instructions.
Creating a map on a Mobile Device
You can create and save a map in our Mobile app as well. The steps are similar to the ones outlined above. Here is a video tutorial on the process.
Maps created in the mobile app will sync with your account and you'll be able to view them on your computer.
Print your Map
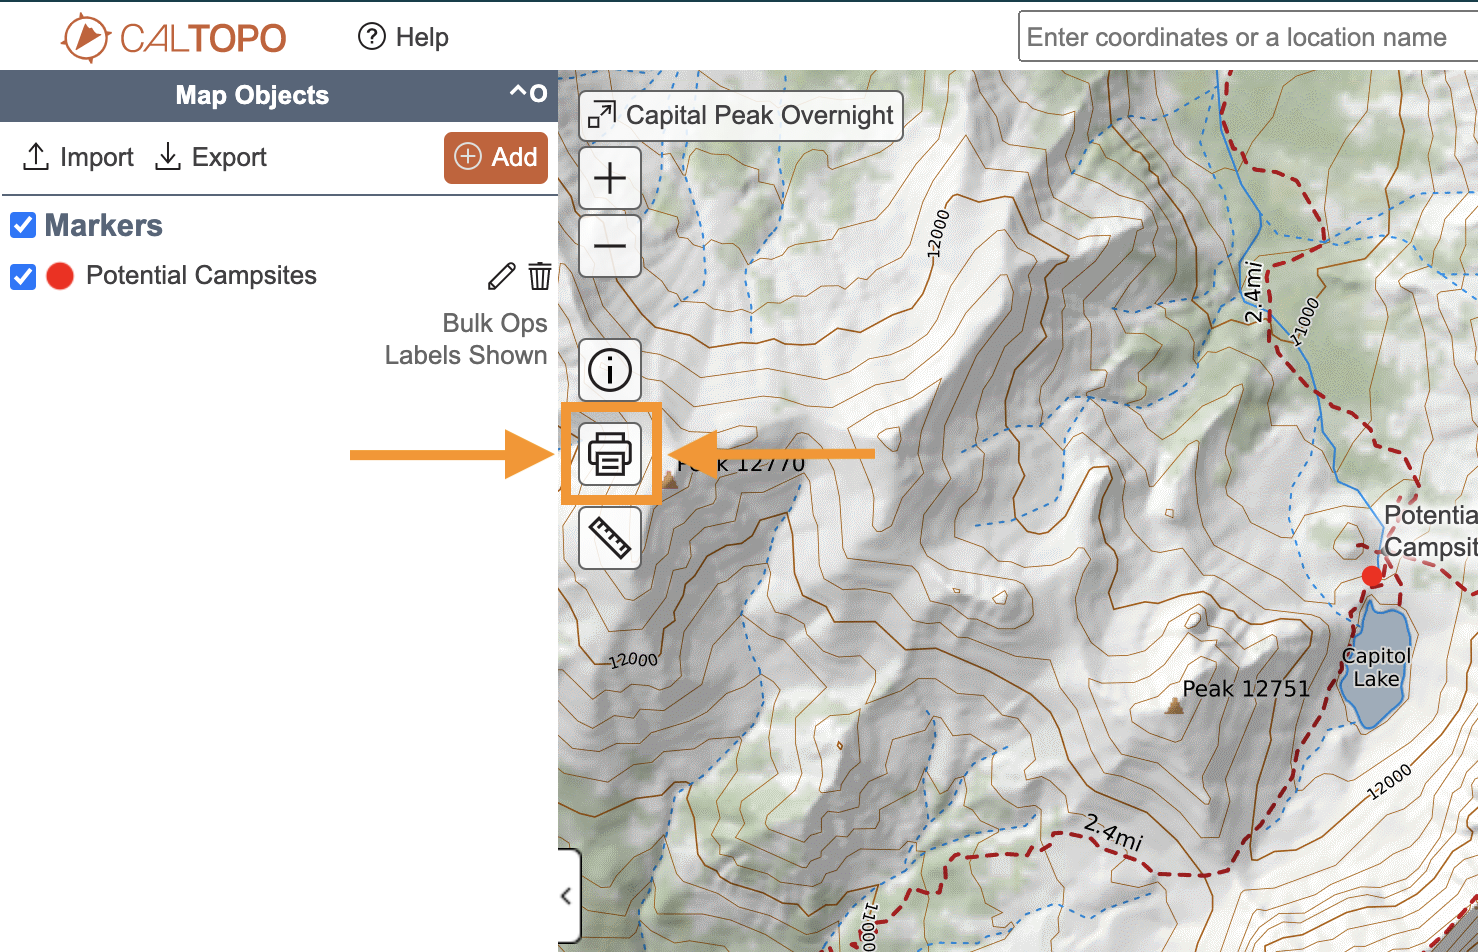
Many users will want to take their maps into the field with them. The CalTopo mobile app and the print function on the web are the two primary methods of doing this. You can print a blank map with just your desired layers or print a map with the objects that you've drawn in CalTopo. To open the print page, use the print button on the left side of the map, just below where the save button was. This will open a new browser tab with a whole host of options.
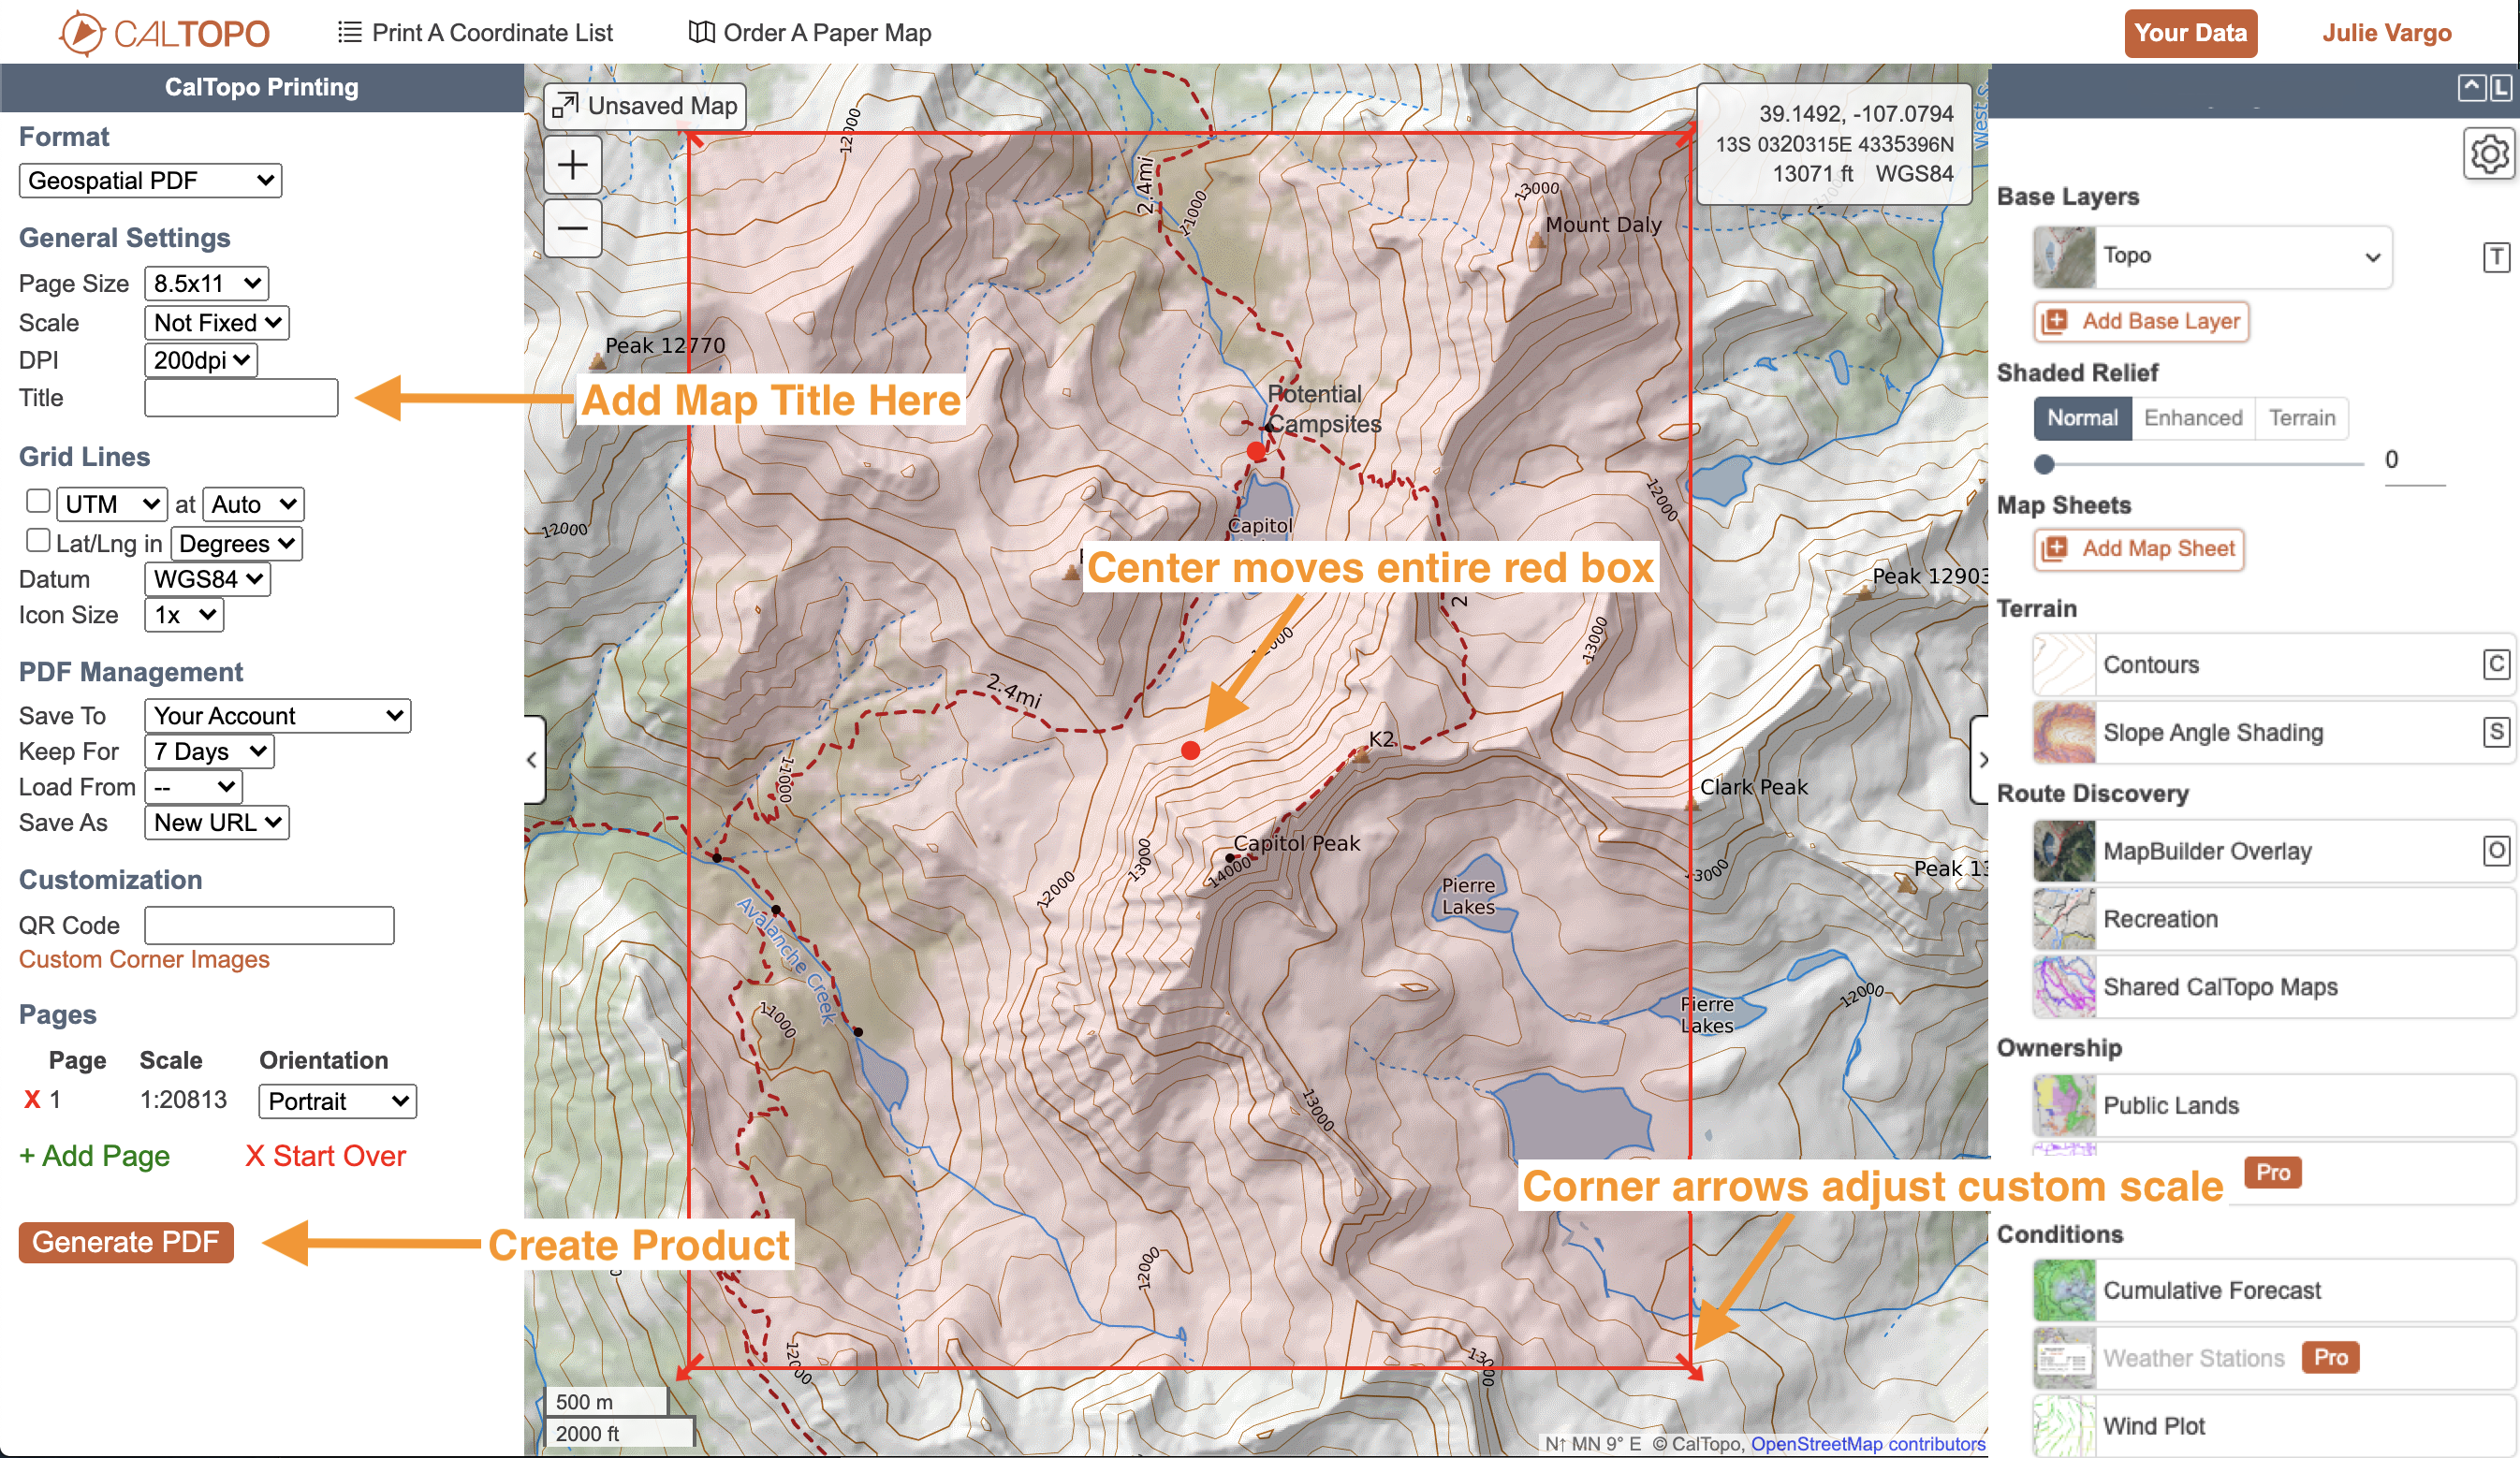
A new tab will open and a transparent red box will appear over your map. The red transparent box is your print area- anything that is in this box will appear on your printed map. You can change the boundaries of the red box by clicking and dragging the arrows that appear at each corner.
In the left side bar you can change settings and details about the PDF or JPG you will be generating. For this example, let’s give our map the name “Capitol Peak Overnight” by typing it into the Title field. We will leave the rest of the settings on default. Click Generate PDF at the bottom of the left side bar to generate a PDF of your selected area.
PDFs of maps are saved for a set period of time and will appear in Your Data under the Your PDFs tab until their expiration date. To access your saved PDFs, click on Your Data on the left upper left side and then select the Your PDFs tab.
For more information about printing and related functions, visit the Printing Chapter.