Location Integrations
introduction
CalTopo supports tracking various devices that report your location to a map.
This page provides information on third-party devices and systems to help you integrate them with CalTopo. While we strive to keep this information updated, we cannot fix or troubleshoot these products. If you encounter issues with a device, please contact its manufacturer.
This page does not cover setting up the CalTopo side of the location process. For that, see the Teams setup guide or the Recreational setup guide.
Topics on this Page:
Garmin inReach Professional Account Setup
CalTopo offers integration with all inReach devices including the popular inReach mini and other devices.
CalTopo uses the inReach Personal Connect (IPC) to receive this information from Garmin. Use of the IPC requires a professional account for your device. Garmin allows one or more devices on a single Professional plan.
More information about Garmin Professional plans can be found here. If you are already active on a Personal plan, you can switch your account to a Professional plan by following Garmin's instructions for switching an inReach subscription to a Professional Account.
The next setup steps are done in Garmin's interface and require an active device with an active professional plan (see above). To begin, navigate to Garmin's inReach portal and login.
You'll be brought to the main page of Garmin's account system. select Settings (circled with an orange 1 on the below image) and then navigate to Portal Connect (circled with an orange 2 on the below image). Once on this page, you'll see the OUTBOUND Portal Connect. Copy and paste the URL with the connect key in the URL field.
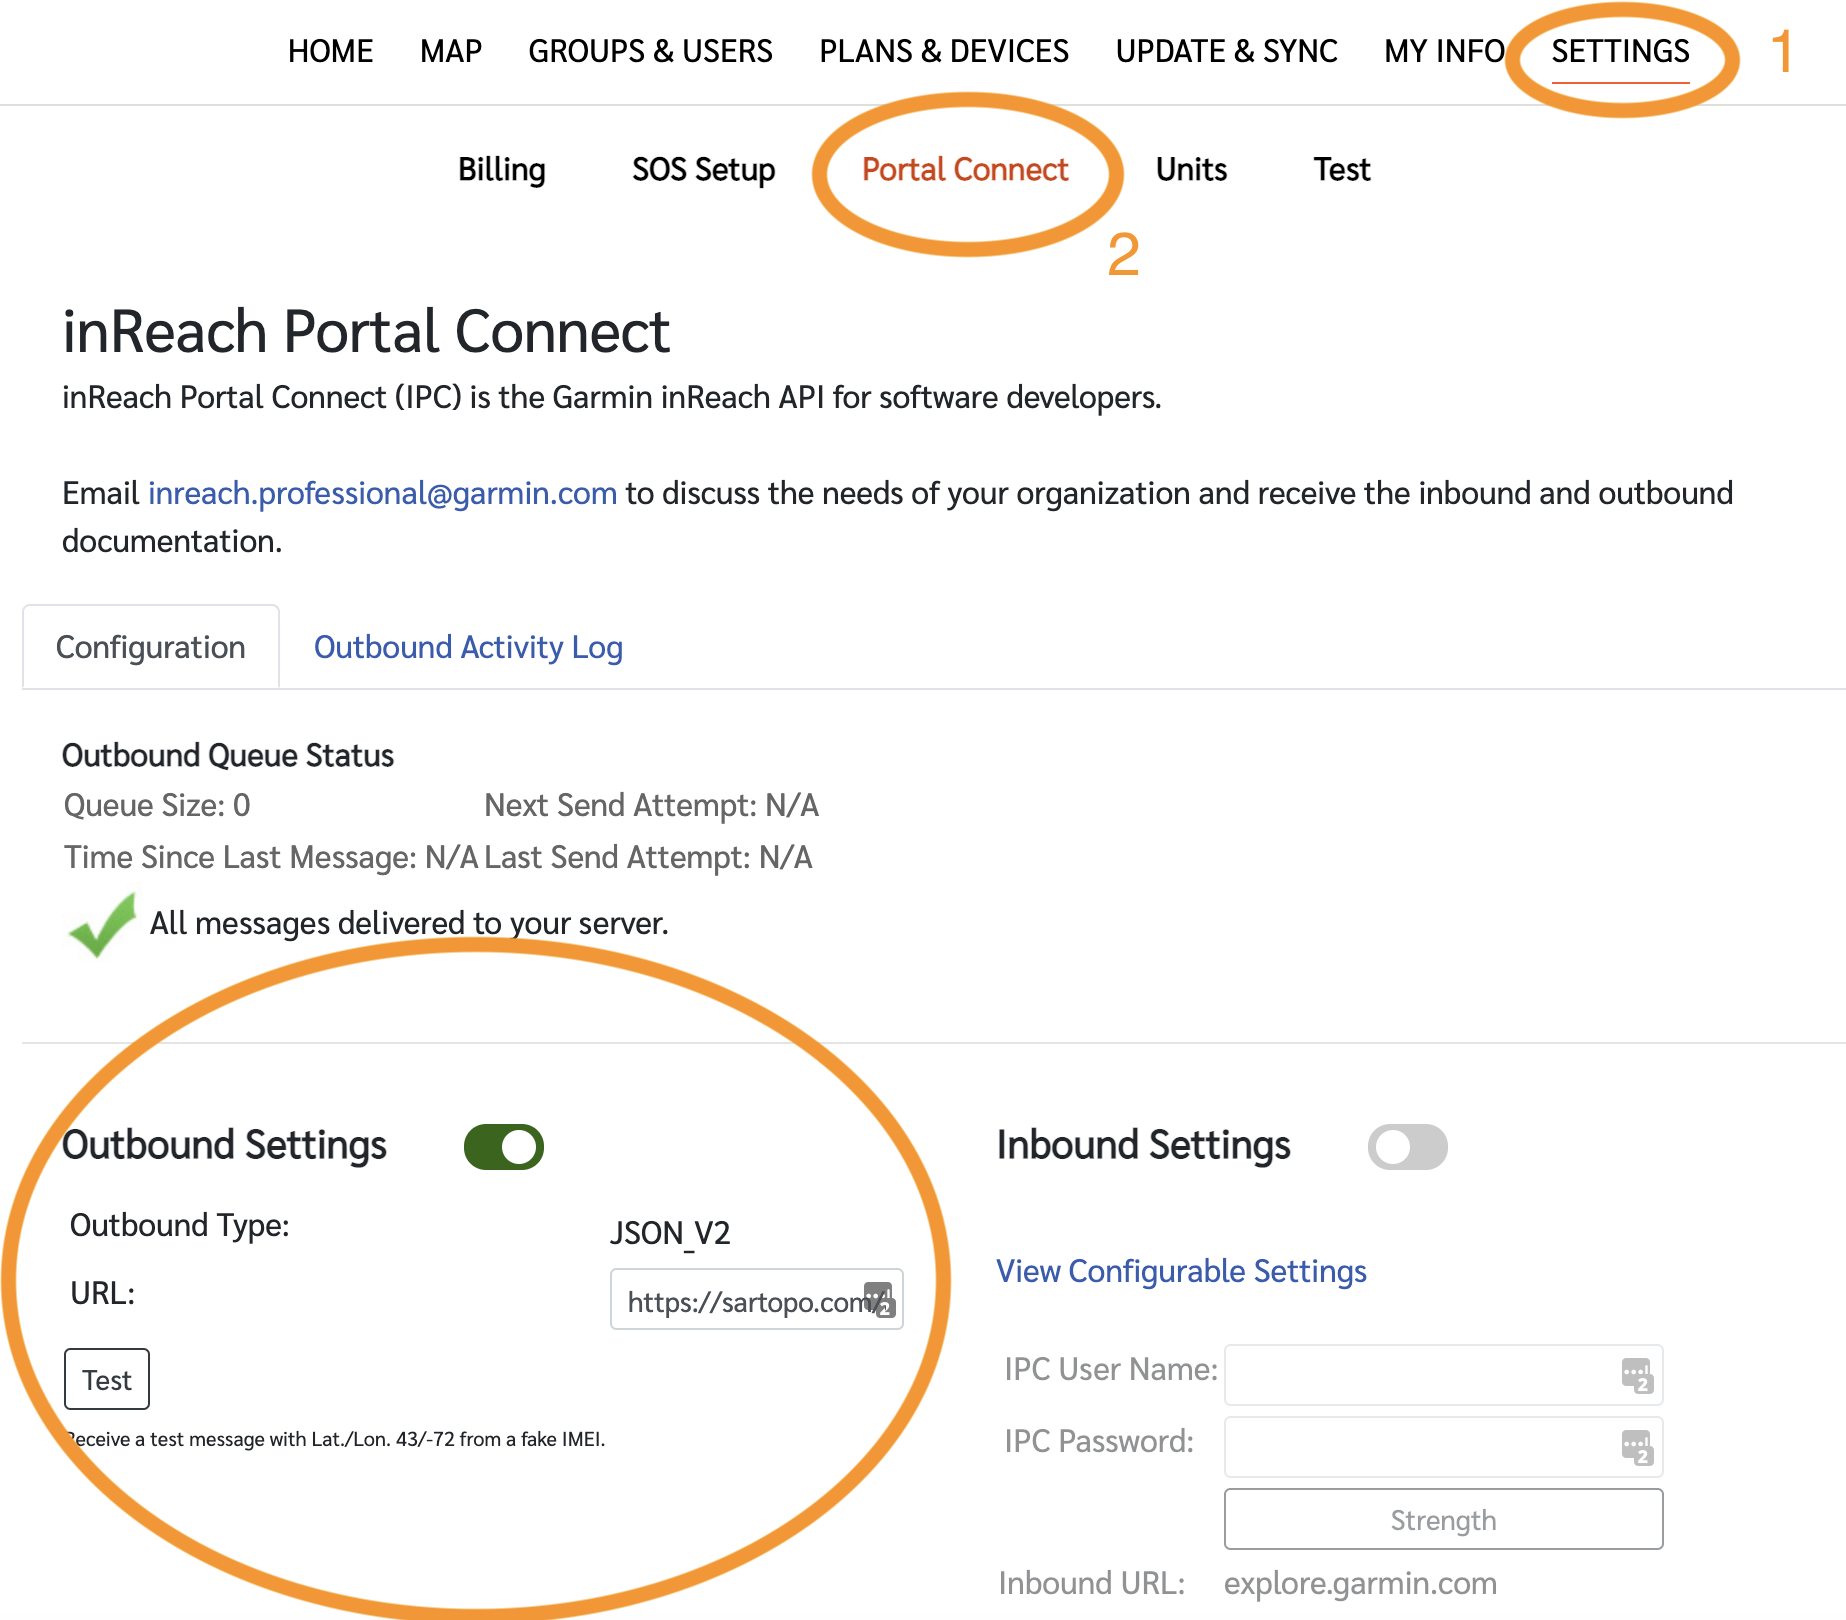
Turn on the outbound connection (click on the gray off switch and it will turn green and display the word on as shown above). Copy and paste the copied URL from the details dialog box into the URL field.
You can send a test message at this point to your map and it should display a dummy locator and a marker at that point. Make sure to save your settings on the Garmin site at the bottom of the page.
We'll say that one more time- remember to SAVE this setting.
At this point you've successfully linked your trackable device to the team account. Any inReach that is part of the Garmin account will appear in the Trackable Devices list and as part of the Shared Locations layer the next time that it reports its location. Garmin devices may require additional settings to push updates; typically these can be set to occur regularly, or only on demand, based on your plan and preferences.
Learn how to set up the CalTopo Team locator. For individual accounts, locators can be added to a map as described in the Live Tracking and Locators section.
Garmin inReach MapShare Setup
You can set up a Garmin inReach that is not on a Professional Plan to report a location to a CalTopo Team using the Garmin MapShare system. Please note: adding a Garmin inReach using this method requires team account membership.
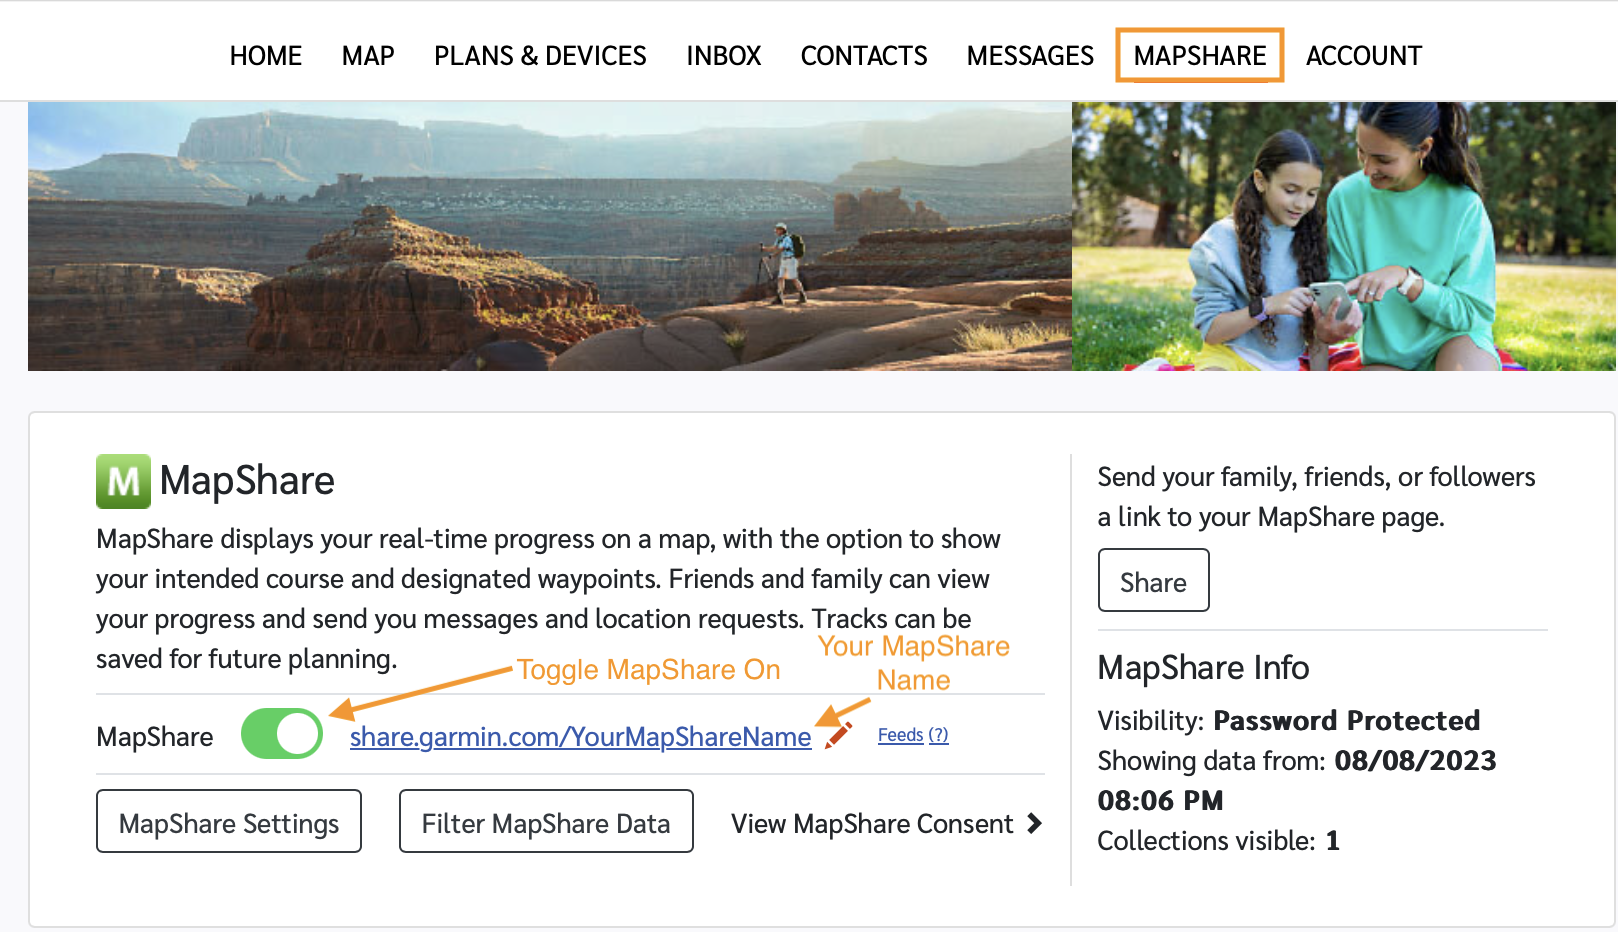
Getting Your MapShare Information.
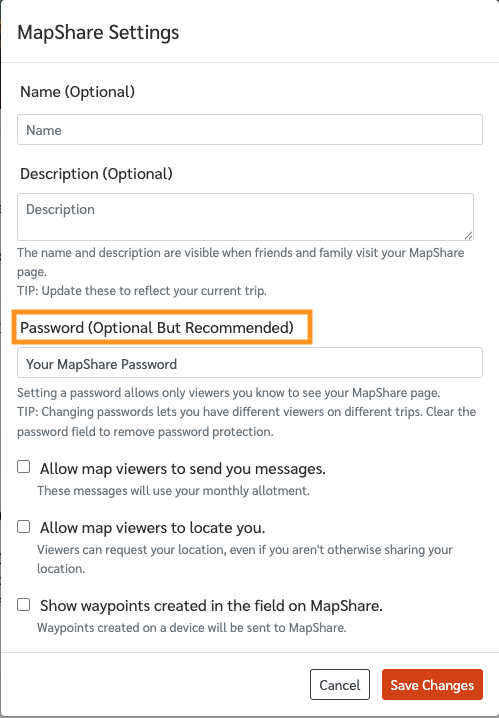
To get your MapShare information, you need to go to the Garmin Explore website: Garmin Explore. Once there, sign in and click the "MapShare" tab.

After turning on MapShare, you can find your MapShare Name, in the example above, it’s “YourMapShareName.” You do not include the share.garmin.com portion. Next, open MapShare Settings to create a password.
Once you have your MapShare Name and password (optional) you can fill out the CalTopo form and save.
Get information on how to set up the CalTopo Team locator here.
.Garmin inReach Tracking Info
Once you've configured the Portal Connect page or the MapShare page, there are a few important things to consider regarding your inReach device. You'll need to set up your inReach tracking settings and understand how frequently the device reports its location to the satellite. This information is covered here on the Garmin website.
A crucial section to note is near the bottom of that page. InReach devices report their positions only once every four hours when stationary. This can lead to confusion during set up as the device is often stationary when you test it out.
From Garmin
Additional Important Tracking Information
The inReach device has a power-saving function that will change the Send Interval to 4 hours if the device has not traveled more than 100 meters (328 feet). When the device is moved this distance, the Send Interval will revert to the setting selected on the inReach device.
When the inReach device is powered off, the tracking feature will be turned off as well and remain off even when the device is turned back on. Tracking will need to be started again when the device is turned back on. Updates have added a new feature that allows for the tracking on the device to be automatically turned on when the inReach is powered on. To use this feature on the inReach, Auto Track would need to be turned on in the Tracking settings of the inReach device.
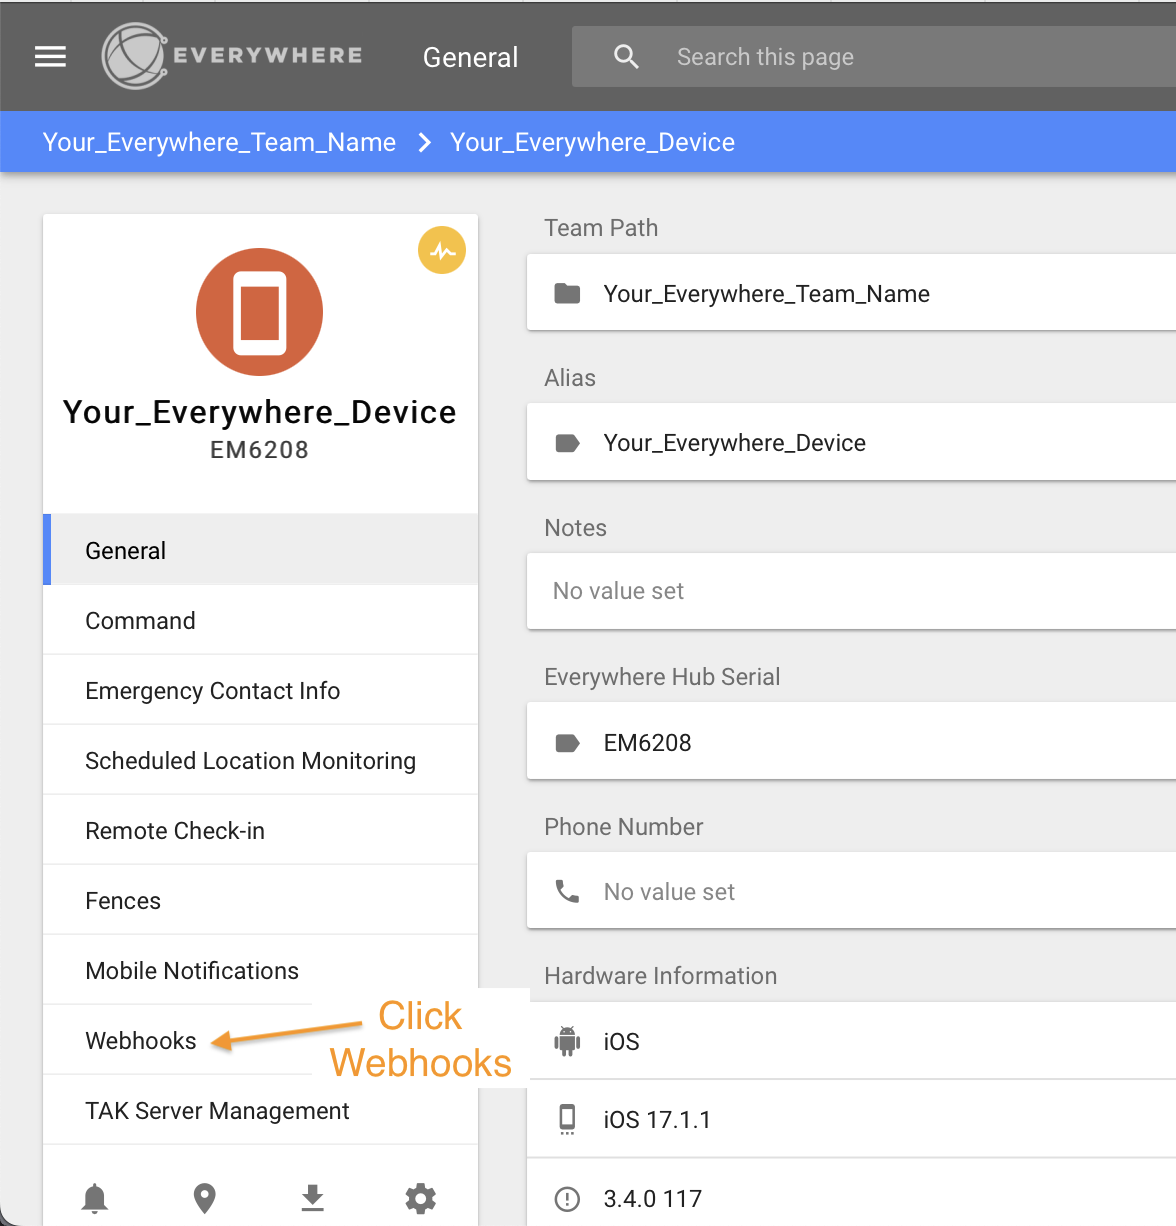
Everywhere Hub Setup
CalTopo provides integration with Everywhere Hub. Additional details about Everywhere Hub plans can be found here on the Everywhere Hub website. If your team already has an Everywhere Hub account, you will use their webhook feature to integrate with CalTopo.
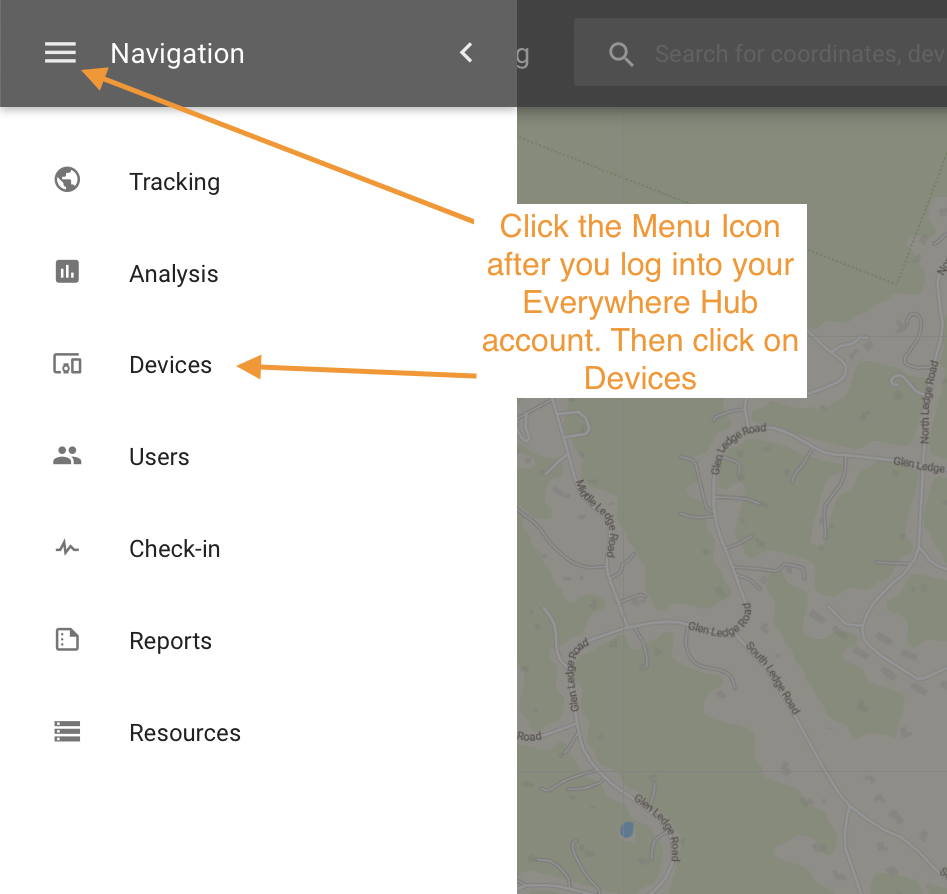
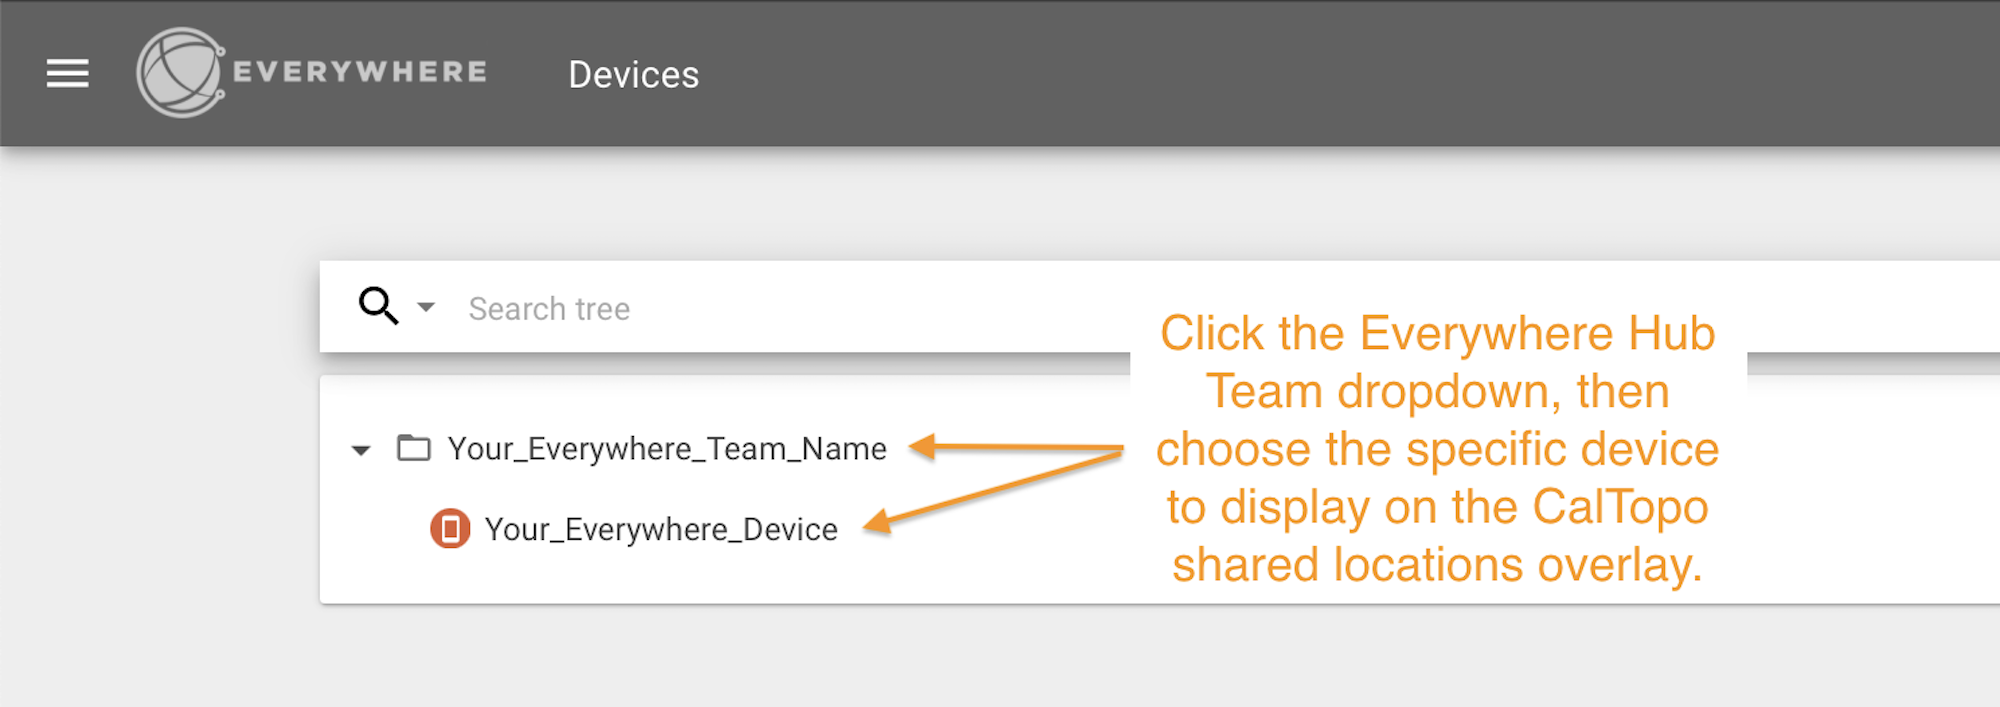
The next steps take place on the Everywhere Hub page. First you'll need to log into your Team's Everywhere Hub account. Then follow the steps outlined below for each device associated with your Everywhere Hub team that you want to appear in CalTopo's Shared Locations overlay.
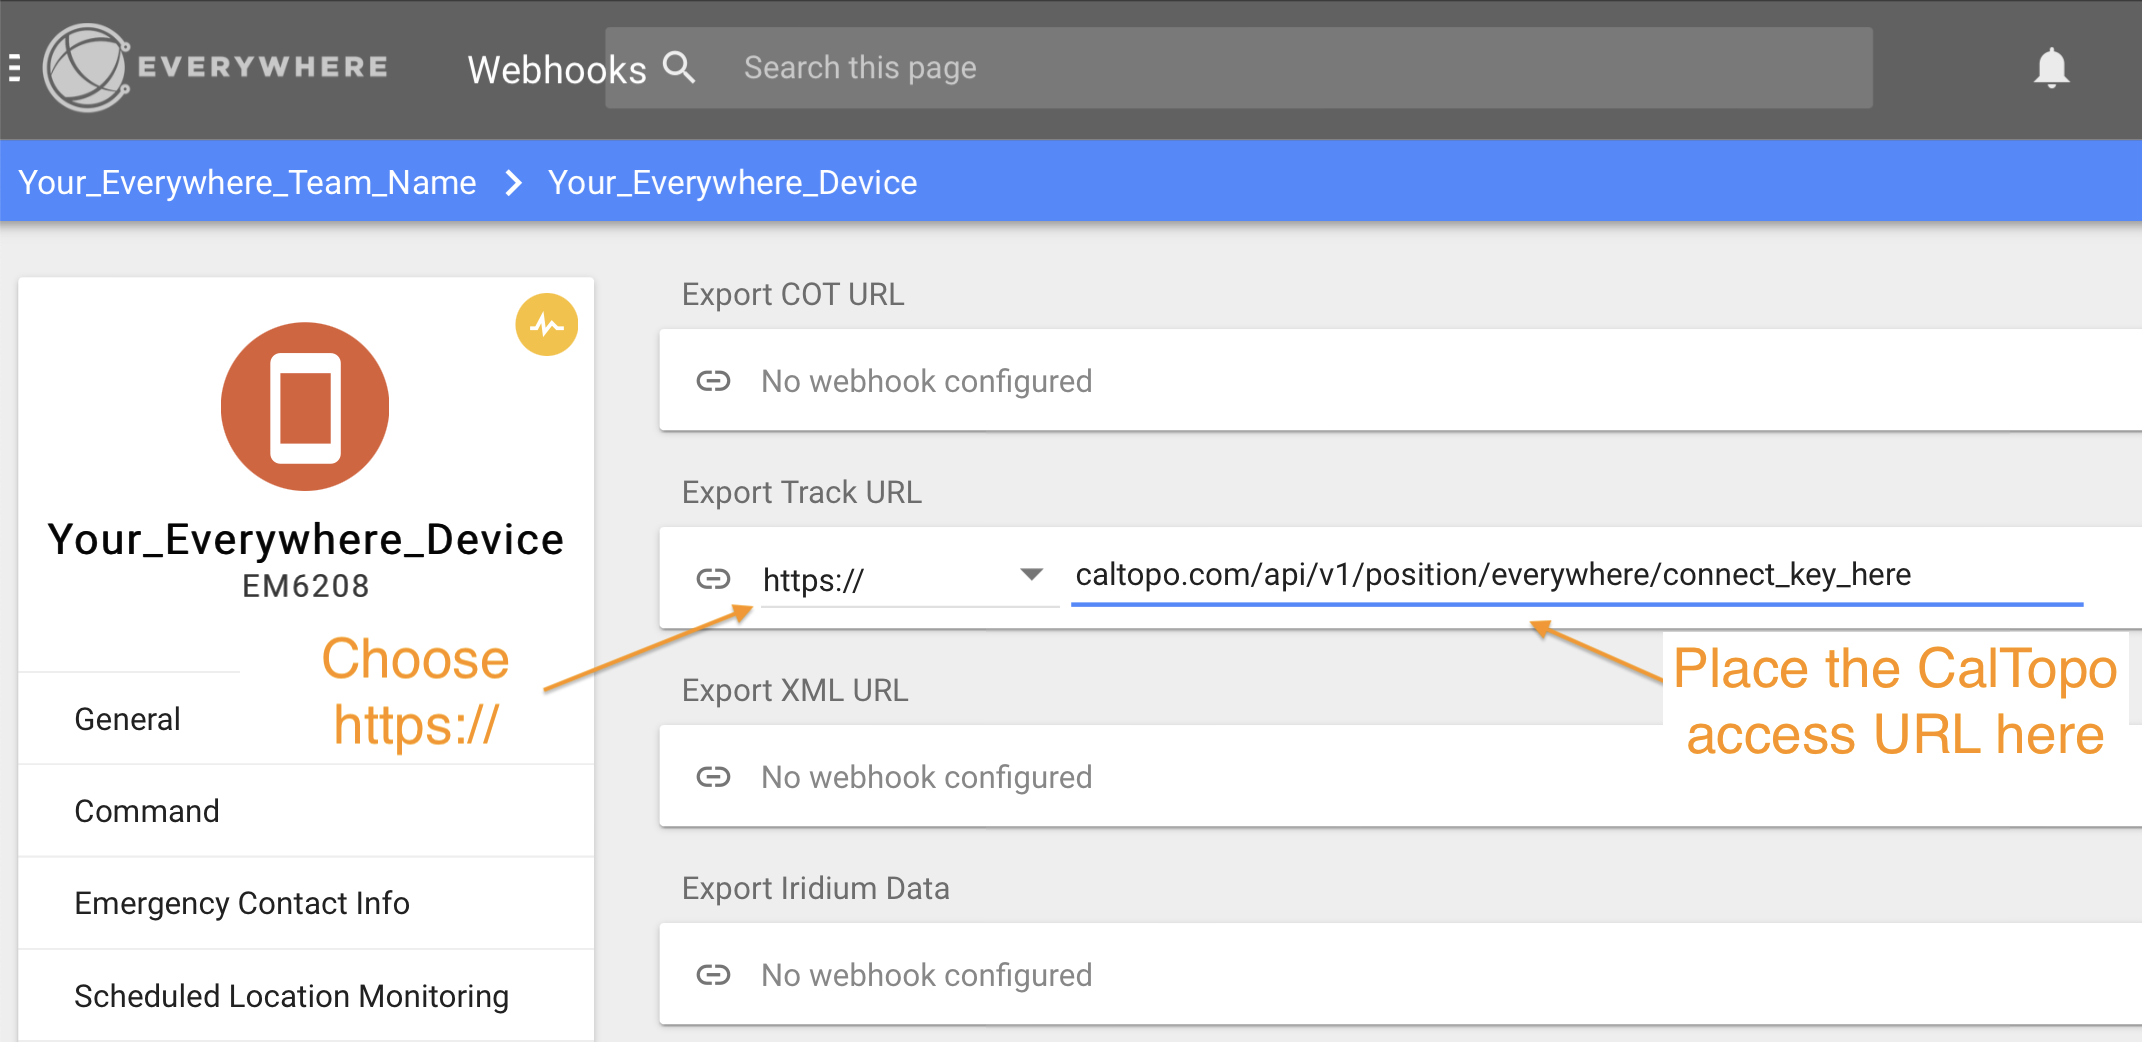
To access the Everywhere Hub webhook, click the menu icon in the upper right corner of the screen. From the menu, select "Devices." This will lead you to a page listing all the teams and sub-teams. Click on the team or sub-team of the device you intend to add and then select the specific device. You will find the Webhooks option towards the bottom of the left-hand menu. Click this and then copy and paste the CalTopo access URL in the Export Track URL box.
Somewear
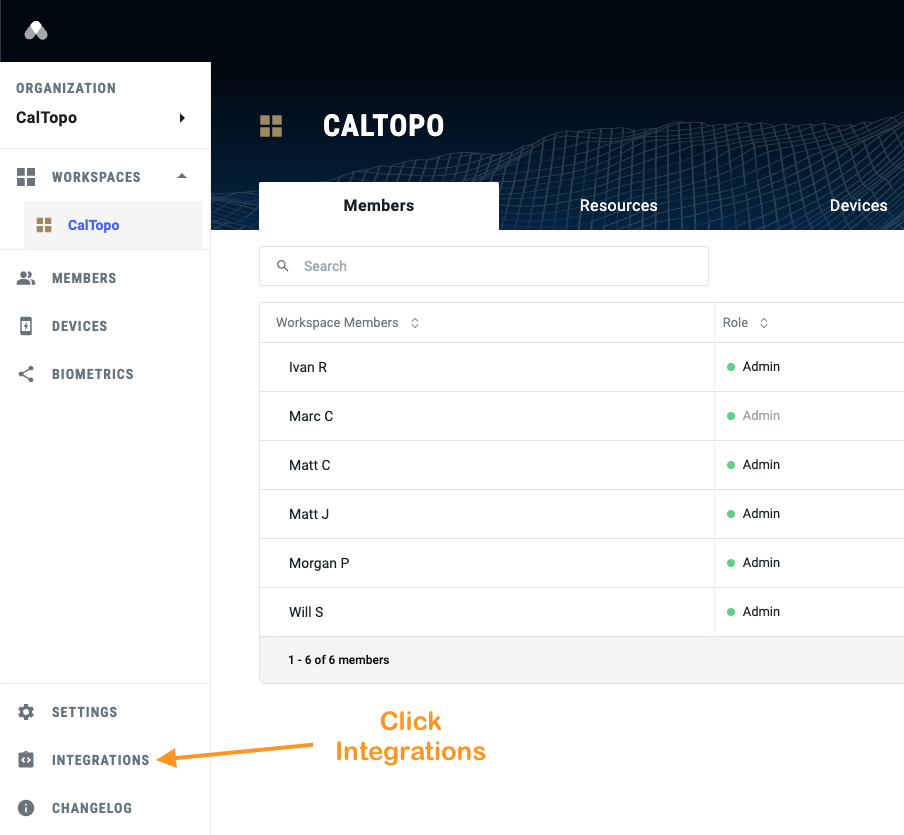
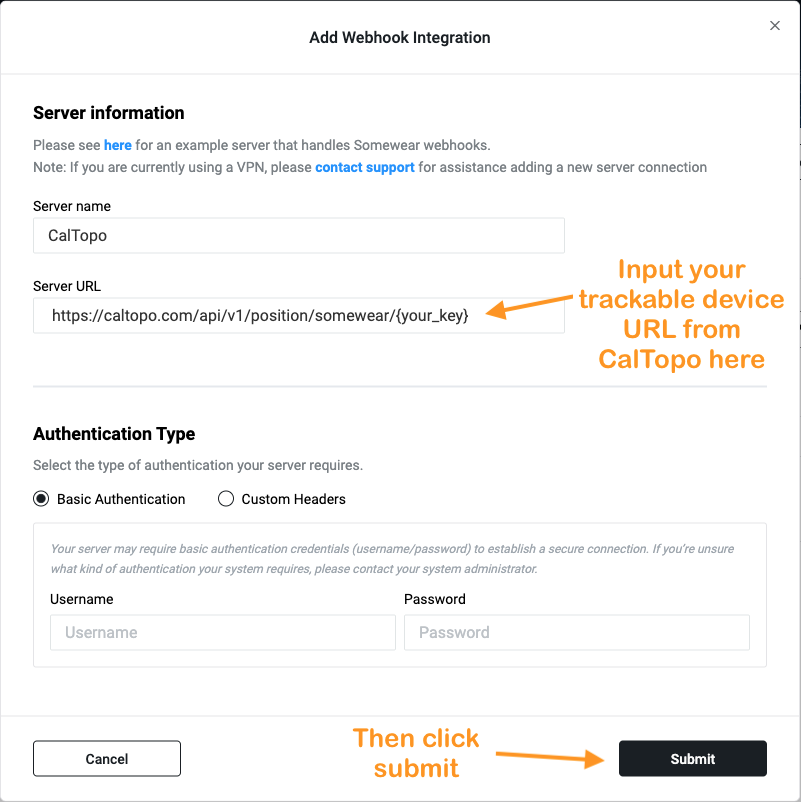
CalTopo provides integration with Somewear Workspaces. Additional details about Somewear plans can be found here on the Somewear Labs website. If your team already has a Somewear Workspace, you will use their webhook feature to integrate with CalTopo.
The next steps take place on the Somewear Workspace Dashboard page. First you'll need to log into your Team's Somewear account. Then follow the steps outlined below
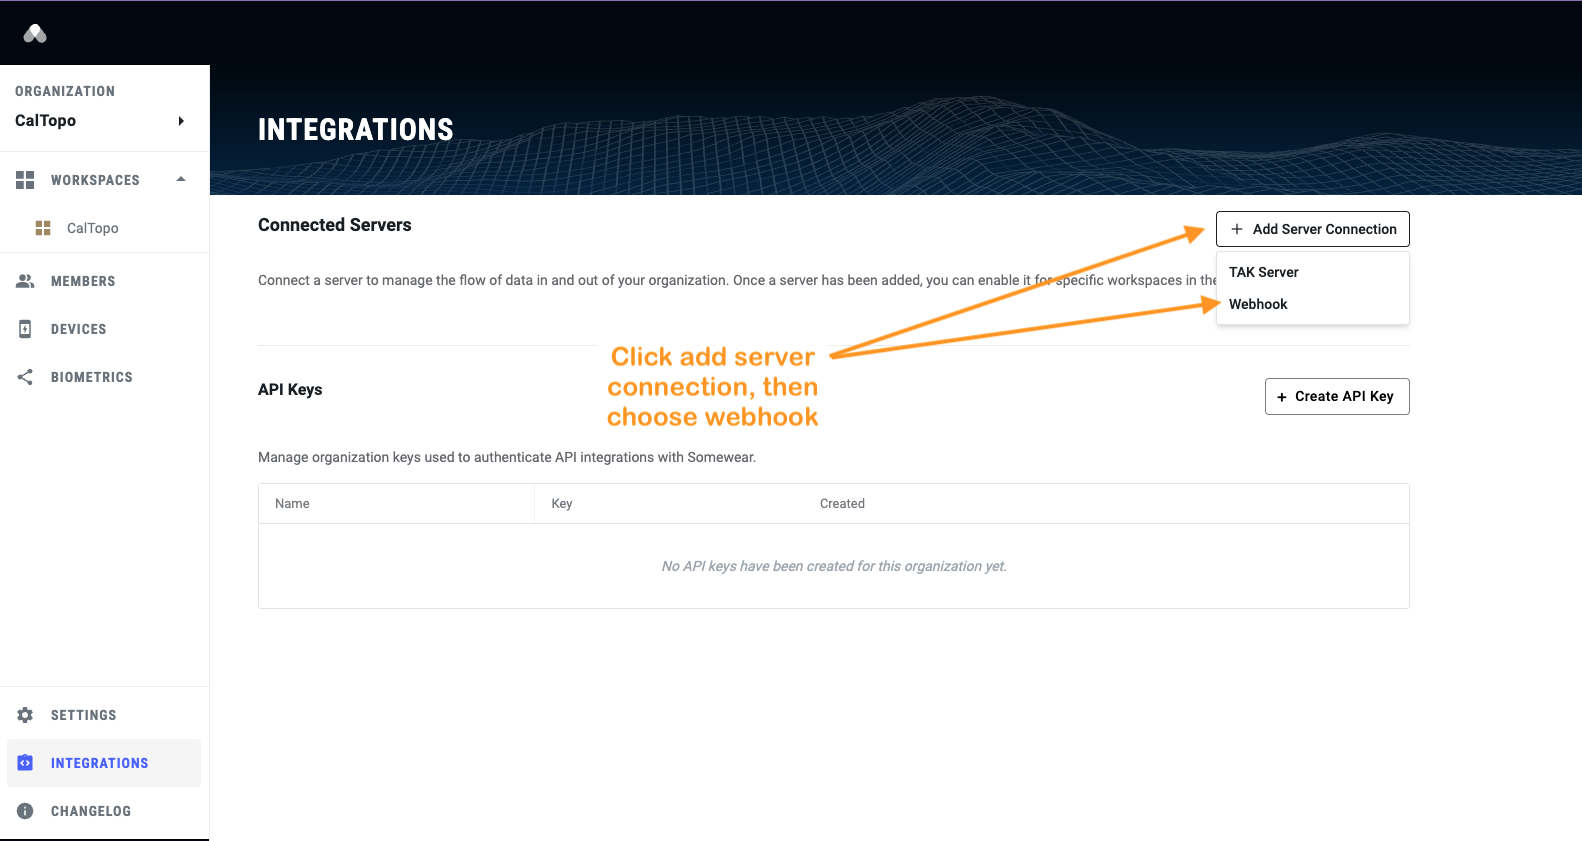
To access the Somewear webhook you need to be an ADMIN of the Somewear Workspace. When you are logged in you will see Integrations at the bottom left of the page. You will need to click that then click Add Server Connection then Webhook.
UAS Sentry
You can track your drone using UAS Sentry. To set it up copy your Connect Code and send it to UAS Sentry . UAS Sentry will input the connect code into their system and your drone will then report its location in the Shared Locations overlay.
Amateur Radio APRS
APRS can work through an iGate but this section will focus on getting local traffic using the Desktop Instance. You can get more information about local APRS on the Local APRS with Desktop page. This section will cover the set up of Terminal Node Controllers (TNC's) and radios. There are a lot of TNC's and radios available so we can only cover the ones we have direct information about. There are also differences between how they are set up depending if you have an Apple or Windows computer. If you have set up a different system and have information you'd be willing to share with us, please email us at help@caltopo.com and tell us about your configuration.Mobilinkd
The first device we will cover is the Mobilinkd TNC. We have used the Mobilinkd on an Apple machine. Below are the settings we used in the Mobilinkd app.
Kenwood TH-D7A
We have limited information about the settings on the radio. However, we received feedback from a customer who successfully used the following sentences in the topo.properties file on a Windows machine with the Kenwood TH-D7A: ``` sarsoft.location.aprs.local.enabled=true sarsoft.location.serial.COM5=9600,8,1,0 ```Learn how to set up the CalTopo Team locator. For individual accounts, locators can be added to a map as described in the Live Tracking and Locators section.
Meshtastic
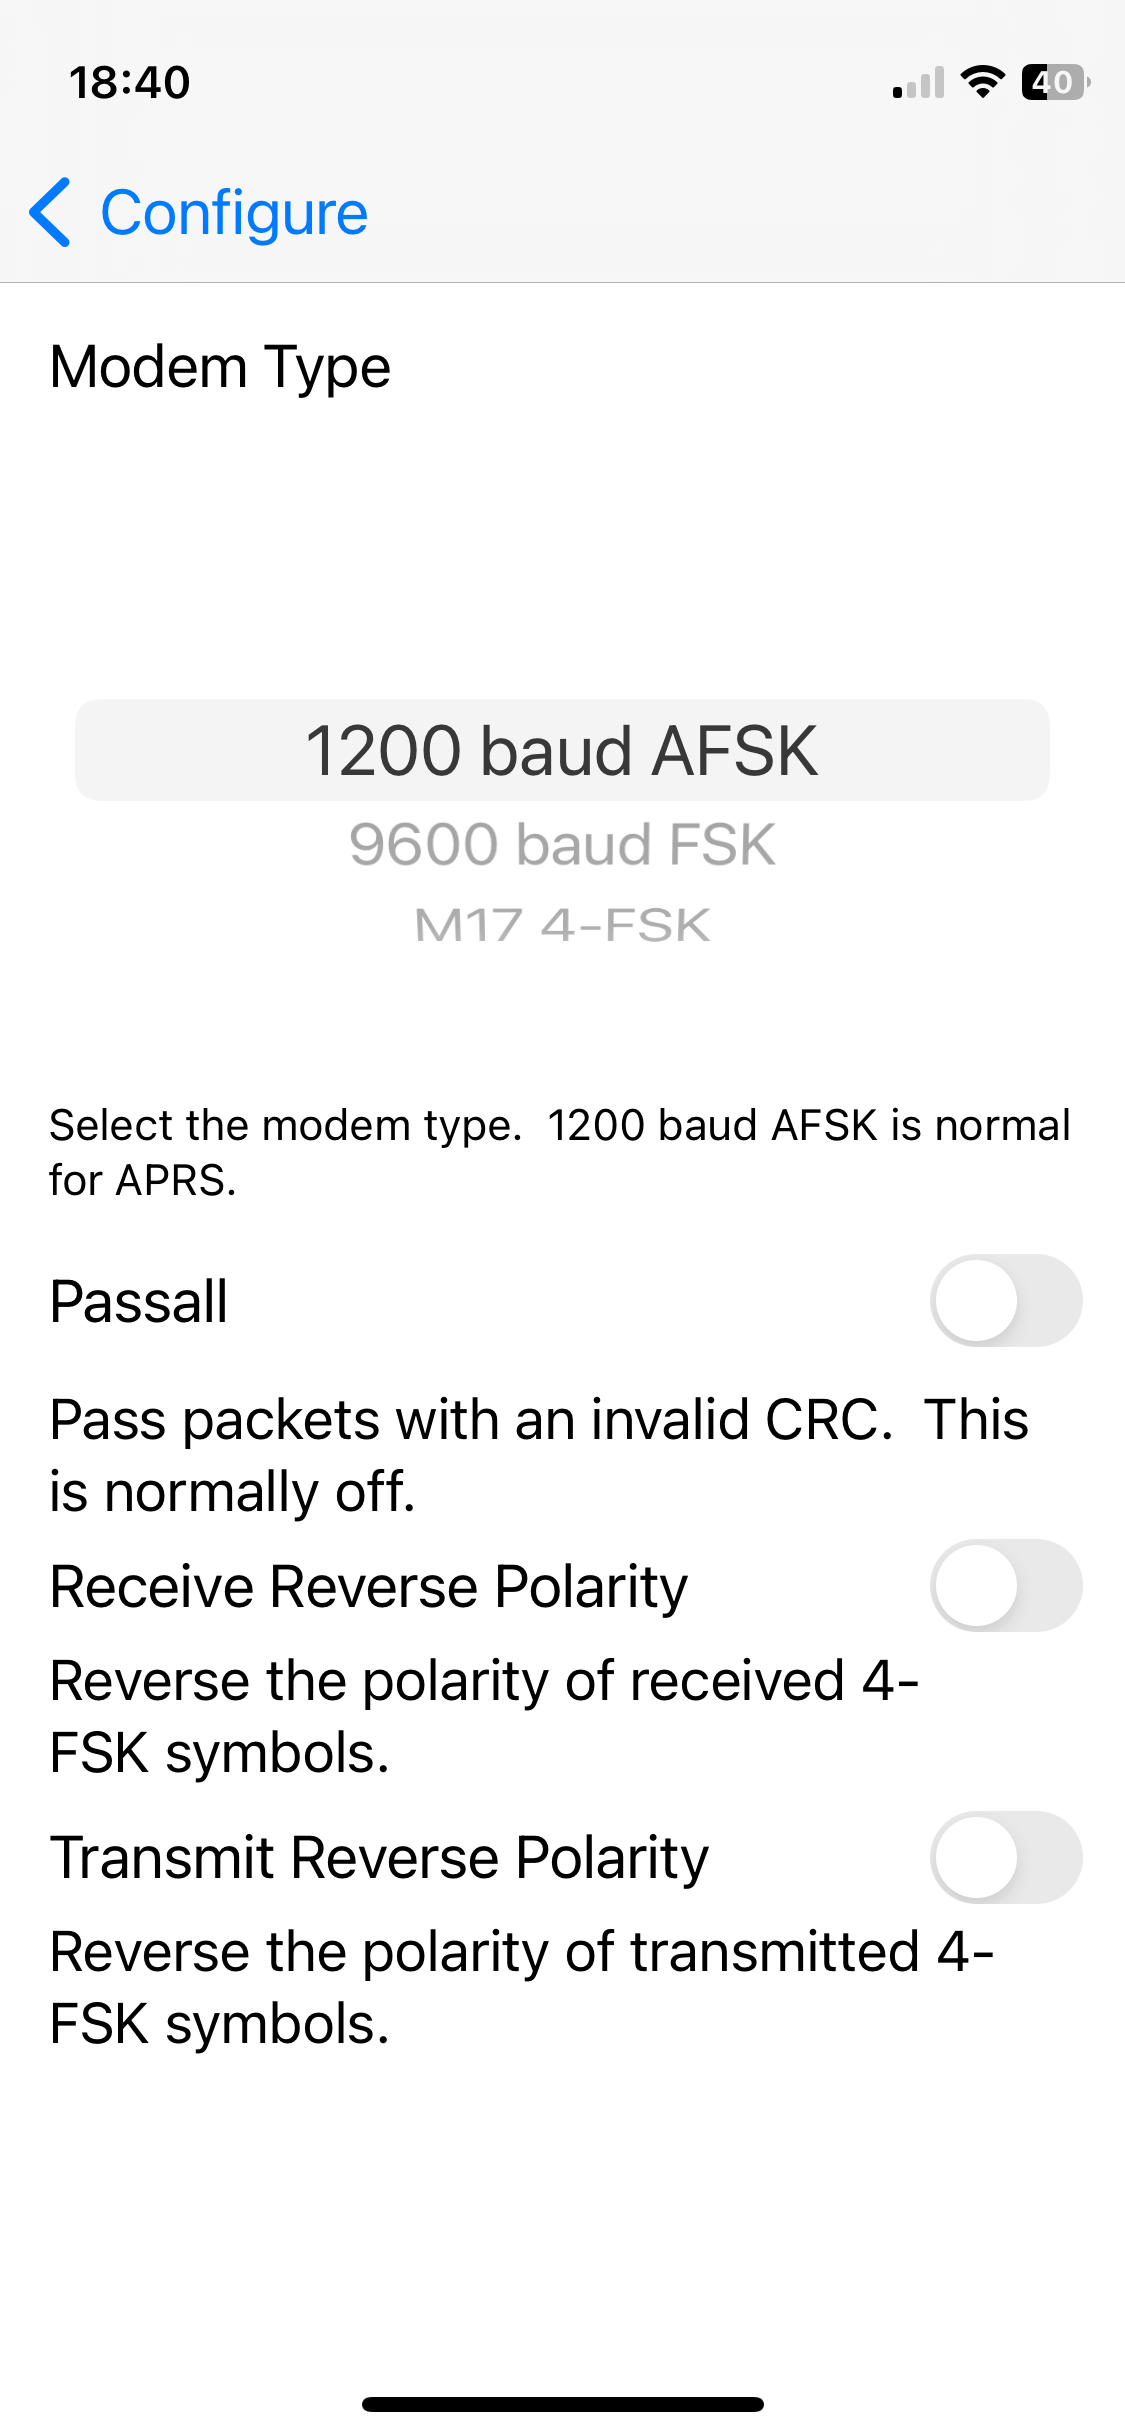
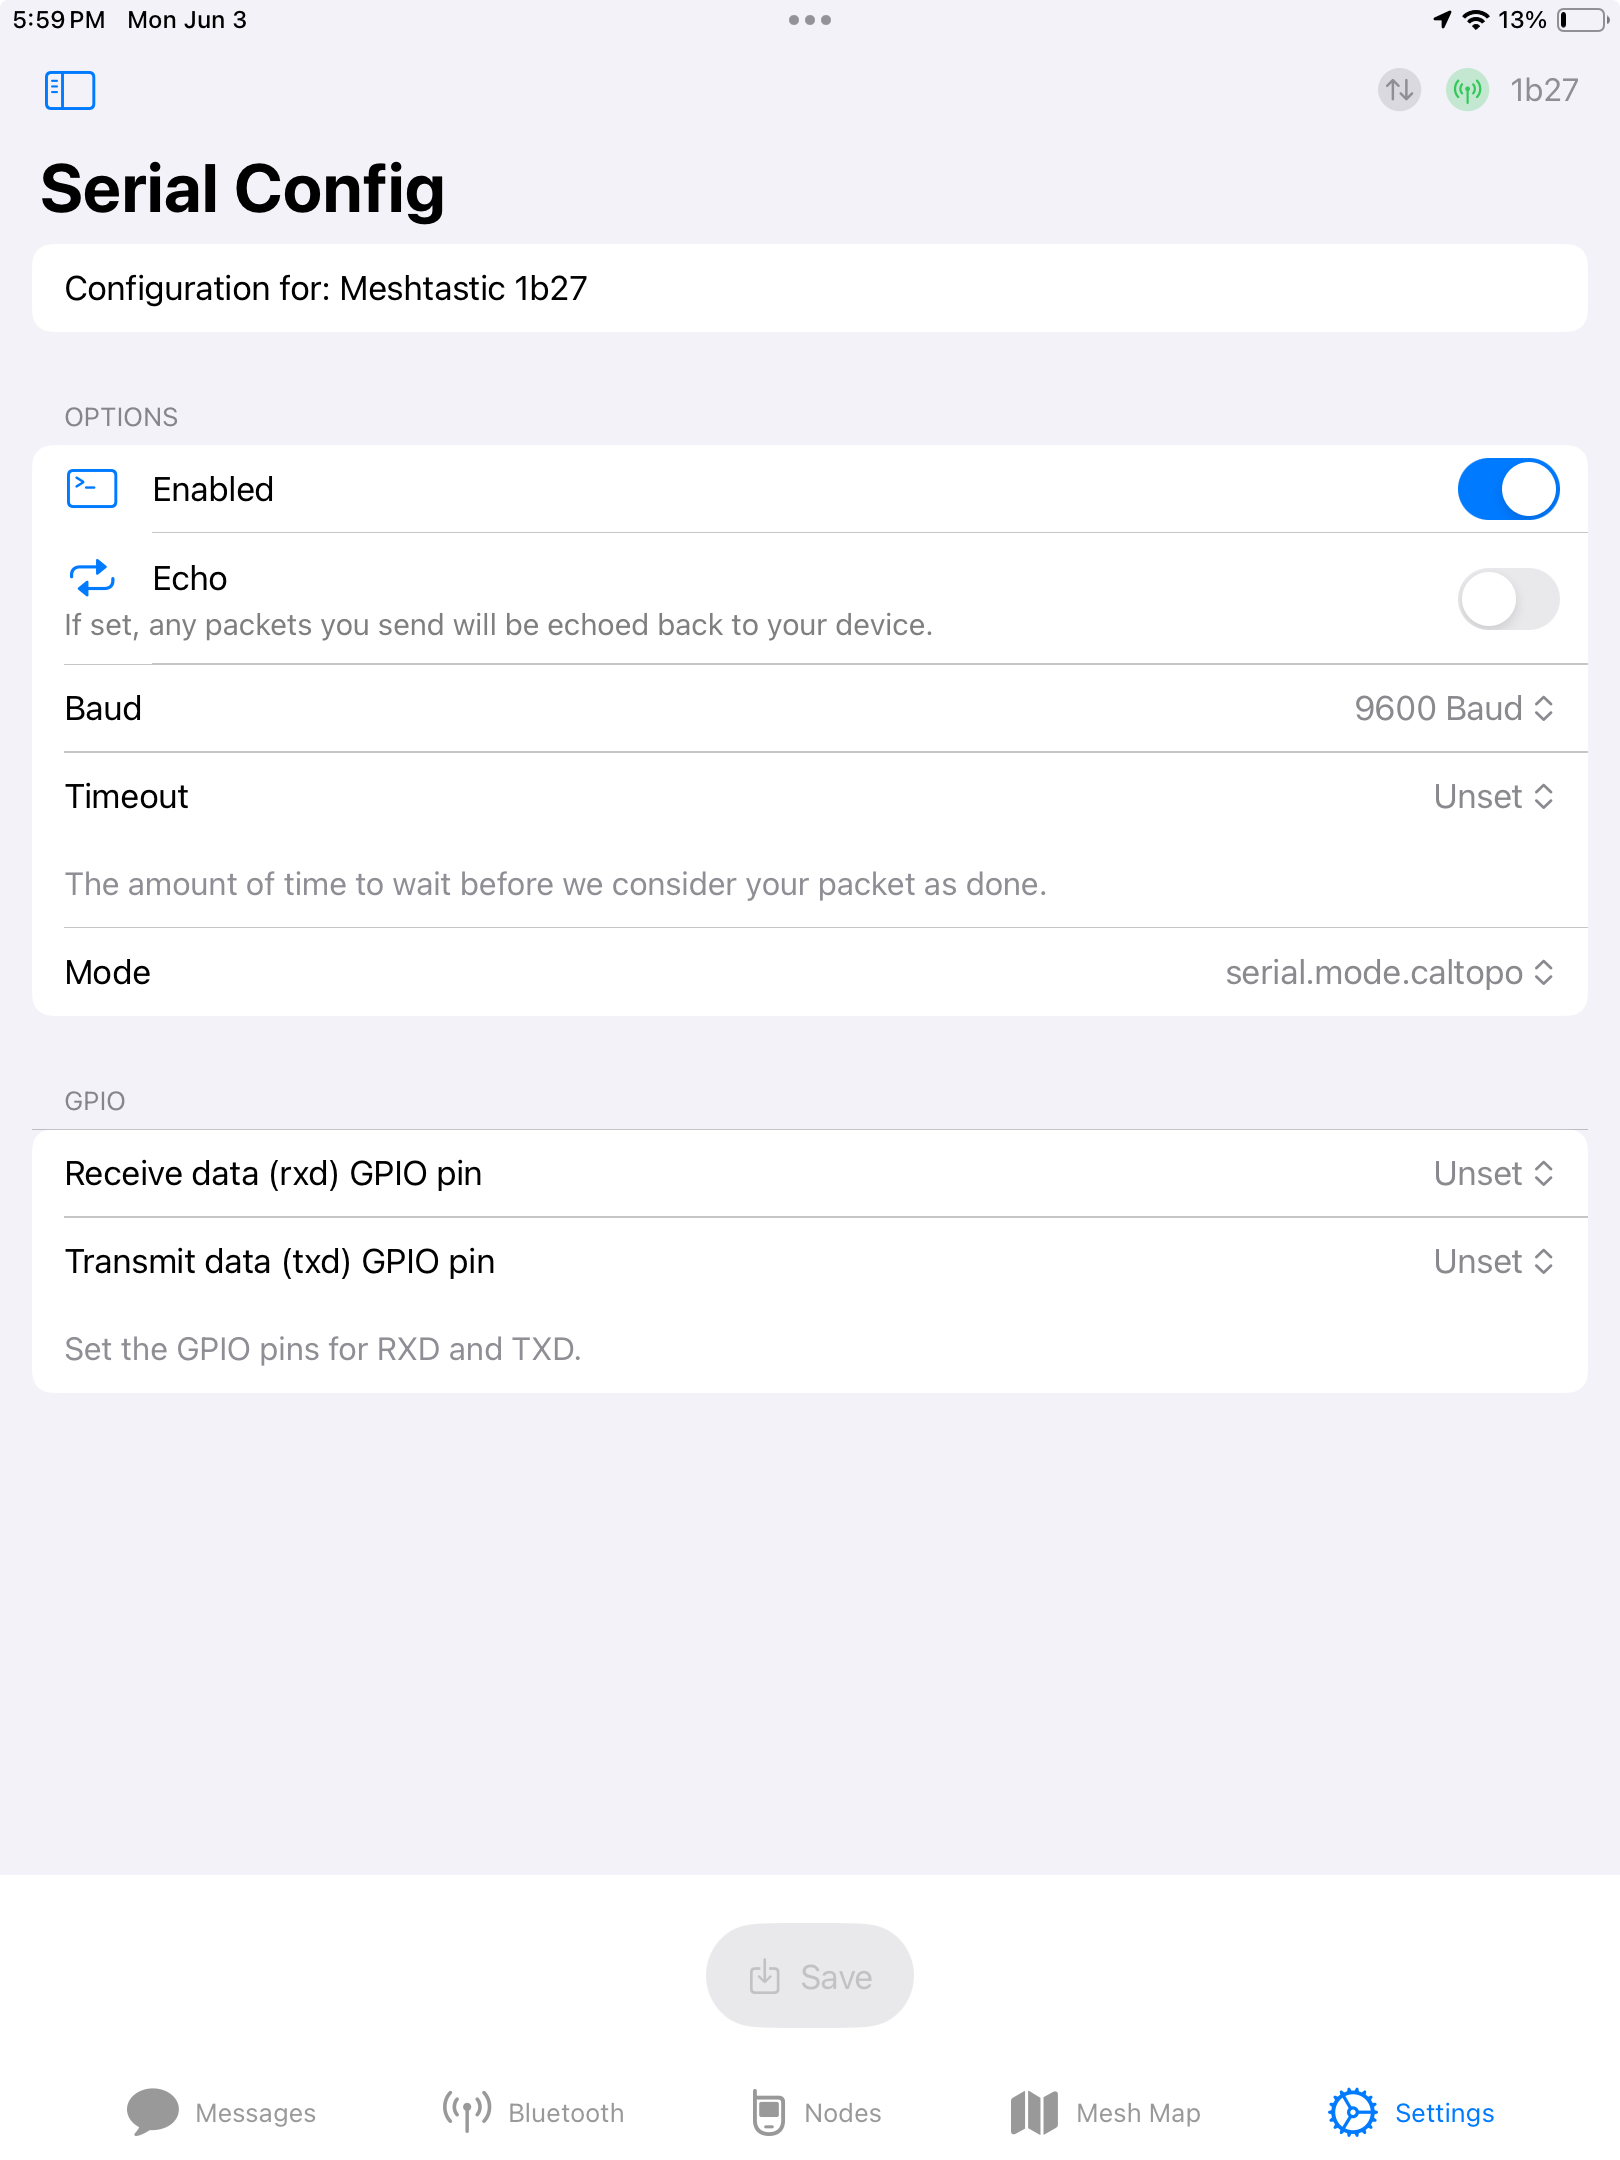
Being familiar with Meshtastic prior to setting up your radios for CalTopo is helpful. However if your primary use for your radios is to integrate with CalTopo here are some basics. If you buy radios specifically for this purpose get at least one that has BlueTooth, a USB port and make sure the radio is flashed with the latest firmware (2.3.7 or better). Connect the radio to the Meshtastic app via bluetooth and navigate to the Serial Configuration. The Bluetooth PIN for most radios is 123456, Bluetooth on your phone or tablet will need that to connect to your radio. The primary thing you need to configure via the Meshtastic app is the Serial configuration. The mode needs to be:serial.mode.caltopo
sarsoft.location.serial.tty.usbmodem1301=9600,8,1,0
For more information on how to set up the CalTopo Desktop app to receive Meshtastic location, please visit the APRS page.
Below are some Meshtastic links that are specific to the CalTopo integration.
https://meshtastic.org/docs/software/integrations/integrations-caltopo https://meshtastic.org/docs/configuration/module/serial