Map Viewer Tour
let's begin
With all the features and possibilities available in CalTopo, the first time you open the map viewer can be overwhelming for some users.
The purpose of this lesson is to get you acquainted with the map viewer on both the web and mobile app. You’ll find that once you get familiar with the lay of the land, it's much easier to find your way around and get started creating unique and informative maps.
Topics on this Page:
First Look
When you first open up CalTopo, you will see the map viewer. The map viewer is where you create and edit maps.
The screenshots and videos below will take you on a tour of different parts of the map viewer as seen when logged into a free account - first on the web, and then on the mobile app. Keep in mind that you can do a lot with a free account on CalTopo; however you will gain access to even more features with a paid subscription.
For more information on the features and pricing of individual account subscriptions, please visit our Individual Accounts page.
On the Map
Ignore all the side bars for a moment and look at just the buttons and information boxes drawn on top of the base map. Many primary map functions are located here.
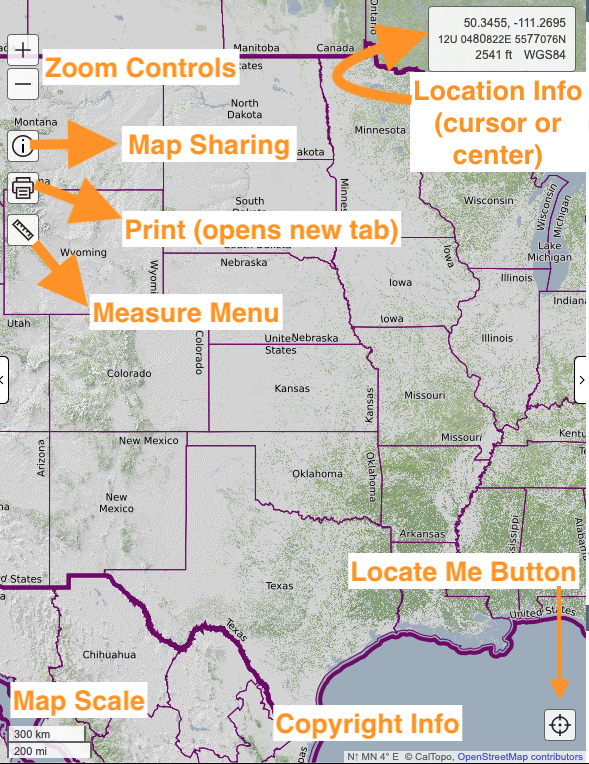
Use the zoom control buttons to zoom in and out on the map. Double clicking on the map or using your mouse wheel will control the map zoom also. You can also use your mouse to move, or pan, the map by clicking and dragging. The arrow keys on your keyboard will move the map as well.
In the top right corner of the map viewer, there is a small box overlaying the background map that contains information about the cursor location on the map, or the center of the map in view depending on which settings you choose in the settings menu. This box shows the coordinates of the cursor in the two formats you chose in settings, as well as the elevation of that point and the datum for the map.
At the bottom of the window are the map scale on the left, and the copyright info and locate me button on the right. If you turn on more layers, additional info such as legends will also display along the bottom of the page.
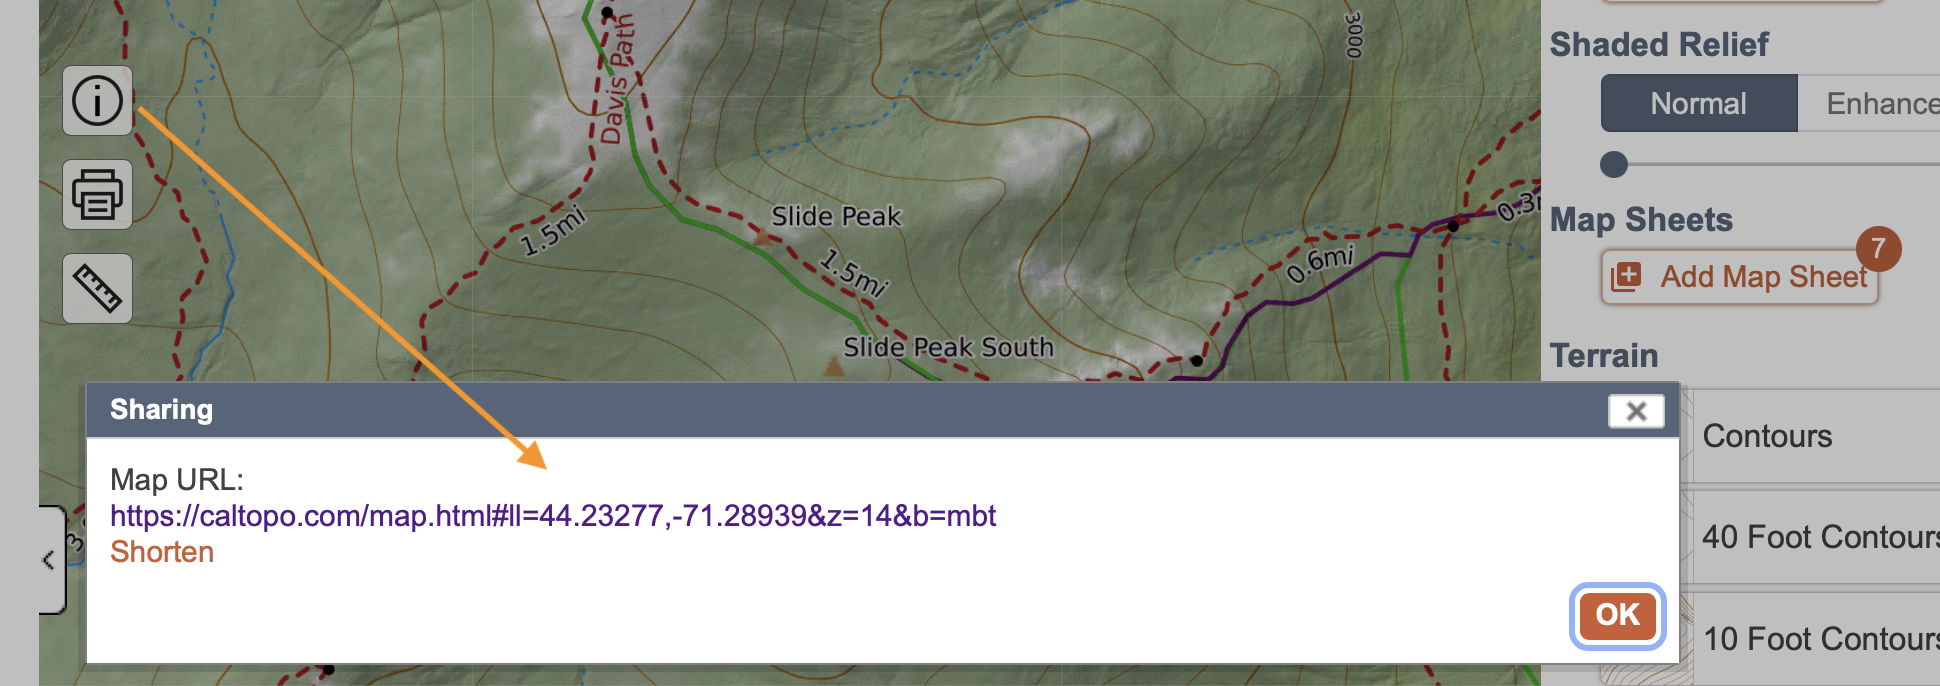
The other three buttons (map sharing, print, and measure) all open additional menus or browser pages, as shown in the next three images.
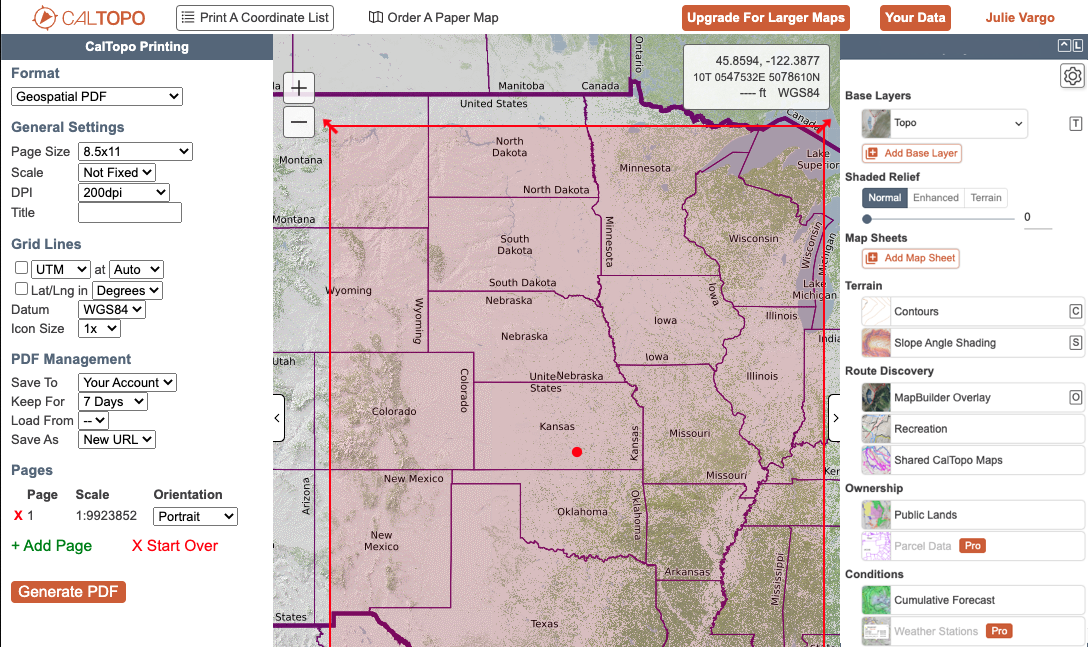
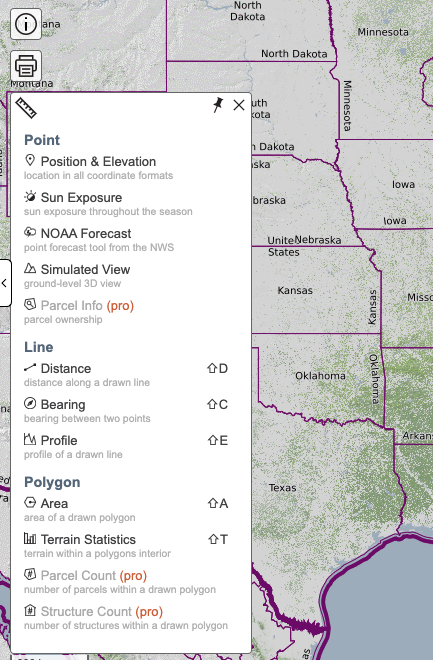
The measure button opens a menu with various measure functions, which are covered in the measure tools lesson.
Top Bar
After you close the "accept use" banner, you will see the top bar. On the left side of the bar are the CalTopo logo, which links to the CalTopo About site, and the help button, which links to a page with several resources for getting help, including this page.
Moving across the page to the right, next you see the search bar. Enter the name of a place or coordinates (in any common format) into this bar, press enter on your keyboard, and the map will center on that location.

On the right side of the page are the Settings menu button, a Close button, Sign Up and Login buttons.
- Settings: This contains map wide settings, such as your choice of primary coordinate systems, labels display, datum, and grid display. For more about settings, go to Settings Menu.
- Close: On an unsaved (draft) map, this will erase any existing objects you added to the map and start over. On a blank map, it reloads the page. On a saved map, it will close the saved map and take you back to a blank map. See Blank, Draft, and Saved Maps for more about map types.
- Sign Up takes you to the account creation process.
- Login is for existing users who want to access their account.
Top Bar After Login
After creating an account and/or logging in to CalTopo, the buttons on the top bar change some.

- Upgrade: The upgrade button displays if you have an upgrade option. Click the link to see the options.
- Your Data: When you save maps, PDFs, layers, and more, these get stored in Your Data. Click the button to view your map list and other tabs. Read about your account items here
- Your Account (displayed as your name or email): Clicking on your name will open your account panel, where you can see your current subscription, link to change subscription and payment info, add alternate logins and more.
Map Objects Menu (Left Side Bar)
On the left side of the screen is a column called the Map Objects Menu. You can collapse and expand this side bar using the arrow-tab or the keyboard shortcut control-o (^o). At the top of the bar are the buttons for importing map objects, exporting map objects, and adding new map objects. After you add a map object, they list in this column.
You can adjust the width of this sidebar by dragging the arrow tab left and right.
For more information about importing and exporting objects, go to the import and export chapter.
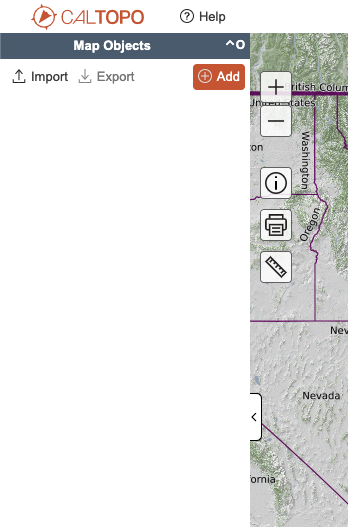
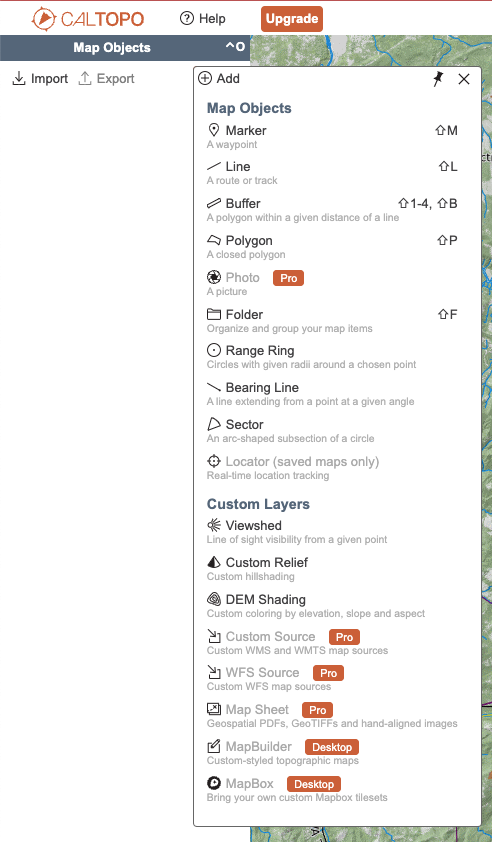
Pressing on the orange +Add button opens a menu with choices to create new map objects and custom layers. Some map objects have keyboard shortcuts also, which are listed next to the object name. The pushpin icon at the top of the menu will leave the menu open until you un-pin it.
Go to the Objects chapter to learn about adding objects to your map and working with them.
Map Layers (Right Side Bar)
On the right hand side of the map viewer page is the Map Layers. Like the objects menu, this is collapsible via the arrow tab or a keyboard shortcut - in this case control-L (^L). Layers are one of the most powerful features of CalTopo. There are three types of layers, Base Layers, Overlays and Map Sheets. You can learn about Base Layers and Overlays and what each layer and overlay shows in the Base Layers chapter and Overlays chapter. Map Sheets can be imported by you or you can use publicly shared map sheets. Here you can find more information about Map Sheets.
Base Layers: to select and stack base layers. The drop-down menu shows the list of layers to choose from.
Shaded Relief: move the slider to add shaded relief to any base layer
Map Sheets: to select and stack geospatial images such as JPG, TIFF or PDF files.
Map Overlays: turn on and off overlays to add additional data to your map.

Base Layer and Overlay Catalog
CalTopo provides a wide range of base layers and overlays, from general-purpose maps to highly specialized options. To make it easier to find what you need, these are organized in a catalog where you can choose which layers and overlays to include in your personalized menu. When you first open the Map Layers, the Base Layer and Overlay menus start with a default selection of our most popular and generally useful layers. Although you can hide certain layers and overlays, you can always unhide them later if you want to use them. We recommend taking time to explore the full catalog and customize it to best suit your needs.
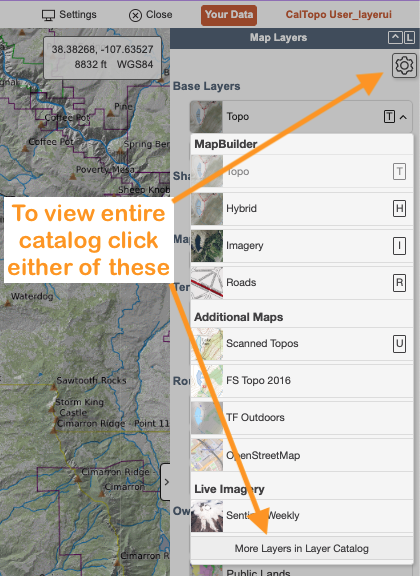
How to use the Layer Catalog
-
Open the catalog
- Click the Gear icon in the Layers panel.
- This opens the full Layer and Overlay Catalog.
-
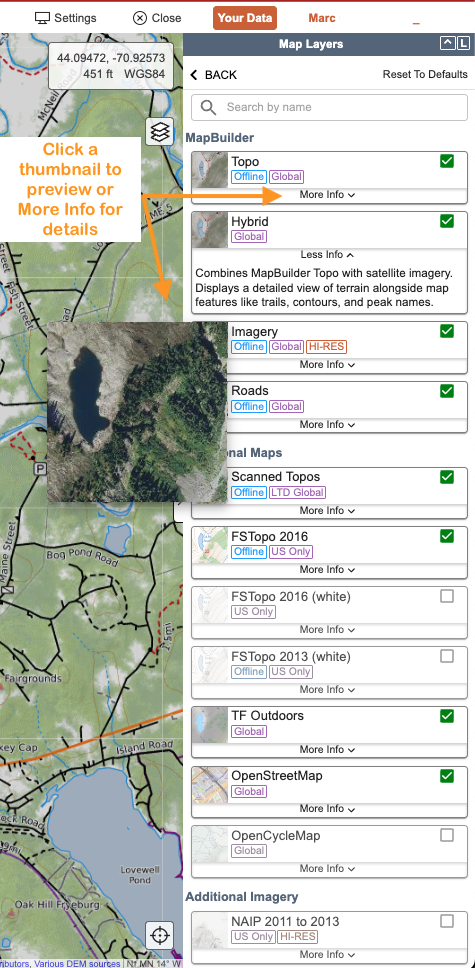
Customize your Base Layer and Overlay list
- Browse through the catalog.
- Check the Base Layers and Overlays you want available in your working list.
- Uncheck (or leave unchecked) the ones you don’t want or don’t use.
-
Return to the map
- Once you’ve customized your list, click the Back button at the top to return to the map.
Using layers after setup
- Your Base Layer dropdown now shows only the base layers you selected.
- Your Overlays list shows only the overlays you chose to keep.
- From this point on, you don’t need to open the catalog during normal use.
You only need to click the Gear icon again if you want to add or remove layers from your list, which for most people will be occasional.
With the catalog, you can keep layers and overlays out of your list instead of scrolling past them every time. This helps reduce clutter and makes the layer list easier to work with.
Layer Catalog Tags
Each layer in the catalog includes tags that indicate the area it covers, whether it’s available offline, and other key features. Below is a list of the tags and their meanings:
-
 Available for download and offline use in the Mobile App with a subscription.
-
 Covers the entire globe.
-
 Available in the United States and in select areas worldwide.
-
 Available only within the United States.
-
 Requires a Pro or higher subscription.
-
 High-resolution imagery layer, ideal for detailed area views.
-
 Medium-resolution imagery layer, good for viewing snow or vegetation cover.
-
 Low-resolution imagery layer, typically used for weather or cloud cover.
-
 Contains clickable objects that provide additional information.
-
 Available only to users on a CalTopo Team account.
You can hide the layers menu in order to view more of the map. Click on the Map Layers button in the upper right of the map viewer to display or hide the sidebar. You can also use the tab mid-way down the column, on the map viewer side of the sidebar. When the layers side menu is closed, a layers icon also appears on top of the map below the cursor information box.
Downloading and Logging in to the Mobile App
Download the CalTopo mobile app from the Apple Store or Google Play Store
Log into the mobile app with the same provider and email as you use on the web app. If you still need to create an accoount and have questions about that, please go to the accounts lesson and/or the FAQs for accounts for account setup instructions.
After you have logged in, the mobile map viewer will now open.
Mobile App Map Viewer Tour
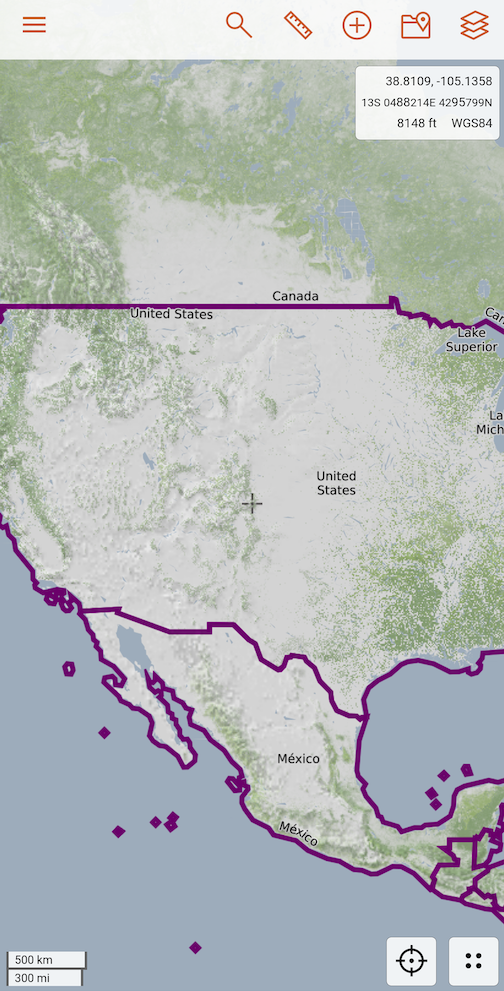
The mobile map viewer has many of the same tools as the web, although the layout differs. Let’s explore the different parts of the mobile map viewer as seen on the iOS app. Some icons may differ on the Android app although their location and function is the same.
Let’s start with the icons along the top of the mobile map viewer.
- Main Menu: access saved maps, map sheets and tracks, scan a QR code, download base layers for offline use, change your display options and settings, as well as view your account information.
- Measure: gather information quickly without saving anything to the map.
- Map Objects: view and edit map objects and custom layers currently the map you are viewing as well as add new ones. Import and export map items and tracks.
- Search: search for a location by name or any coordinate format.
- Layers: access base layers, map sheets and overlays.
The icons along the top of the map viewer include:

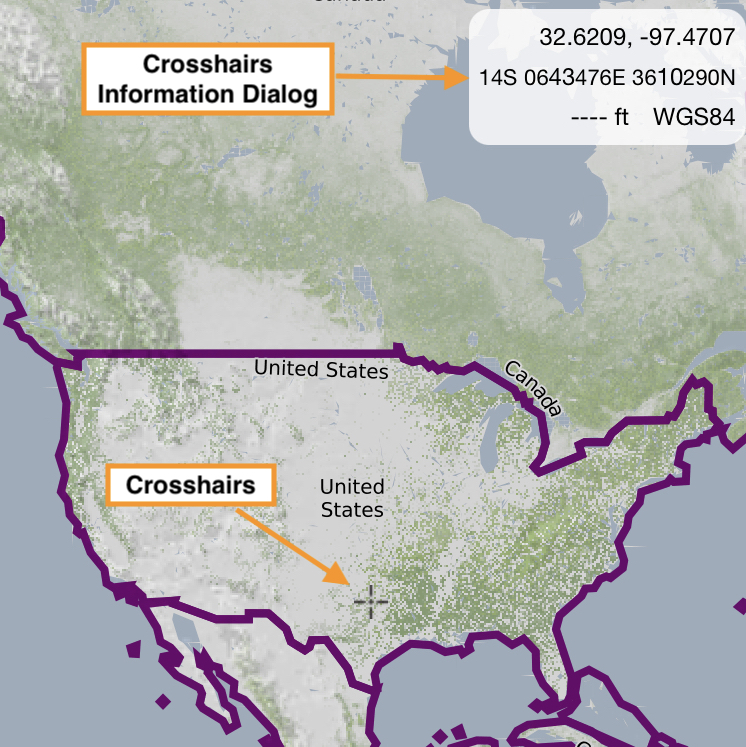
Below the icons along the top of the mobile map viewer is the crosshairs information dialog, similar to the cursor information dialog on the web. However the important difference is that the crosshairs information dialog displays the coordinates and elevation of the crosshairs at the center of the mobile map viewer. As you zoom in and out and pan around the map, the crosshairs will remain centered and the crosshairs information dialog will reflect the current coordinates and elevation of the crosshairs and the map datum.
The four dot Location Menu and Locate Me icons are in the lower right hand corner of the map viewer.

Finally let’s look at how you can move around the mobile map viewer. You can zoom in on a particular area by pinching your fingers together on the screen and zoom out by bringing your fingers further apart. To pan around the map, simply press your finger on the screen and drag it in the direction that you want to move the map.
If you’d prefer to take a virtual tour of the mobile map viewer, check out this video. As with the screenshots above, this video shows the iOS CalTopo app. Some icons may differ on the Android app but the location and function is the same.
Navigating the Mobile App Quick Video
Check out this video for a quick tour of the mobile app map viewer.