Creating Lines and Polygons
in this lesson
Here we look at creating lines and polygons and using the snap-to function.
A line is a series of connected points. They are vector objects in an X,Y coordinate system laid out on the surface of the earth. Lines have a direction, and are designated as a route or a track. Commonly, lines are used to indicate a route or trail. They also could trace a watercourse, show a bearing, or designate a boundary.
A polygon is a line that is closed back on itself to form an area. Polygons are used to designate an area on the map. It could be an area of interest, a lake, an area to camp at, a dangerous area to stay out of, a certain vegetation type, or much more.
Topics on this Page:
Adding Lines and Polygons
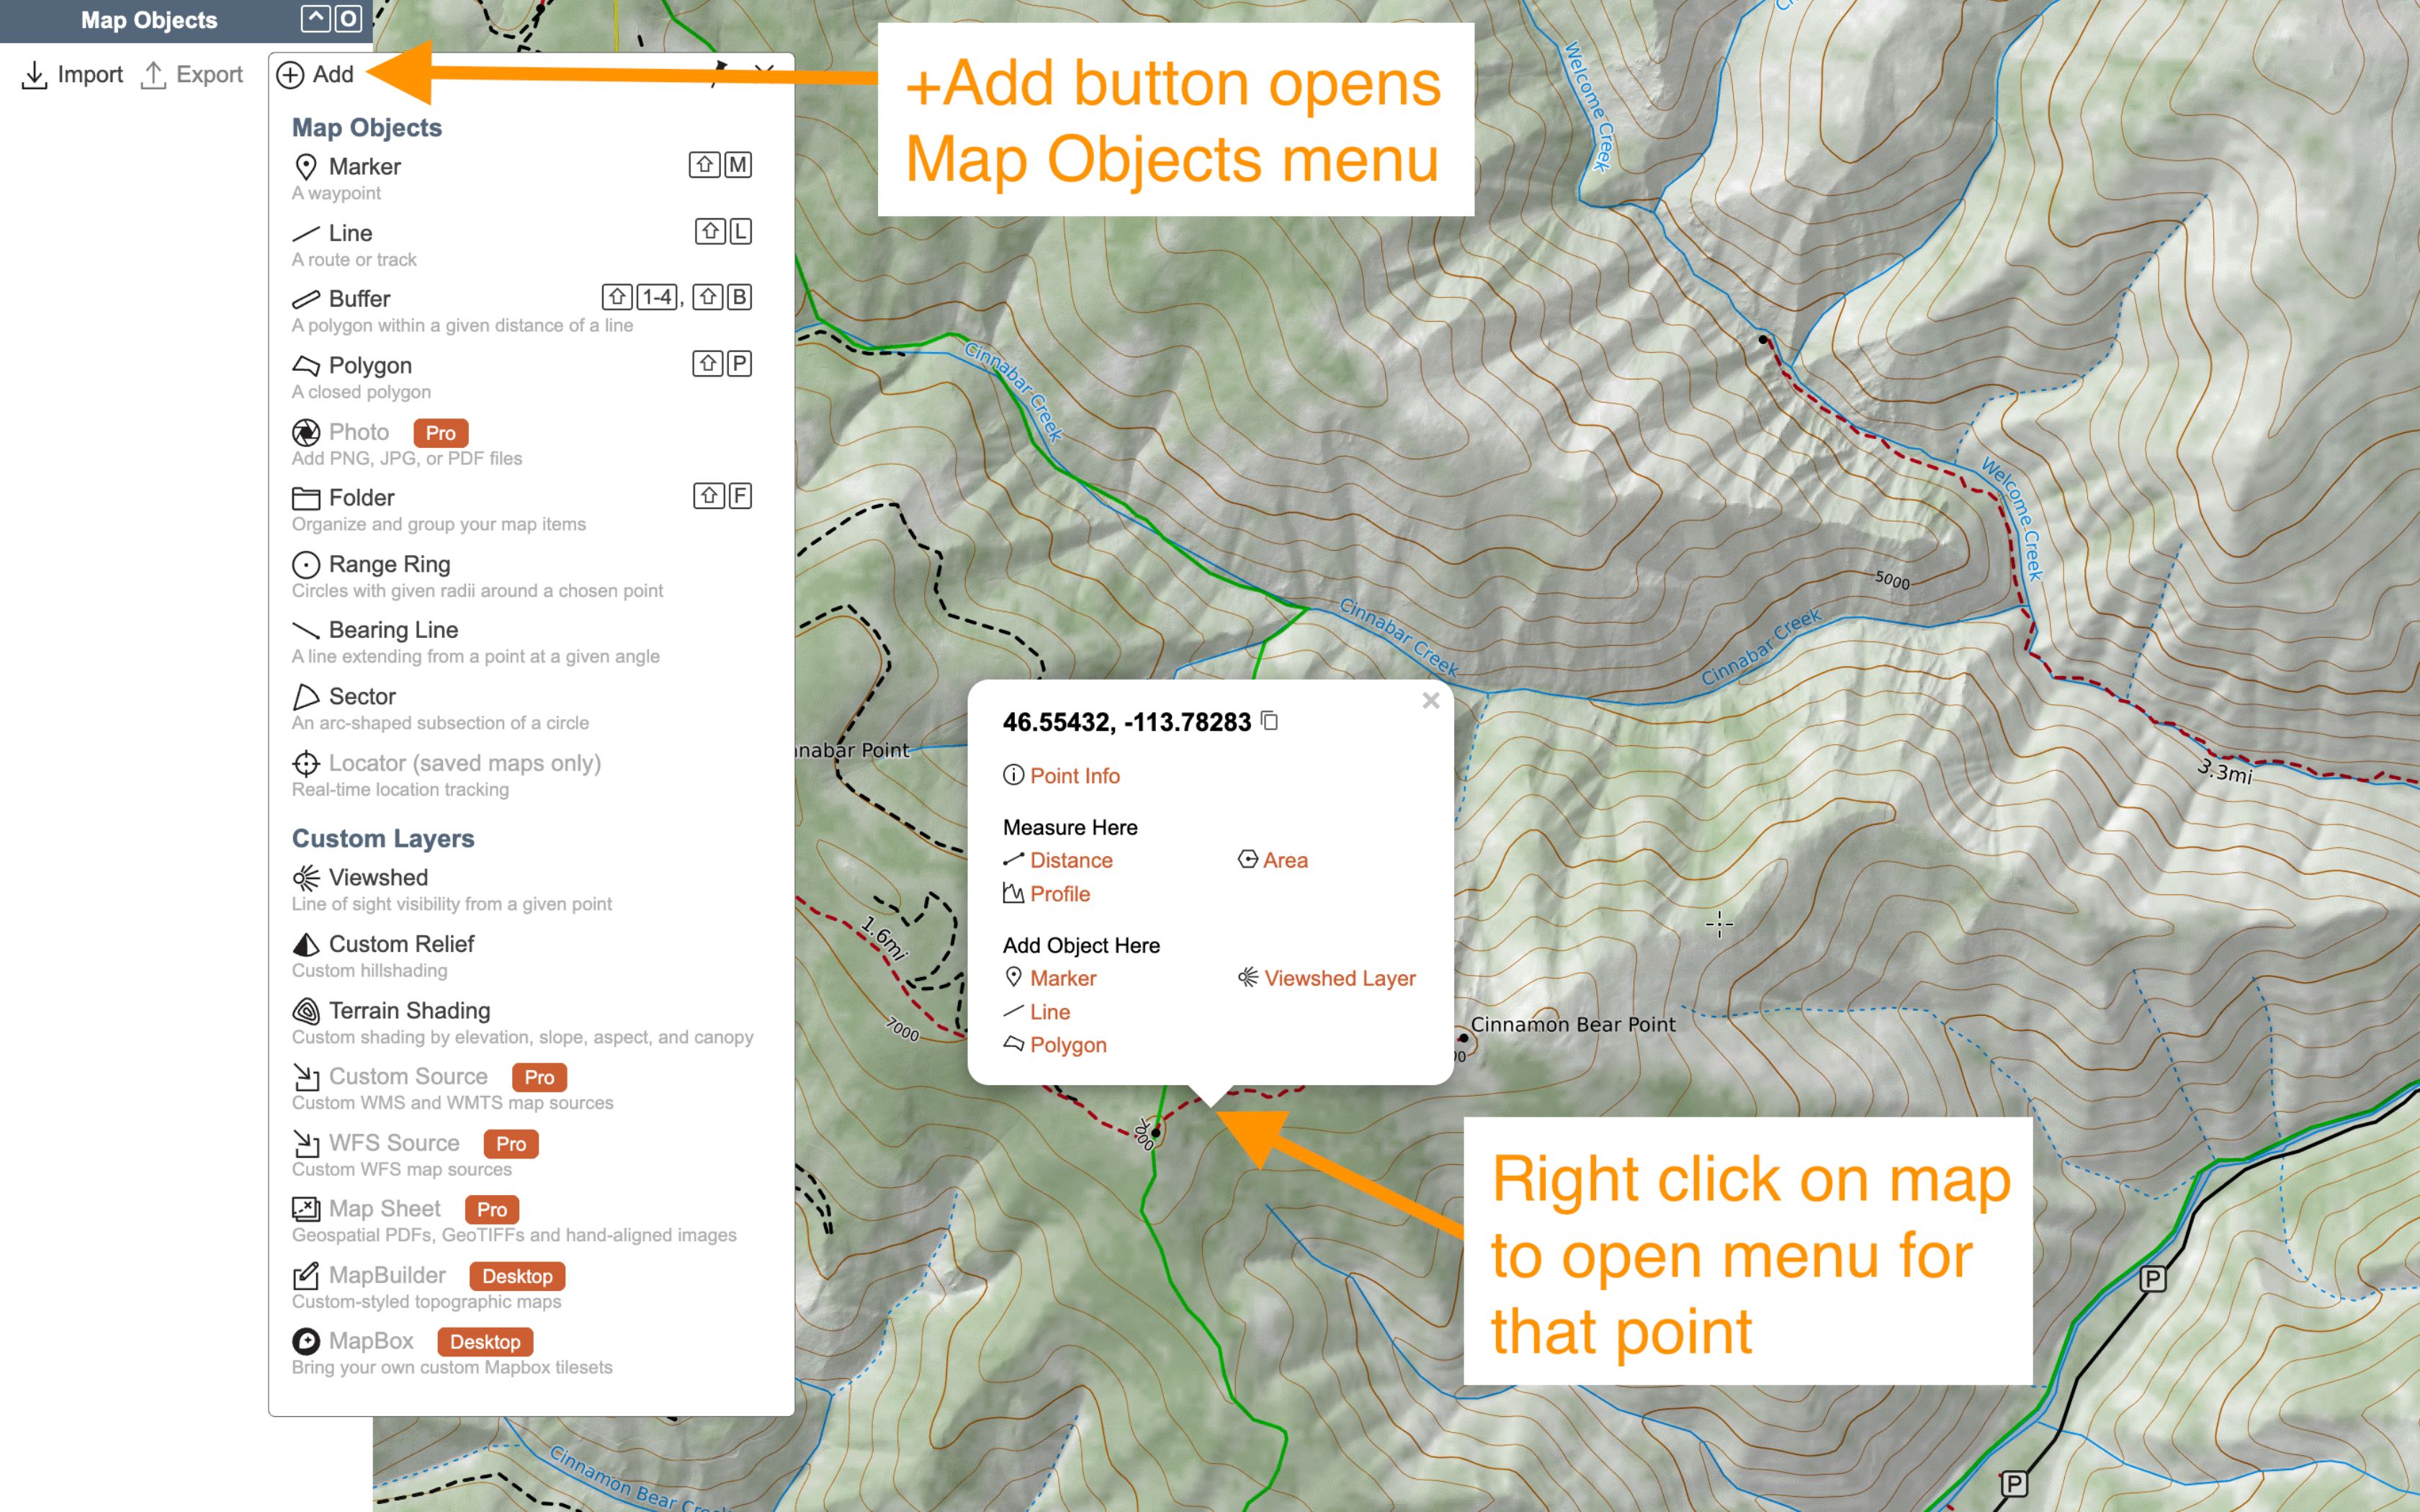
To add a line to your map, use one of the same methods as described for adding a marker:
- The add button in the map objects left sidebar. However, your first point doesn’t appear on the map until you click it again to start drawing the line.
- Right click on the map where you want the object to start.
- Use keyboard shortcuts for some objects (Shift-L for line, Shift-P for polygon, and Shift-B for a buffer or Shift 1 through for 4 for buffers of certain widths.)
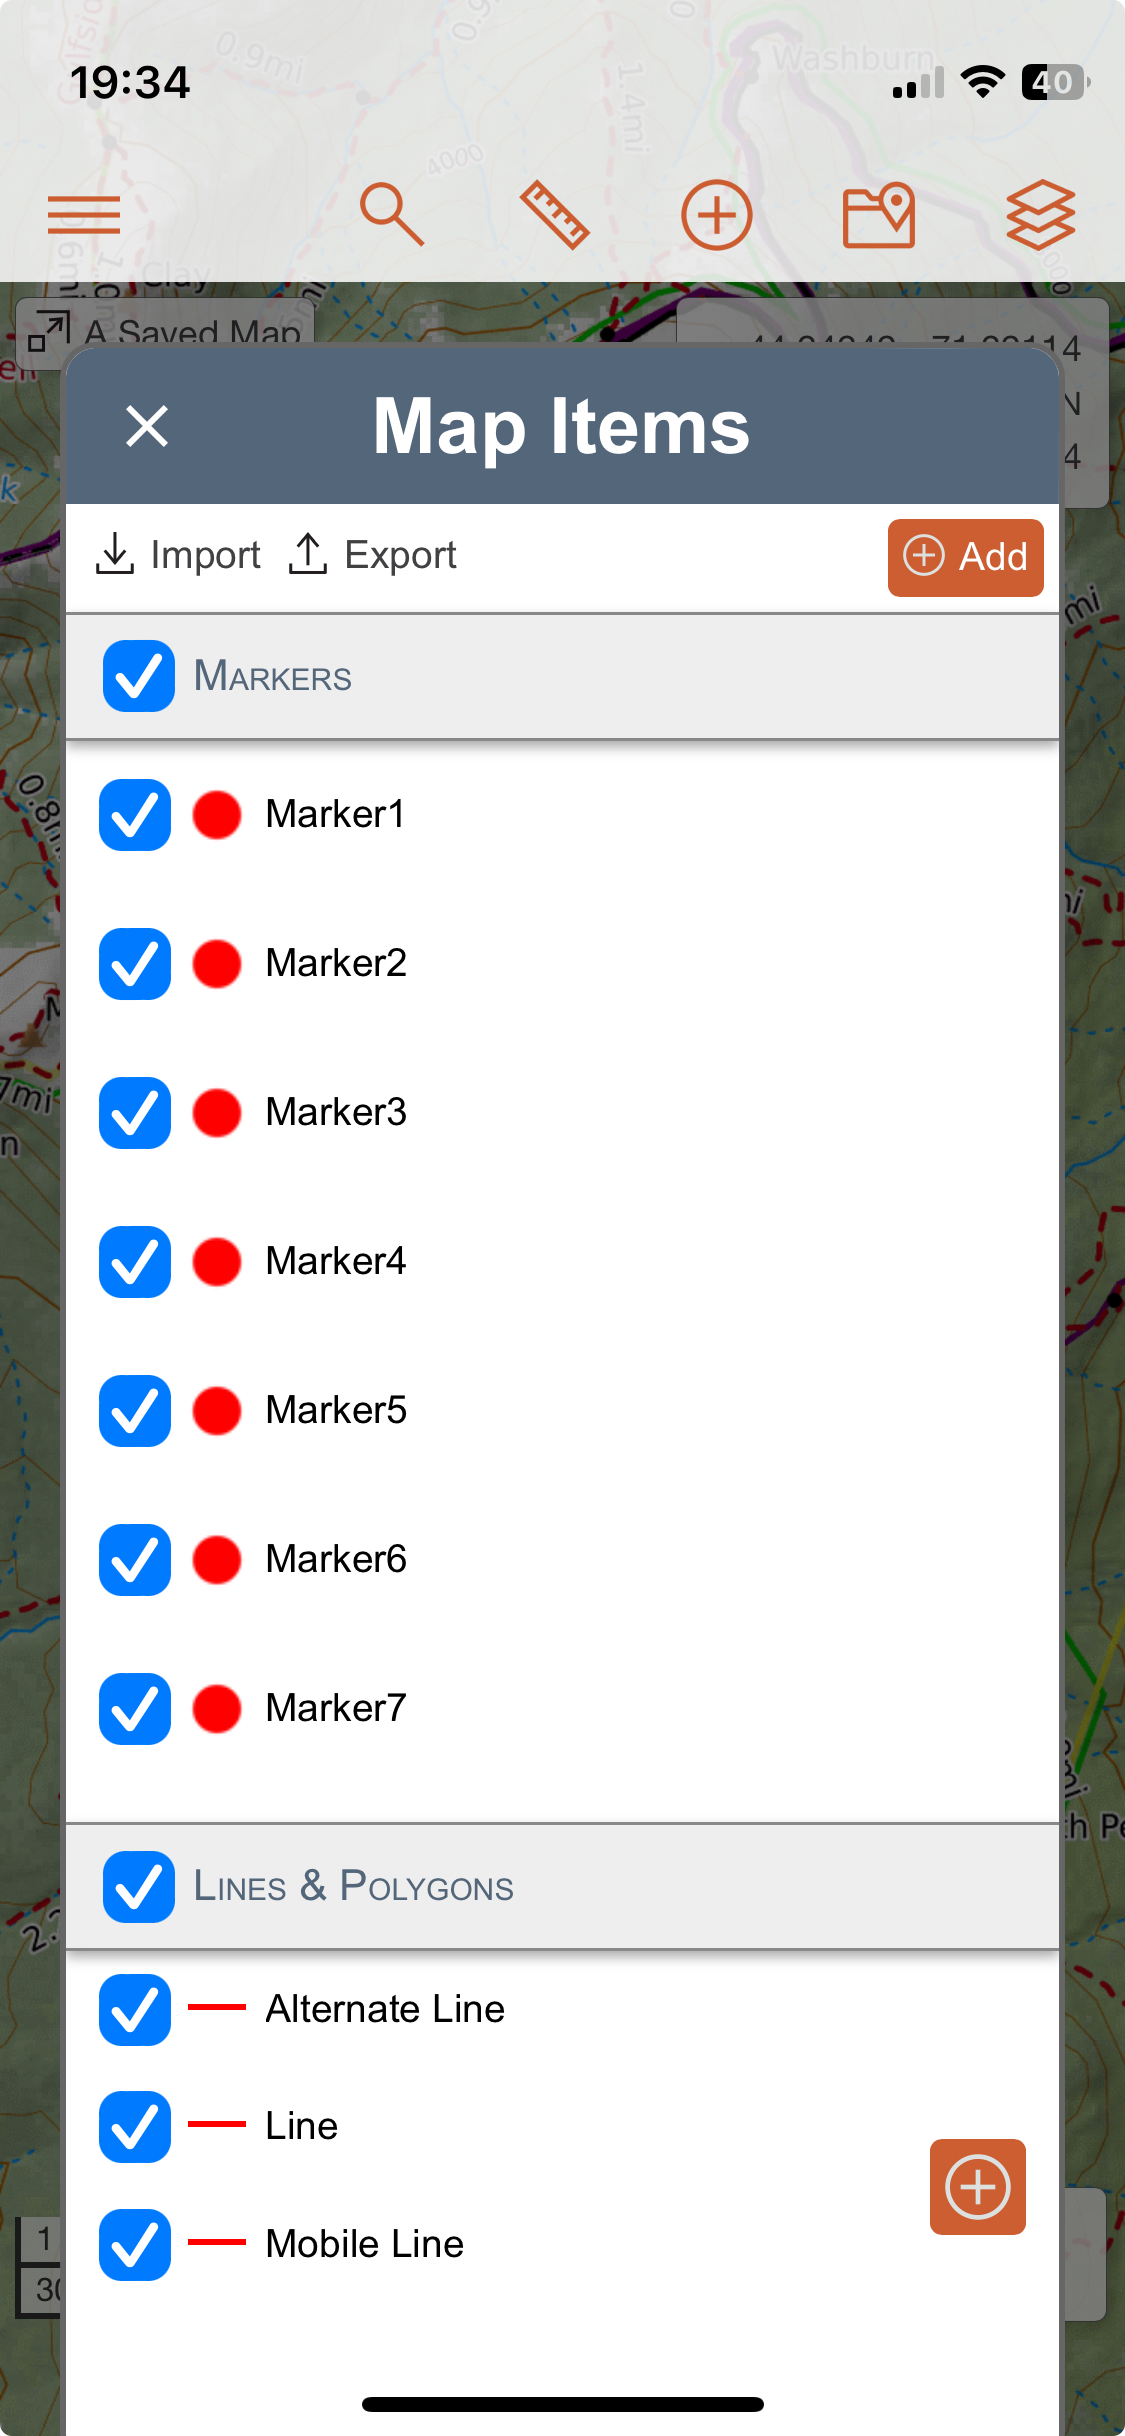
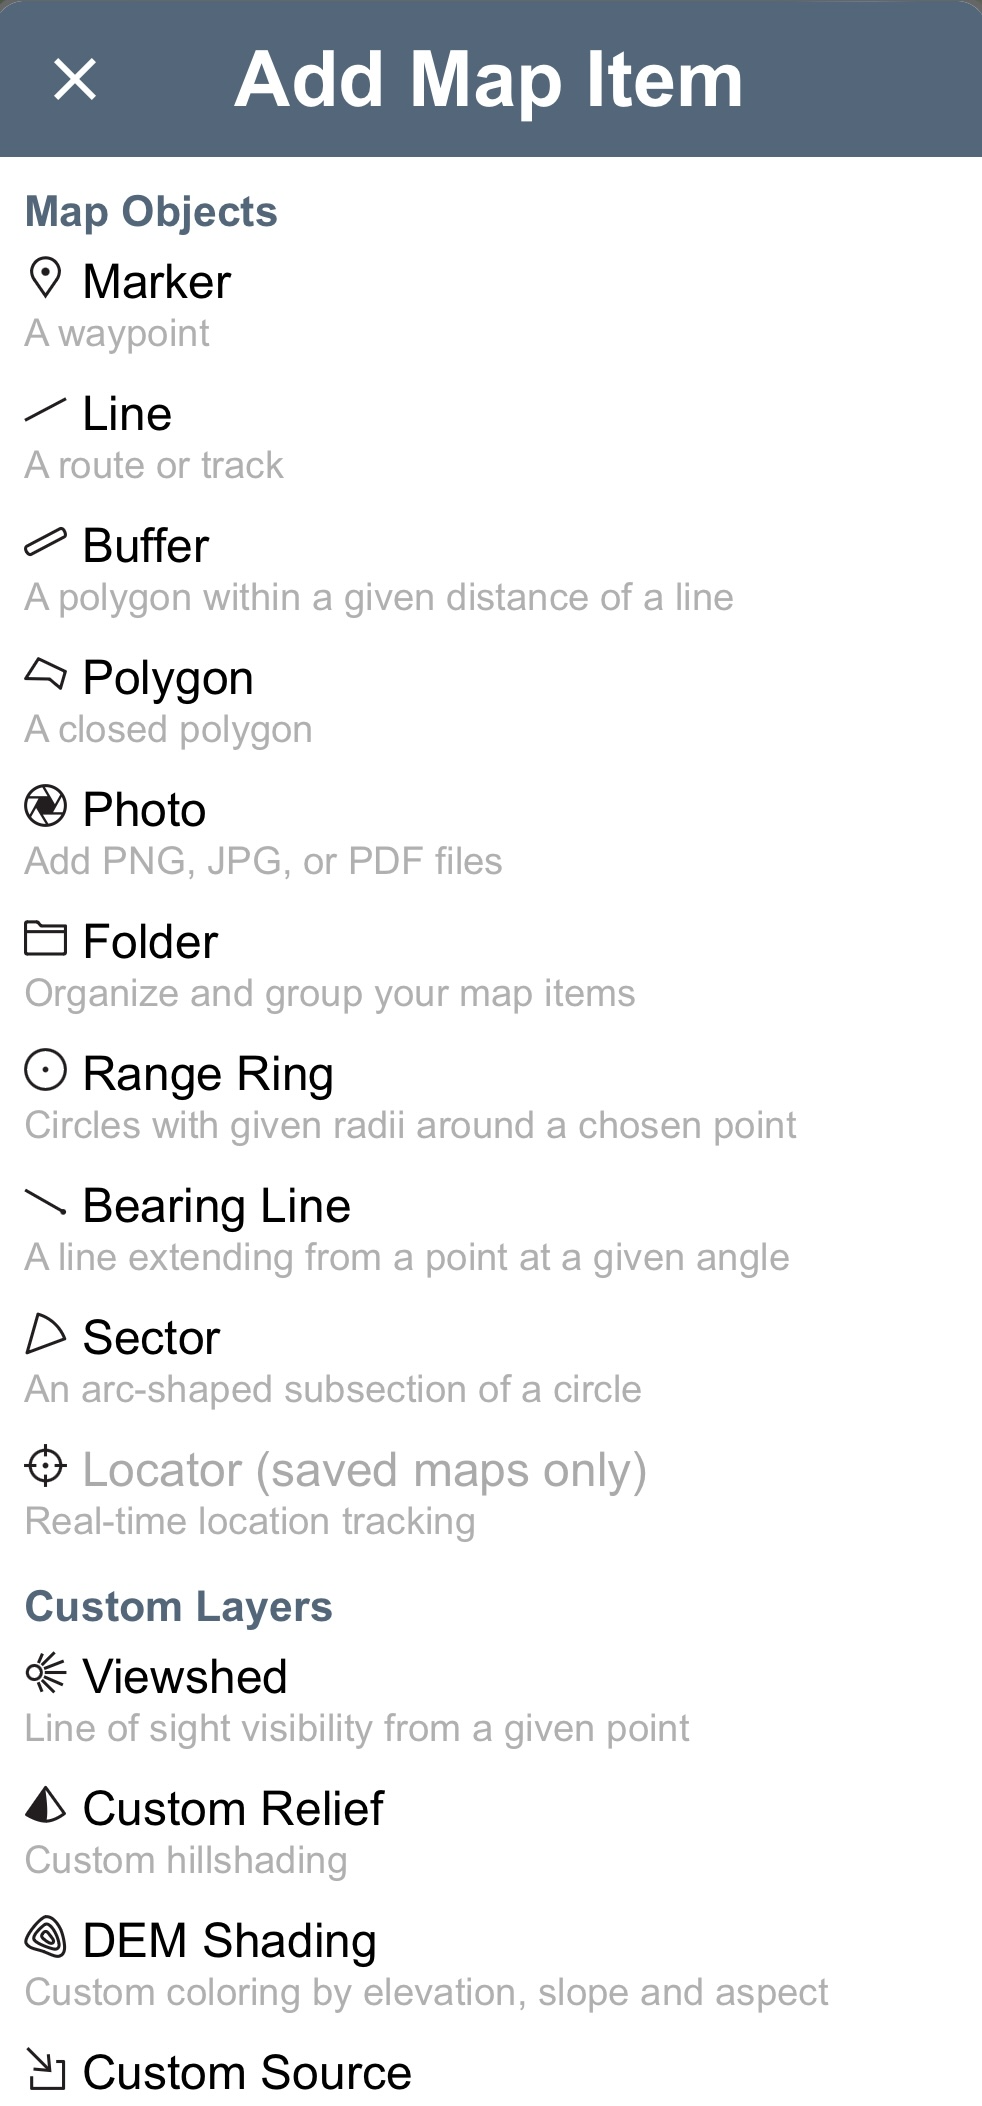
To add a line or polygon to the map, you cannot long-press on the map as you do for adding a marker. To add an object other than a marker, go to the objects folder, then use the Add Object button at the bottom of the screen. Here you will find an extensive add-object menu, as well as the menu for adding a custom layer.
After selecting a line or polygon to add to your map, the process for drawing is pretty much the same as the web (described below).
You can fill out all the information in the edit box before, during, or after drawing the line. Or you can draw your whole line, finish it, then re-open it to edit the label and other information.
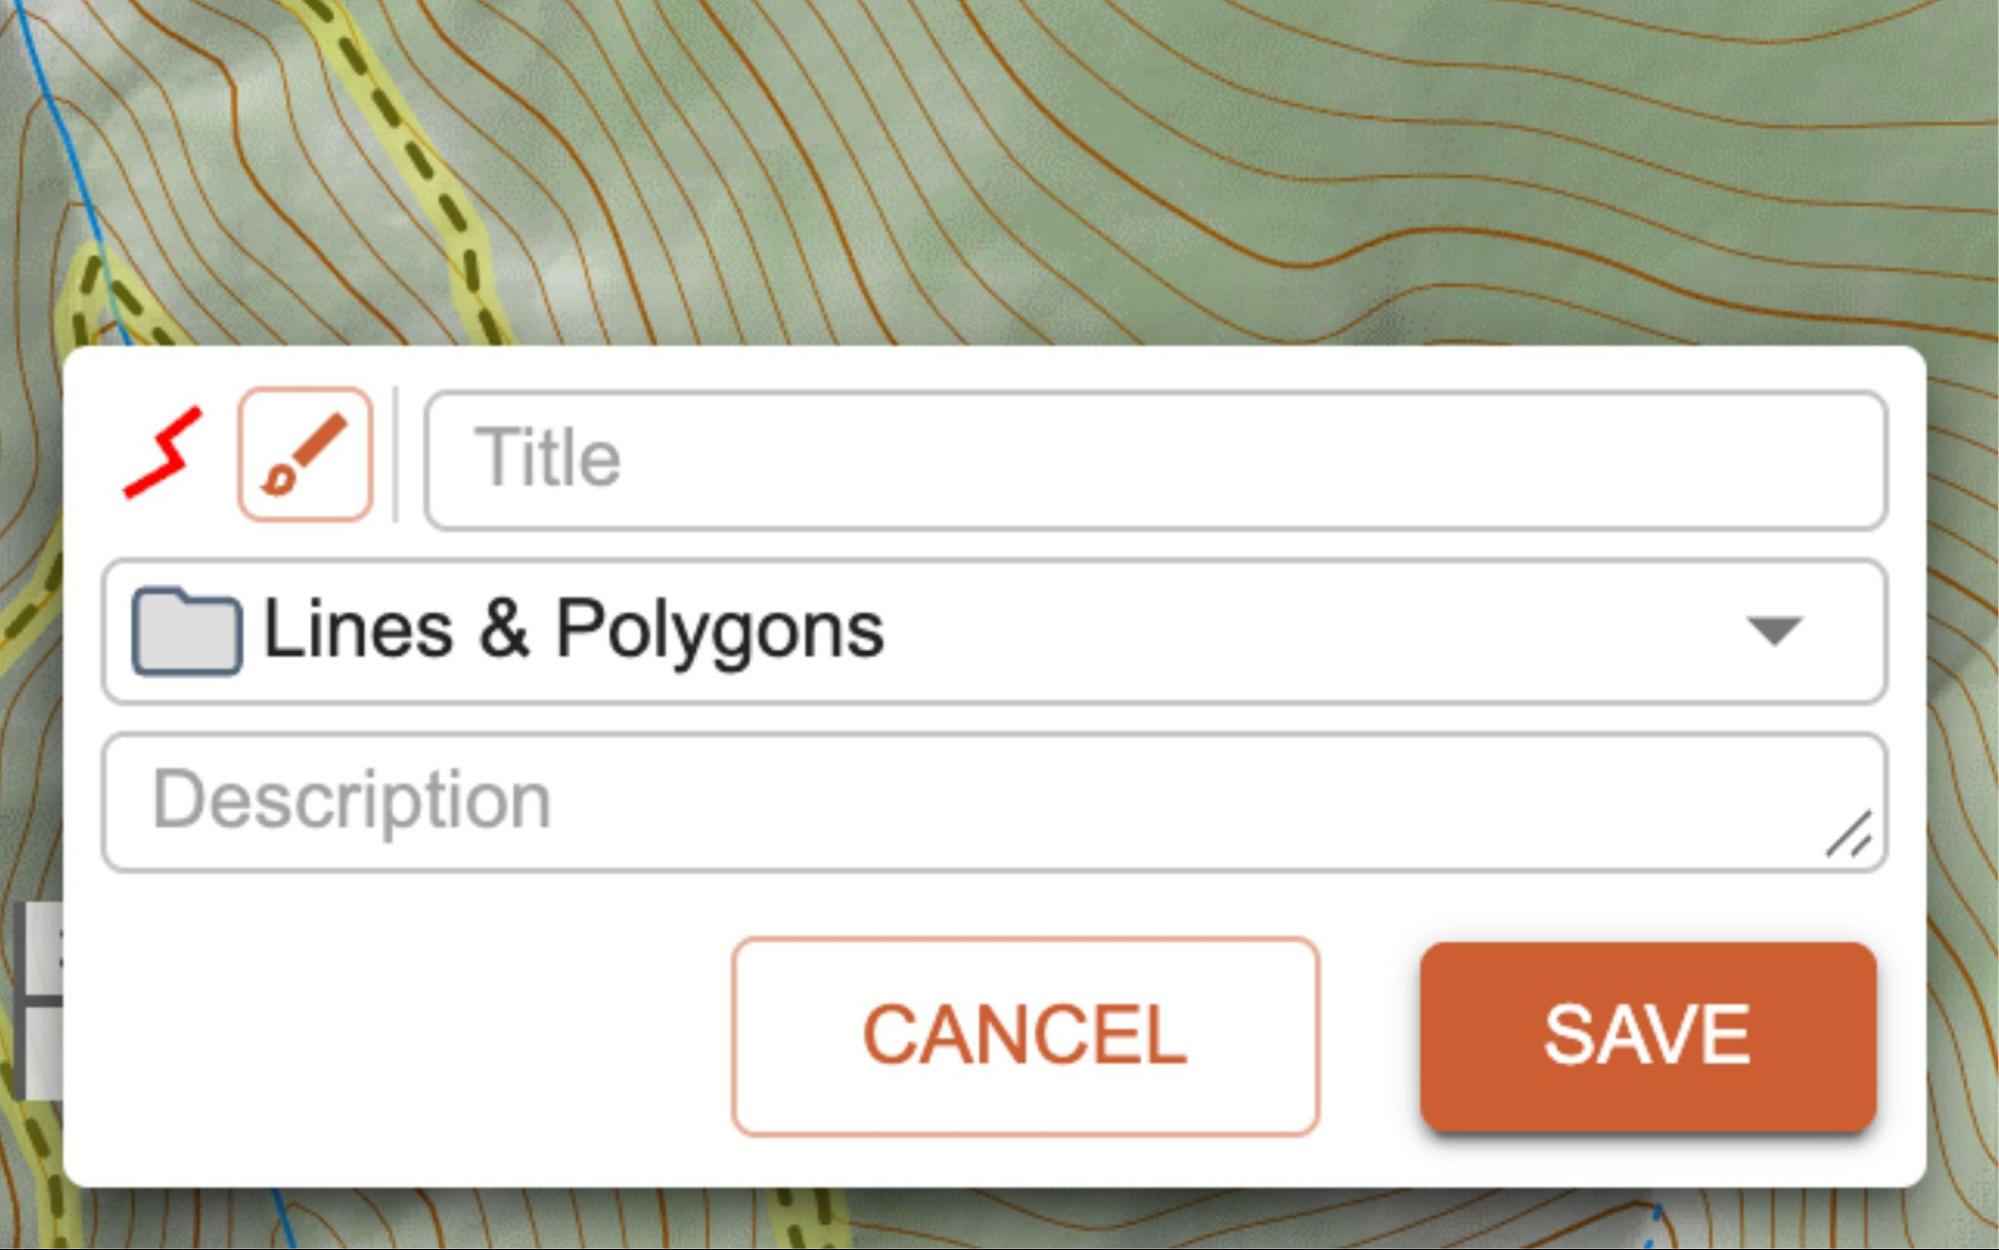
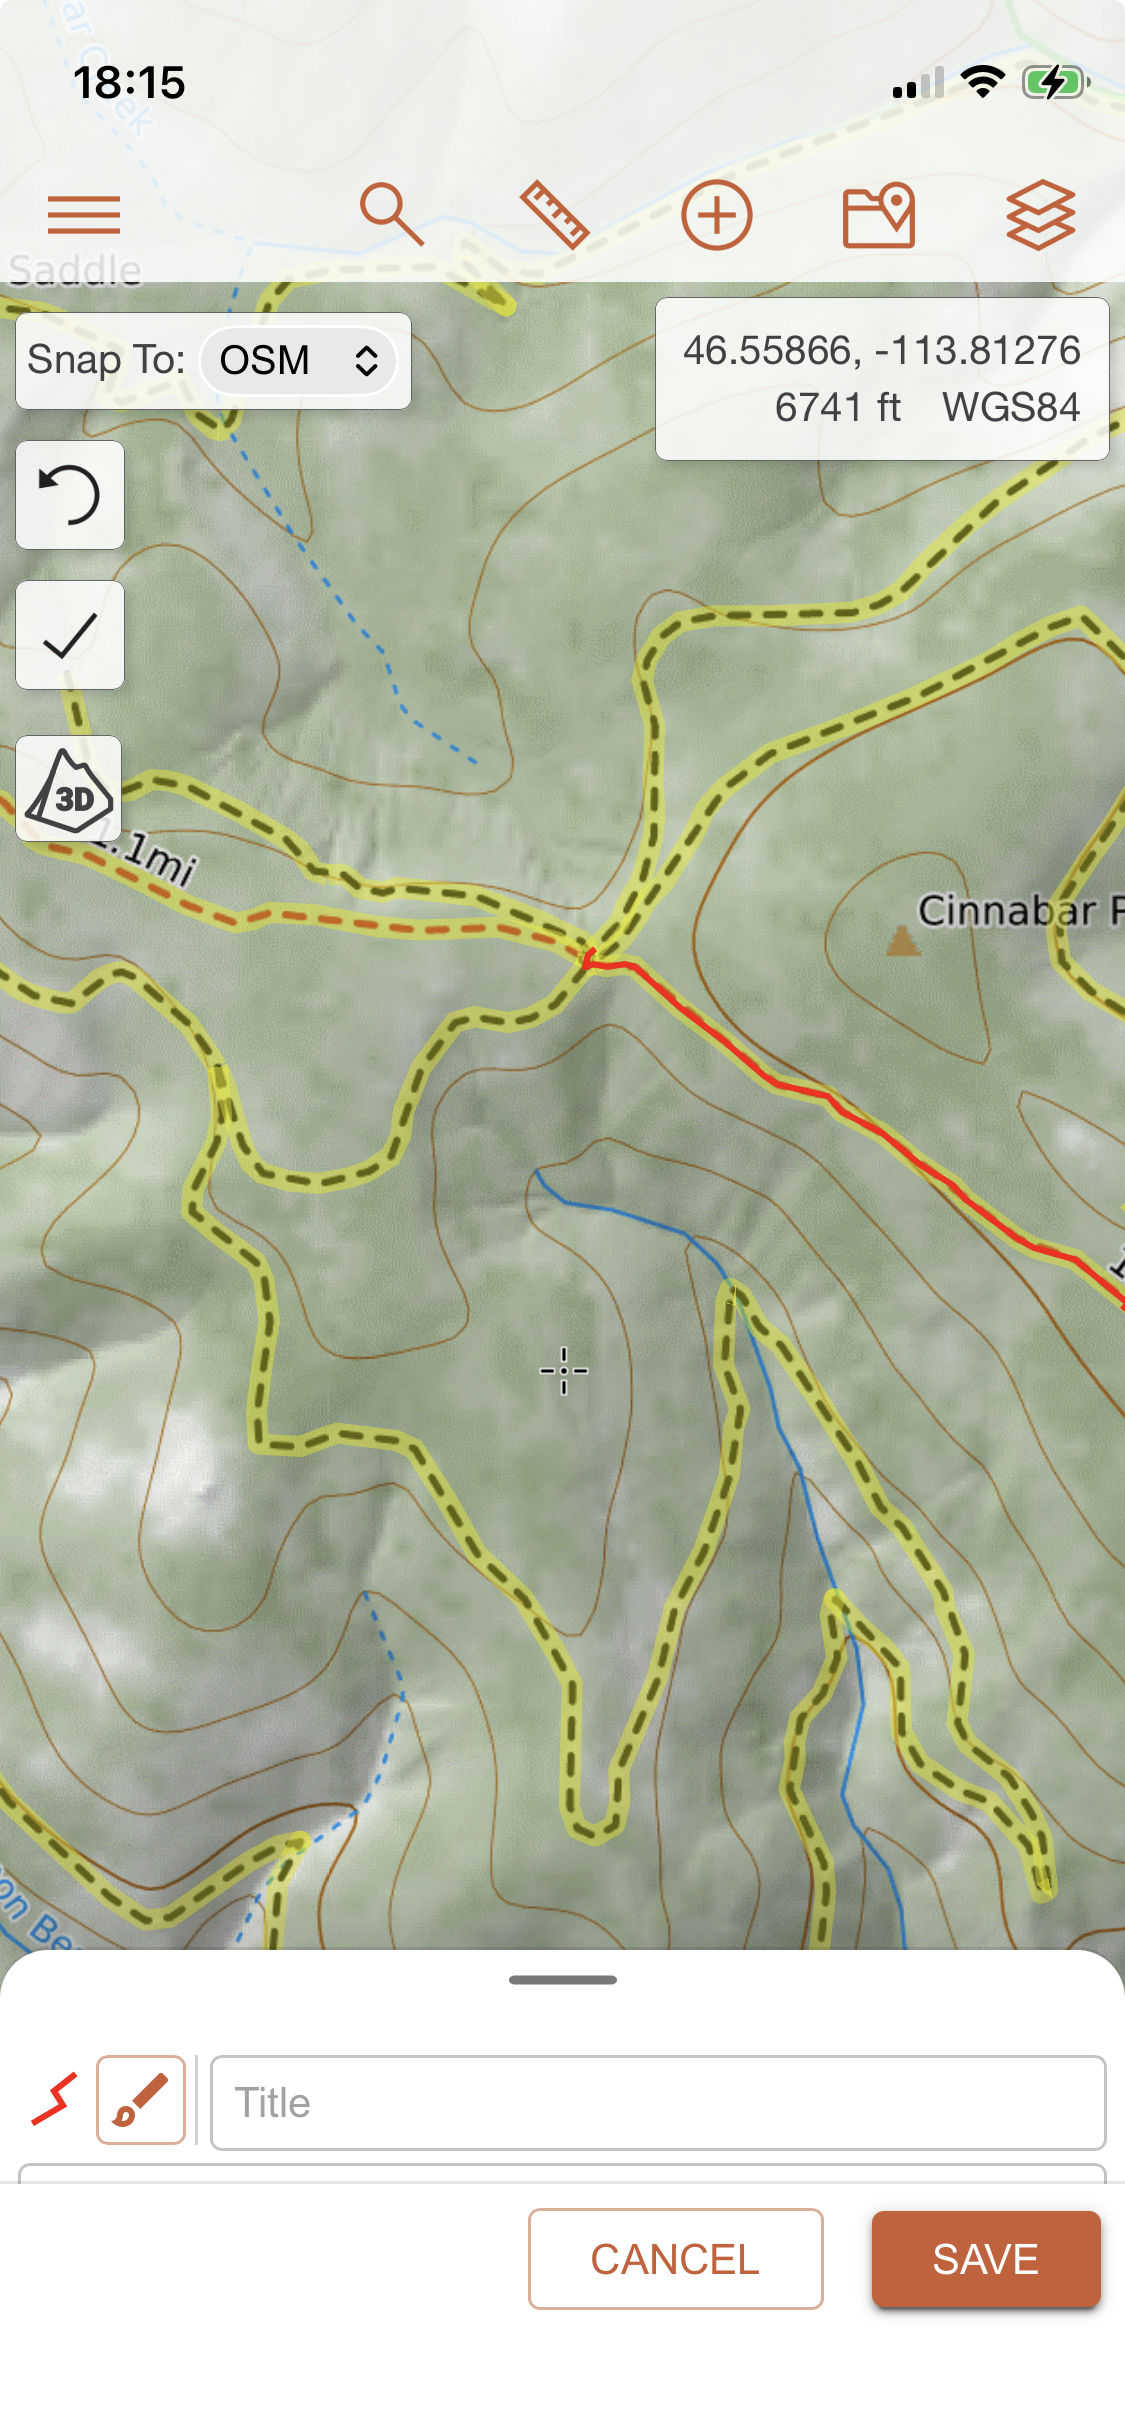
The edit box for a line or polygon is very similar to that for a marker, but there are few additional style options.
- The title for the line will appear on the map (assuming you have labels turned on) and in the left-side menu bar to identify that line.
- The folder menu allows you to move the line to another folder if you have created any.
- The description also appears in the left side menu bar.
To change the style of a line, select the paintbrush icon next to the Title. This will open the Edit Style dialog (also called the Style Picker). A preview of the line’s color, weight, opacity, and style appear in the upper right. Change the line’s attributes in the relevant section as desired.

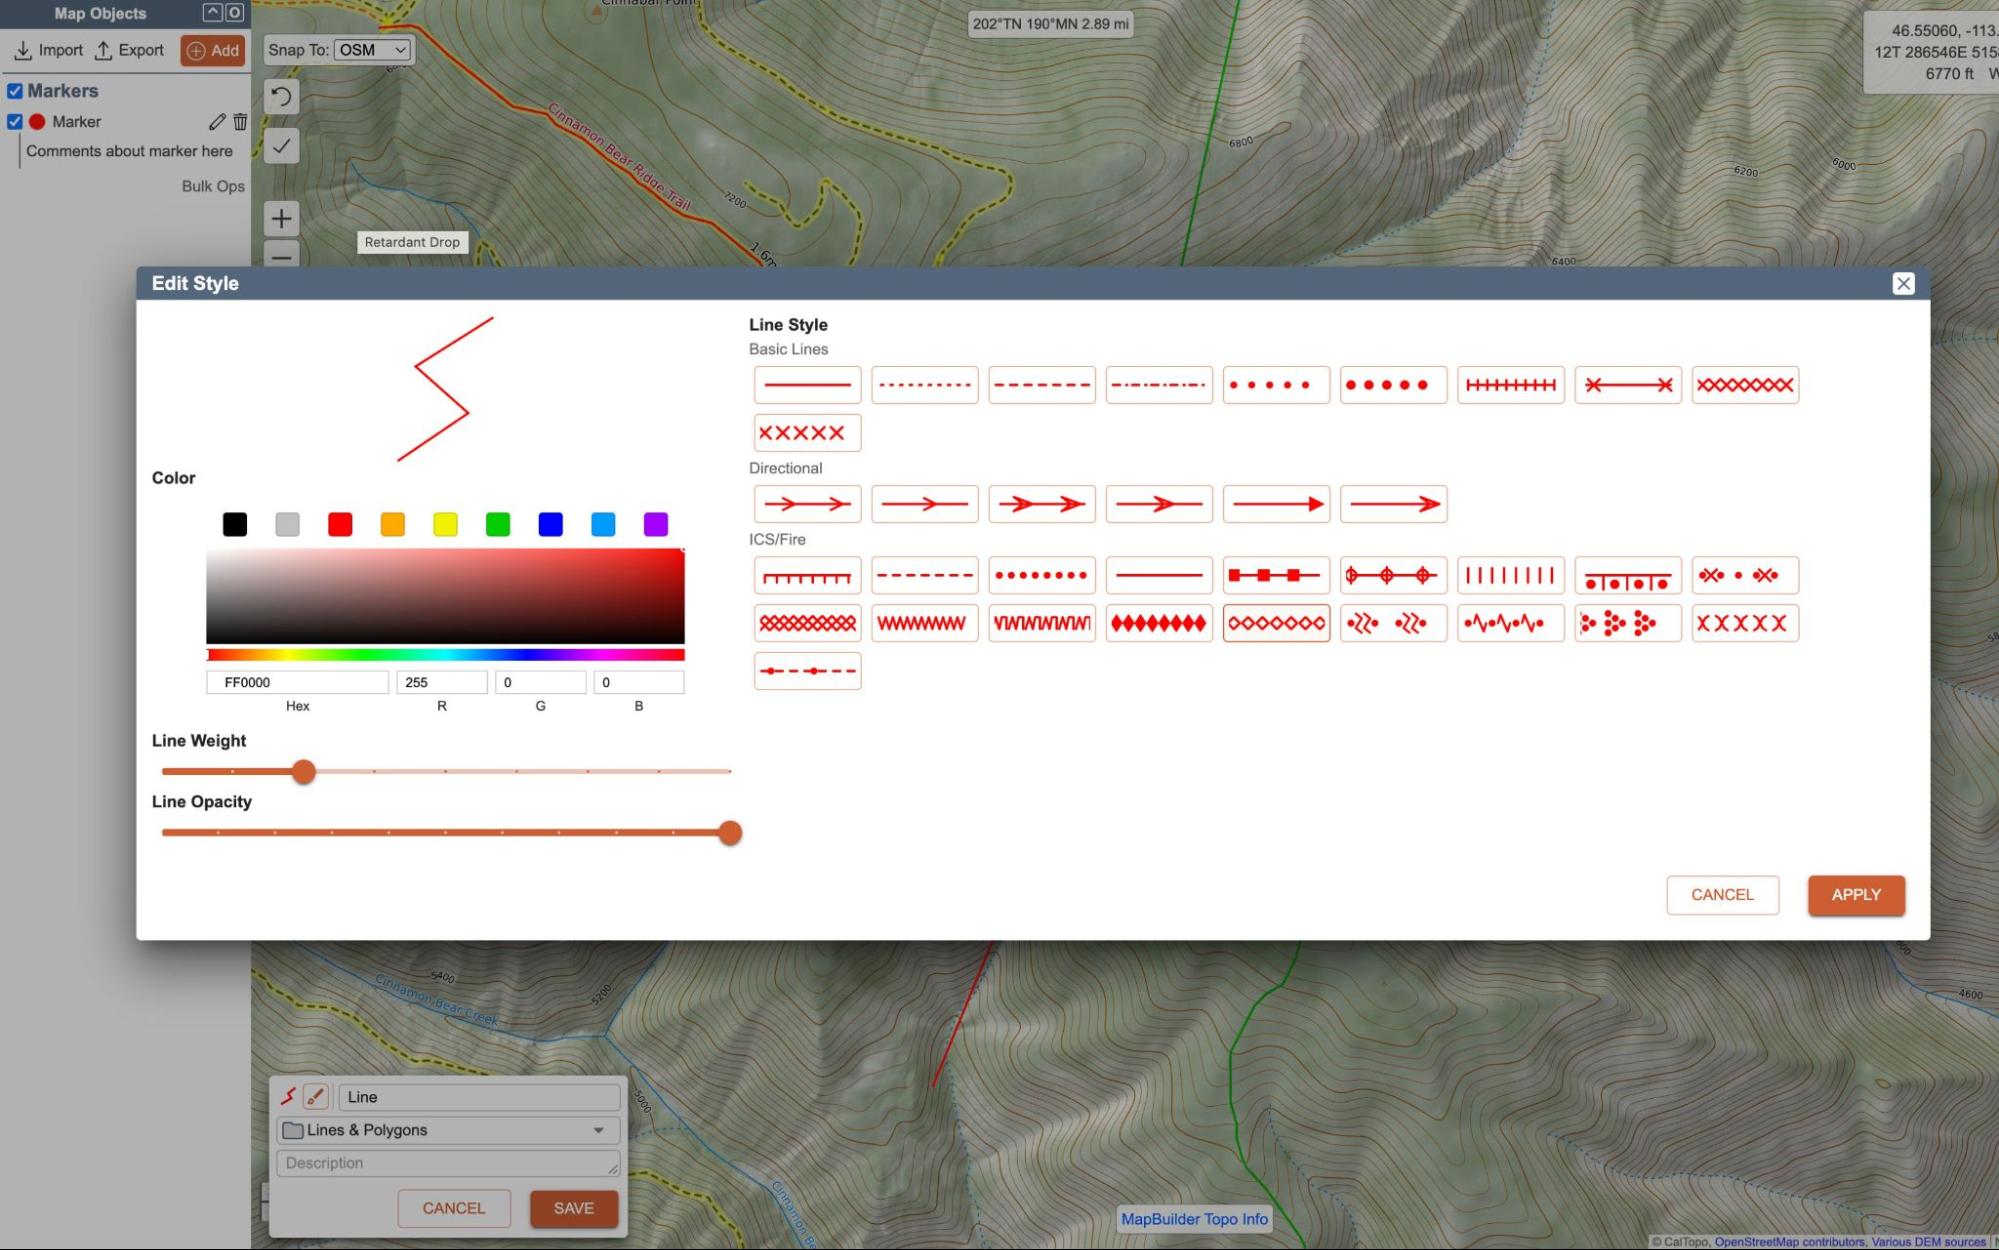
An important note about line style: lines styles other than the basic solid line can have a disproportionate effect on your map display times. Adding a lot of custom line styles to your map could make your map very slow to work with as you add new objects or pan (move the view around) the map around.
For a polygon, the edit box is identical to the line edit box. However the Edit Style dialog has a polygon fill option instead of style choices.. The default for this setting is 10 20%, which means the polygon will be filled in with the polygon color at the indicated opacity level of 20%. The default for this setting is 10%, which means the polygon will be filled in with the polygon color at the indicated opacity level of 20%.

Drawing Lines and Polygons
In the simplest form, drawing lines is just clicking one spot on the base, then clicking another spot, and the program connecting the two. However, planning detailed trips or assignments can be tedious and time consuming, so we have features to help you draw lines more easily and effectively which we will look at later in this lesson.
To draw a line, click once on the base map to set the starting point. Move the cursor to the next location that you want to mark, and click again to set a point, or vertex. Repeat this action as many times as you wish until you are ready to finish the line. To finish: double click at the final location, or use the check-mark box, or hit the OK button in the edit box.
Drawing Lines (Old Interface, but works the same)
Watch this short video to see view the line-drawing process.
More Drawing Tricks
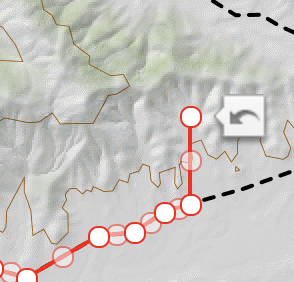
Undo Points While Drawing
To undo a point, press ESC on your keyboard, or use the undo button that appears next to the last point you edited. in the map viewer. Repeat as necessary.
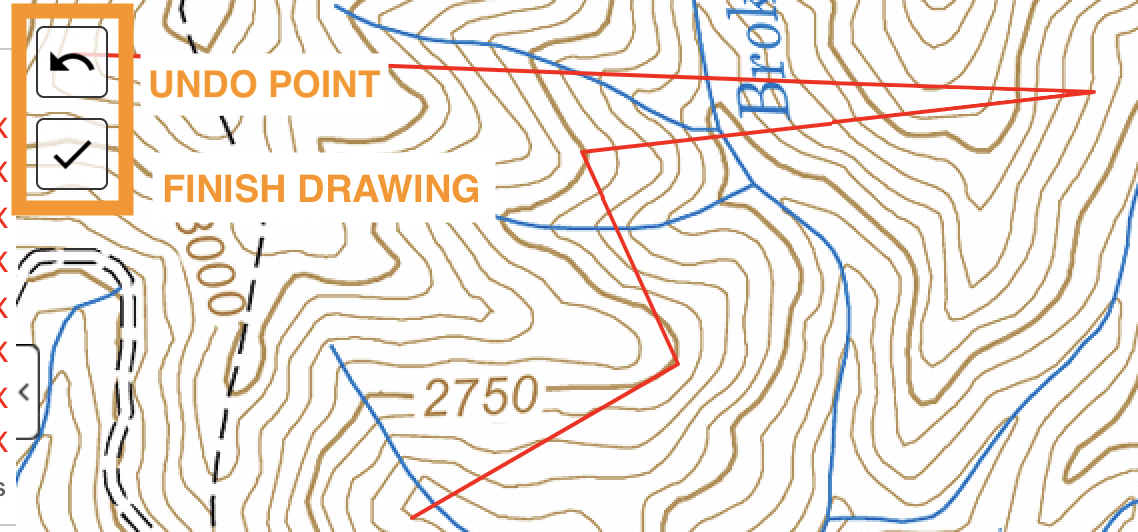

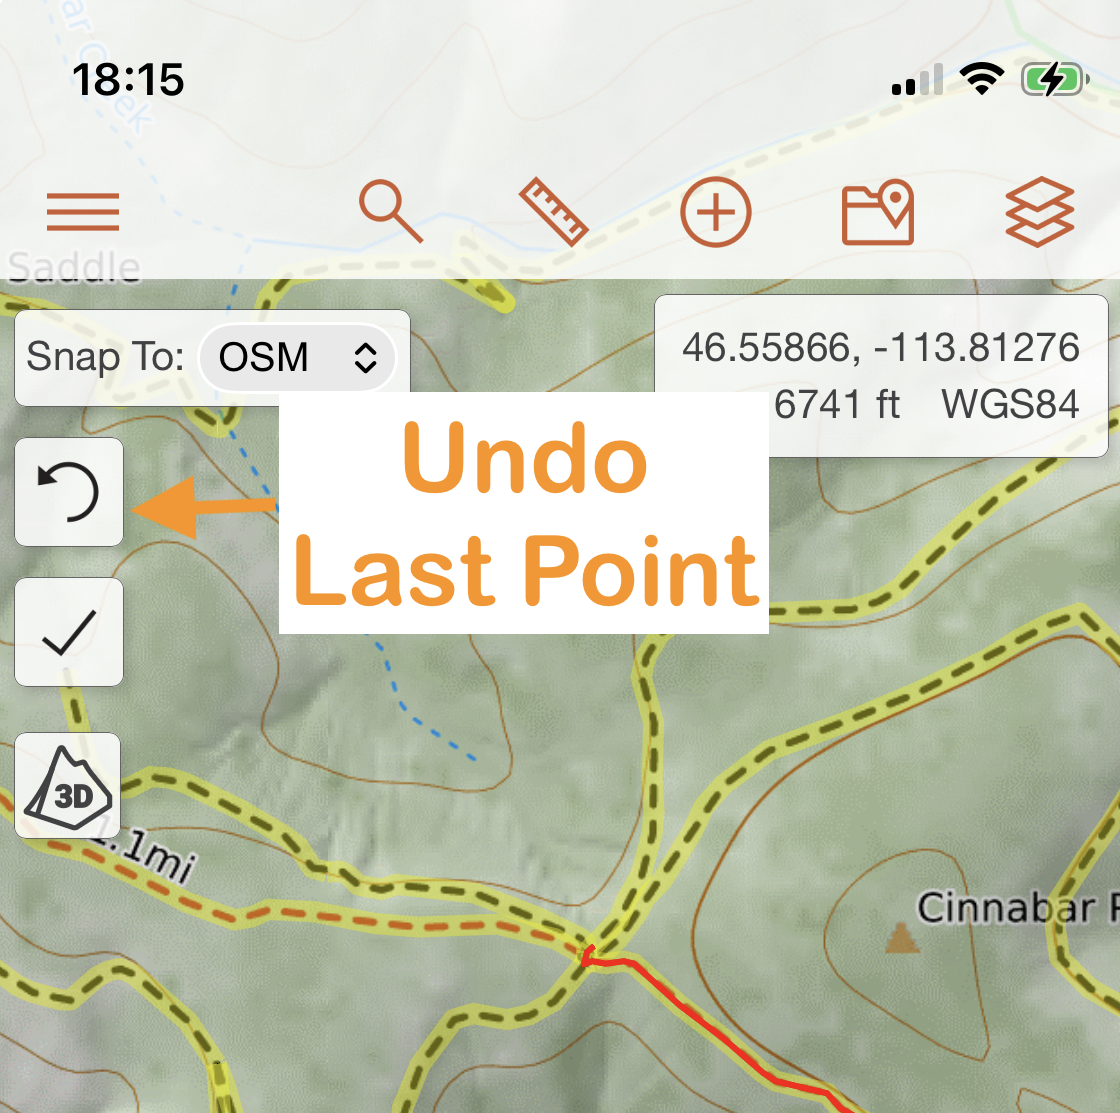
Undoing Points Drawn in the Mobile App
To undo points while drawing a line in the mobile app, the buttons in the upper left are the same as the buttons in the web program.
Draw Freehand
When drawing, instead of clicking on each individual spot to set a vertex, you can draw “freehand” by holding down the SHIFT key while you move the mouse.
Snap To
This function works on the web and in the mobile app.
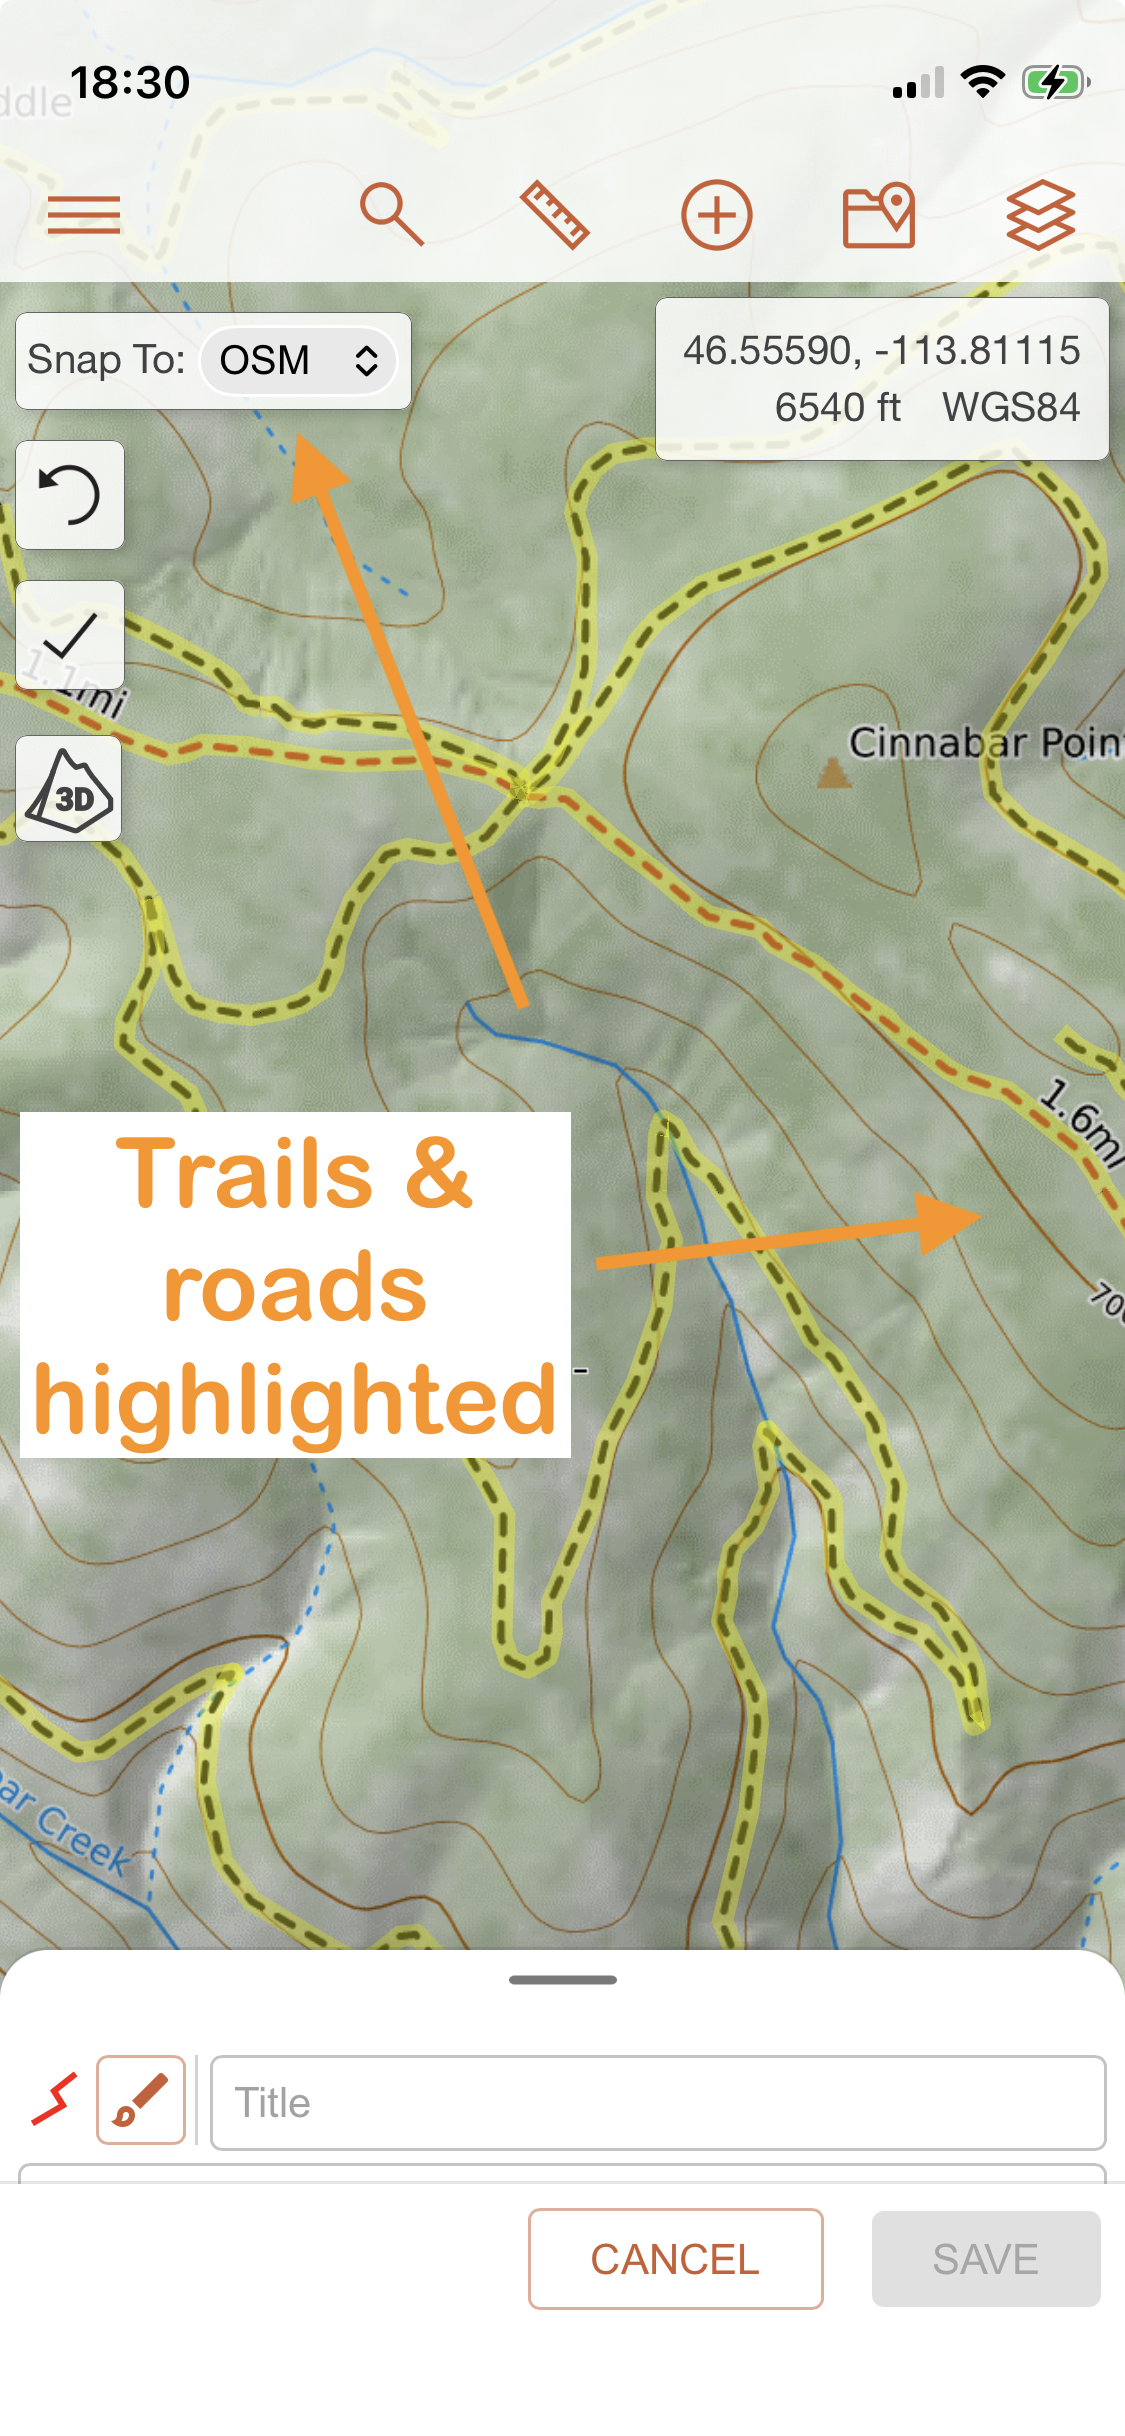
When you initiate drawing a line, you will see that there is a lot more going on than when we added just a marker. Yellow highlighting appears and indicates roads, trails or features that you can snap the line you are drawing to- we call this “snap to”. You’ll see that there is now a snap to drop down menu in the upper left hand corner. You can change what the line you are drawing is snapping to at any time from this menu.
What is Snap To
When drawing a line, a lot of times you want to follow a trail exactly, and clicking every point along the trail would be tedious and time consuming. Snap To allows you to draw lines along established objects quickly to a high level of detail. There are of course some tricks and limitations to using this tool, but overall it can be very helpful when drawing objects.
How does it work?
With snap to, you can draw lines polygon edges over long distances very accurately. When you open a line or polygon for editing, the snap feature is automatically turned on and highlights the available pathways to choose from. When you hover the mouse over a highlighted feature, the highlight color changes from yellow to red to indicate that it is preliminarily selected. To officially select the object, you must click on it to establish a point. The same principle for drawing a line applies to drawing a line with Snap To. Click on a point to start the line, click additional points to capture the distance and direction, and double click to finish.
What options are available to select?
Snap to uses existing databases of geospatial data that includes tracks for trails, roads, paths, water courses and other objects. The data is divided into categories and you can choose a category to use for planning. As you will learn with map layers, not all data sets are available in all areas. If you select a snap to option and no data exists for that option in the map area you are viewing, then nothing will highlight.
- OSM is open street map source data and includes roads, trails, and paths in any jurisdiction worldwide. This is the most widely available data set for snap to, covering much of the world. Beware: It may contain trails on private property or in closed areas.
- USFS consists of United States Forest Service designated roads and trails. This set only functions in areas of USFS lands. If you are looking at private land or NPS land, it likely won’t show any items to snap to.
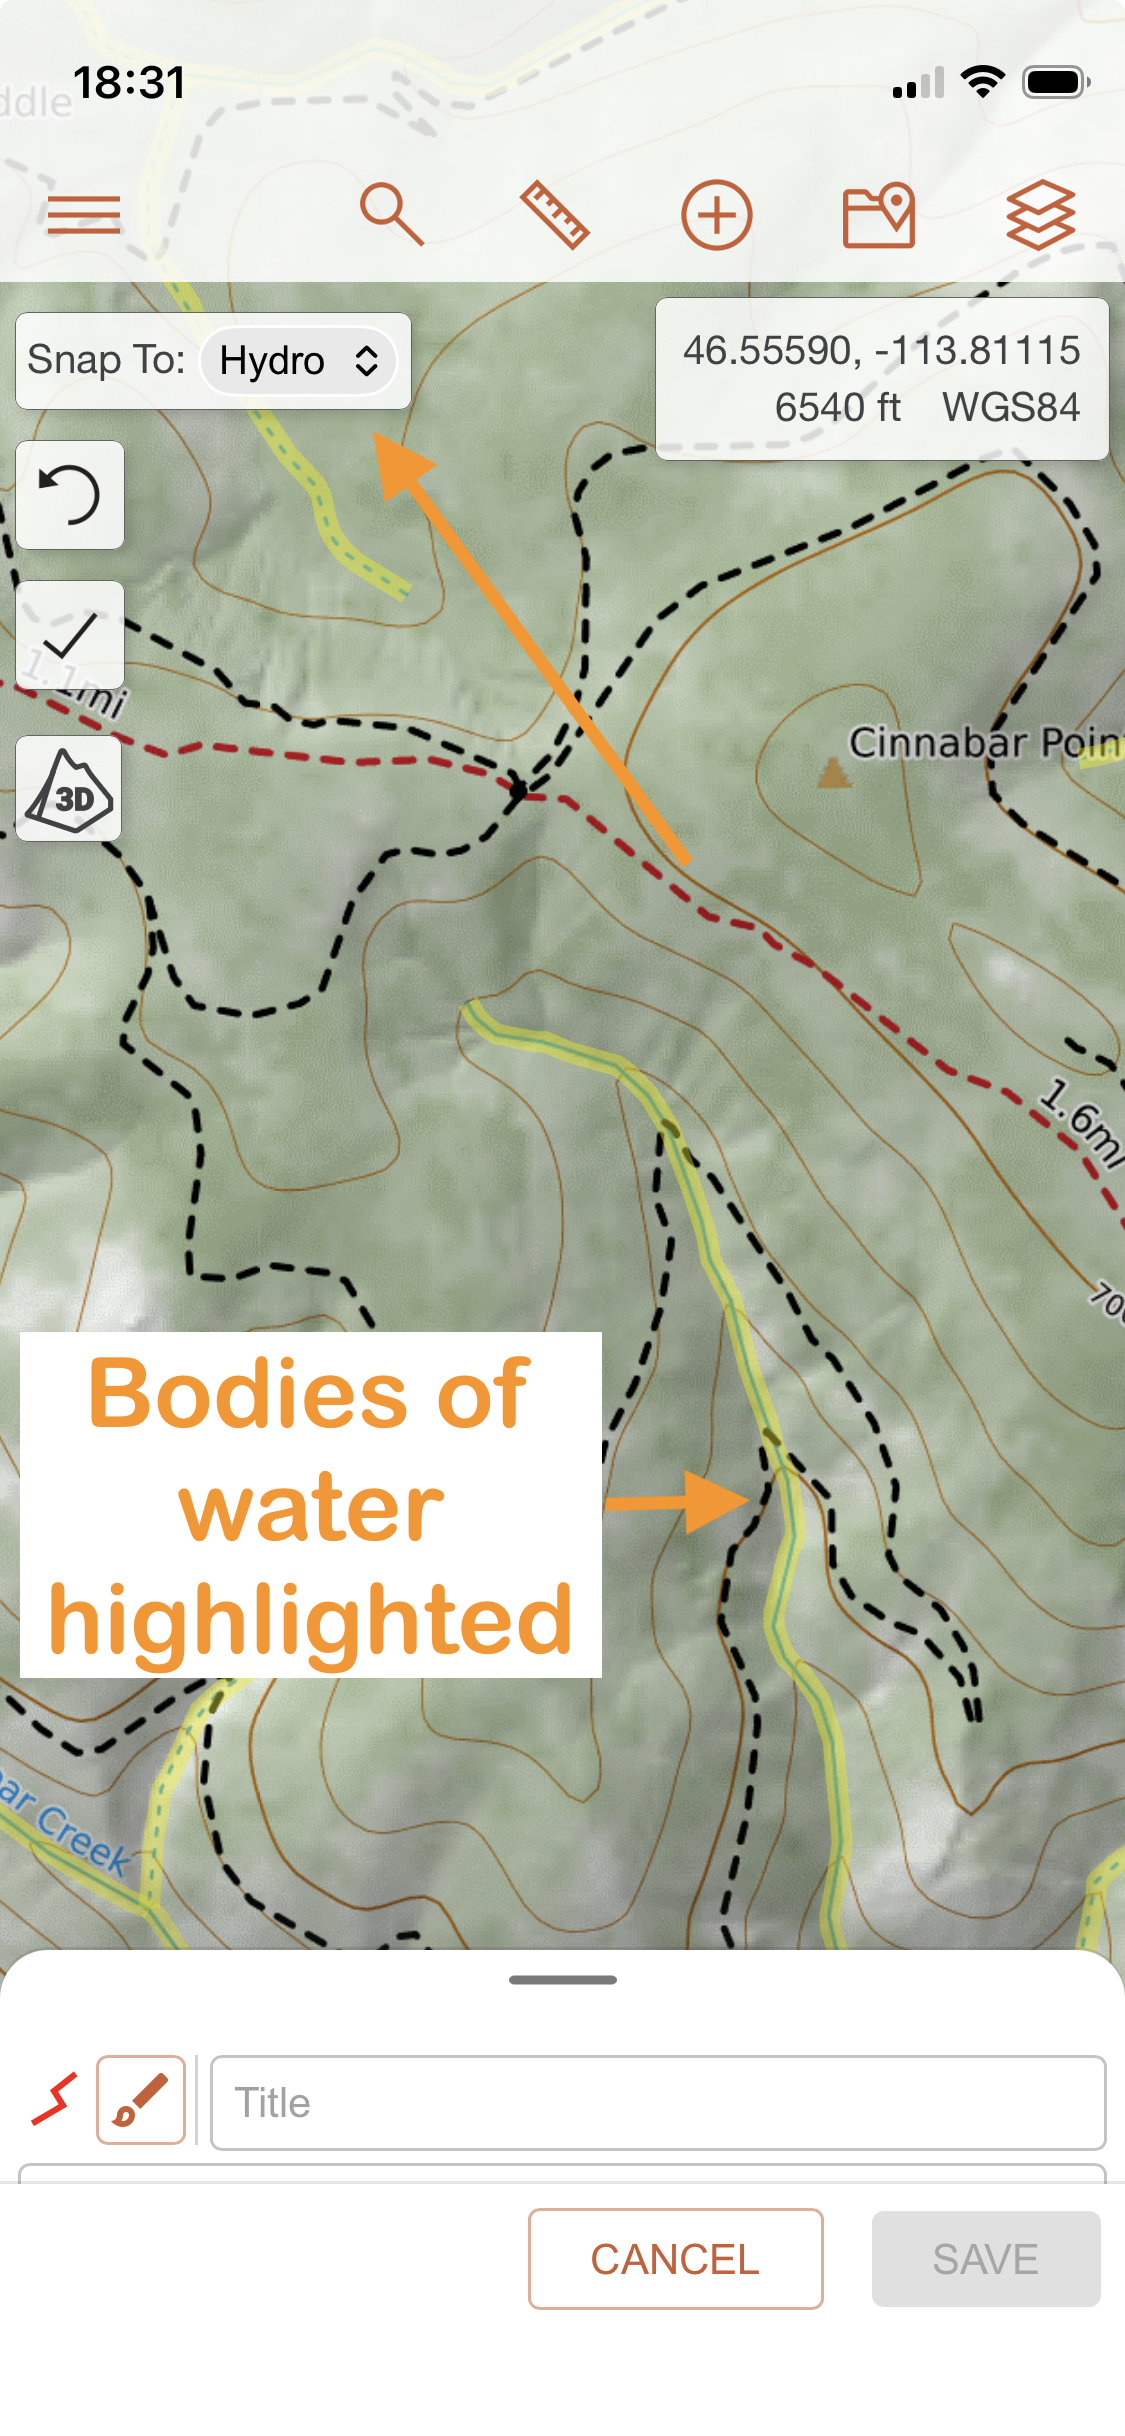
- Hydro is a set of water courses and features. Some examples for why this is helpful are if you need to draw boundaries that trace a drainage system or if you are planning a river trip.
- Lines and Polygons refers to existing objects you have added to the map already. If you drew a polygon and need to draw another polygon cleanly up against it, this is the setting for you.
- MVUM selects certain off-highway vehicle routes if they are included in our database.
- None will turn off Snap To.
Snap To on the Mobile App
Using snap to on the mobile app is much like using it on the web. You can tap highlighted features and then tap further along and your drawn line will snap to the feature. One difference is on the web you can hover a cursor and that will enhance the yellow highlight, that enhancement does not exist on mobile.
Snap To Tricks... and Caveats
While the snap tool is very helpful for many uses, it can be troublesome at times also. These tricks and caveats may help you use it better.
- Zoom in: Snap to only works when you are zoomed in enough for the function to turn on. If you aren’t seeing the highlights turn on, you could be zoomed out too far for it to work.
- Click accurately: You can tell when you are close enough because the highlighting changes color. If it’s not changing, then you are not hovering over that feature.
- Intersecting Objects: When using the lines and polygons setting, if you have lots of overlapping objects drawn, it has a hard time figuring all the possible paths and will cause the program to hang.
- Switching settings while drawing: You can change settings back and forth between the snap options while you are drawing an object. For example, start with it set to OSM and trace a trail, then without finishing the line, change the setting to hydro and continue your line while tracing a stream.
- Set more points: Sometimes when a lot of objects or routes are near each other, Snap To will jump your line around in unexpected ways. Click to set additional points closer together than you might normally while using the snap tool so it knows which path you are trying to use.
Move on to the next section to look at working with existing objects.