Creating SAR Objects
in this lesson
CalTopo's SAR mode includes object types not available in Recreation mode. If you are not familiar with using map objects, please go back to the All Users Chapter on Map Objects.
The additional CalTopo object types are based around managing searches. They include Operational Periods, Line, Buffer, and Area assignment types, and clues.
This chapter will cover how to create and manipulate each of these object types. Examples used are aimed at Search and Rescue users, but other first response user types will gain a lot just the same.
Topics on this Page:
- Map Mode
- SAR Objects
- Working with Multiple Assignments
- Display Settings
- Assignment Bulk Ops - including change attributes, reletter and renumber, and print SAR forms.
Map Mode
Map mode is the method by which you are able to distinguish whether SAR-type objects show up in the Add Object menu. Instead of choosing between caltopo.com and sartopo.com, all maps and data now live in one place. The SAR objects that we cover below are included in the SAR map mode.
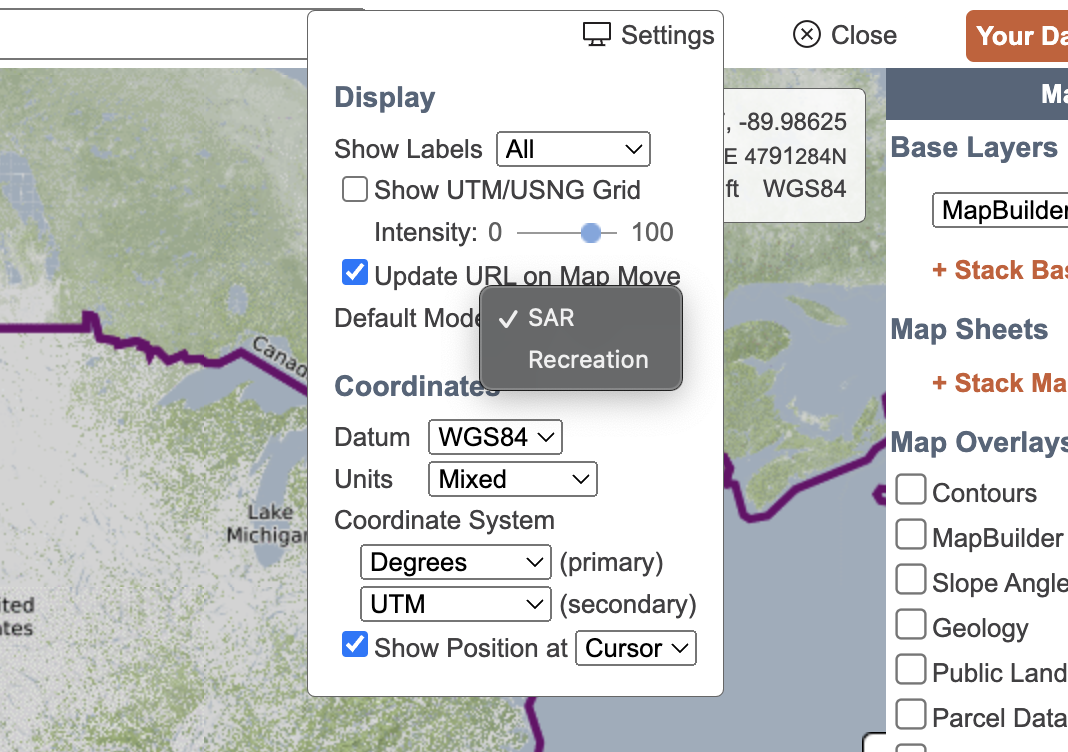
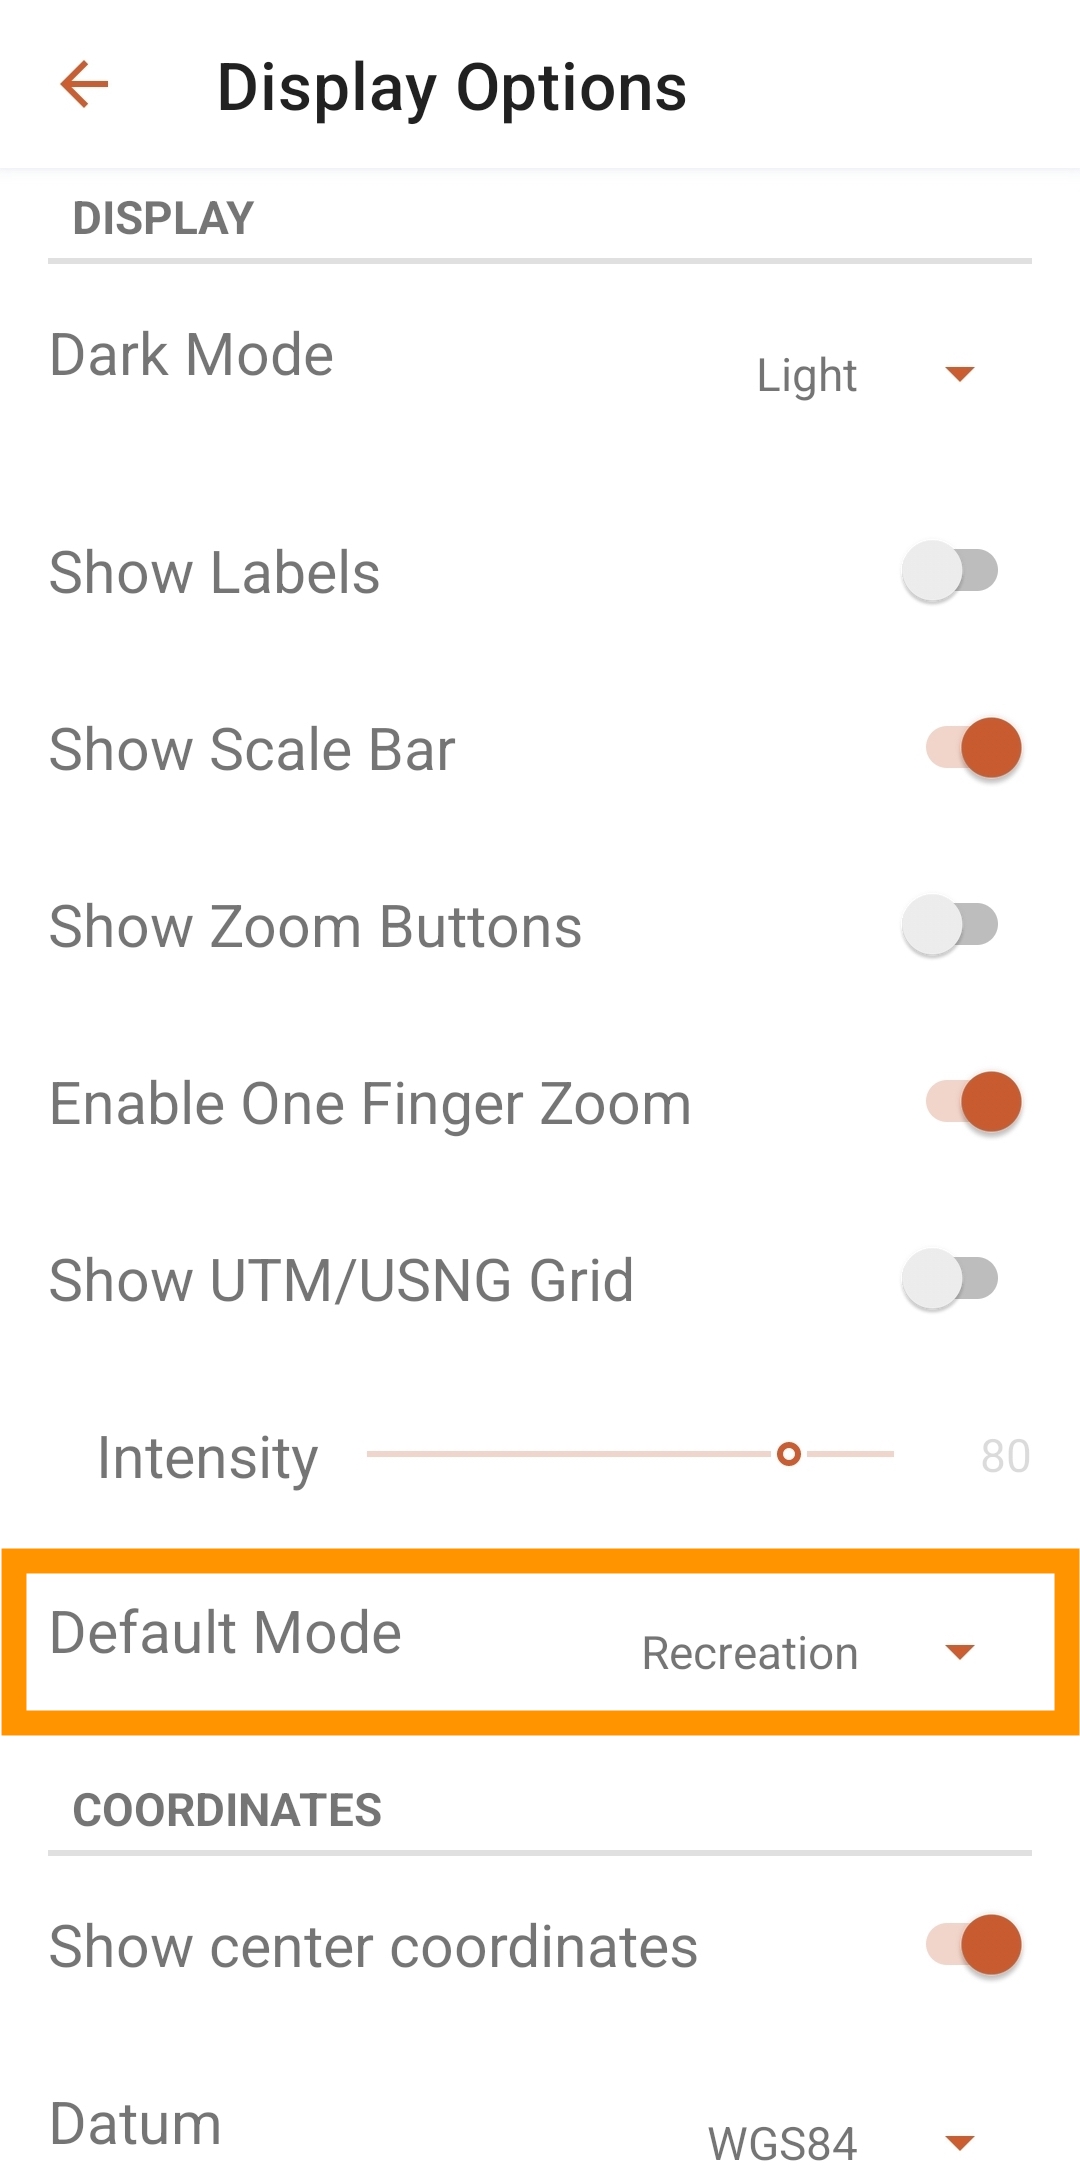
Map mode can be set by default as well as on a map-by-map basis. Let's look at the default option first. This will be in the settings menu at the top right of the webpage. Click the Settings button, then look for the drop down menu next to "Default Mode". Choose either SAR or Recreation. After designating one or the other, this will be the default menu that you get.
Once the default mode is set, the menu will always either show or not show the SAR objects always, unless you set it differently on a specific map.
Setting the mode for a specific map
You also have the option of setting the mode for any individual map, regardless of what the default setting is. This can be done when you first save the map, or via the Info/Sharing dialog box on a saved map.
When saving a map for the first time, you can change the mode in the save menu, immediately below the map name. Choose the mode from the drop down menu.
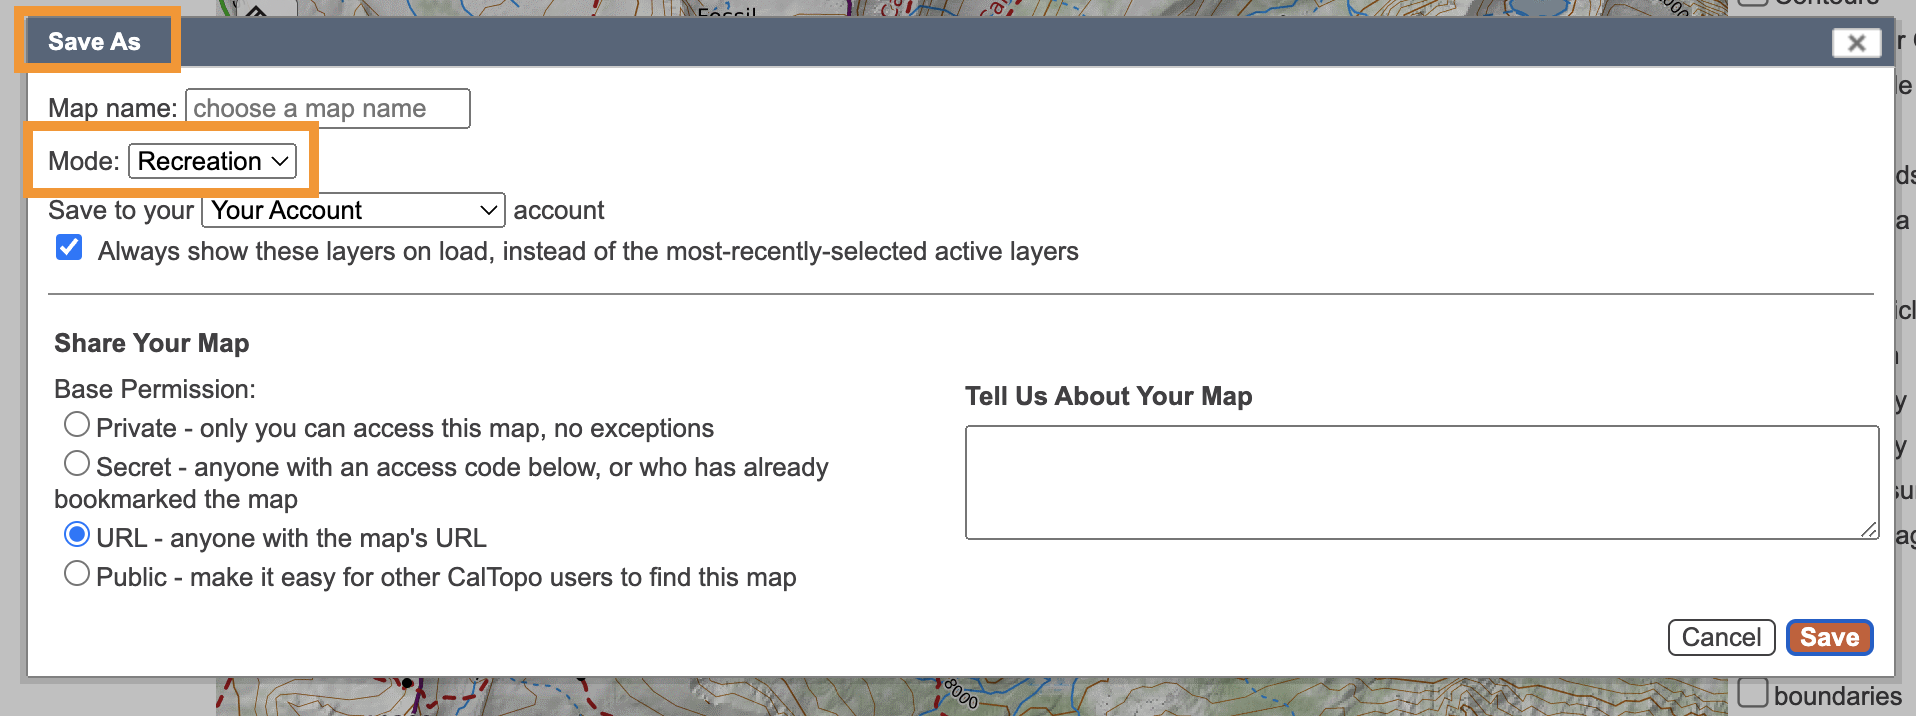
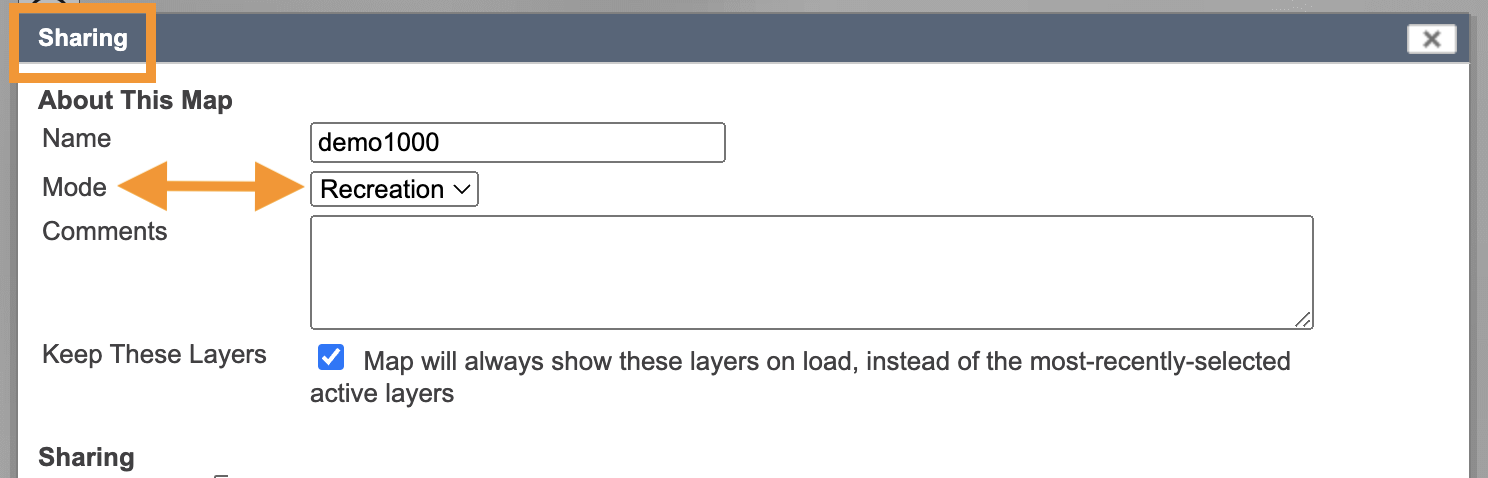
To change or reset the map mode on any saved map, open the map, then click the Info icon on the left side of the map to open the sharing dialog. Choose the mode you want from the drop down menu.

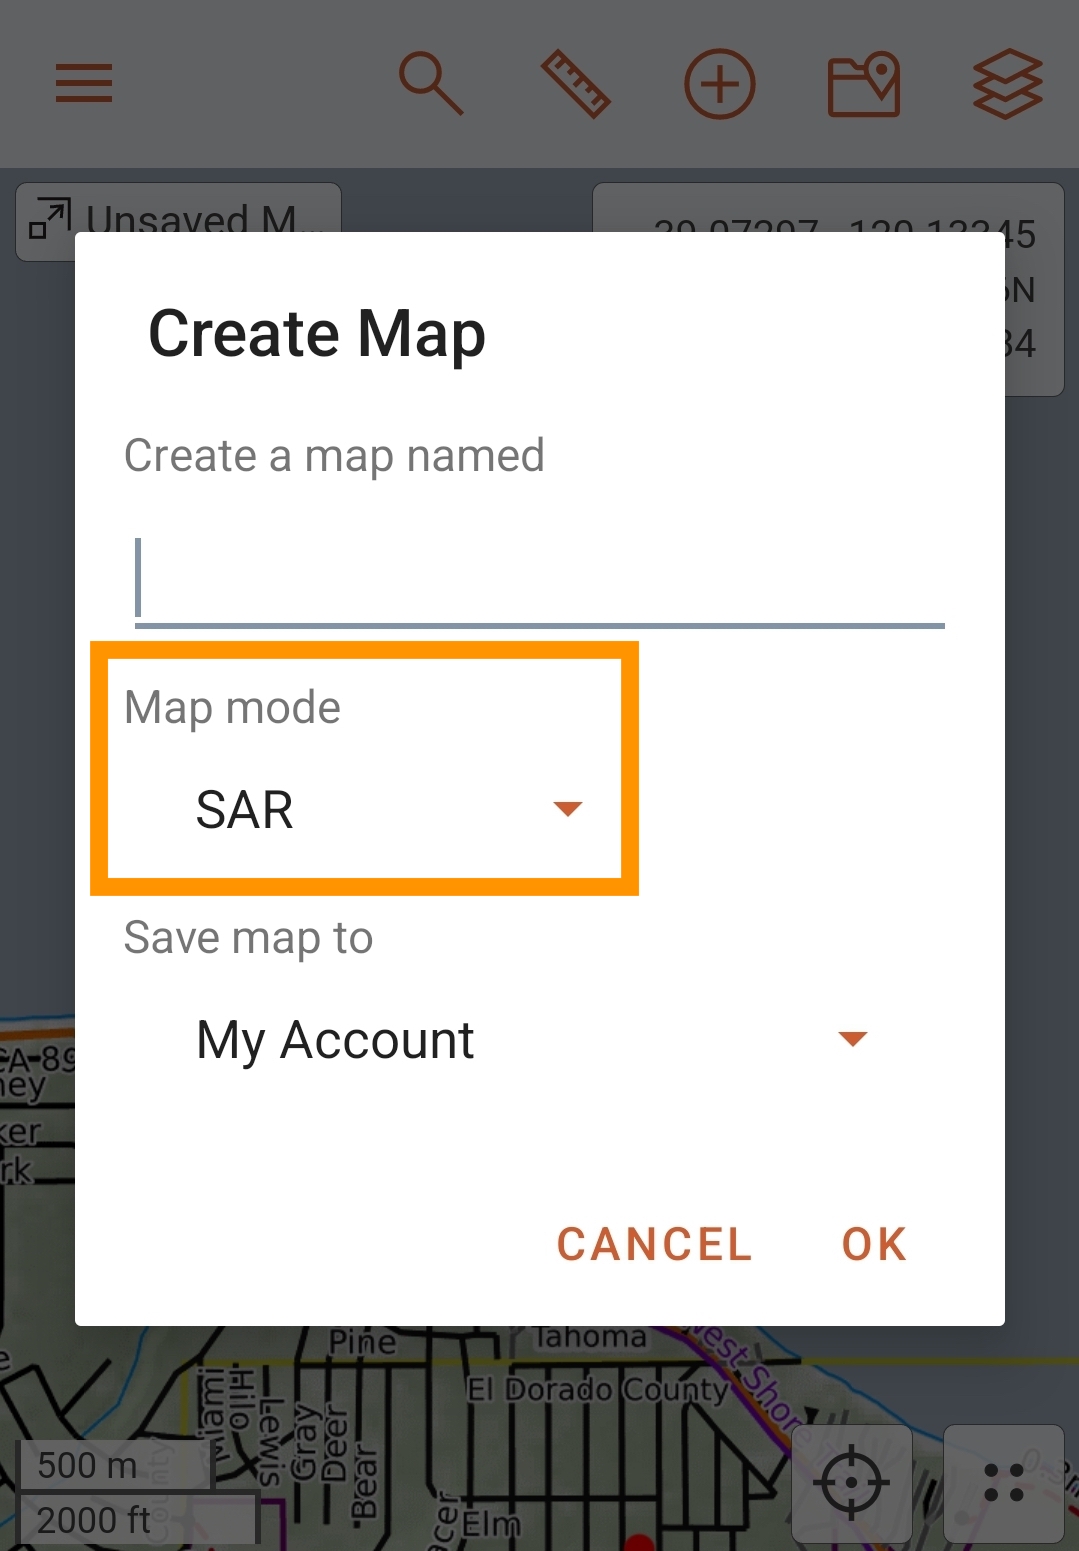
Setting Map Mode in the Mobile App
You cannot CHANGE the map mode on an existing, saved map from within the mobile app. You can only change map mode for an existing map by accessing that map via a web browser.
When creating a new map in the mobile app, you have an opportunity to set the map mode on the save screen. See the first image below.
You can also set the default map type for when you are first creating a new map, to determine which set of objects are available when first creating the map. However, this may not affect the default SAVE setting when you go to save the map. So, make sure to double check that before saving your map.
The SAR Objects
SAR-type objects build on the CalTopo object types. Operational Periods are essentially folders for storing and sorting assignments. Assignments are lines, buffers, and polygons with additional input fields that help communicate plans between the IC team and field teams. Clues are simplified markers, organized into their own folder.
The SAR objects live in the same menu as the CalTopo objects. To add one, use one of the same methods you use to add any other object: right click on the map, or use one of the two add menus - either in the left side bar or in the top menu bar.
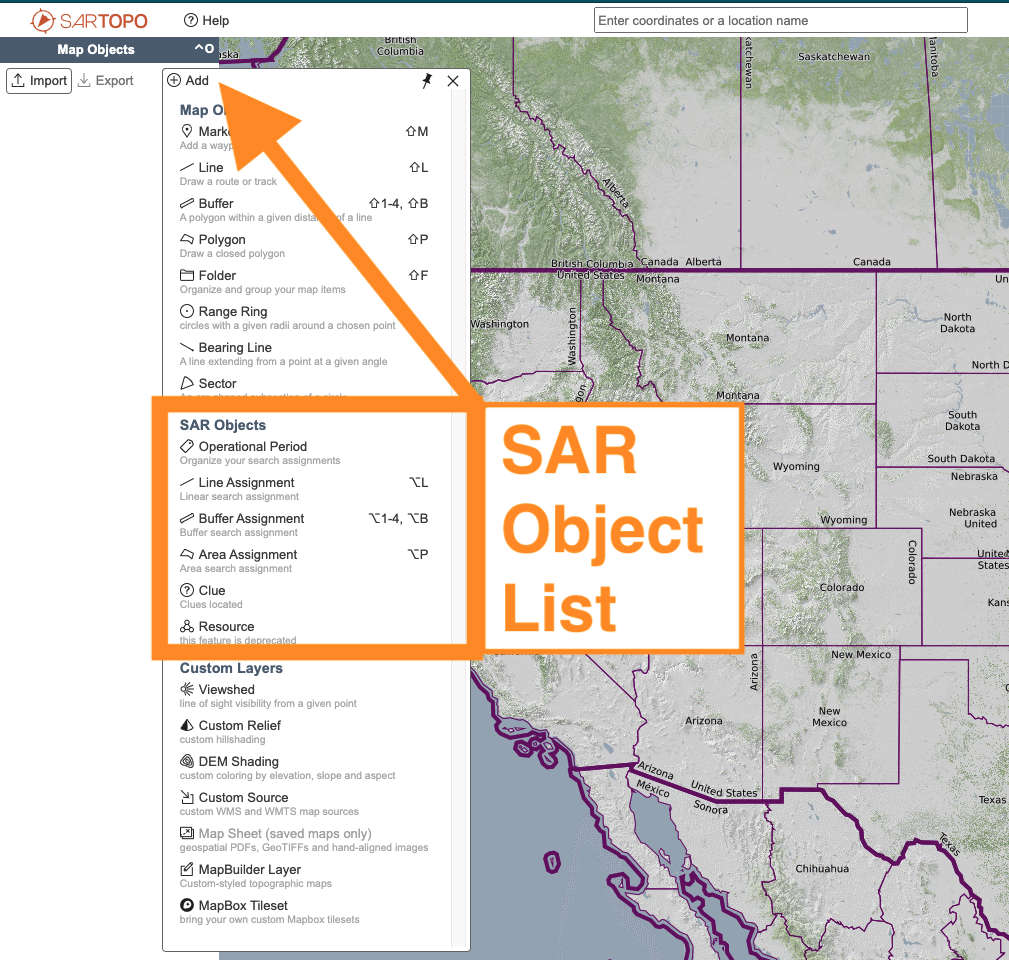
Object Type: Op Period
An op period, or operational period or OP, is a method of grouping assignments so they can be displayed and tracked as a group. Unlike a folder, assignments added to an op period do not move into an op period folder. The assignments for an op period stay in the assignments list, but their color and display on the map are controlled by the op period settings.
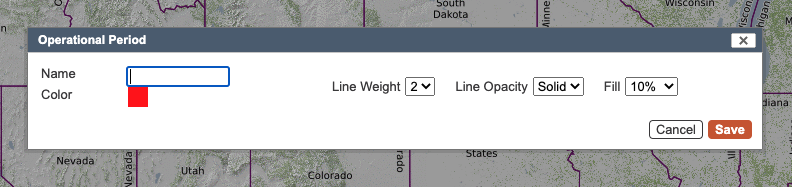
When adding the op period, you can give it any name, then adjust the display settings. These include the color, thickness of the display line or outline, and opacity of the line or polygon (ie fill.) Press save to create the object. Op periods are stored in their own folder in the map object menu. Deleting an op period will not delete all of the assignments in that OP. The assignments designated as the deleted OP will return to being assignments with no OP set.
Anatomy of an Assignment
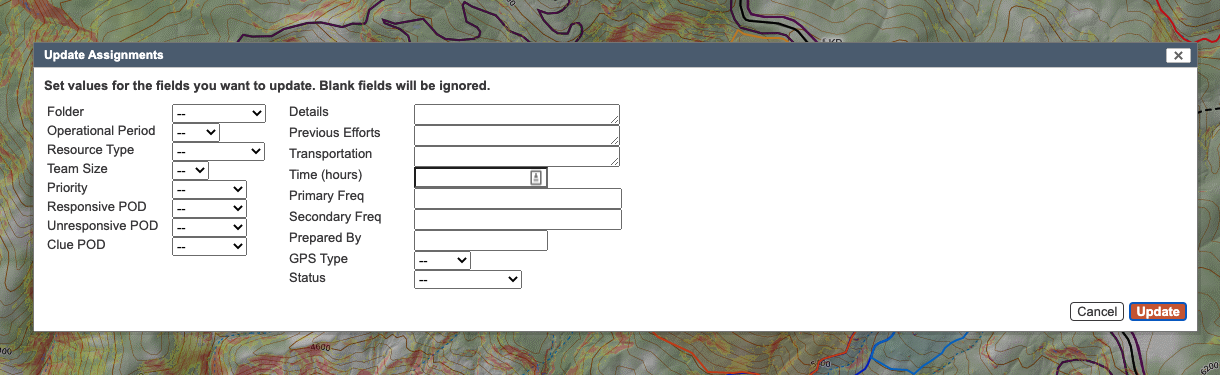
Assignments are available as line, buffer, or polygon (area) objects. Assignments have many more input fields than their regular map object counterparts. These input fields are the same regardless of whether the assignment is a line, buffer, or area assignment type.
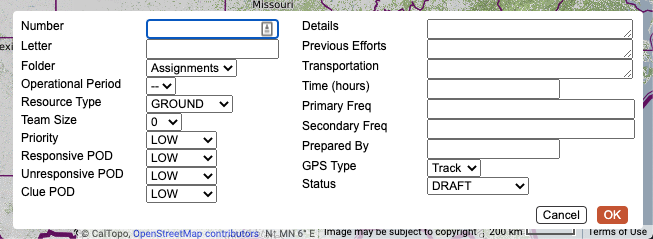
- Title The title of the assignment. We like to use numbers to indicate the team, and the letter to indicate the assignment.
- Folder (defaults to assignments folder) allows you to organize your assignments by selecting which OP and/or folder they belong to.
- Description is where you describe the assignment - something like “Hasty search, follow the main trail and talk to anyone you encounter to ask about the missing subject,” and anything else you would like to tell the searchers, or your notes about the area.
- Resource type and team size allow you to choose from typical types of available resources such as ground, air, or dog teams, and to indicate how many people you would like working on the assignment.
- Priority refers to how important the assignment is compared to others, so when you hand this off to the operations team they know to put a team to work on it right away, or not.
- The three POD (probability of detection) values let you tell the search teams what they are looking for and how closely they should be searching. Values are low, medium, or high.
- Previous Efforts is an area to provide additional information and context about anything that has previously occurred in this assignment area.
- The Transportation box lets you or operations add a method of transportation to and from the search assignment, for example if the team is to be inserted by helicopter.
- Time can be used to indicate how long you expect the team to take to search the area to the standard you expect.
- Primary and Secondary Frequencies help with your communication plan while teams are in the field.
- Prepared By helps to keep a record of who is developing each assignment, so if there is a question others can find you to ask for more clarification.
- GPS Type refers to the gpx export of the object. GPX files are classified as tracks or routes. Unless you have a specific reason and know why you want to use a route, you probably want to leave this as a track. This is a great website to learn about GPX file types and the differences between routes and tracks.
- Status indicates what is currently happening with the assignment. It could be in draft, fully prepared, in progress with a team in the field, or completed.
You do not have to fill out any of the input fields in order to create the assignment. Draw it on the map using the same methods as you would for a similar map object, as described in the All Users section. After clicking the OK button, the assignment appears in the Assignments section of the left hand map objects menu, unless you designated a different folder. A common use case where users put an assignment in a different folder is to separate air or dog assignments from the group of ground team assignments.
Before going further into working with assignments, we need to cover the other CalTopo object types because they are relevant to using assignments.[Jump to Working with Assignments]().
Clues
Clues are a special type of marker object. Clues default to the clues folder, but can be moved to other folders as needed.
Clues might be used in a few different ways and thus they have different input fields to account for that. The label will show up in the object menu and on the map if labels are on for clues. If you right click on the map to add the clue, the coordinates will populate with the coordinates that you clicked on the map. Otherwise, you can add your own.

Clues can be added to an assignment to communicate an action to the field team in that assignment. Instructions options include Collect, Mark, or Ignore. Details provide a text description input, and location can be used to describe more specific details of where the clue is or may be found (ie tucked under the east side of a large rock).
Working with Multiple Assignments at Once
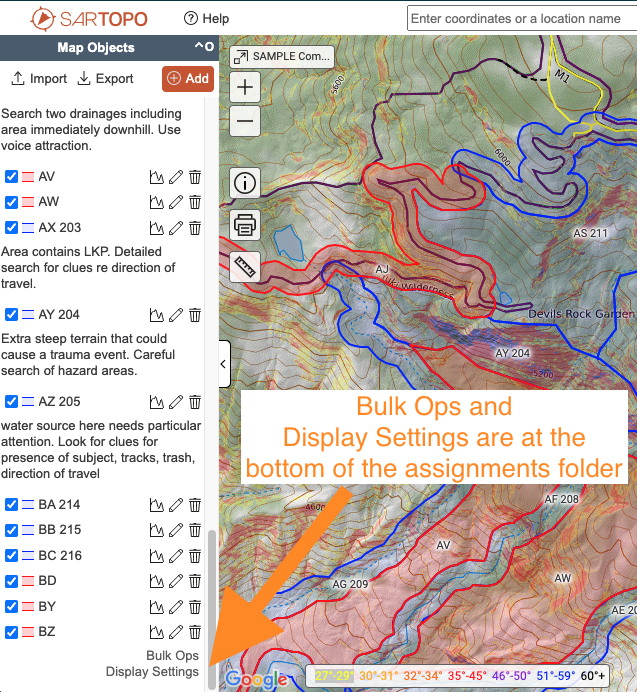
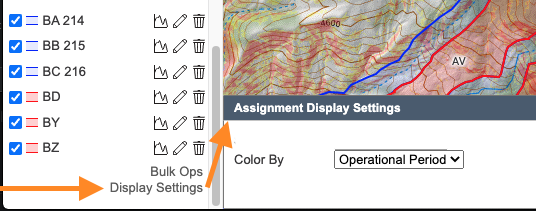
In the objects menu at the bottom of the assignments folder, there are two options for working with assignments: Bulk Ops, and Display Settings. These have the potential to affect all assignments.
Display Settings
Your assignments are colored by operational period by default. If you want to display assignments in colors other than by OP, you can select from options here.

Click on Display Settings at the bottom of the assignments folder: Select which assignments you want to change the display settings for, based on the resource type field. Then select the method for designating color. You cannot select the final color itself.
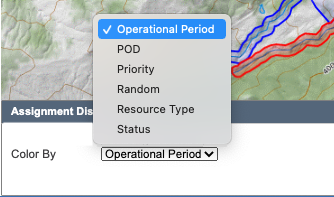
The Color By settings allow you to designate how you want the assignments colored.
- Operational Period will display the color set for that OP.
- POD will color each assignment based on the level of POD set for that assignment: high, medium, or low.
- Priority will color each assignment based on the priority set for that assignment: high, medium, or low.
- Random will color the assignments based on a set color scheme and assignment proximity to others.
- Resource Type will color each assignment based on the type of resource set for that assignment.
- Status will color each assignment based on whether the assignment is set as draft, prepared, in progress, or completed.
Bulk Operations on the assignment folder can both help you visualize the status of all the assignments at once, as well as to perform edit functions on multiple assignments. Again, bulk ops for assignments is very similar to the bulk ops you find in the all users section, though we get a few more options here.
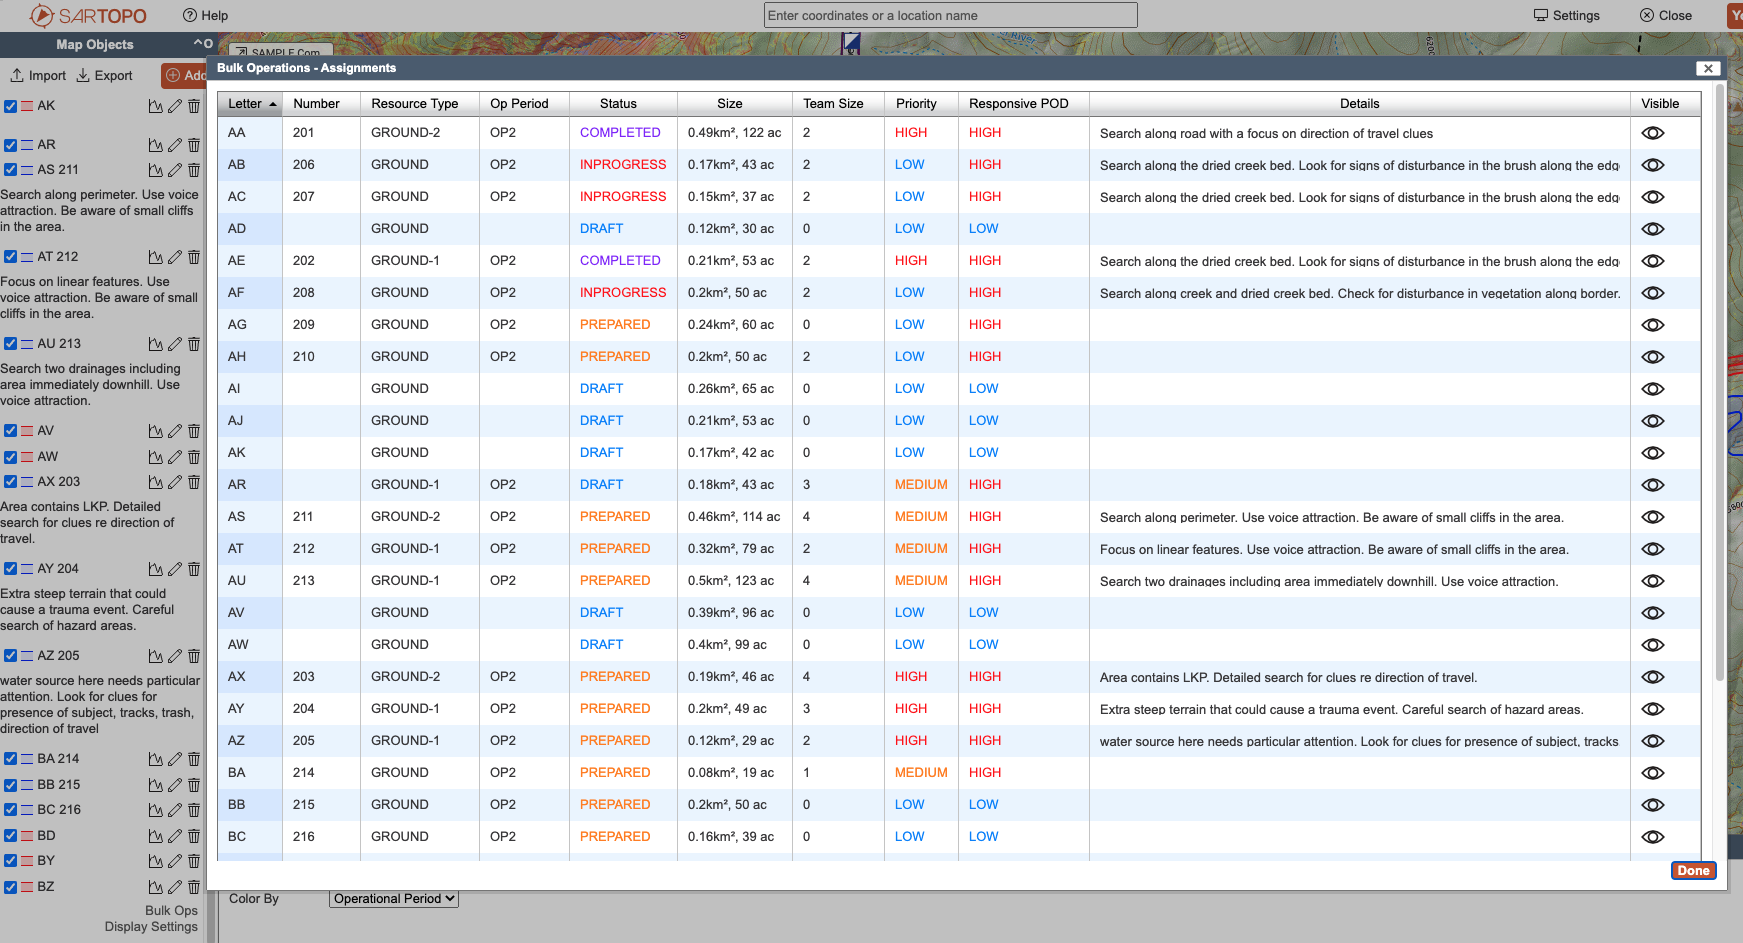
Bulk Ops Tour
The bulk ops window lists all of the assignments in the assignments folder along with some of the data input fields from the assignments. These columns are Letter, Number, Resource Type, Op Period, Status, Size, Team Size, Priority, Responsive POD, and Details.
Use any of the column headers to sort the table by that column. Some columns display their data in color so that you can quickly evaluate certain characteristics: status, priority, and POD. Depending on the size of your browser window, you may need to scroll the box horizontally to see all the information.
Print Individual Maps, Change Attributes, comparing Profiles, and Travel Plan are all covered in All Users.
Use command or control to select multiple lines.
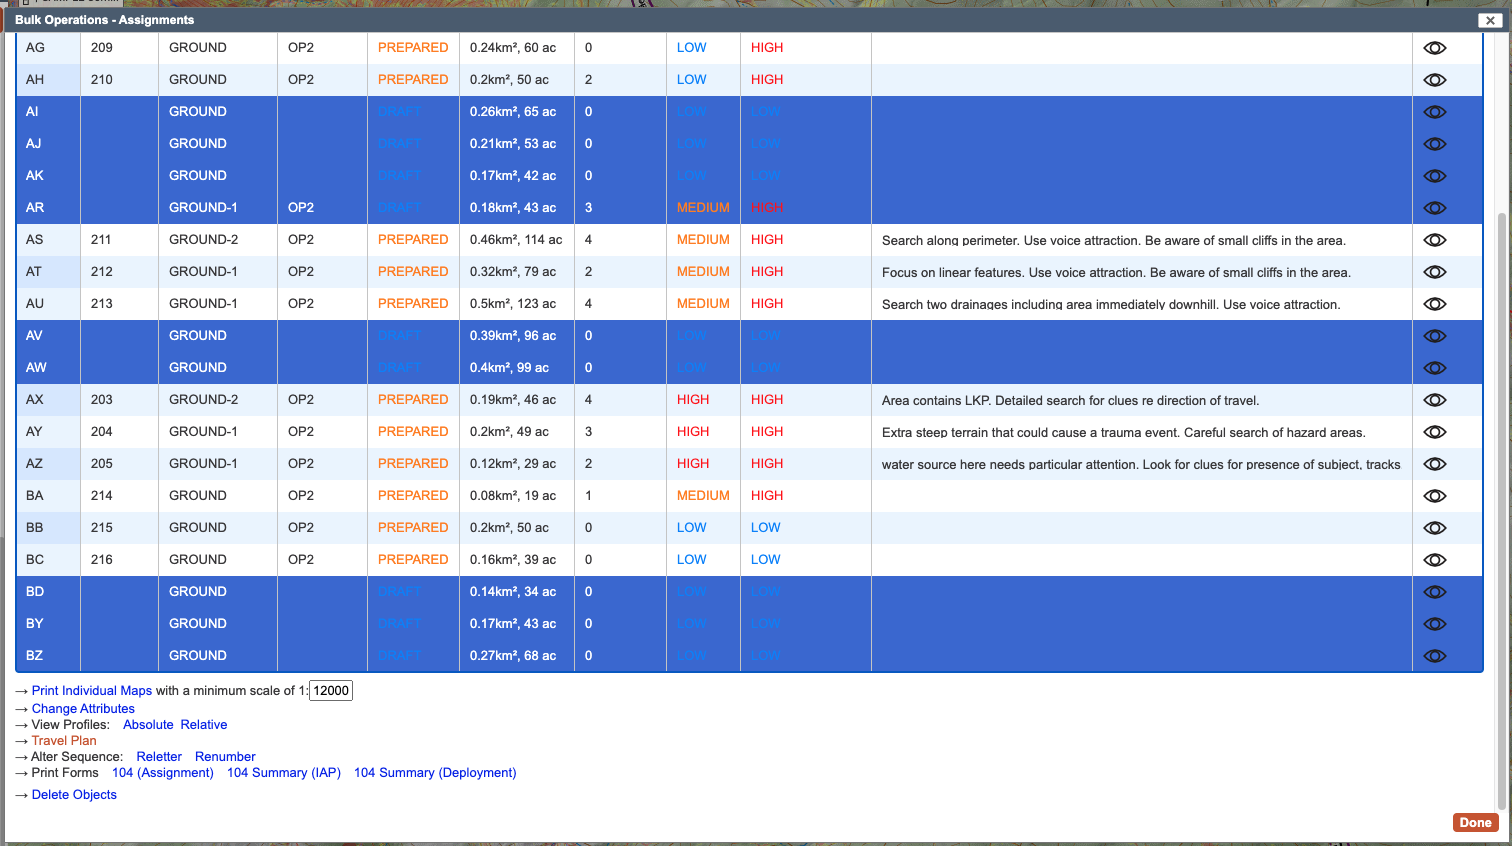
Change attributes will let you update the fields in the assignments, so that you can move multiple assignments over to prepared status, switch operational periods or folder, change team size, priority level for the assignment, or more.
This feature makes it easy to create a bunch of assignment objects without worrying about entering the same details into each one. Fill out the relevant fields that make an assignment unique compared to the others, then use Bulk Ops to add things like resource type, team size, operational period, POD, radio frequencies, transportation, prepared by, and status.
Leaving a field blank in the change attributes dialog box will keep the existing setting or text for each field. For example, if you do not enter new text into the comments field, each item will keep the text that already existed.
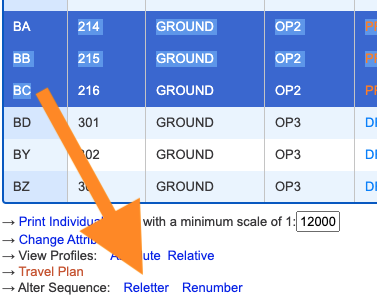
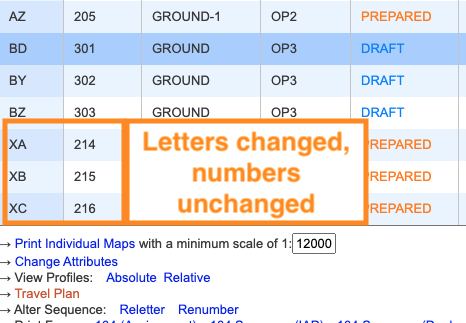
Alter Sequence: Use the alter sequence function to add or change the number or letter series for a set of assignments. For example, you get the assignments prepared for the day, and are ready to add numbers to them to give them to teams. Select the relevant assignments in bulk ops, then choose either Reletter or Renumber.
- Title Sequentially: To reletter, you designate the starting point, and the relettering takes the last letter of the series and incrementally moves it one more letter through the alphabet. So, if you select three assignments and ask it to start with A the output will be A, B, and C. If you ask it to start with AA, the output will be AA, AB, and AC. You can begin the sequence with anything, and the change will only apply to the final letter. So starting with helloa will output helloa, hellob, and helloc. The assignments will be lettered in the order in which you selected them in the bulk ops menu. Relettering does not care if you already have another object with that letter or letter combination. If you did not select assignment AA in bulk ops, then you start your reletting with AA, you will end up with two AA assignments.

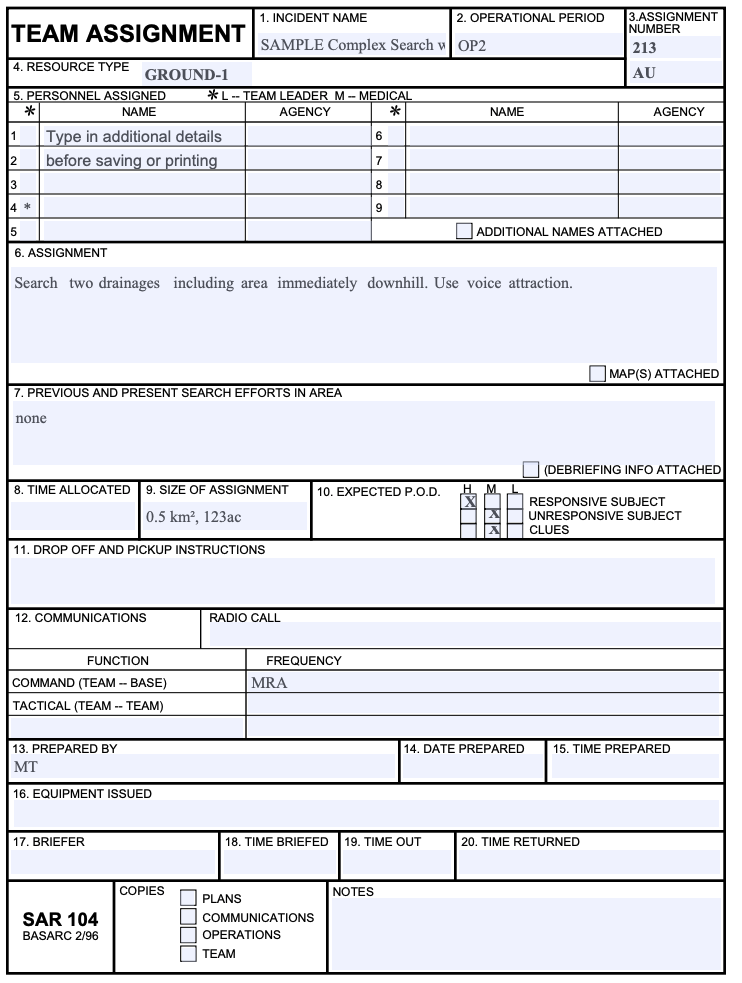
Print Forms: Once your assignments are prepared you can use the links in bulk ops to prepare assignment paperwork for your Incident Action Plan (IAP). CalTopo provides three different forms via bulk ops: Team Assignment, Team Assignment Summary for IAP, and Team Assignment Summary for Deployment.
- The SAR 104, Team Assignment sheet, is a standard form used by many SAR teams. Form fields are fillable so you can add names or make adjustments before printing or saving.
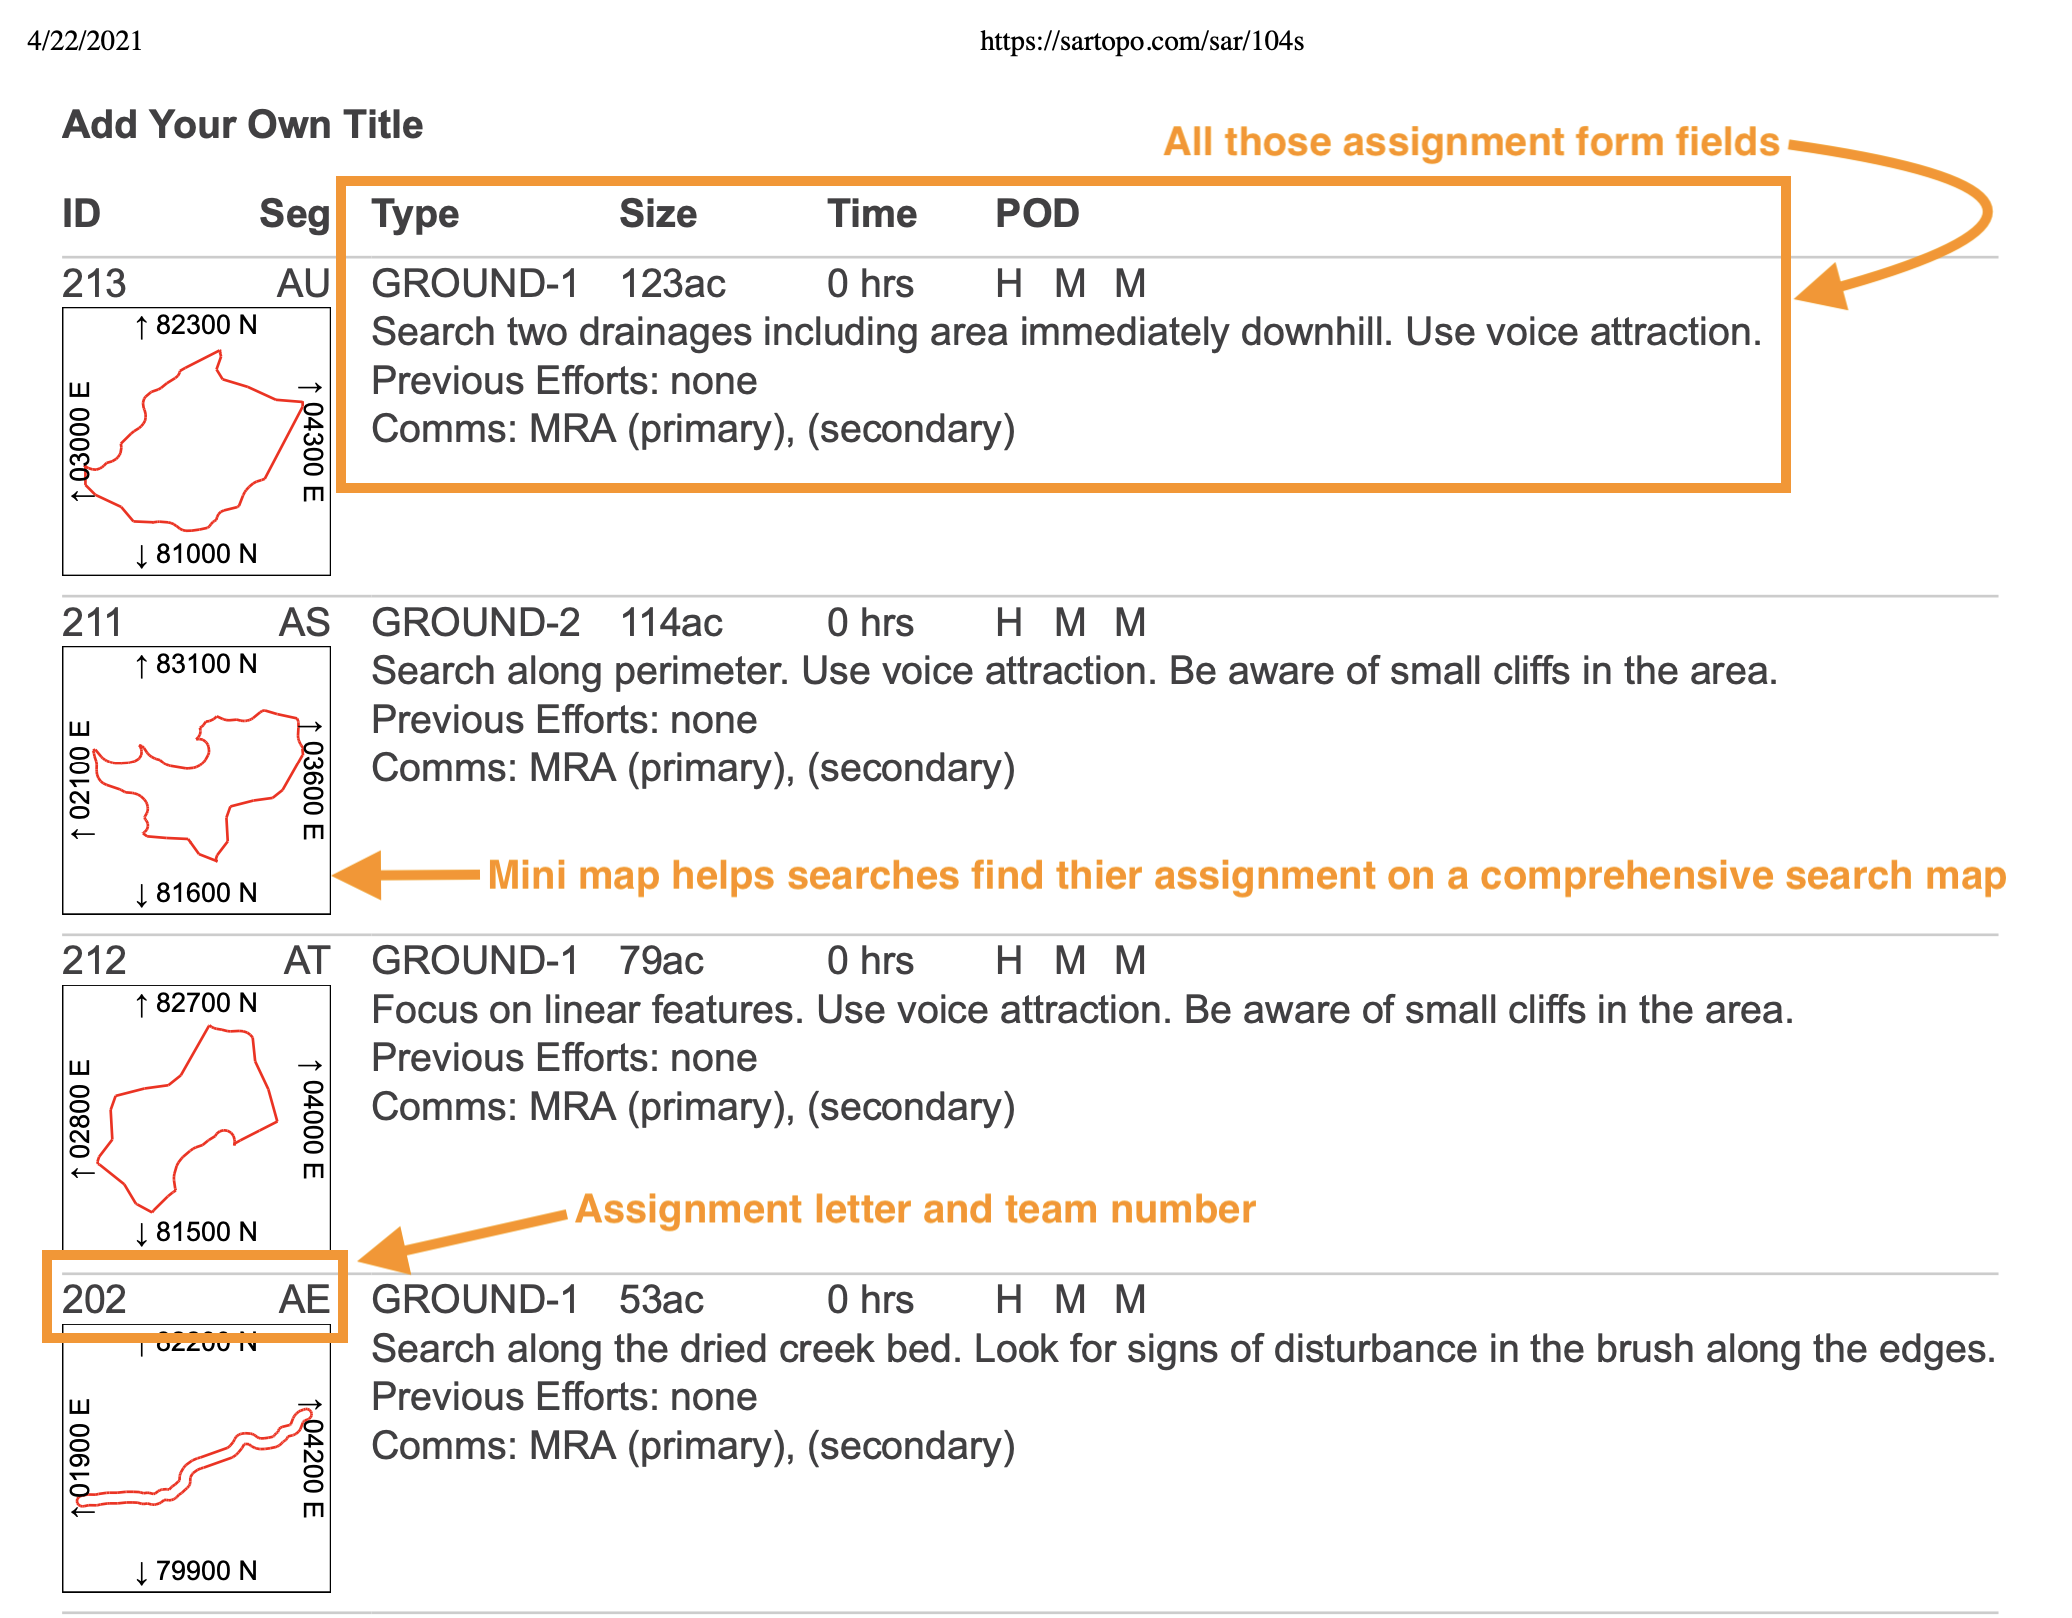
- The Team Assignment Summary (104s) for the IAP is designed specifically for sharing large amounts of information in a concise manner with many people. It contains all the information from the assignment form fields in a concise package, plus a mini map of the assignment for reference back to a map showing all assignments.
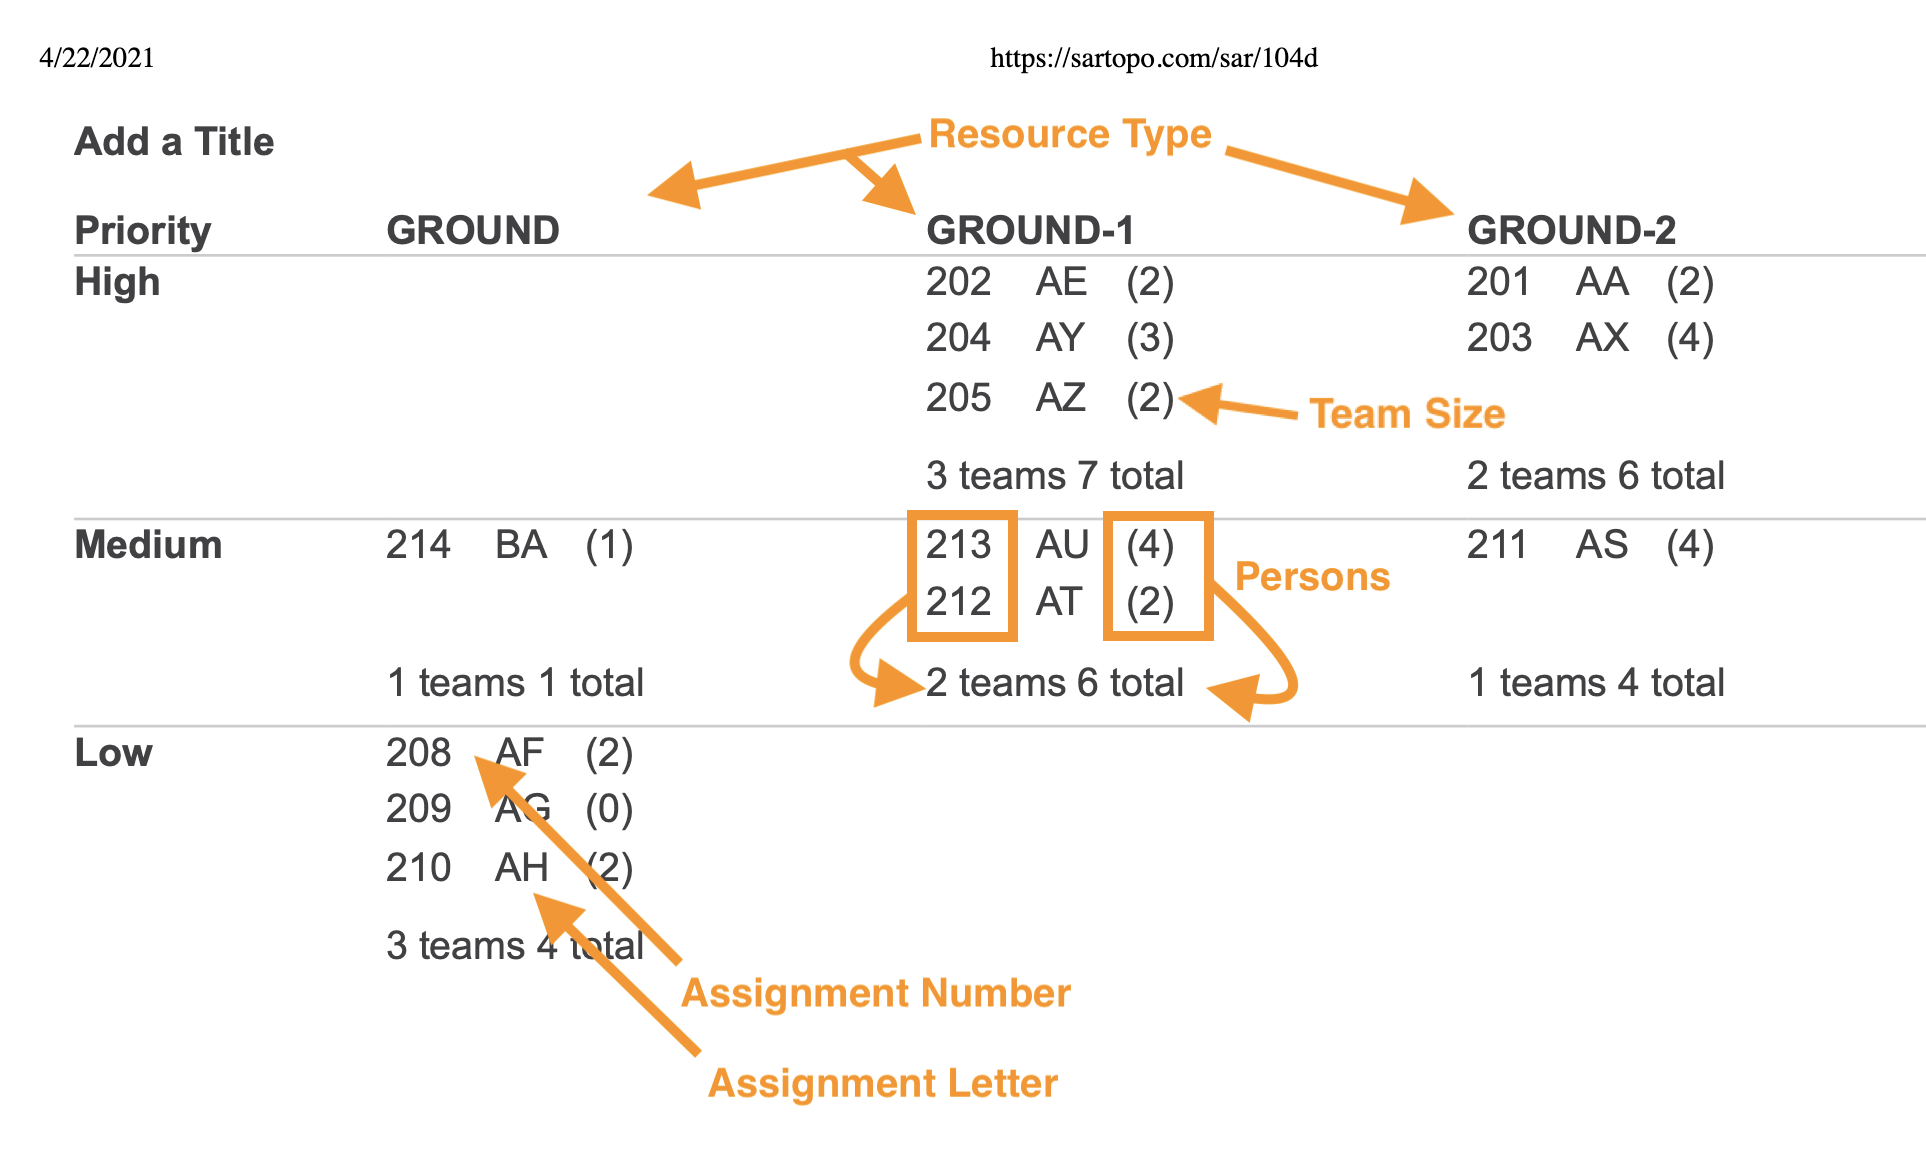
- The Team Assignment Summary for Deployment is designed to help with connecting assignment segments to responding resources. For missions with lots of resources responding and the need to quickly determine who goes where, this form provides a guide.