Other Object Types and Functions
in this lesson
Besides Markers, Lines, and Polygons, other objects available in CalTopo include Buffers, Folders, Range Rings, Bearing Lines, Sectors, and Locators. The processes for creating and editing these objects are not significantly different than any of the objects this training series has already covered. In fact, after they are created, Buffers and Sectors become polygon objects, and Range Ring and Bearing Lines become line objects.
Topics on this Page:
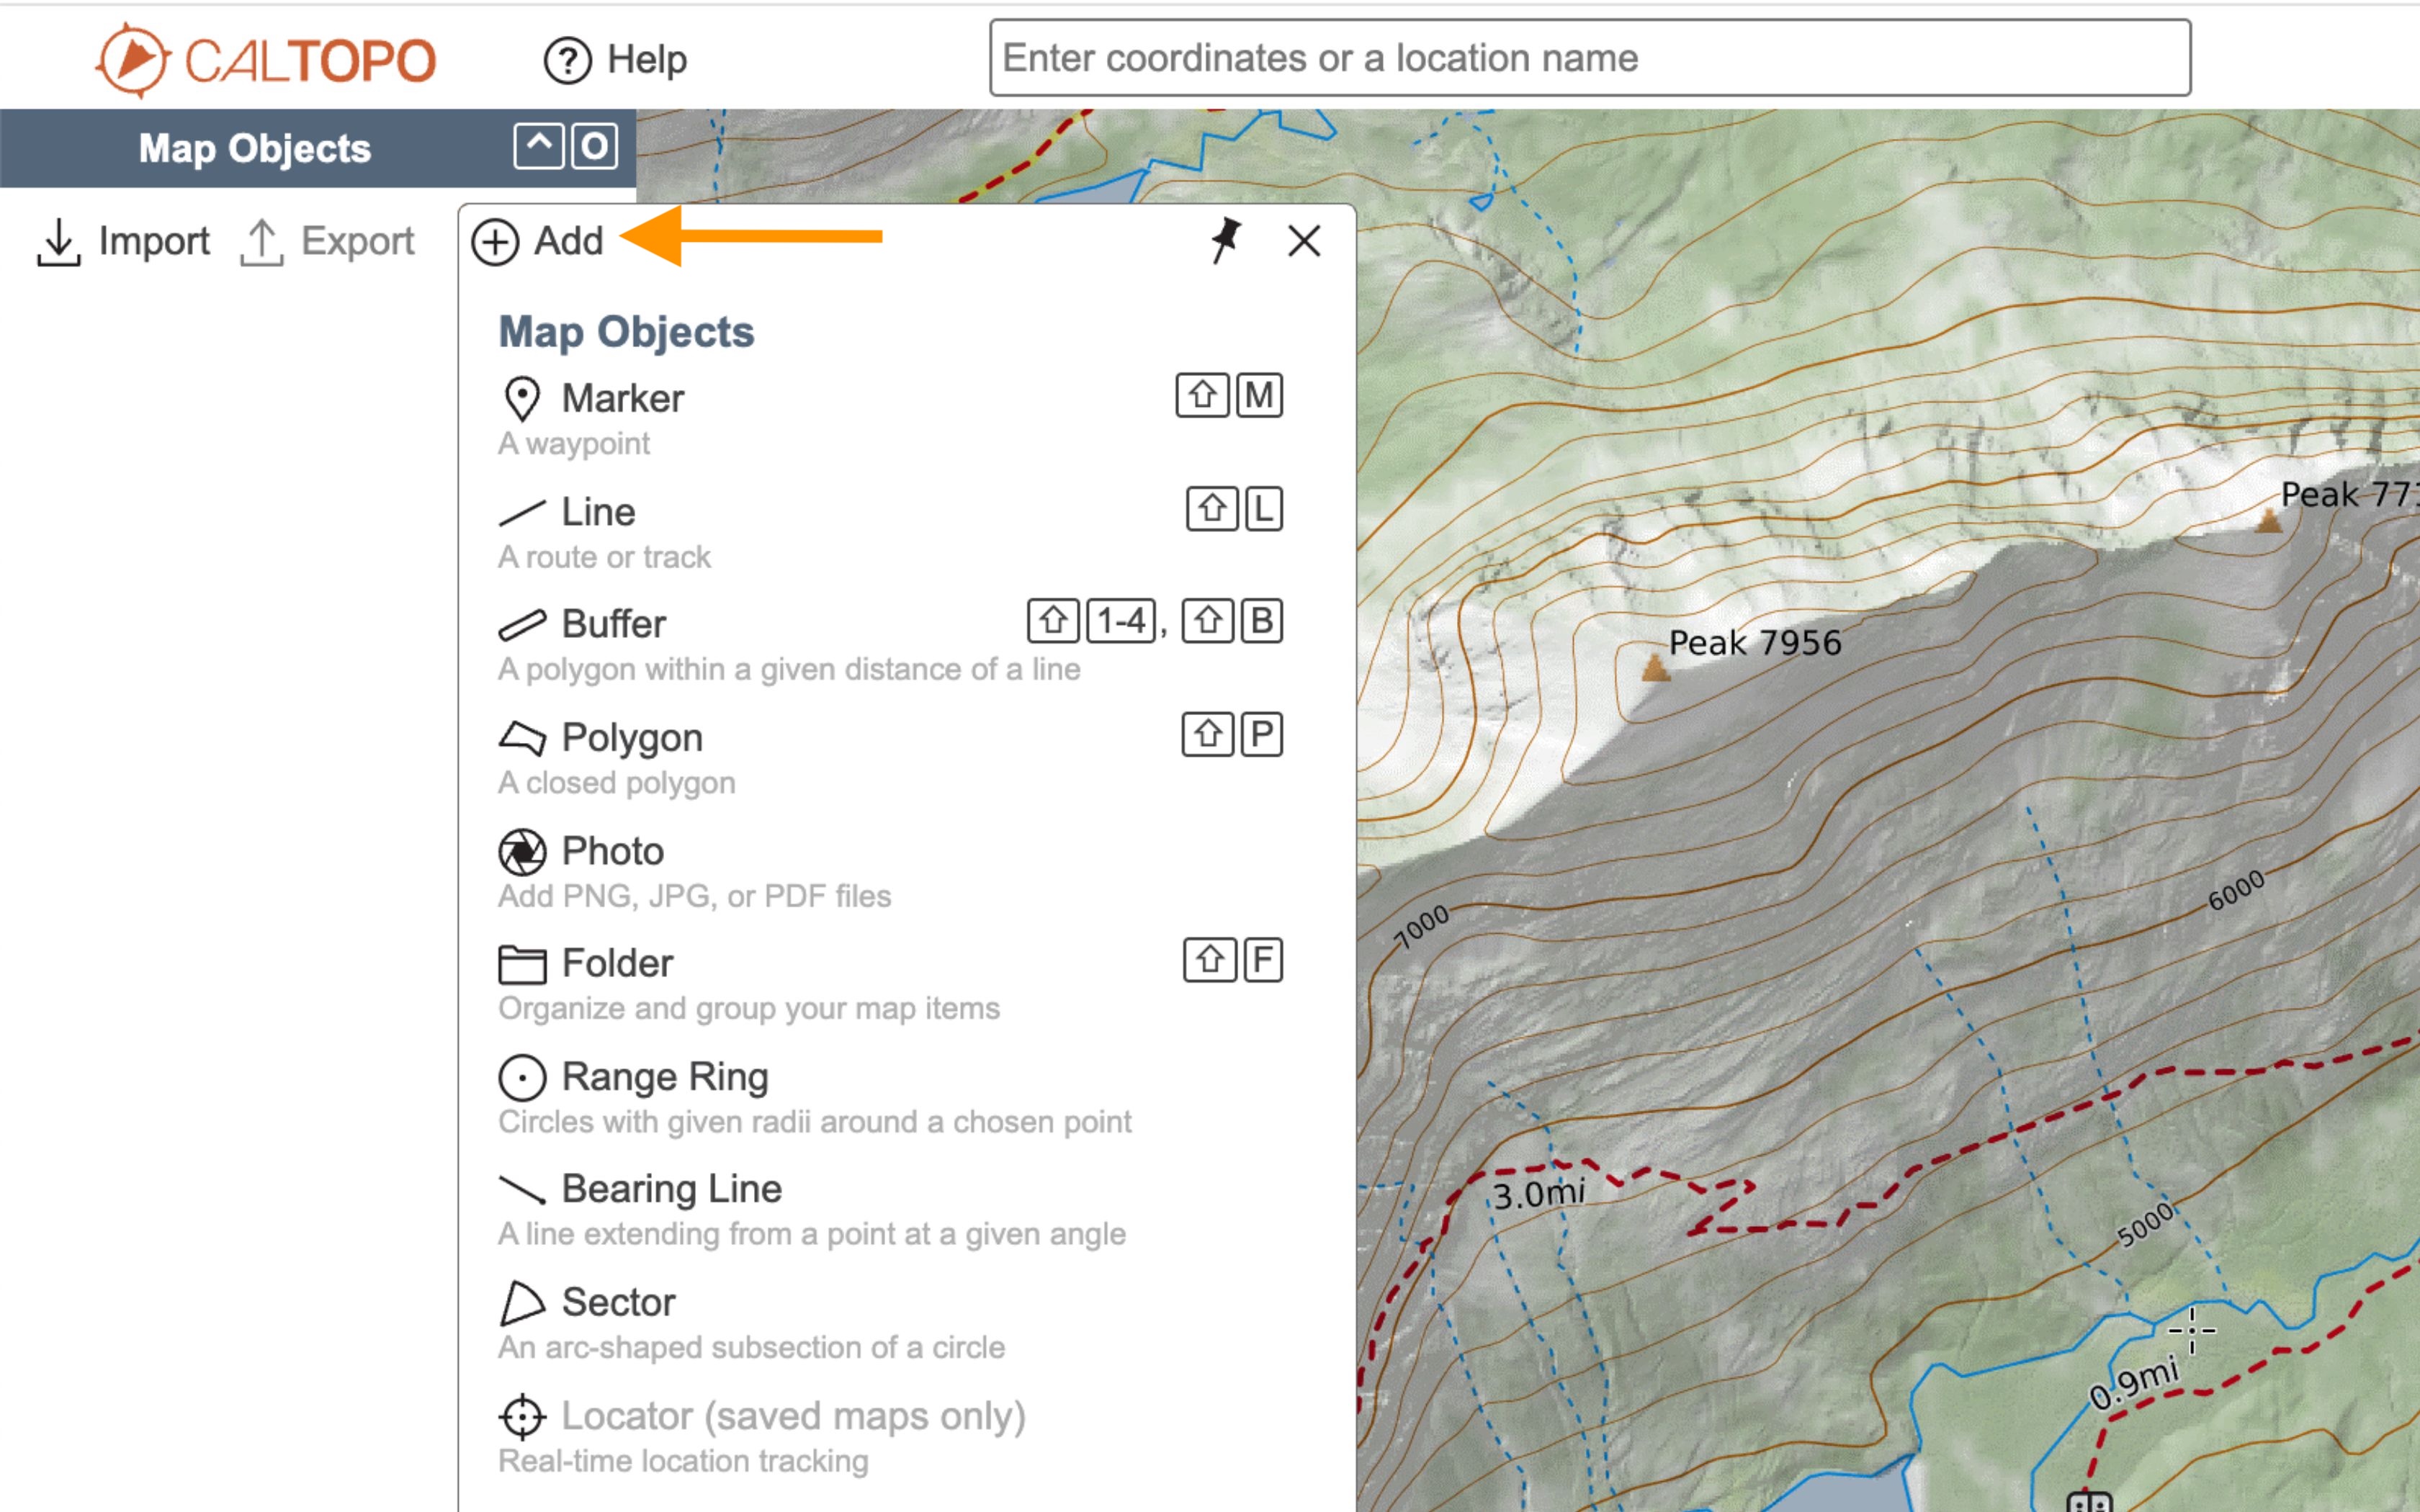
Objects are added using the +Add button at the top of the left-side object menu. If you are unfamiliar with the Add menu, go back to the beginning of the chapter.
Using Other Objects in the Mobile App
The objects in this lesson are essentially the same in the mobile app as in the web app.
Add objects to a map in the app by using the folder icon button at the top of the screen to access the objects menu, then clicking on the “add object” button in the lower right of the screen.
After adding a Buffer, Range Ring, Bearing Line, or Sector to the map, these objects edit as if they are lines or polygons. Thus you should refer to the lessons for lines and polygons for how to edit these objects after they have initially been saved to the map.
Buffer
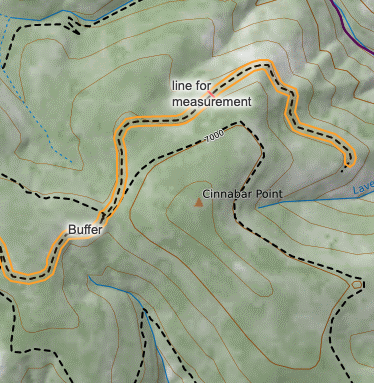
A buffer is used to draw an area around an object. Buffers are drawn in the same way as a line, but the result is a polygon. You might draw a buffer to make a trail or line object more obvious visually, or to see what other objects or features fall within a certain distance of a line-type feature.

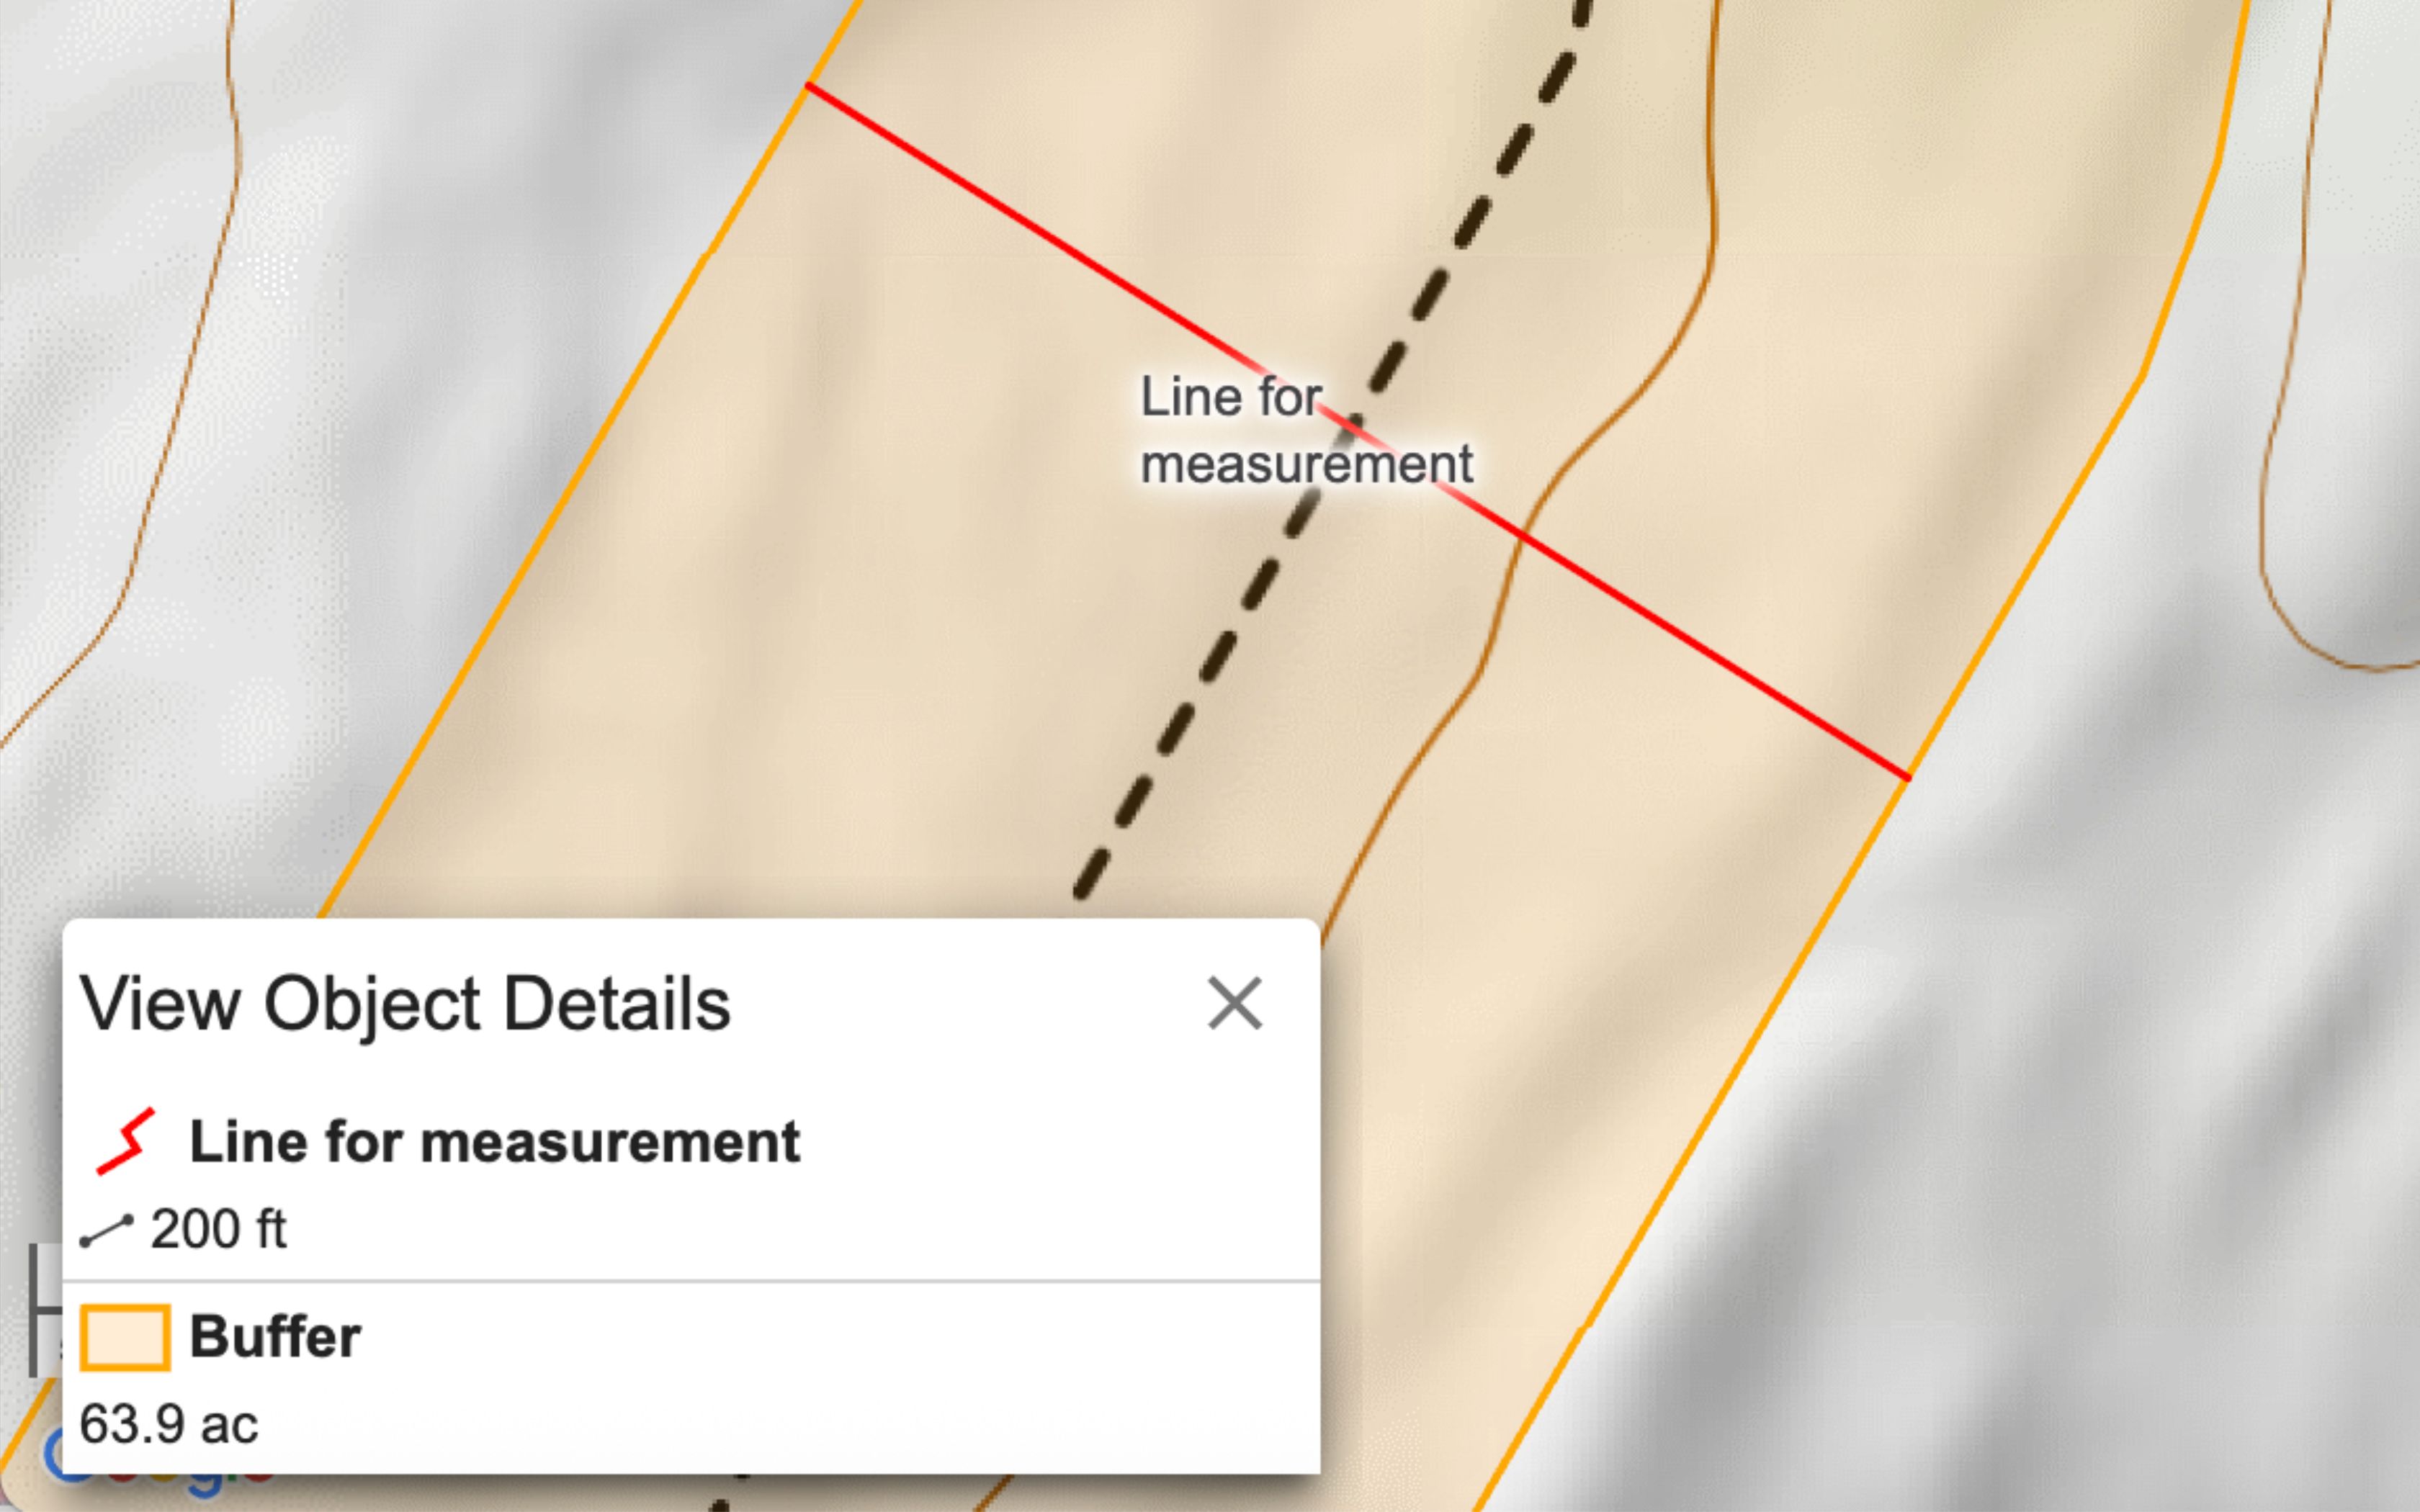
You indicate the radius that you want the buffer to cover on either side of the line you draw. In the example below, the center of the buffer follows the trail, and the polygon covers 100 feet on either side of the trail. In the last image, there is a line drawn to show that the buffer is in fact 200 feet wide, after I’ve set the radius at 100ft.
Buffers tend to be very complicated polygons if you are not drawing straight lines, such as if you are using snap to to follow a trail. Once you complete a buffer, they edit in the same way that a polygon does, but since they have many vertices it can be difficult to make large changes to them. There is no way to change the radius of the buffer after you draw it. You will have to just draw a new one.
Folder
Some folders are created automatically as you add other objects to your map. For example, markers default into a Markers folder, and lines and polygons get a folder. Choose Folder from any of the add new object menus to create and name additional folders which can be used to sort and organize your objects in ways that are meaningful to you.

When you create a new Marker, Line, or Polygon, you can choose which folder to create the object within. All objects can move between folders when you edit them, after initial creation.
The next lesson (Data Organization: Folders and Bulk Ops) covers using folders in greater detail, including how to move objects between folders and how to move many objects at once.
Range Ring
A Range Ring starts with a given point and draws one or more circles at an indicated distance out from that point.
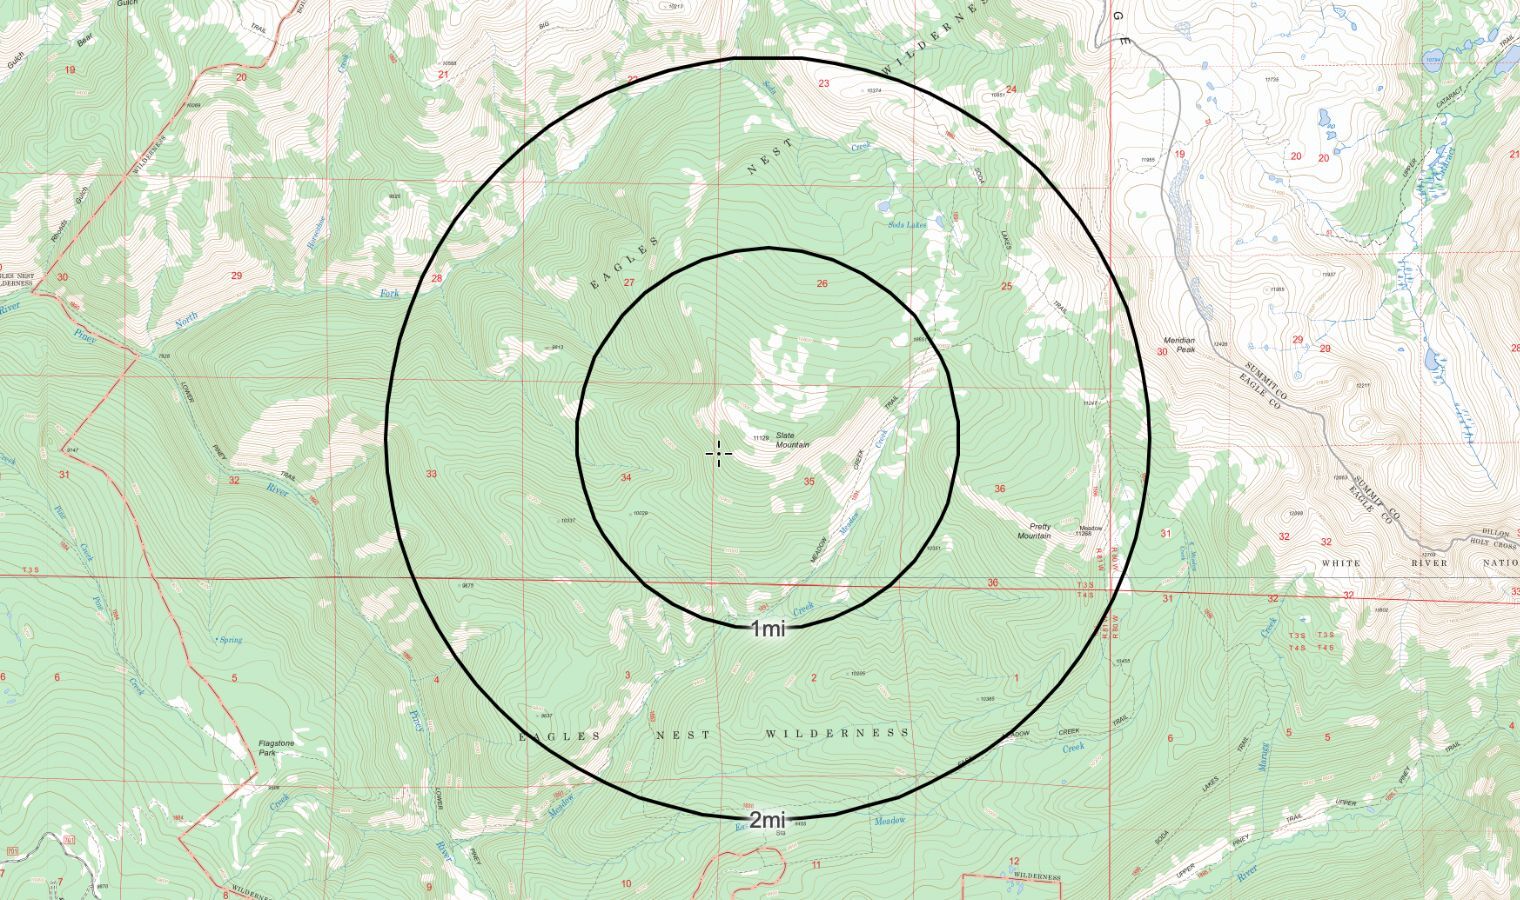
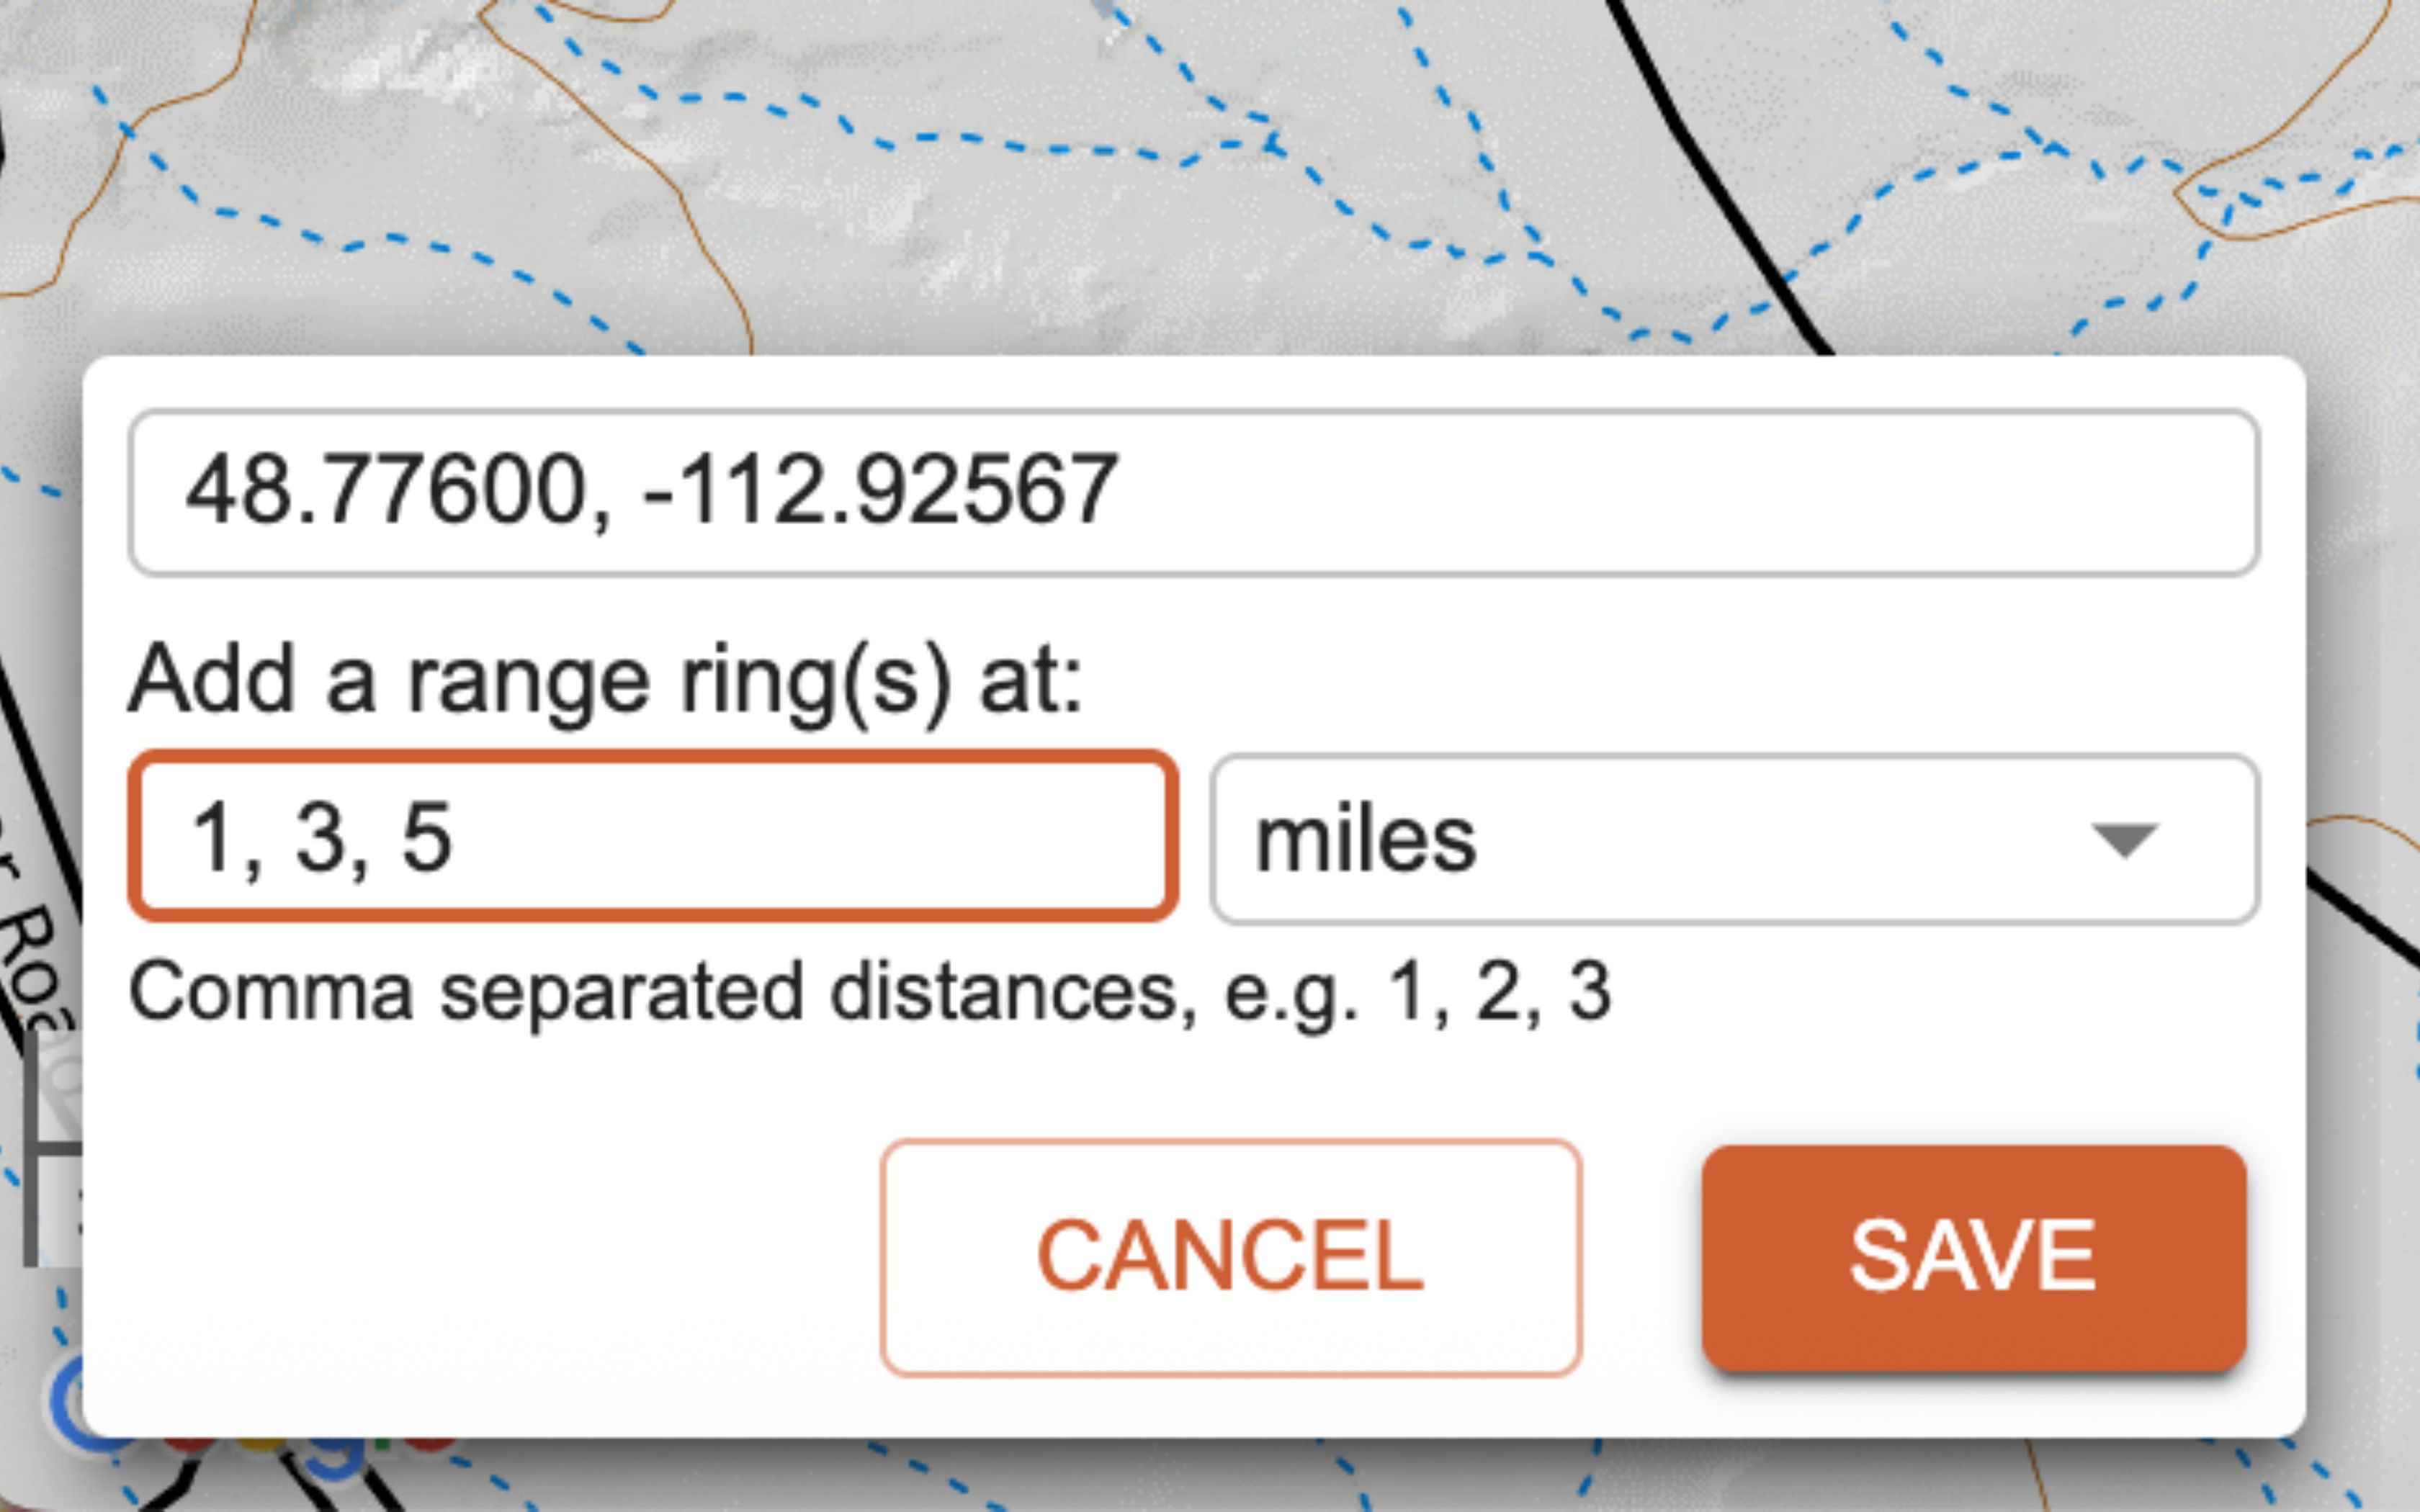
You can adjust the range ring directly in the map or using the Range Ring dialog. To adjust the center of the range ring(s), you can enter coordinates in the “Coordinates” field in the dialog or click and drag the red bullseye at the center of the range ring(s) to the desired location. To adjust the radius of an individual range ring, you can enter the numerical radius in the “Add a range at” field in the dialog or click/tap and drag the white box on the range ring to change the size.

To add multiple rings based at the same location, separate the numbers with commas when you enter them. In the example below, there are three circles located at 1, 3, 5 miles from the center.
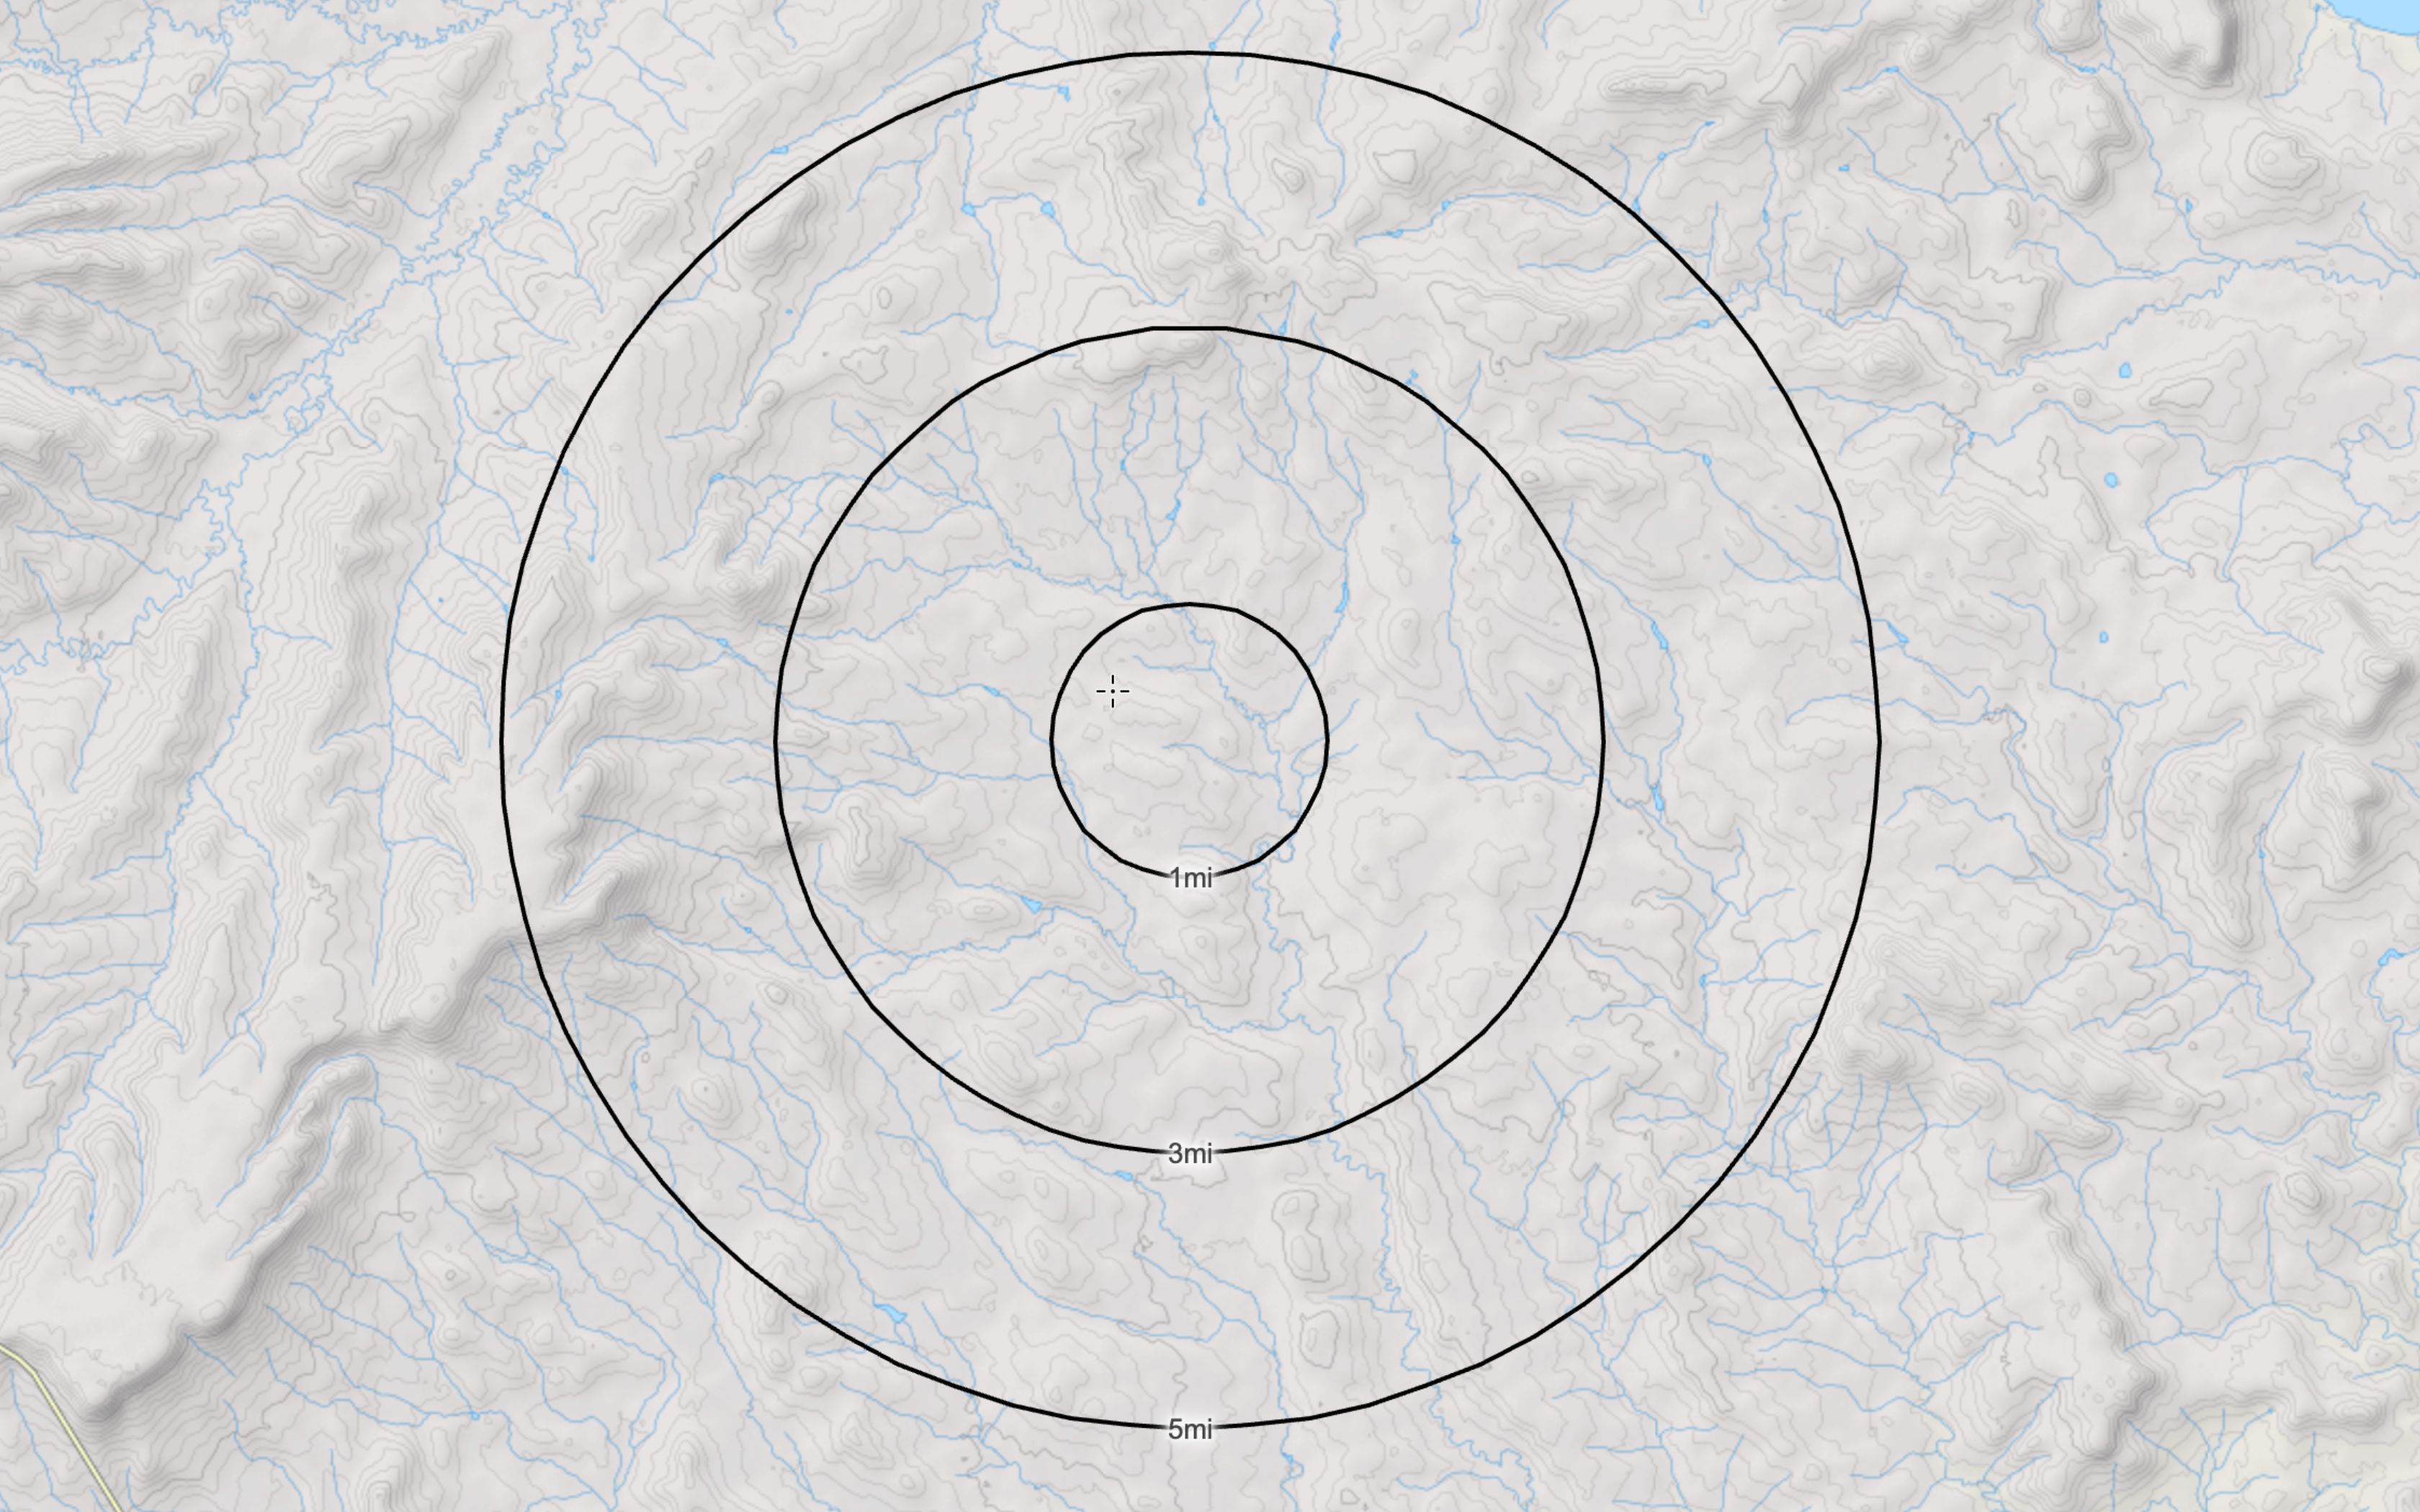
Range rings can help you gain awareness of the relationship between distances. It may help you think about how far you could travel in a certain amount of time, or view all the peaks that fall within a certain distance of another peak.
Bearing Line
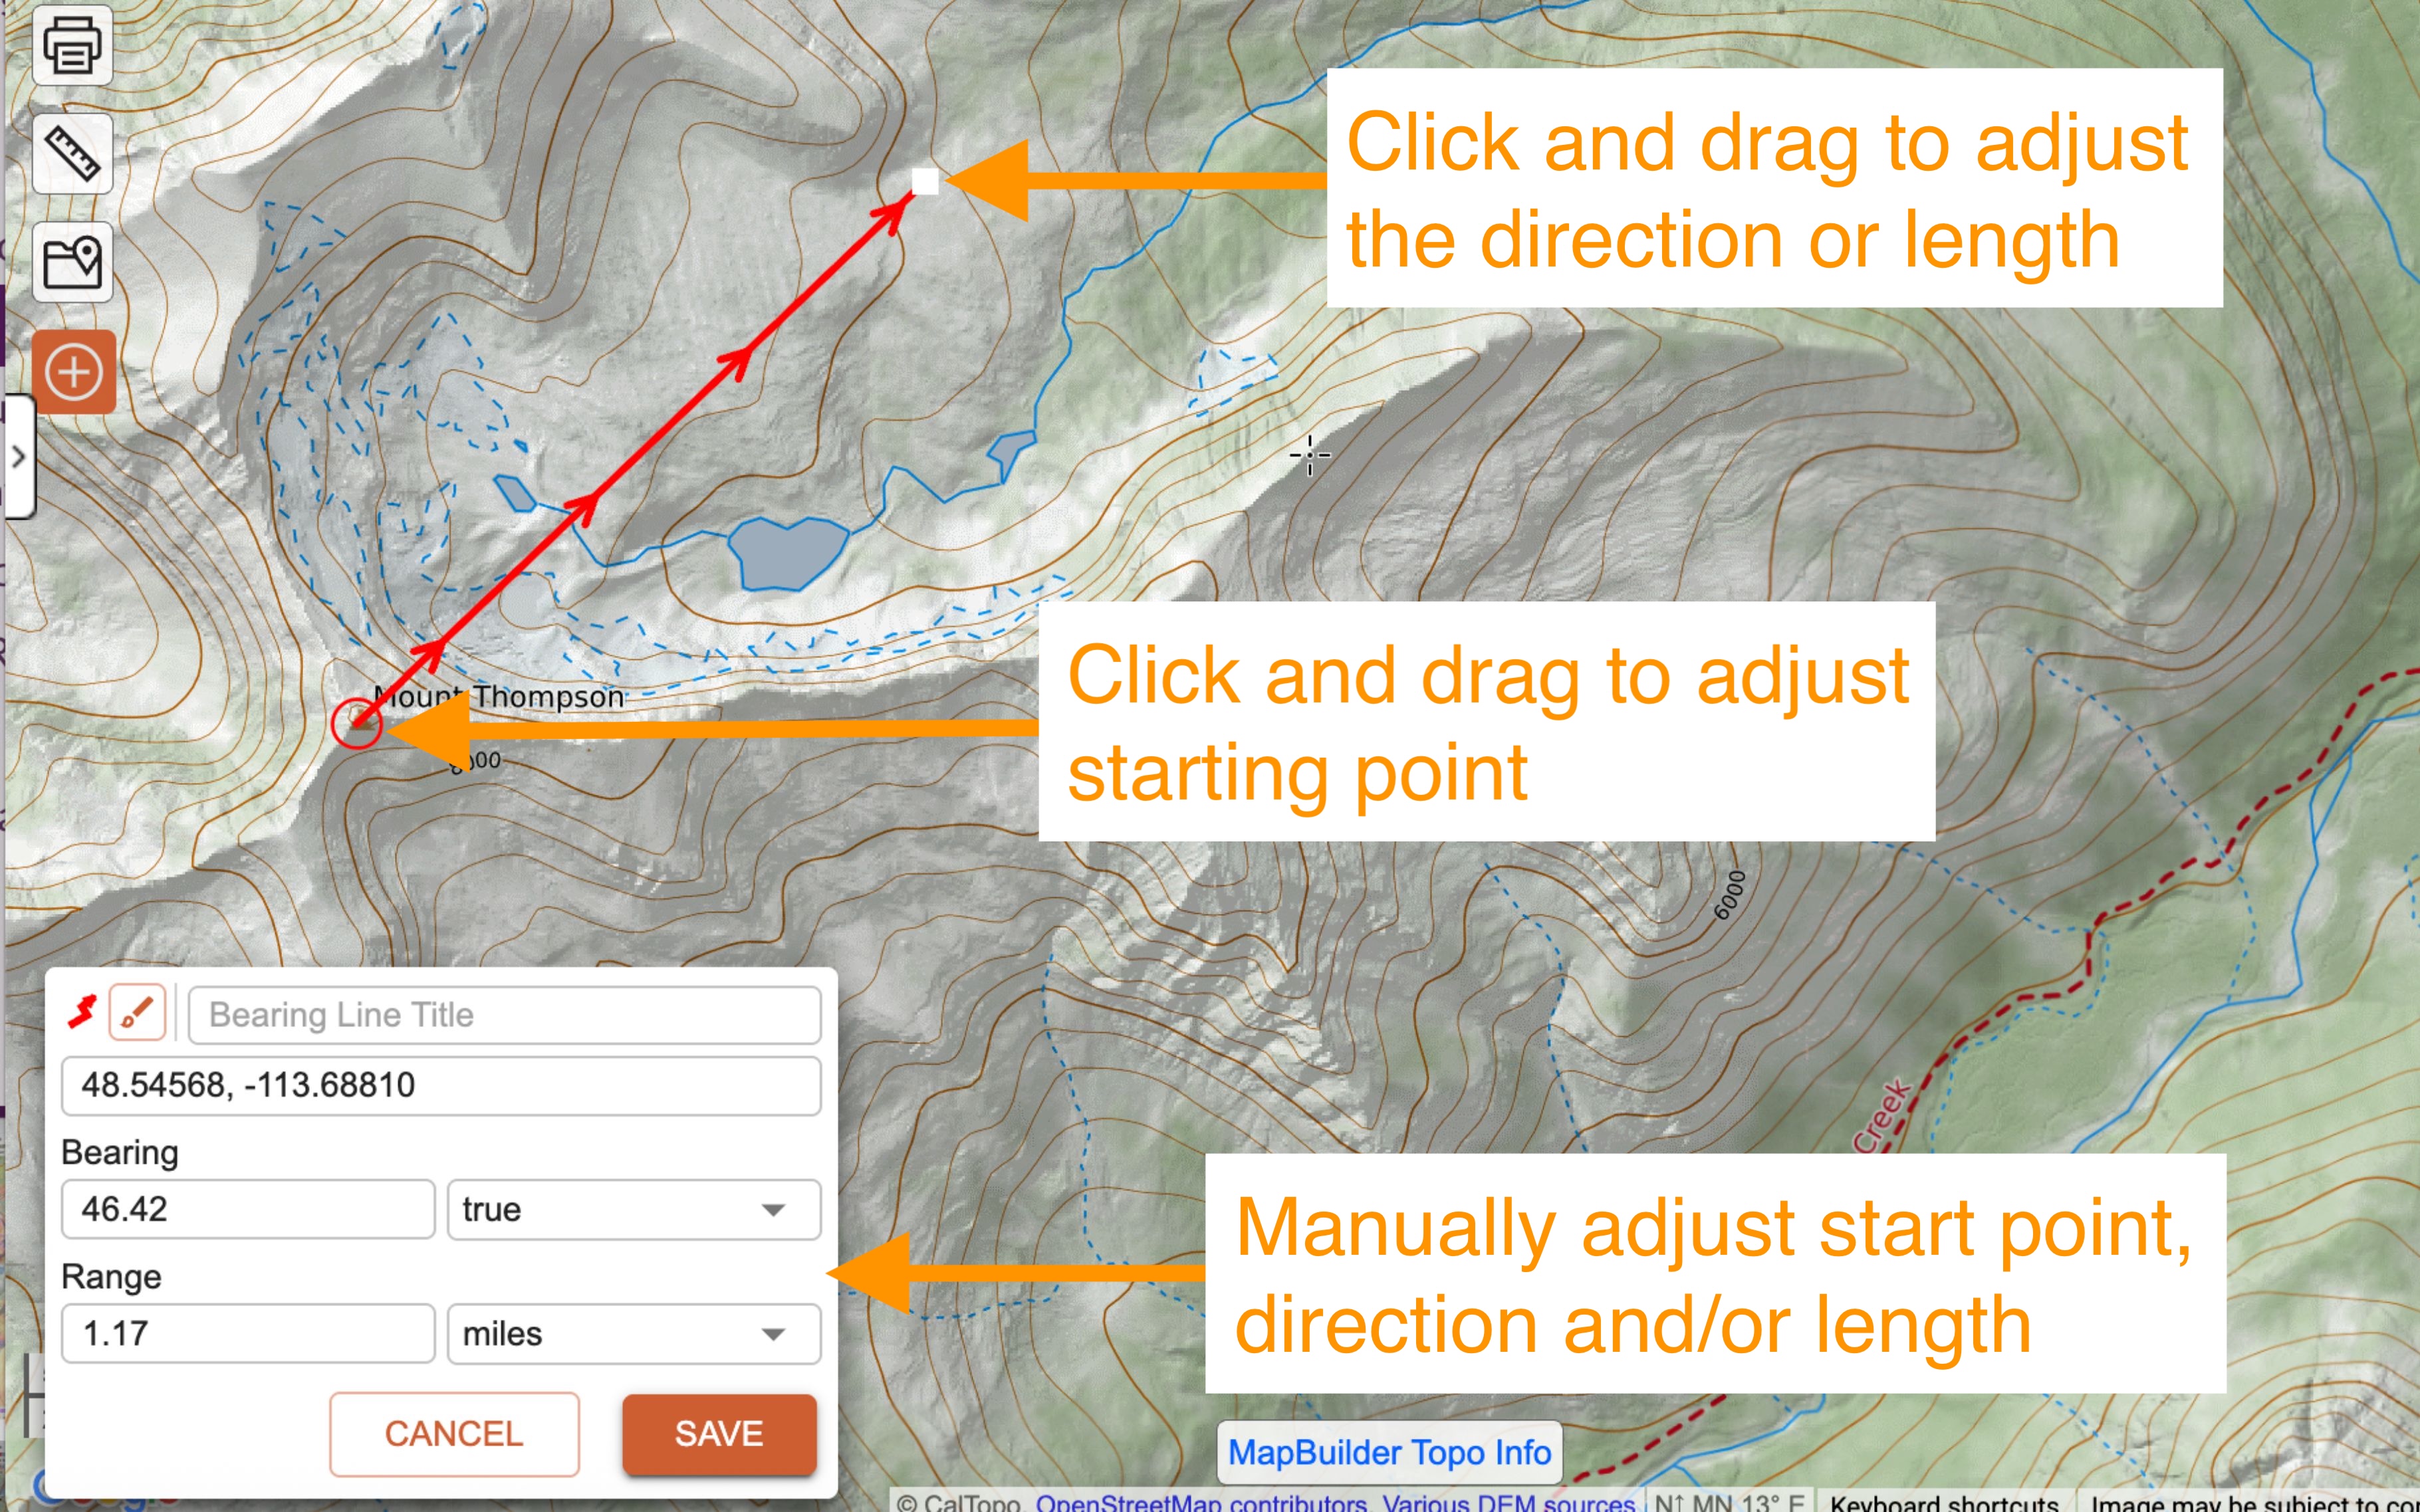
A bearing line helps you visualize a direction on the map for navigation, planning, or reference. When you create a bearing line, a box appears where you can enter a name, specify the angle, and input coordinates. The starting point is set to the center of your map view by default. Once placed, the bearing line can be adjusted by dragging the endpoints, allowing you to fine-tune its direction and distance without manually entering an angle.
You can manually set the bearing angle and length, and choose true or magnetic. Once you click OK, the object becomes a line and can be edited as a line. The comments area will be filled with the data of the coordinates where your bearing line begins, your designated bearing angle, true or magnetic north as well as the units of length in the Bearing Line dialog. While you can edit the line that the bearing line function creates, you cannot reset it to a different bearing by just entering a number. For that you would need to draw a new bearing line.
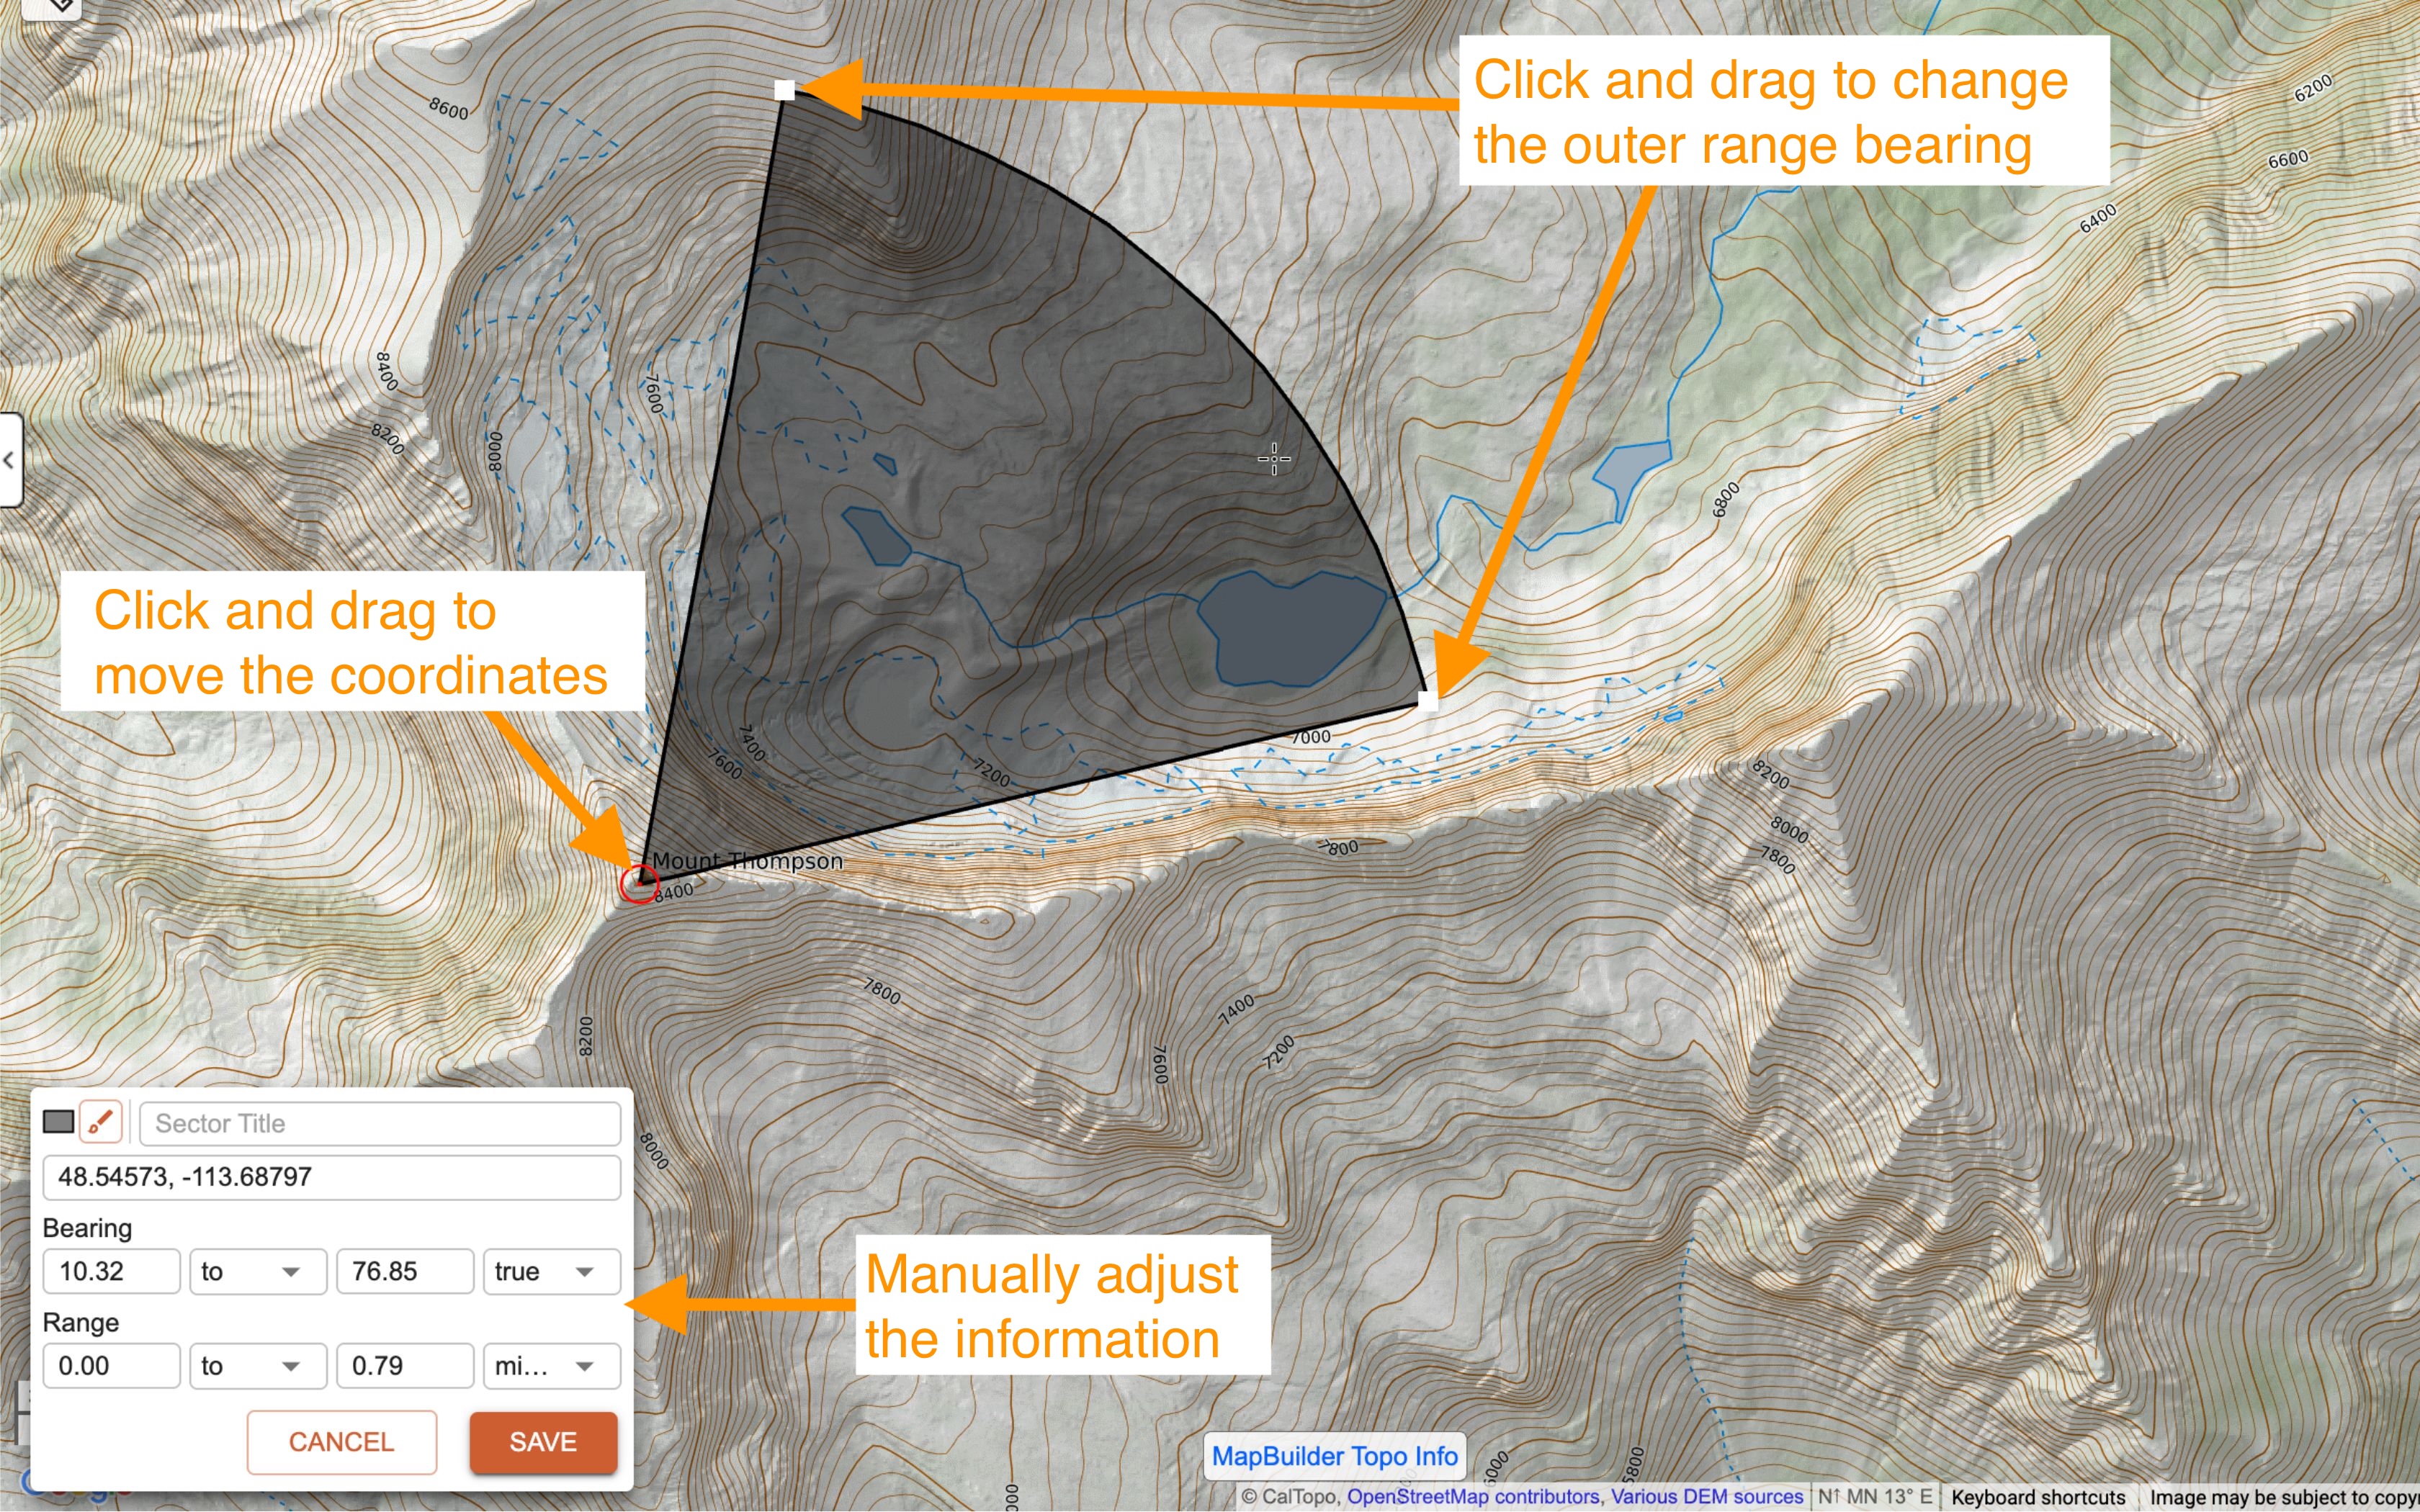
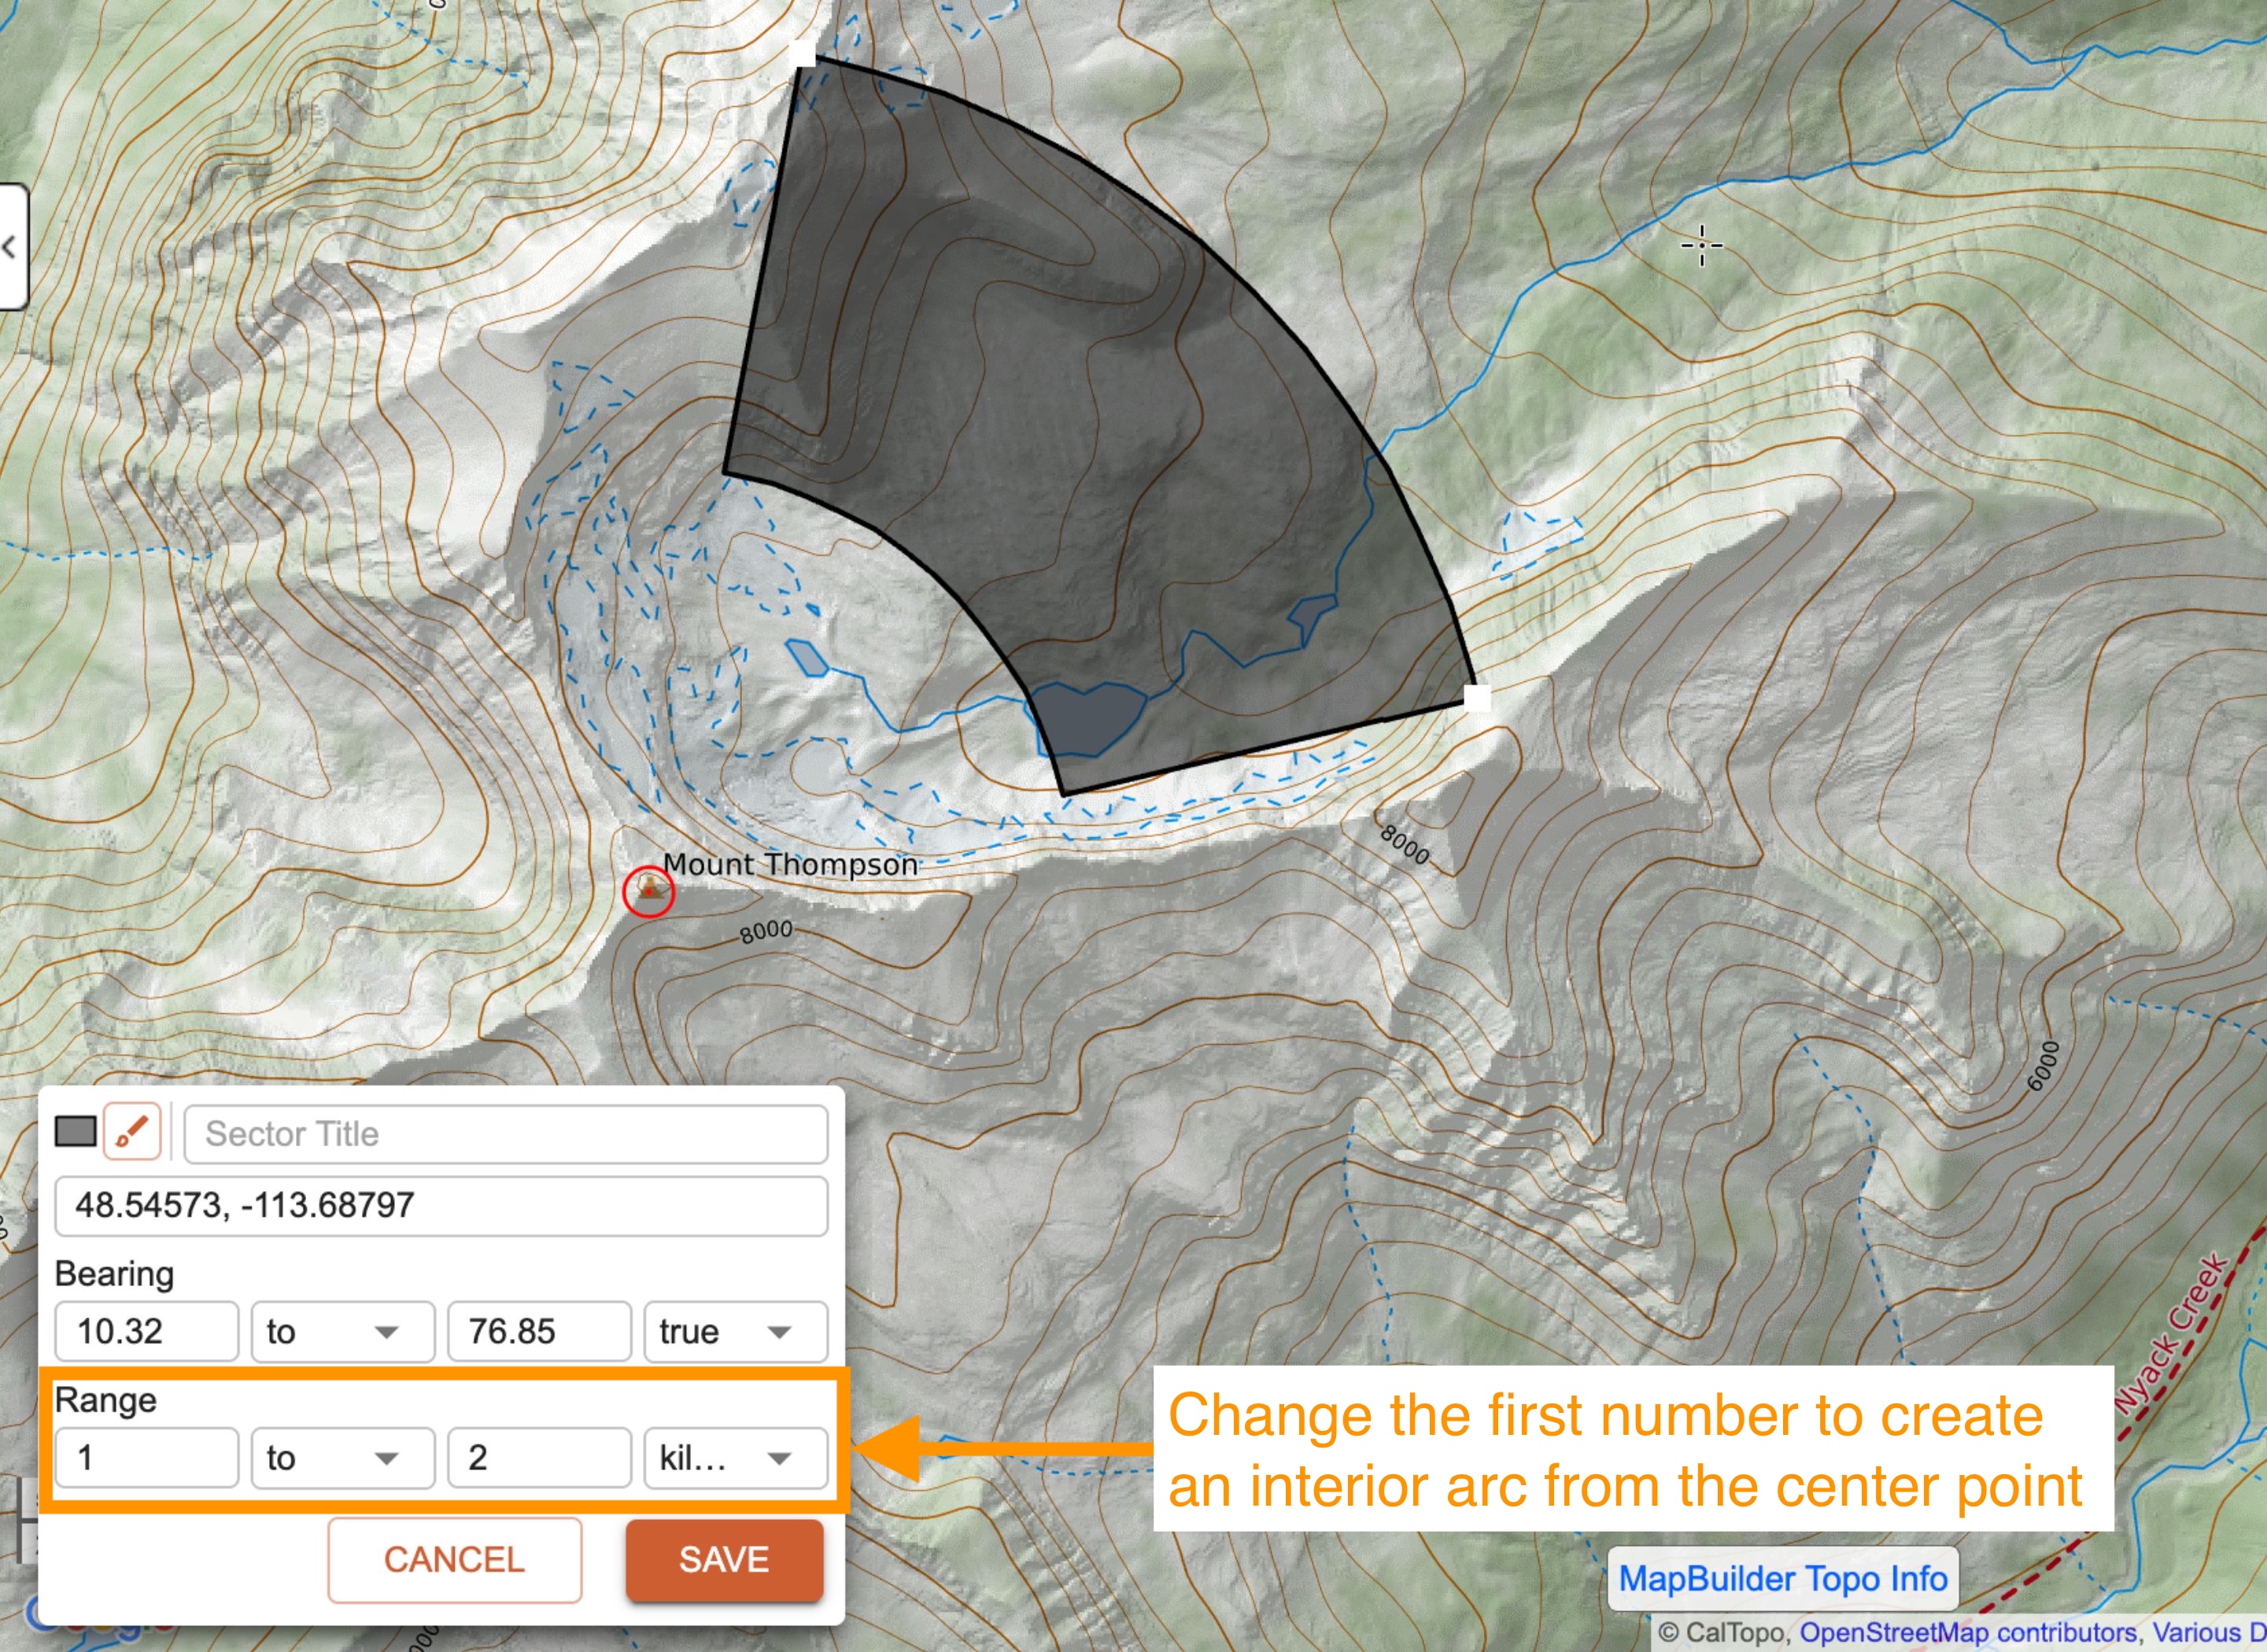
Sector
A sector is an area within a circle. It is defined by two bearings, an inner radius, and an outer radius. It creates a polygon object, with a label color, and fill. The sector requires input similar to a range ring. It has a center point and a radius to define the outside. The inner radius can be left at zero or set to any value up to or including the outside radius value. The shape of the Sector can be adjusted visually or information can be input into the appropriate places in the edit box
Locators and Live Tracks
Locators and Live Tracks allow individual account users to receive position updates or record a live track for trackable devices such as Garmin inReaches, APRS, ADS-B aircraft, and custom integrations. Unlike recording tracks with the mobile app, Locators and Live tracks allow live location sharing to the map even if cell service or wifi is unavailable.
Please note that Locators are no longer an option. All individual account users are encouraged to use Live Tracks. While some devices may require more information to get set up (such as IMEI numbers for Garmin inReaches), Live Tracks adds support for a wider range of devices and objects (including ADS-B aircraft) and the ability to record live tracks to a saved map.
Visit the Live Tracking and Locators page for more information on how to set up your device to record live tracks to a saved map. After set up, the position of the device will update on the map at either regular intervals as specified by your device’s plan and settings or by manually pushing updates.
Live tracks and tracks recorded with the mobile app are not the same. Most trackable devices do not update as frequently as recording a track with the mobile app. Consider the example in the screenshot below. You can see that the inReach (red line) updated far less frequently than the mobile app track (blue line).
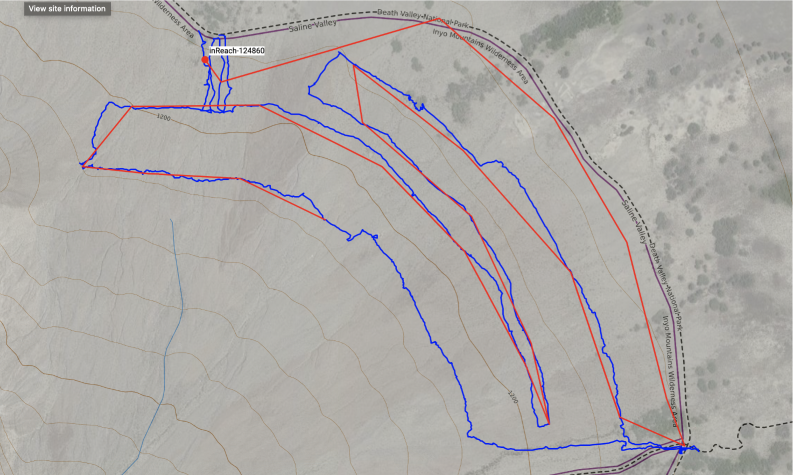
Trackable devices tend to be more useful than the mobile app for situational awareness and tracking resources in areas without a data connection. If you have a need for a more precise record of where someone has been (such as during a search for a missing person), then recording tracks with the mobile app is recommended.
If you are a member of a team account, you can link devices to your team account as part of the Shared Locations overlay. This allows you to display the position of these devices anytime they are on and reporting their location without having to add them to the map each time. Go to Live Team Tracking for more information on adding trackable devices to team accounts.
Object History
The Object History section provides a record of an object's creation, edits, and system changes. Individual users are not identified; however, if the object was created or edited on a team account, the associated team will be shown. If no team information is available, the byline will simply show as "unavailable".
This history allows you to see how an object has evolved over time, including both user-made edits and automated system modifications, without exposing personal user details.
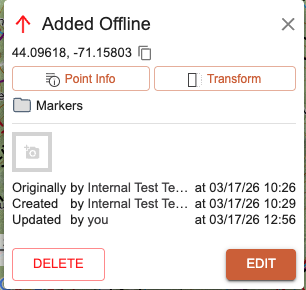
- Originally:
- The time the object was first created, shown if it differs from when it was synced (e.g., created offline).
- Also shown on export/import, reflecting the original creation time from the source map. If the original time is not set, it will reflect the first recorded creation time.
- Created:
- The time the object was created on the device if it was synced immediately.
- Otherwise, this becomes the time it was first synced to the server.
- Updated:
- The time of the most recent modification. If no edits have been made, this will match Created.
- Reflects the time the object was last modified, including both user edits and system modifications.
- Examples of system modifications include:
- Expired live tracks
- Processing a photo waypoint
Note: When offline, both Created and Updated reflect the device creation time. Once the object syncs, Created updates to the server sync time, and Originally will appear if it differs.