Drawing Segments and Assignments
in this lesson
This chapter goes beyond the initial hasty period and looks at starting to subdivide, or segment the terrain using the mapping tools in SARTopo. At the end of this lesson, you should be able to do the following:
- Define segments and assignments.
- Draw clean, well-aligned segments on the map using snap-to and other tools.
- Evaluate segments for proper size, access, and travel.
Jump to Section:
What are Segments and Assignments?
Searches hinge on geospatial information that often requires more specific information than "the south side of the peak" or "area bounded by the Gordon Mill trail, Timberview trail, and the big ridge". Dividing the map into segments provides us with a geospatial alphabet that makes this communication easier - both when prioritizing efforts during the planning process, and when tasking search teams.
While there are many different approaches to naming search segments, this training will stick with our recommended best practice of using segments and assignments.
A segment is a line, buffer or polygon on the map, identified by a pair of letters (AG, DB, etc). Segments are created early in the planning process without regard to prioritization or search tactics, to give the planning team a broad geographic alphabet when talking about the search problem. Once created, segment boundaries and identifiers should generally not change throughout the duration of an incident. Despite the name, segments are still tracked on CalTopo as "assignment" objects, rather than plain lines or polygons.
An assignment is a segment that has tactics (e.g. resource type, team size, desired POD (Probability of Detection)) added to it, and is identified by a number in addition to the segment letter. Generally, only segments that are intended to be searched in a given operational period are given numbers and referred to as assignments. We recommend tying assignment numbers to the operational period, e.g. 201, 202, 203, etc for OP 2 assignments.
This system allows you to create a large number of segments upfront, and then filter and prioritize them as part of your planning process. Having a catalog of segments to fall back on also makes it easy to pivot the search in response to new information, or redeploy teams in the field. It also keeps individual task identifiers unique, so that you don't have multiple days' worth of debriefing and tracks in the same area, reusing the same name. There will always be edge cases, such as sending both dog and ground teams into the same segment on the same day, but we have found this approach to work well on large, complex searches.
To better understand this idea, consider the following example:
You are planning for an upcoming operational period that is following your hasty search op. You draw a bunch of possible search areas on the map - let’s say 20 of them, lettered AA through AT. These are segments. In the morning, you find out that you have 15 ground searchers. You decide to split them into teams of 3, so you will need to convert 5 of your 20 segments into assignments, let’s say segments AA, AB, AC, AD and AE. They go search the areas, you get tracks, process any clues, and start planning for OP3. You evaluate priorities, draw a few new segments (say, AU through AX), and chose some possible segments for the next day. Now you have segments AA-AX, they are not overlapping, and they are used to describe the search area in a consistent way from one Op to the next. In the morning you have 30 searchers, so you choose 10 segments to assign for the day. One of your priorities is to go re-investigate a previously searched area, let’s say segment AC. For OP3 then you assign segments AC, AM, AL, AY, AT, AH, AJ, AN, AR, and AK.
Through the whole process your segments remain the same, and their letters remain the same. Each OP you pick and choose which ones are assigned for that particular OP.
What makes an effective segment and assignment?
The goals for drawing effective and clear assignments are that they are an appropriate size, relatively easy to understand and navigate, and are clean and don’t leave areas empty.
Good segments generally follow a few simple rules:
- Appropriate Size: Searchable by a team in a day.
- Navigable: Bounded by visually-identifiable features such as streams, ridges, or trails - or if necessary, elevation contour lines.
- No interior boundaries - if a segments spans both sides of a creek, teams should be able to easily cross that creek.
- Consistent Detectability and Probability: Where possible, consistent detectability (ie vegetation density) and probability (ie likelihood of the subject being in a given location) across the entire segment.
- Clean and complete: avoid gaps and lines that don’t make sense. Segments should not overlap. You want them nicely lined up to each other with no unsightly holes or extraneous lines.
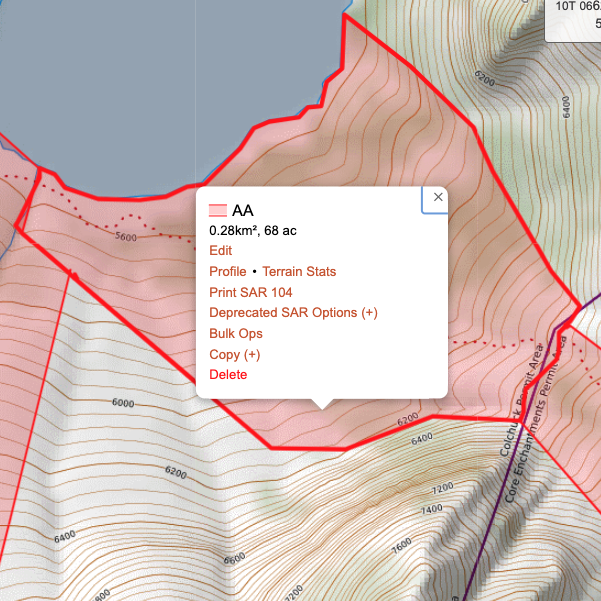
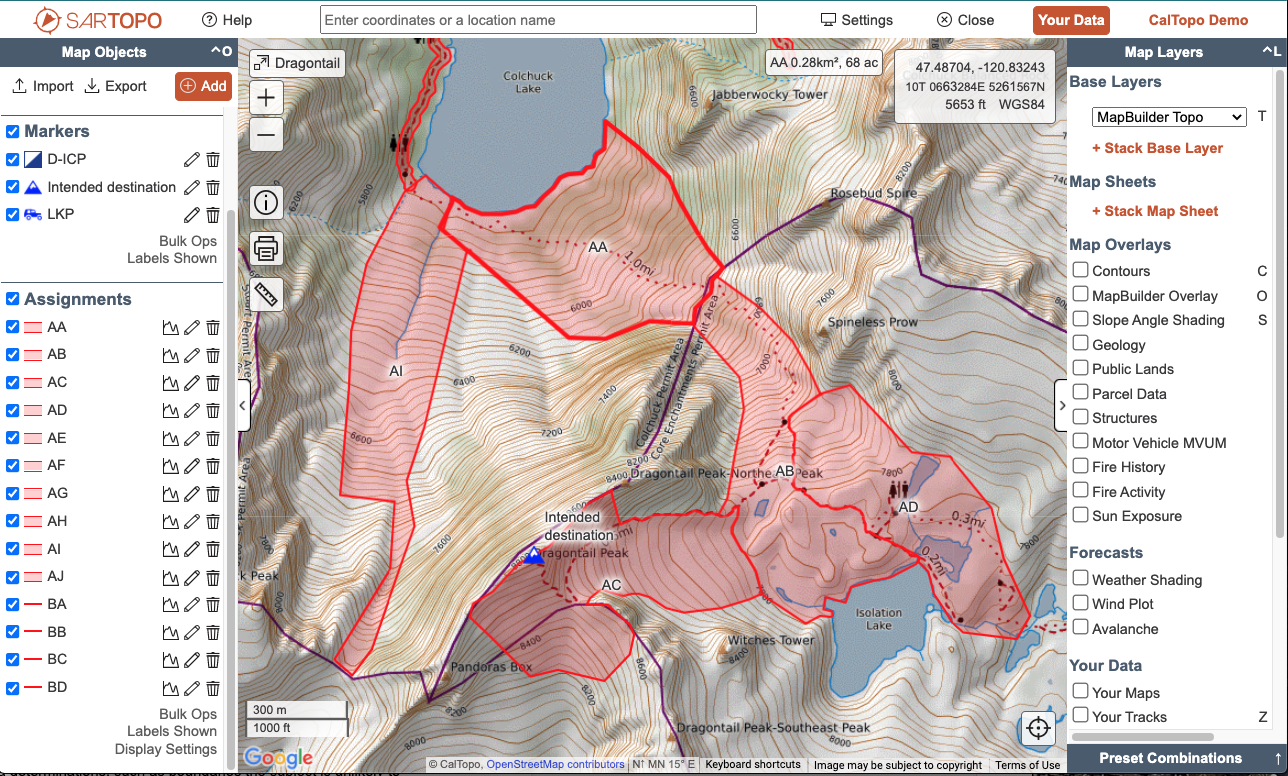
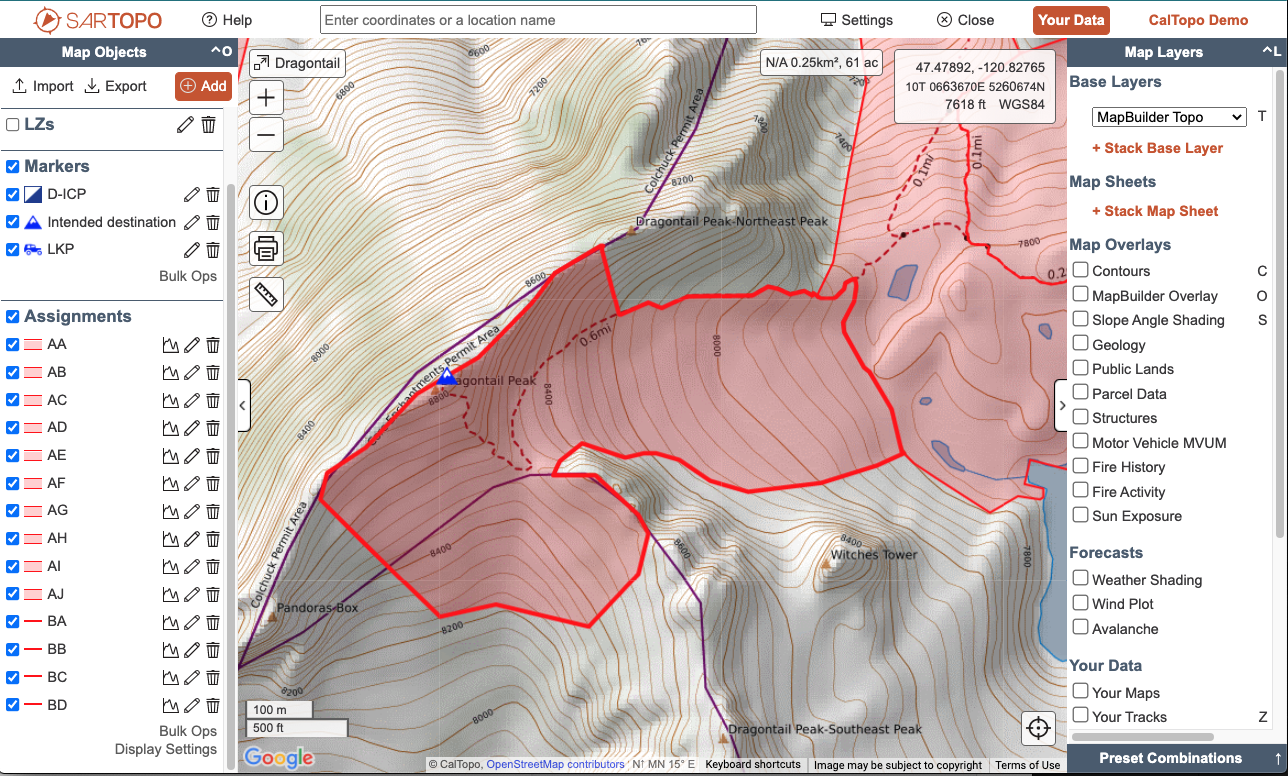
- Appropriate Size: The segment should be searchable by a team in one day. The amount of time available, the size of the ground team, the type of terrain they are covering, and the level of detail for the search goals (POD) are all determining factors for defining an appropriate sized segment. Experience has shown that assignment areas should not be much larger than 60-120 acres. To quickly measure the size of a line or area segment, hover your mouse over it and view the area in the top-center of the map viewer, or click on it on the map. The popup will show the area. Additionally, you can use bulk ops to quickly see the area of multiple assignments. How might you change the size of the segment for a detailed grid search? How about for a helicopter assignment? An OHV assignment?
Go to the Dragontail search map (SUG9) and measure some of these assignment areas. How many acres are they? Are the areas similar to each other? Is one much larger or smaller than the others?
-
Navigable: Screen time on mobile devices and GPS units drains the battery much faster than leaving the screen off. Using boundaries that can be visually identified in the field reduces searchers' reliance on GPS, and also tends to create easily-traversable assignments. Natural features such as ridges, cliffs, creeks or drainages, treelines, and meadows make great segment boundaries, as do manmade features like roads, trails, powerlines, canals, or railroads. Contour lines are also useful segment boundaries because once the searcher navigates to the appropriate elevation, they can traverse at more or less the same elevation fairly easily without constantly referring to a navigation tool. Segments also should be navigable within their boundaries. For example the segment should not be split in half by a cliff face with no way through it on foot.
Additional comments about navigability:
-
Square or rectangle segments might make sense in an urban setting, such as the dementia patient scenario, but are not navigable in a wilderness situation. In the overdue climber scenario, having repeated identical segments might make the lives of your ground searches more difficult than they need to be, and will certainly drain their phone battery as they continuously reference their location.
-
When creating segments for other types of resources, you may need to consider other factors and change how you draw segments. For example, an air assignment will need large and obvious landmarks to define their zone. Ridgelines or large creeks and rivers are usually good indicators, but a trail might be hidden from the air. For an OHV or mounted assignment, put segment boundaries at intersections or a high point on a road, not in a random position in the woods with nothing that will stand out to the searcher.
-
-
Consistent Detectability and Probability: If half of a segment is wetland and half is open scrubland, that makes prioritization and timing difficult. Try to keep segments relatively consistent throughout the area.
-
Clean and complete: Finished maps should be clean with boundaries matching up to each other and limited undefined holes between segments. Our goal is to communicate what needs to be done and not leave things up for confusion in the field.
- Use snap-to set to “lines” to match one assignment up to another.
- There are of course exceptions: we may want to leave a steep area of cliffs out from our final assignments. These areas can be called out as hazards or no-search areas on the map to prevent confusion.
In this course, we are covering the mechanics of drawing segments and how to identify areas on the map. However, in real life, the size, type and location of segments that get placed on a map are going to depend on more input from the planning team, including:
- Segmenting linear features vs relying only on area segments.
- Segment size - higher POD searching generally requires smaller segments.
- Subject's expected travel distance from the PLS.
- Subject's expected direction of travel.
- Deductive search area determinations, such as boundaries the subject is unlikely to cross.
- Likely locations based on additional evidence, such as cross-referencing cell phone data with viewshed analyses.
- Areas of high natural hazard (creek crossings in spring, avy terrain, steep cliffs, burn scars with standing dead trees) that might get marked as independent segments for safety reasons.
Drawing Segments
We recommend approaching segmentation as a 3-step process, all using the "Assignment" object type:
- Start with line assignments drawn on linear features
- Convert those lines to buffers
- Fill in the surrounding areas with area polygons
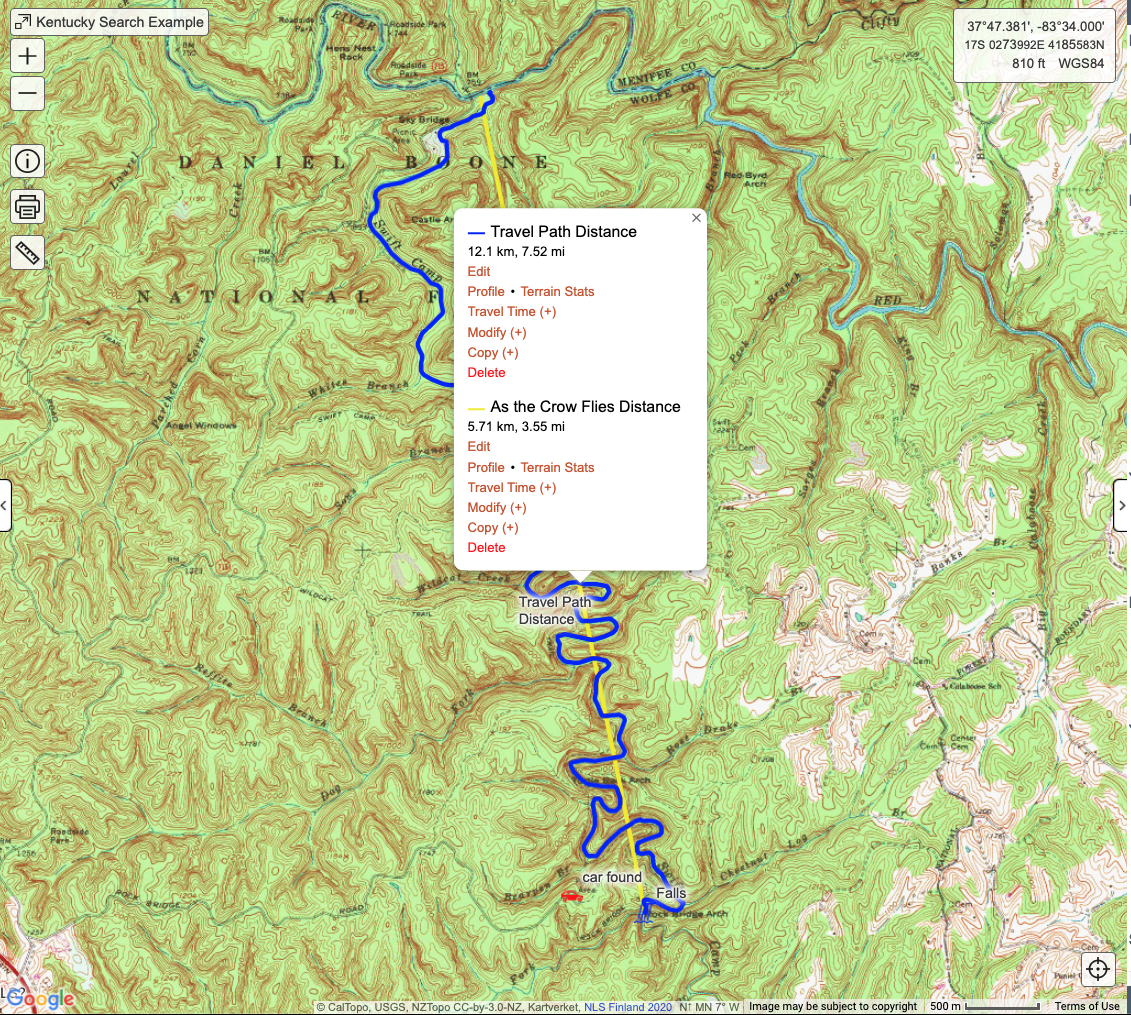
We recommend starting with line assignments because once drawn, buffers are treated the same as polygons - unlike lines, there is no way to go back and split a buffer in half, or join it with another buffer. Draw a line while using snap-to to follow linear objects like roads, trails, or creeks. As you draw the line, you will see the distance you have drawn so far in the upper right hand corner. If you are snapping, move the cursor off of the snap object in order to see the distance.
For a hasty-style search, lines may be sufficient. For larger searches with area polygons, buffers provide visual clarity that prevent the segment from being lost in the border between two polygons. To generate buffer assignments, use the “copy to” function to copy the lines to buffers. If you are satisfied with the copied buffer assignment, you can go back and delete the original line, or put it in a hidden folder for later.
Note: using “convert to” in place of “copy to” will eliminate the original object. If you make a mistake during the conversion, you’ll have to start over. Use copy, then delete the original object when you have the new one right.
The task of drawing assignments can be split among several people, so long as the planning team clearly communicates the goals and requirements.
Putting it all Together
Now that we have covered a bunch of concepts, let's bring them together with an example. After watching the videos below, your next Exercise will have you try to match the example.
Segmenting 1: Prep. In this first video we look at a theoretical search zone in the area of Truchas Lake, about 9 miles north of Wally’s PLK. You can search Truchas Lake in the CalTopo search bar to center your map there.
Segmenting 2: Size. Here we start by considering the size of the whole area, and think about breaking it down into reasonable sections.
Recall that the remaining principles of good segmenting are Consistent Detectability and Probability, and Clean and Complete Segments. Below are some examples of good and bad segments, and a video showing how to use snap-to to draw clean edges.
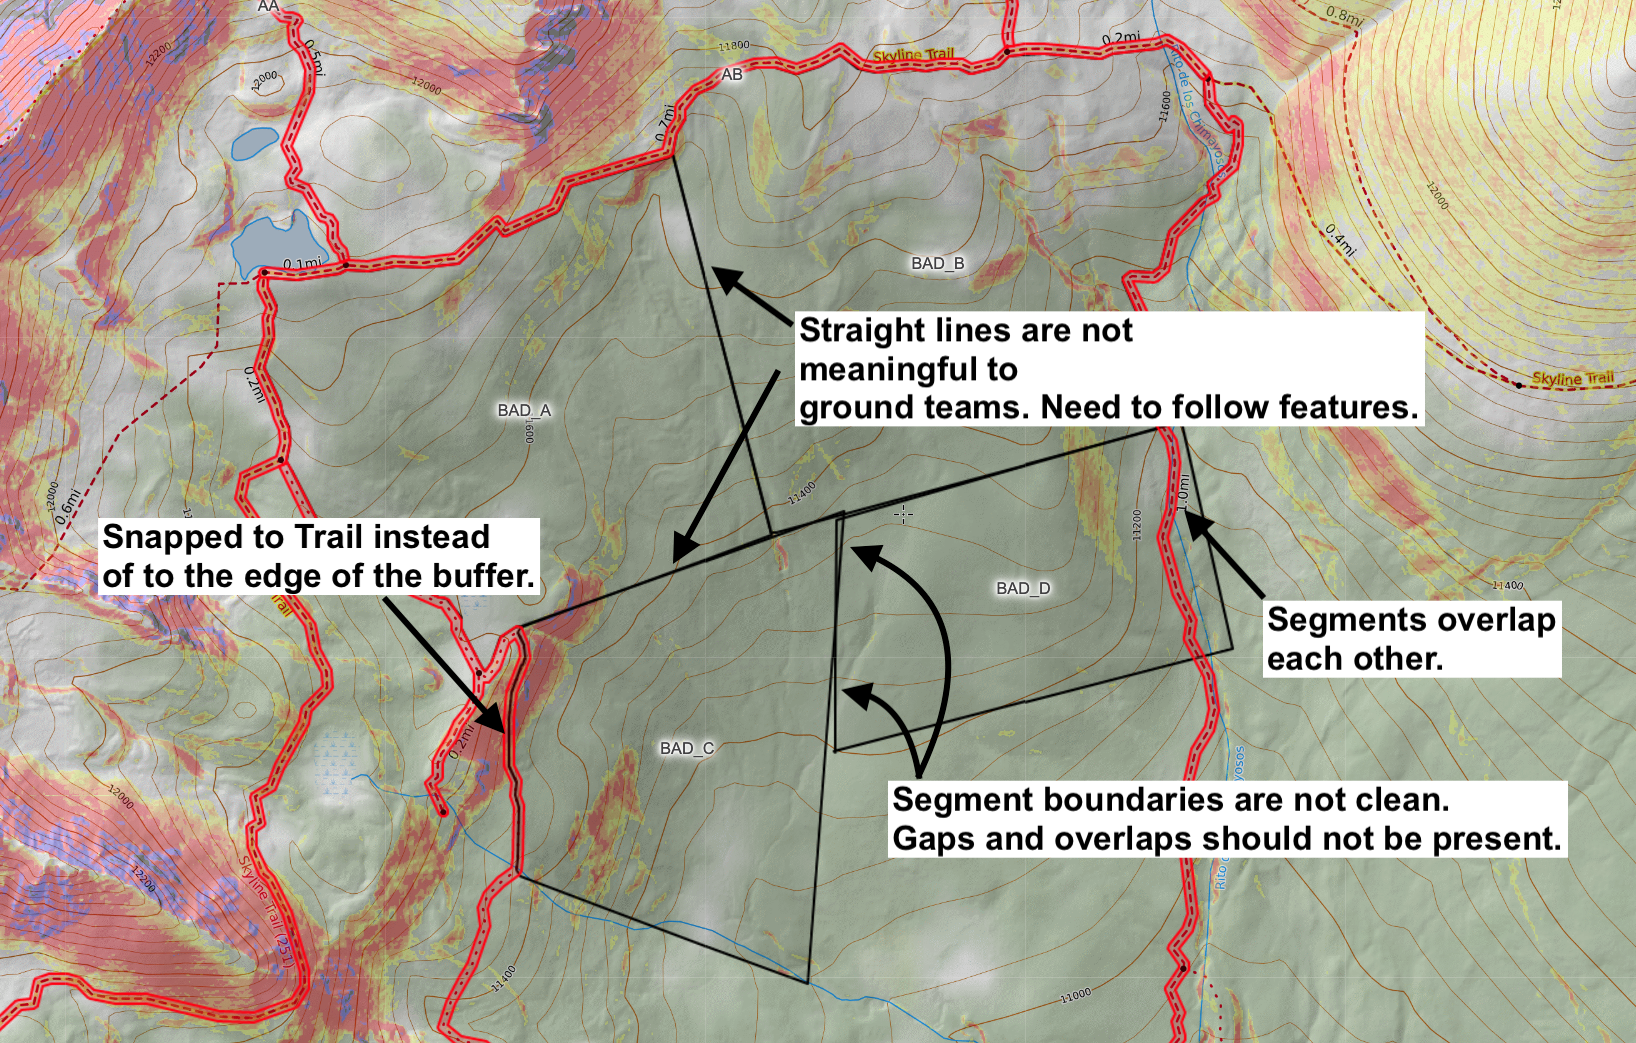

Finally, have a look at how we use Snap-To to quickly draw clean polygons without gaps.
Exercise #8
In this exercise you will convert line assignment objects to buffers.
1. Download this file and import it into your Wally Sinclair map. In it your will find a series of lines on some trails. Your first step is to convert these to buffer assignments, with a radius of 25ft.
2. Once you have converted the lines to buffers, delete the line objects.
Tips:
- Double check that your buffers connect to each other when they meet at trail intersections. If there are gaps, it will be harder to use snap-to later on.
- While drawing, if you make a mistake, click the escape button to undo your last point.
- Switch snap-to types while drawing an object in order to keep everything lined up correctly (see video above.)
Grading Criteria:
- Lines were imported from the given file, converted to buffers, and deleted. We see the appropriate buffers on the map, with a 25ft radius (50ft diameter.)
- Line assignments (pre-buffers) are no longer on the map.
Reference Links
Exercise #9
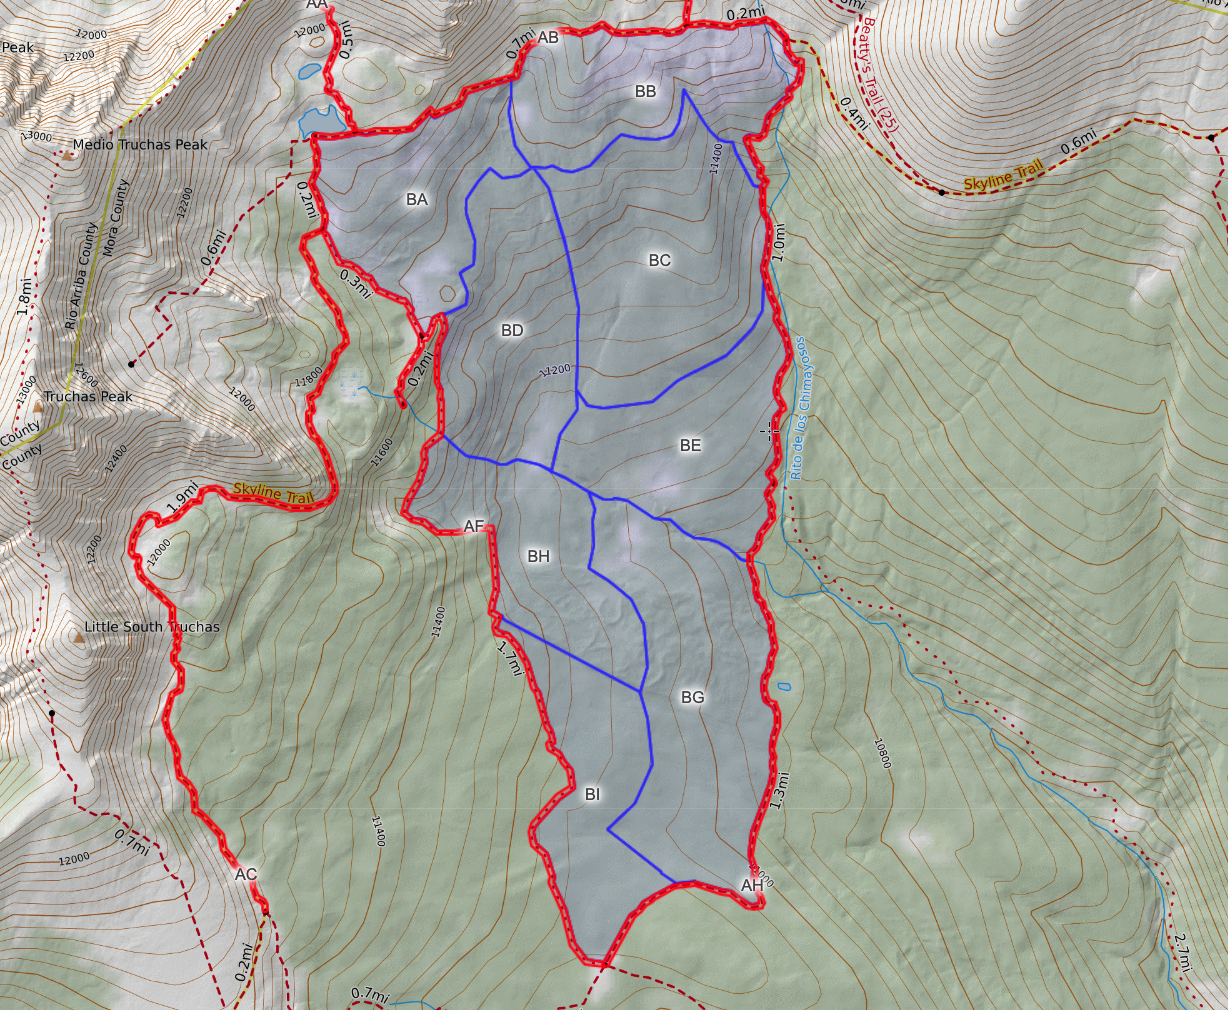
Now you will draw some area segments to match the image below. Create 8 segments to match the following image. You do not need to label them at this time - just get them on the map. For ease of communicating, these instructions refer to the labeled letters.
- BA: uses the 11,560 elevation countour for its south side, and follows a divot/drainage that you can see in the background elevation for its east side.
- BB: South boundary follows the 11,560ft contour until it reaches a drainage feature, which is quite visible if you turn on slope angle shading.
- BC: Uses the 11,160ft contour as a south boundary, and the same drainage that splits BA and BB as the west boundary.
- BD: Uses the creek as the S boundary, and the remaining part of the divot that splits BA/BB and BC/BD until it hit the creek.
- BE: The creek is the remaining boundary, all other sides should be along existing polygons.
- BH and BI are split North/South via the edge of the "bulbous" feature pointed out in the videos. BG and BH/BI are split by the 11,080ft line.
Grading Criteria:
- Eight segments have been drawn on the map matching those from the example image given. (Lettering is unimportant at this point.)
- Snap-to was used to join adjacent polygons. The resulting segments are clean, with no gaps or overlapping portions.
Reference Links