Live Team Tracking
in this lesson
The ability to share and track team member locations can provide valuable information both during and after a major incident or event. Having the situational awareness of where human assets are can have a major impact on response time and efficiency.
CalTopo offers a number of location sharing and tracking functions. The particular function(s) you choose to use will depend on several factors: why you want the location information, whether or not team members have a data connection, and the trackable devices available.
The purpose of this article is to describe the different functions for tracking and sharing location on CalTopo in order to help you choose the best tools for your particular mission.
There are essentially two types of location sharing and tracking functions in CalTopo. The first type tracks on a single map while the second type allows you to get a location and record the movement of team members on more than one map.
Topics on this Page:
Overview of Live Tracking
Below is a video that will give you a good overview of live team tracking.
Click to play
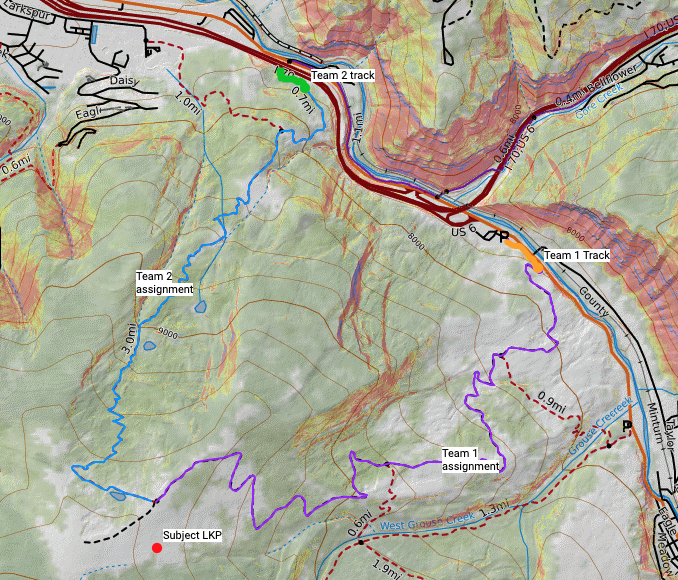
The most common method for tracking is to have team members record tracks on a team map. This is the typical way people think of tracking. The basics are covered below but for more details you can go to the Recording Tracks section of the User Guide. One advantage of this system is that it keeps a complete record of where the team member traveled. The downside is that the track is only available to the rest of the team on one map.
The second system uses the Shared Location overlay. This system is a powerful tool that allows the team to use a number of methods to get location. This system can use:
- The CalTopo App
- Garmin inReach
- Automated Packet Reporting System (APRS) used by Amateur Radio Operators
- Automatic Dependent Surveillance - Broadcast (ADS-B) used by aircraft
- A Custom API that can be used by a team with some technical knowledge
The advantage of this system lies in its ability to utilize numerous devices, many of which do not require cell service. Team members can see anyone using this system on any team map. However, the downside is that it produces straight lines between reported positions. If a device cannot report its position regularly, you won't have a very detailed track of the user's travels. For this reason, many teams use both systems simultaneously, allowing them to leverage the power of both.
Tracking from the Mobile App
Recording Tracks
You can record a track to a particular map. This is not limited to team accounts and is often used by recreational users on their maps.
For the track to record to the map the team member needs to have Update or greater permission. If you want someone outside the team to use this system, they need to be given an Update or greater sharing link to the map.
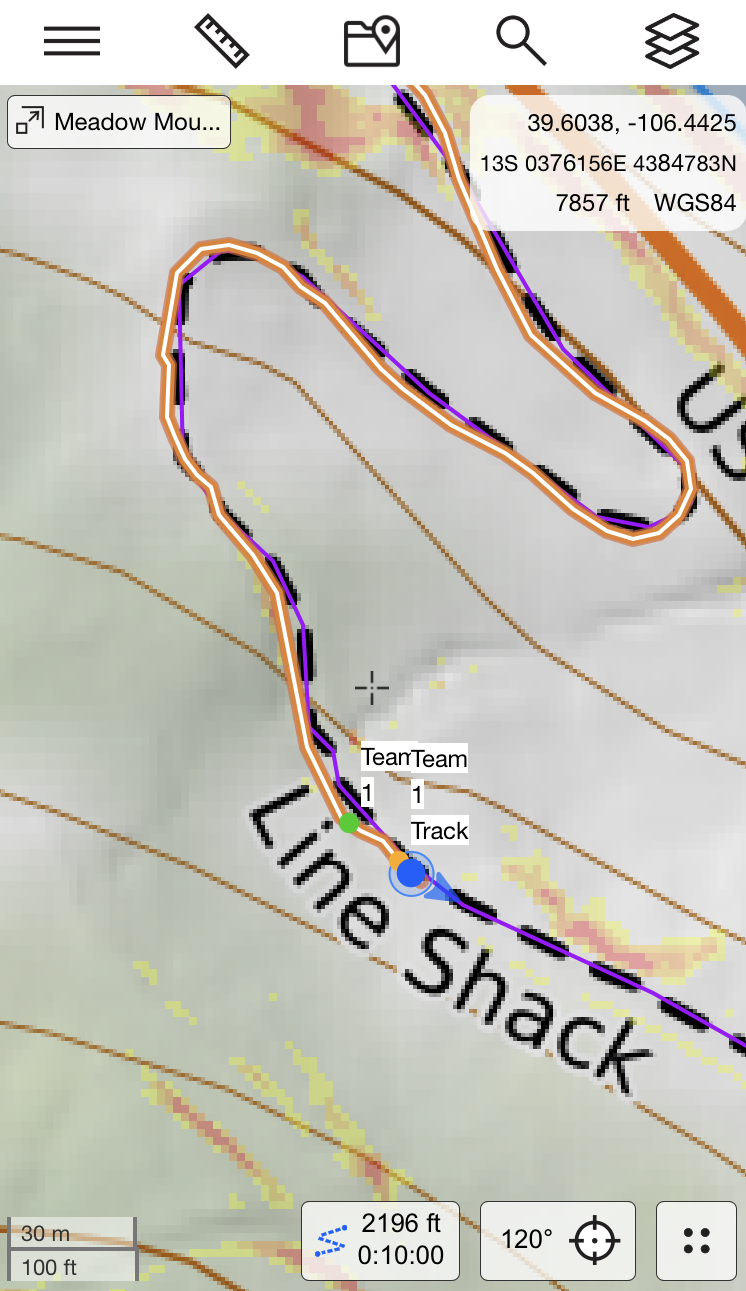
Any tracks that are being recorded to a saved map will upload in near real time with a data connection or as soon as a data connection is reestablished. Every track that team members are recording will appear as a map object in the map viewer and the left side bar. This function allows for anyone viewing the map to see the track(s) so long as team members have a reliable data connection.
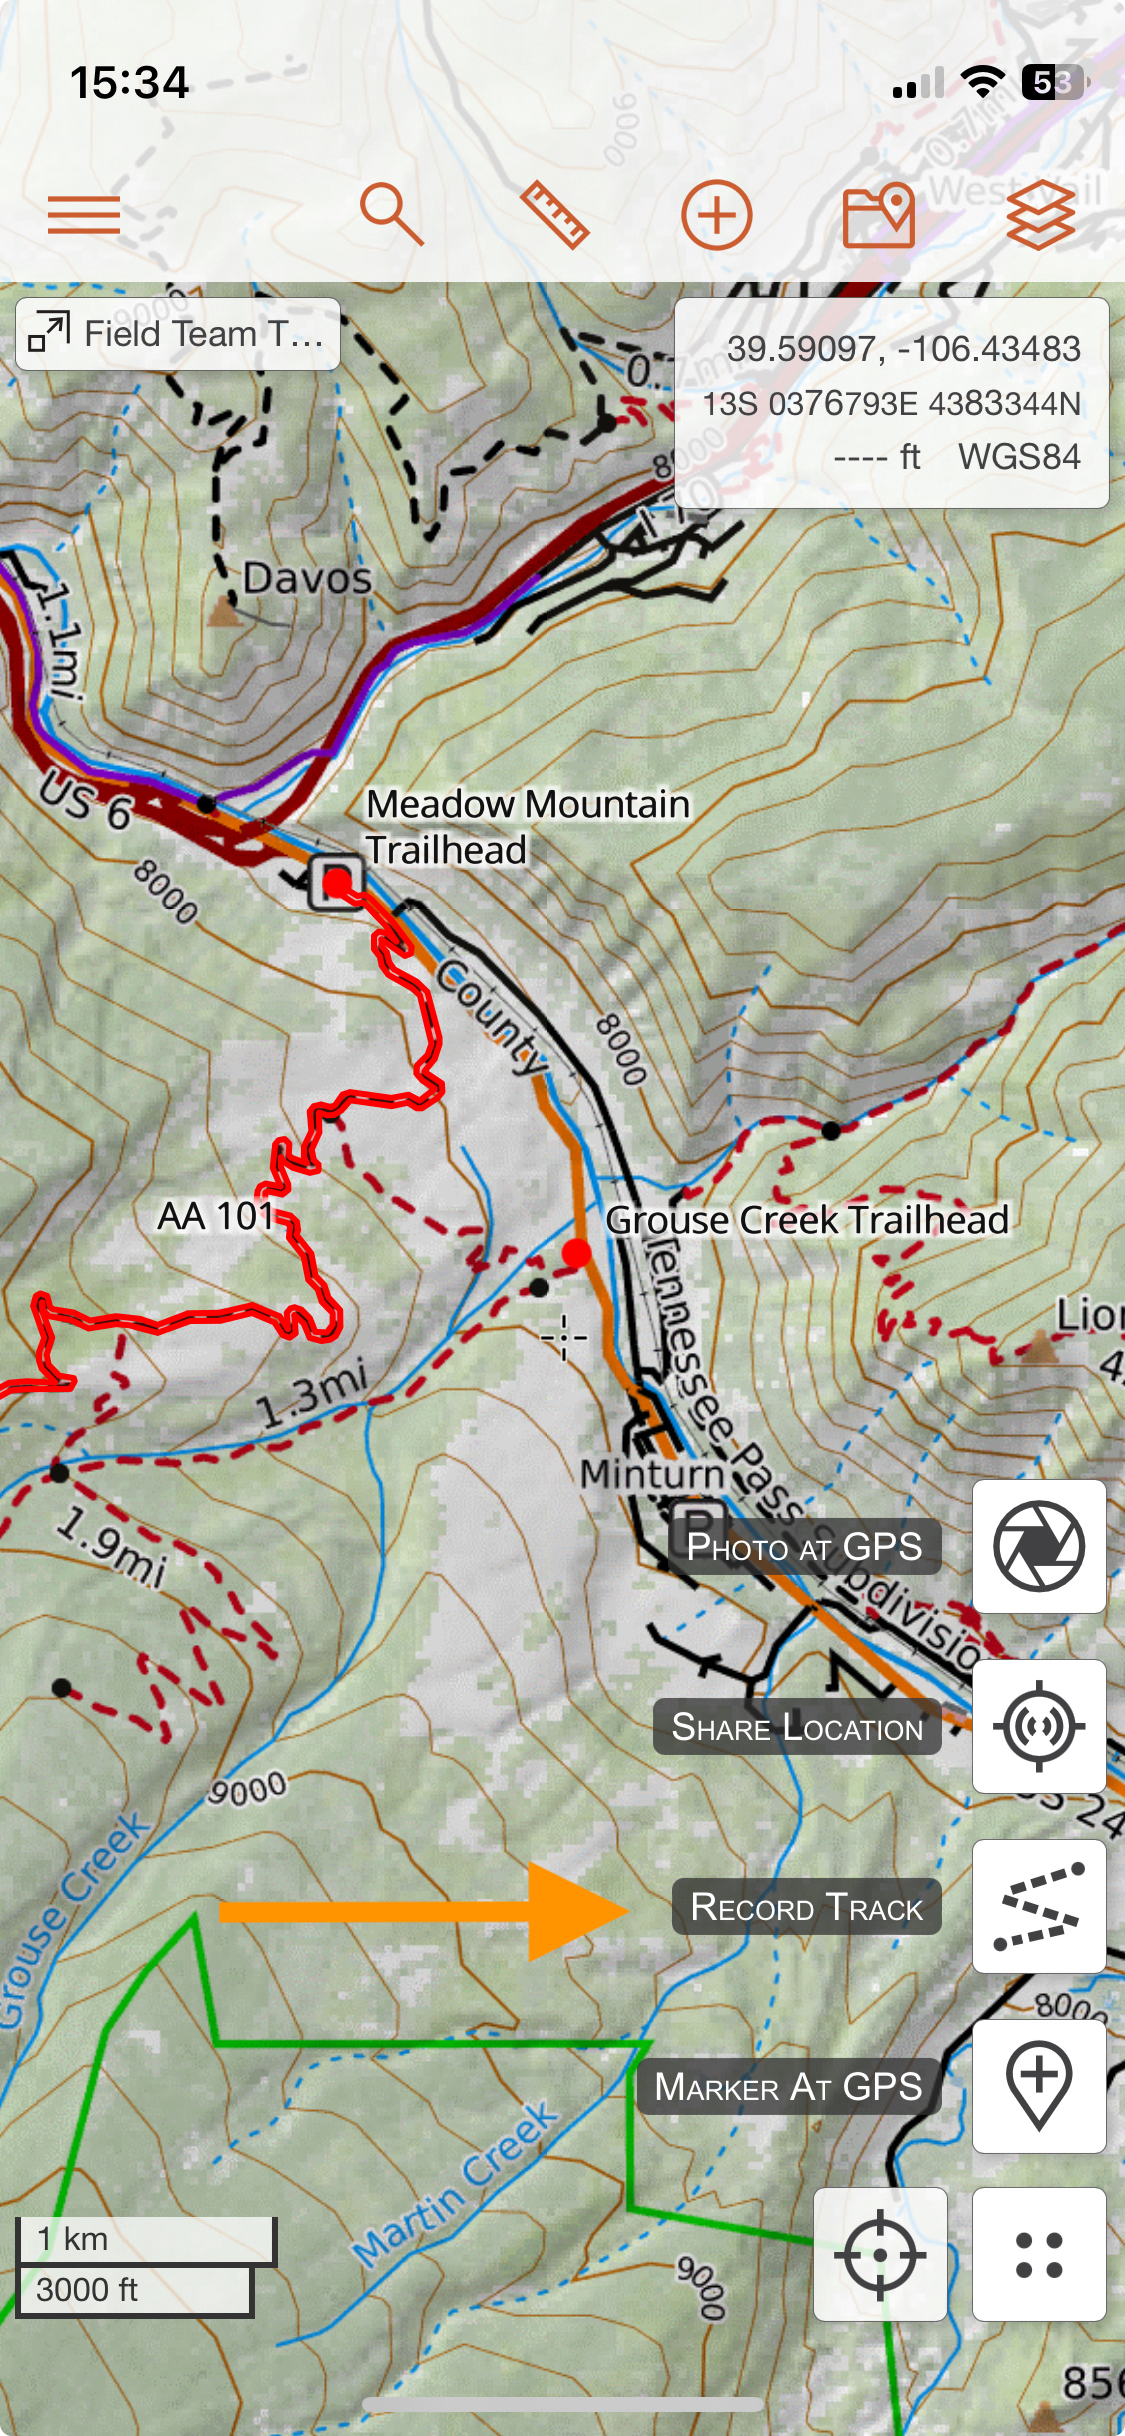
How to use: To record your tracks, open the relevant map first. Click on the 4 dot location menu in the lower right hand corner and select Record Track.
The Start Recording dialog will appear. By default, the name of the track will be the your first initial and last name from your user name. Change the track name and/or color if desired or according to your team’s protocols.

Select Start and the track will begin recording. As long as you have a data connection, anyone viewing the map will be able to see your track. If you don’t have a data connection, the track will save locally to your phone and then automatically sync once a data connection is reestablished.
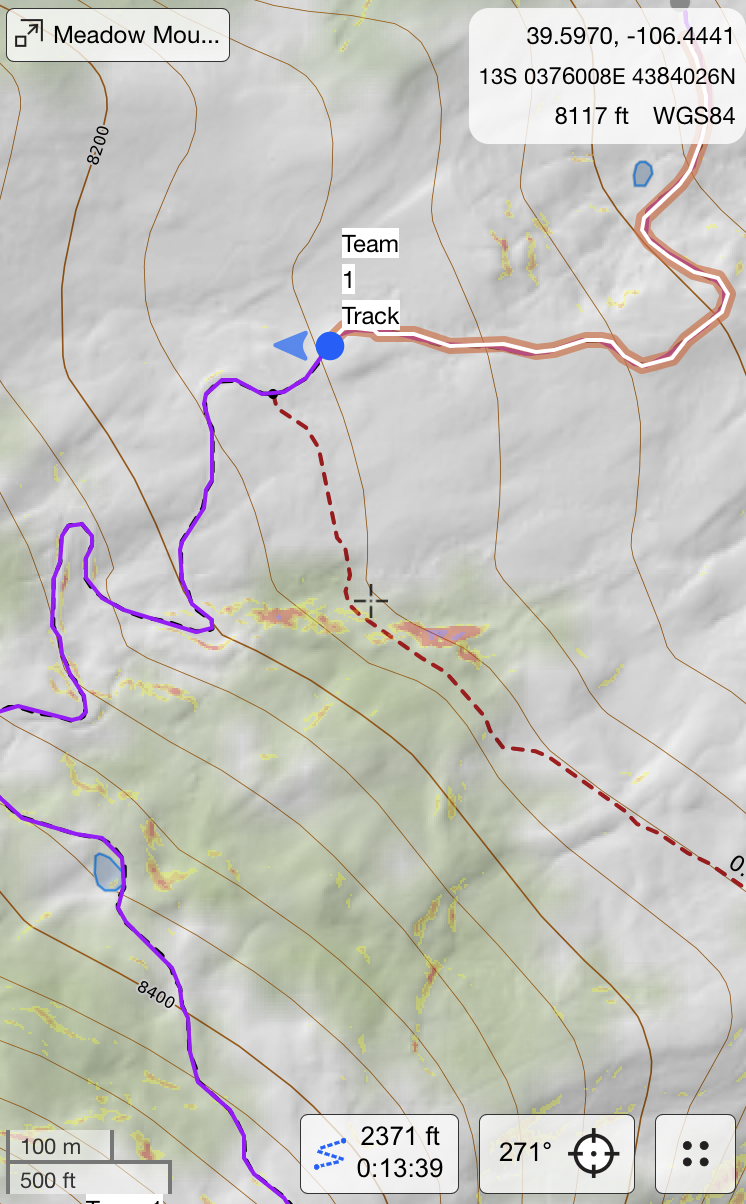
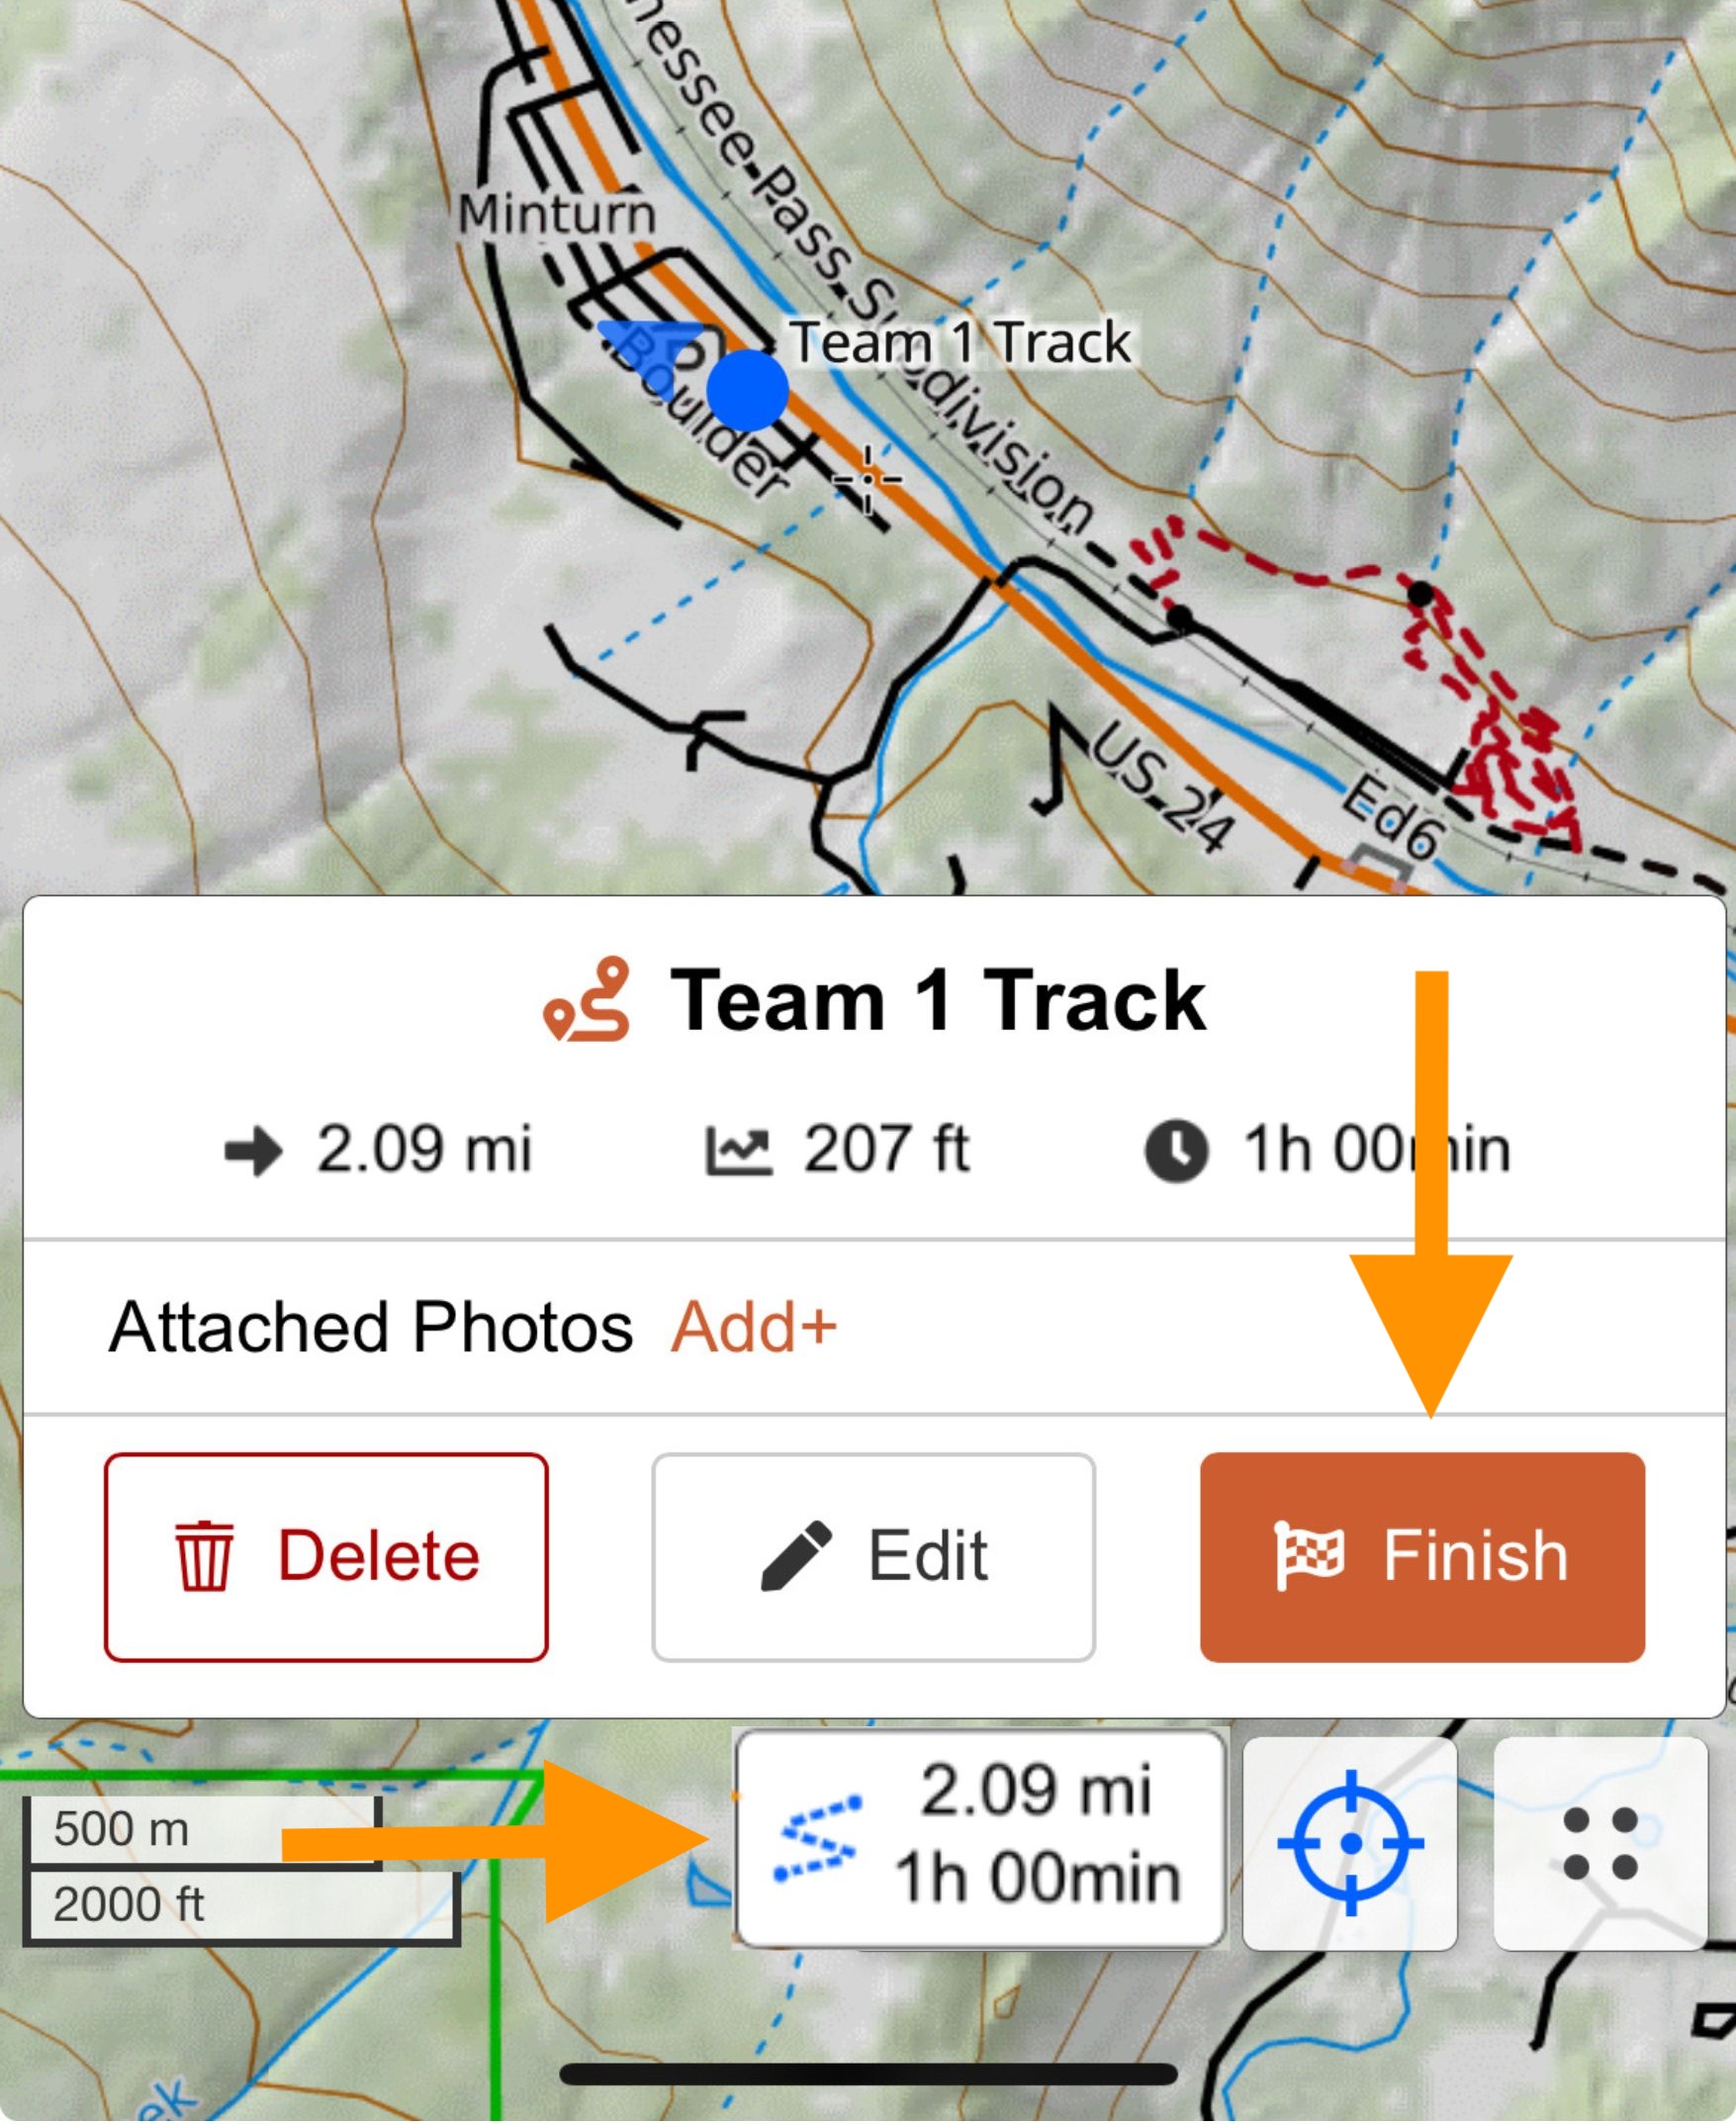
To finish a track, click on the Recording Track dialog at the bottom of the screen and then select Finish and Save.
The track will be saved to both your individual account under Your Tracks and to the shared map.
Shared Locations Using The Mobile App
You can easily share your location with the team from the mobile app as long as you have a data connection and an Update or higher team permission level. This system is not available to people who are not team members. This is different from recording tracks because your position can be displayed on any of the team maps but not necessarily saved to a map. However as you will see position reports can be recorded to any of the team maps.
The Share Location system on the phone is dependent on having a data connection. No record of the users travel is saved to the user's mobile device. If the location is being recorded on the map and the phone loses service, the recorded line will appear as a straight line from where it lost service to where it regained service. If you want a complete record of where someone has been, then the user will need to record their mobile track.
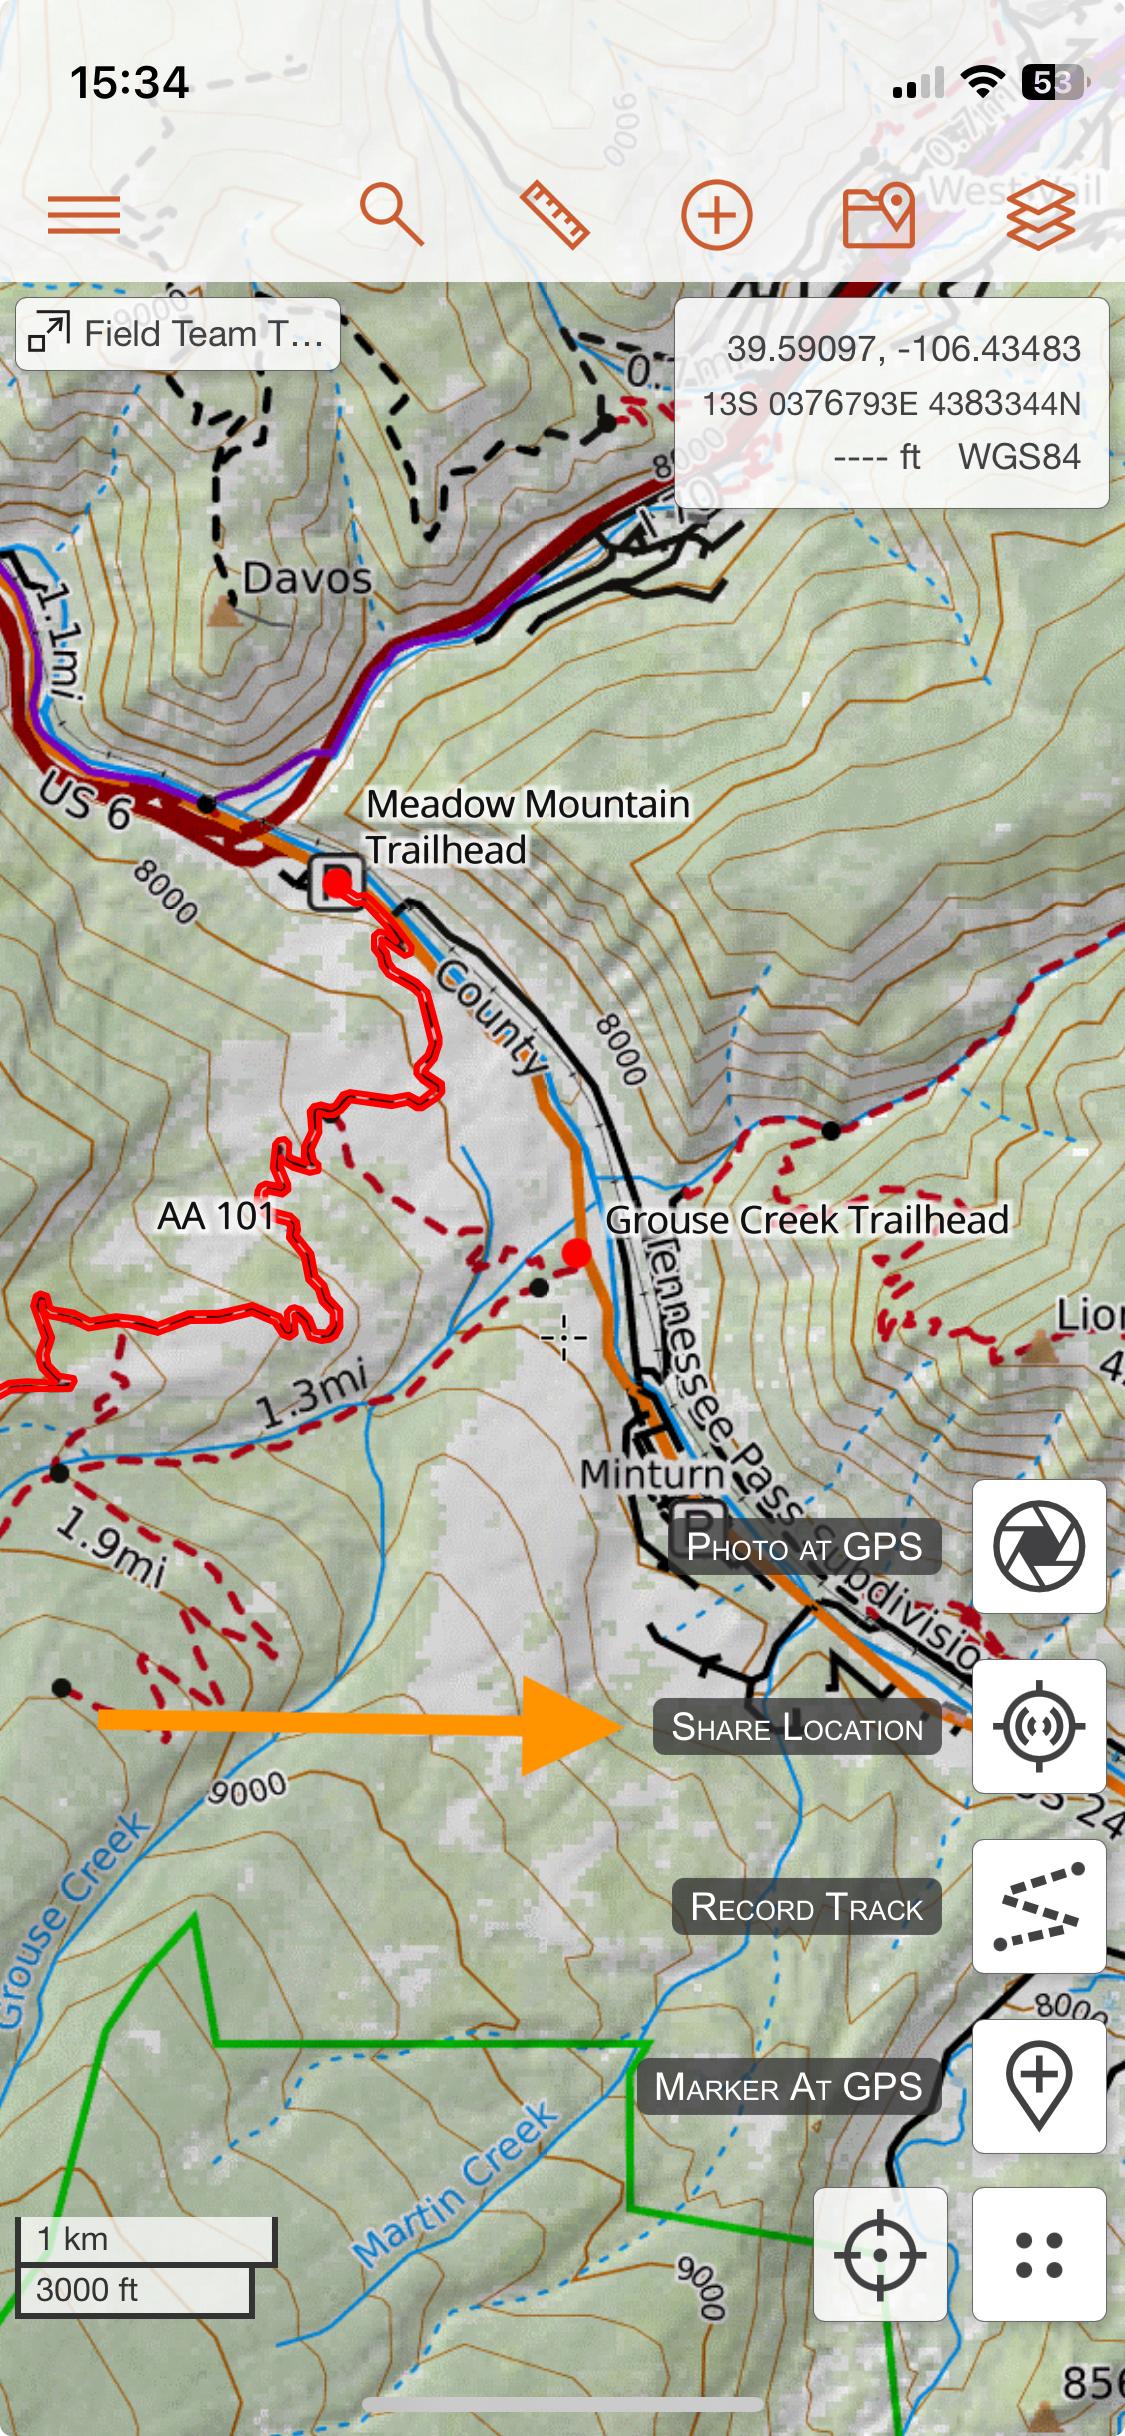
How to use: To share your location with the team from the mobile app, click on the 4 dot location menu in the lower right hand corner and select Share Location.
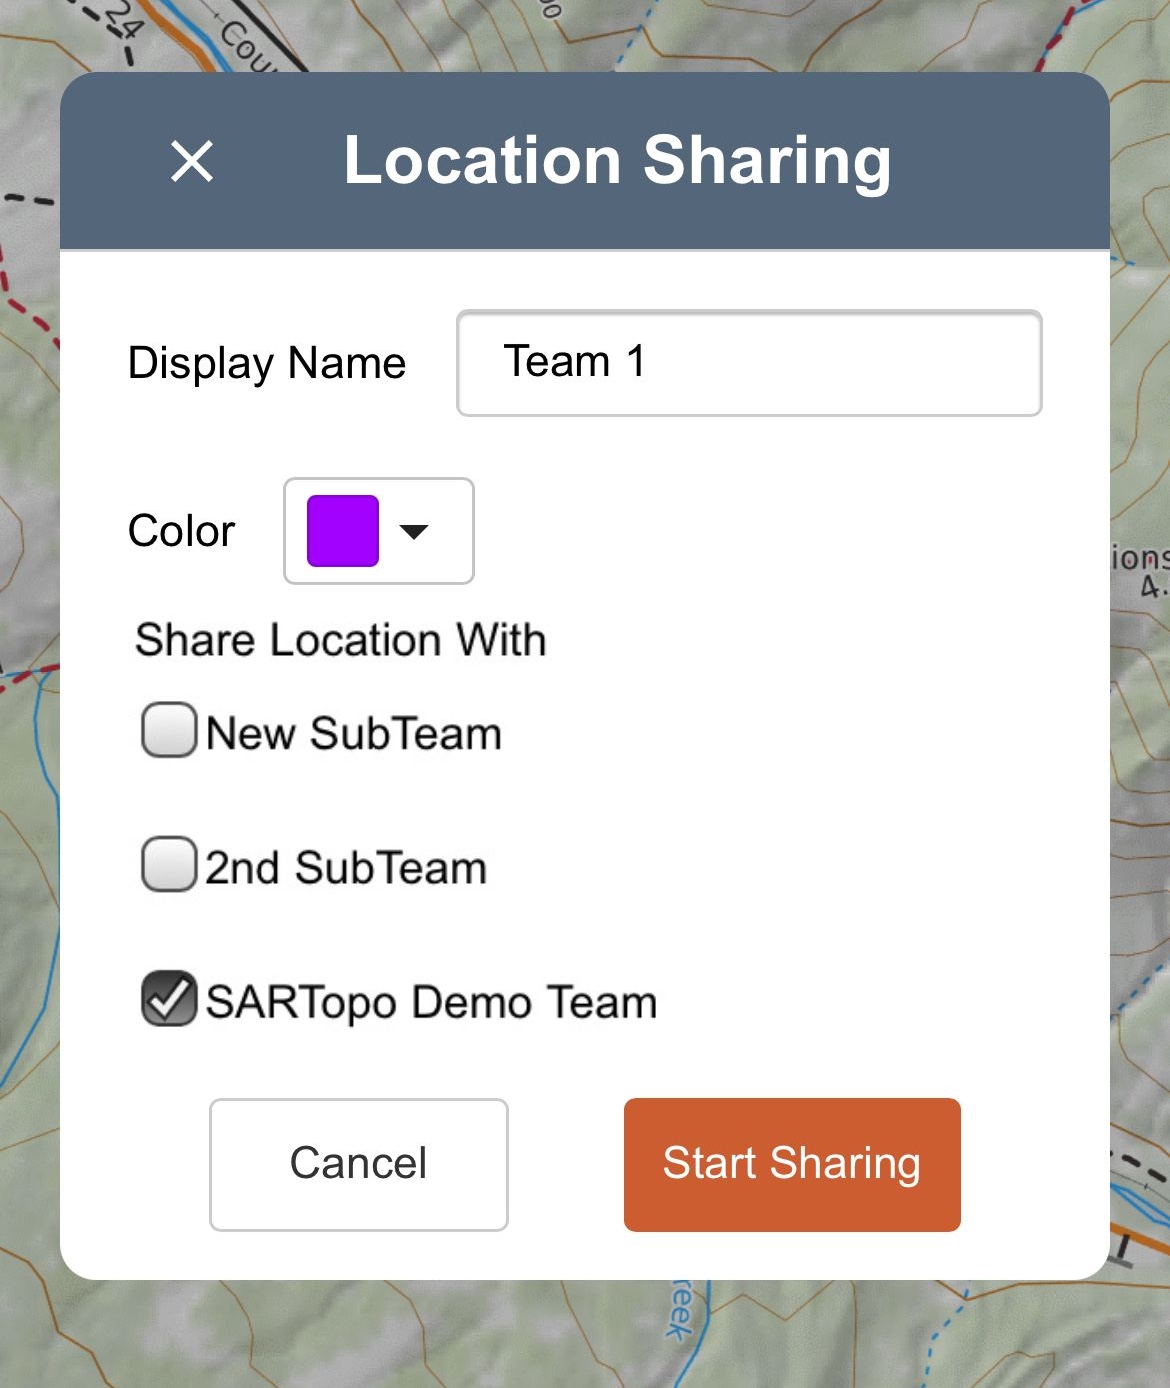
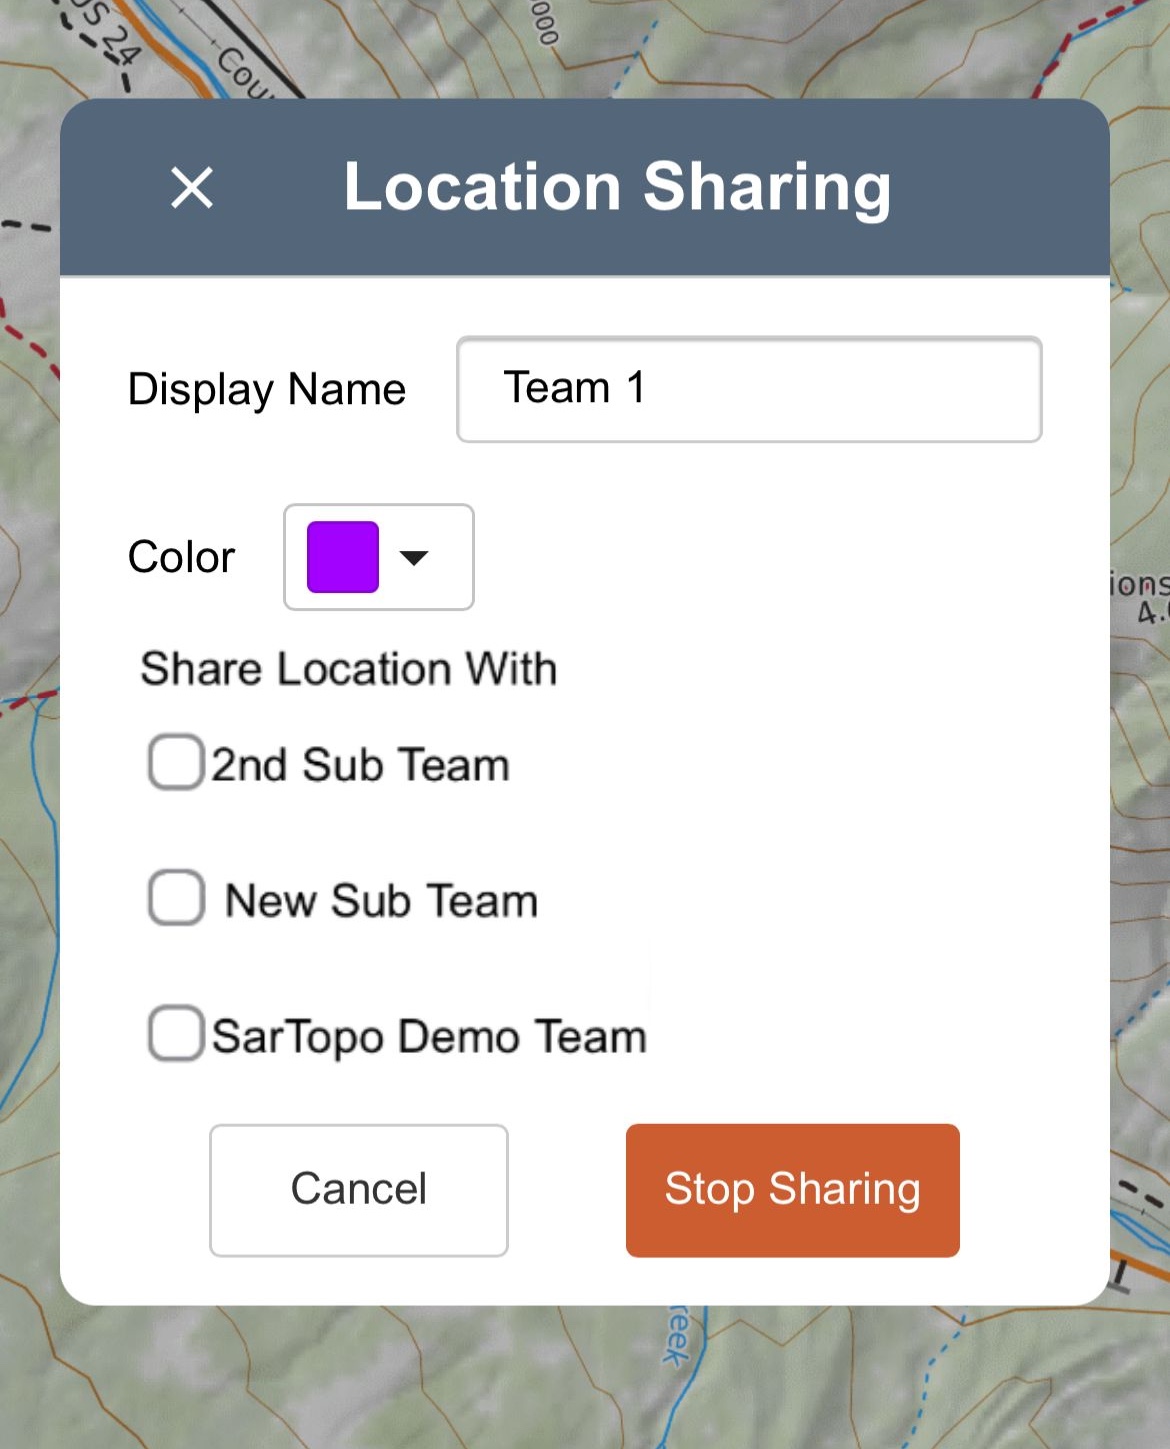
Check any or all the teams and sub-teams you want to share your location with and tap Start Sharing.
To stop sharing you reverse the process. Tap the 4 dot location menu and select Update Sharing. Then uncheck the team(s) you checked and tap Stop Sharing.
Shared Locations
How to Use Shared Locations Overlay
This overlay displays the position of any device sharing its location with the team or subteam. Above, we showed how to share your location using the mobile app. Below, we will cover how to set up other devices like the inReach, APRS, and ADS-B; all of these systems will use the Shared Locations overlay. Because this overlay does not belong to a map, position data can be easily displayed on any map. This allows you to seamlessly switch between maps while still viewing location data. If you need to record location updates for a particular device, locations can be recorded and saved to a particular map for any device on the Shared Locations overlay.
Any device that is currently sharing its location with the team account and is part of the Shared Locations overlay will automatically show up when the overlay is turned on.
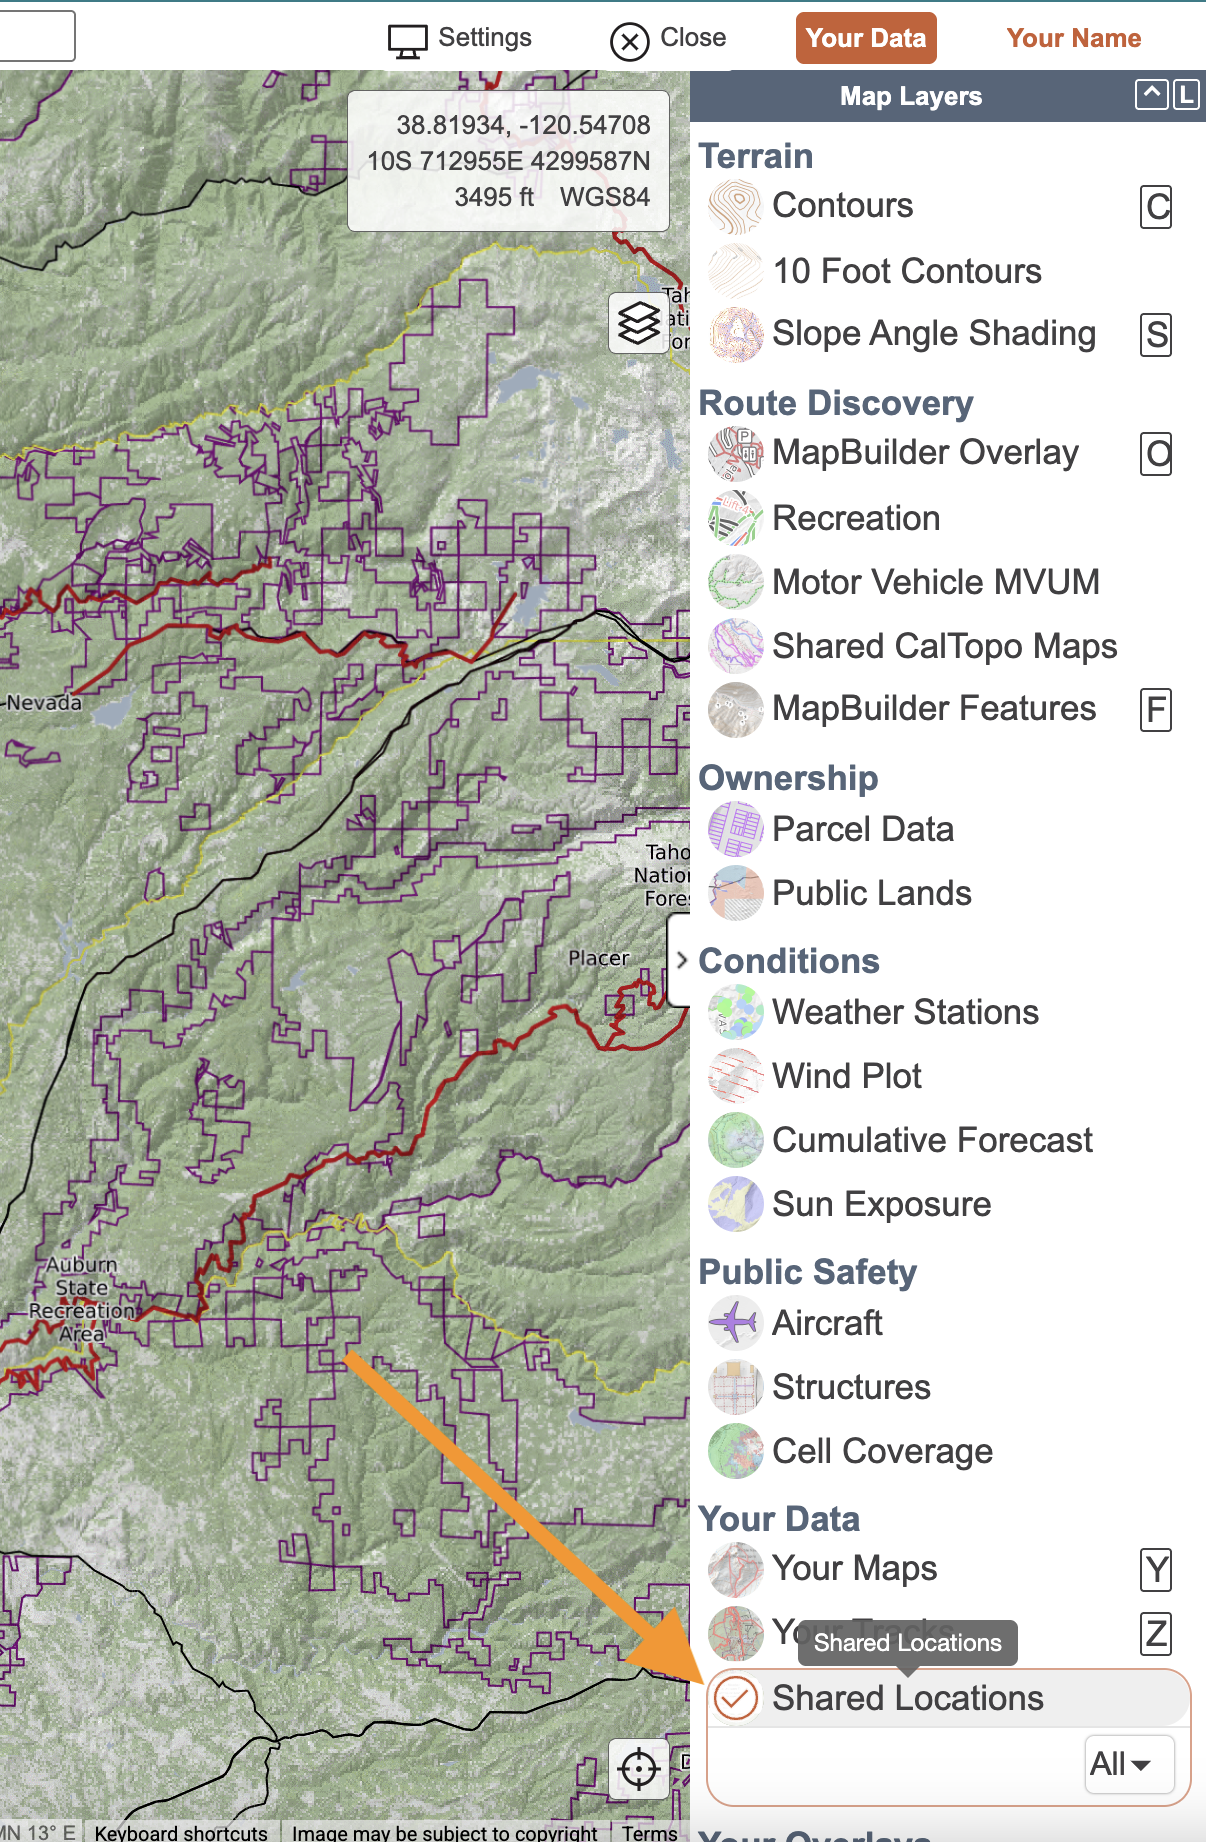
How to use: The Shared Locations overlay can be found near the bottom of the layers menu under Realtime Data. By default, the shared locations for any team, subteam, or temporary subteam that you are part of will be displayed. You can use the dropdown menu to show only the shared locations for a particular team, subteam, or temporary subteam. You must turn on the overlay and have a data connection in order to view the position of devices that are sharing their location with the team.
Each device sharing its location with the team will be displayed as a dot on the map. Clicking on the device dot on the map displays a dialog with the device’s name, coordinates, last update time, adding that point as a marker, and the ability to see their previous track. There will also be options for recording a track if you are on a saved map.
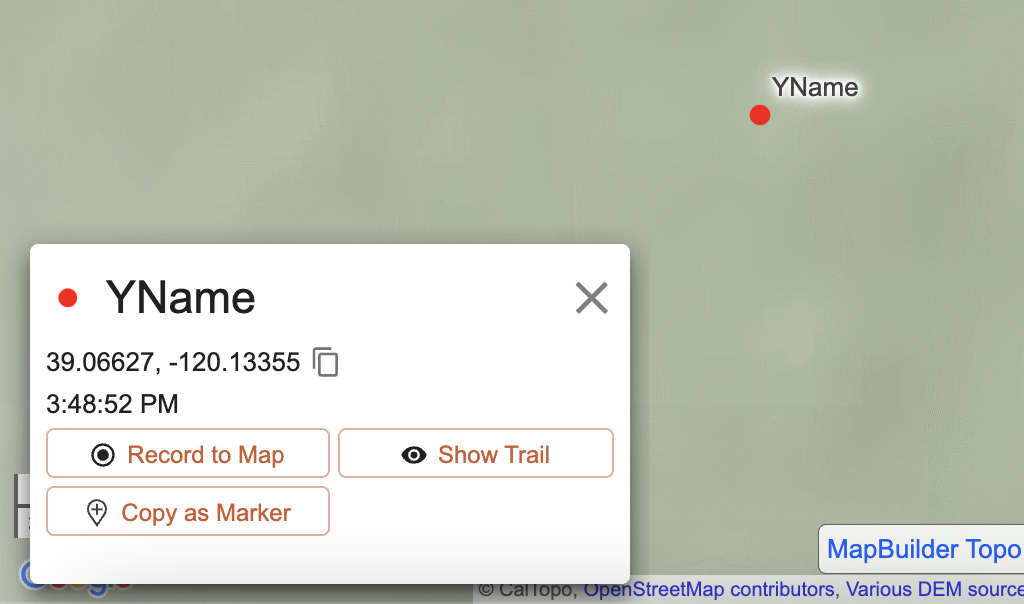
To record a track to the map, click the “Record to Map” option in the device dialog. The Track Details dialog will appear with the call sign field already completed. Fill out a label, color, etc and then click “OK”.
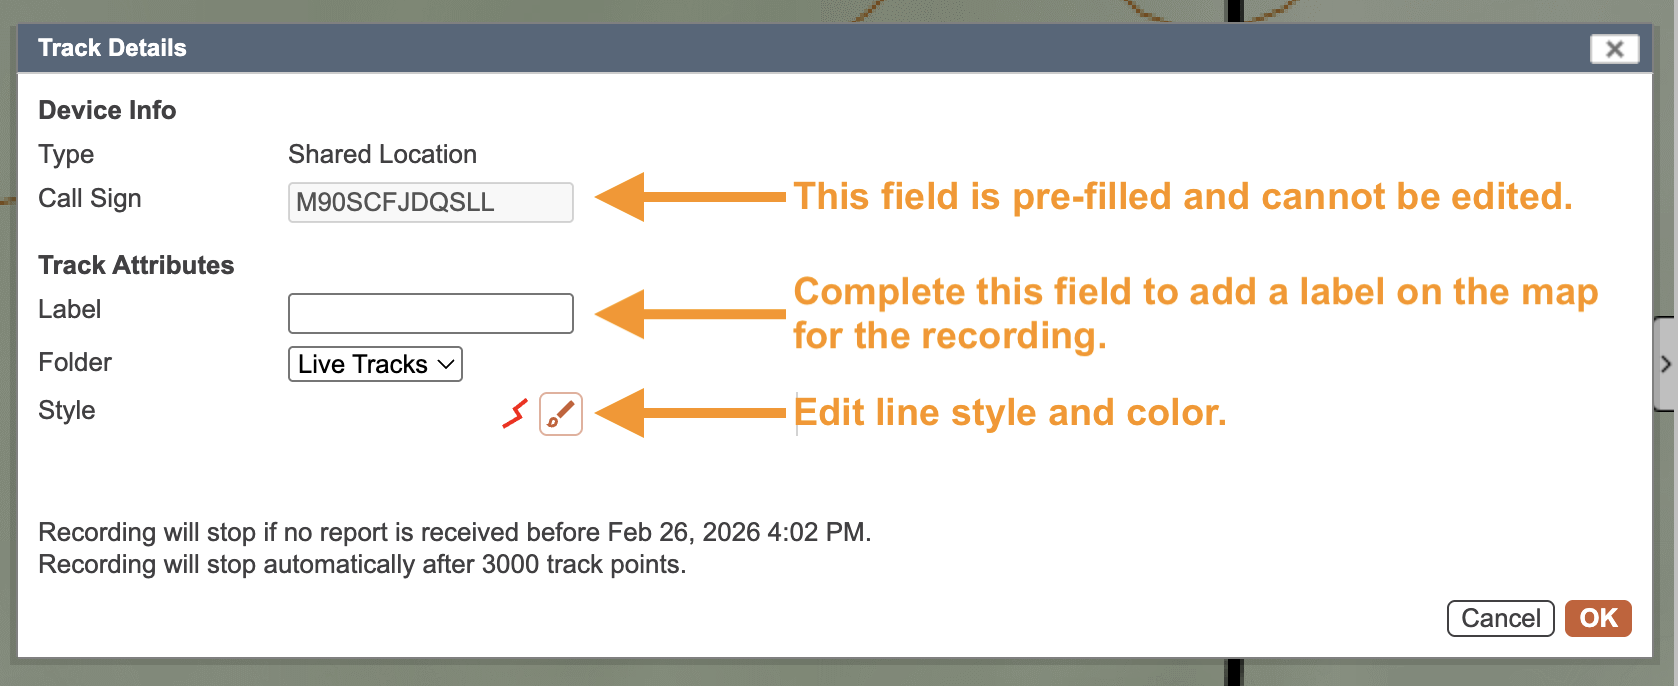
The device will now be added to the map as a map object and it will appear in the Map Objects menu within the Live Tracks folder (unless you designate a different folder). A line will be drawn from each position report to the next. Keep in mind that if the device does not report for some time, a straight line will be drawn instead of depicting the actual route traveled. If accurately tracking the route is important, the person in the field will need to be recording a mobile track.
To stop recording for a device, click on the pencil icon to the left of the object in the Map Objects menu and select “Stop Recording” in the Track Details dialog.
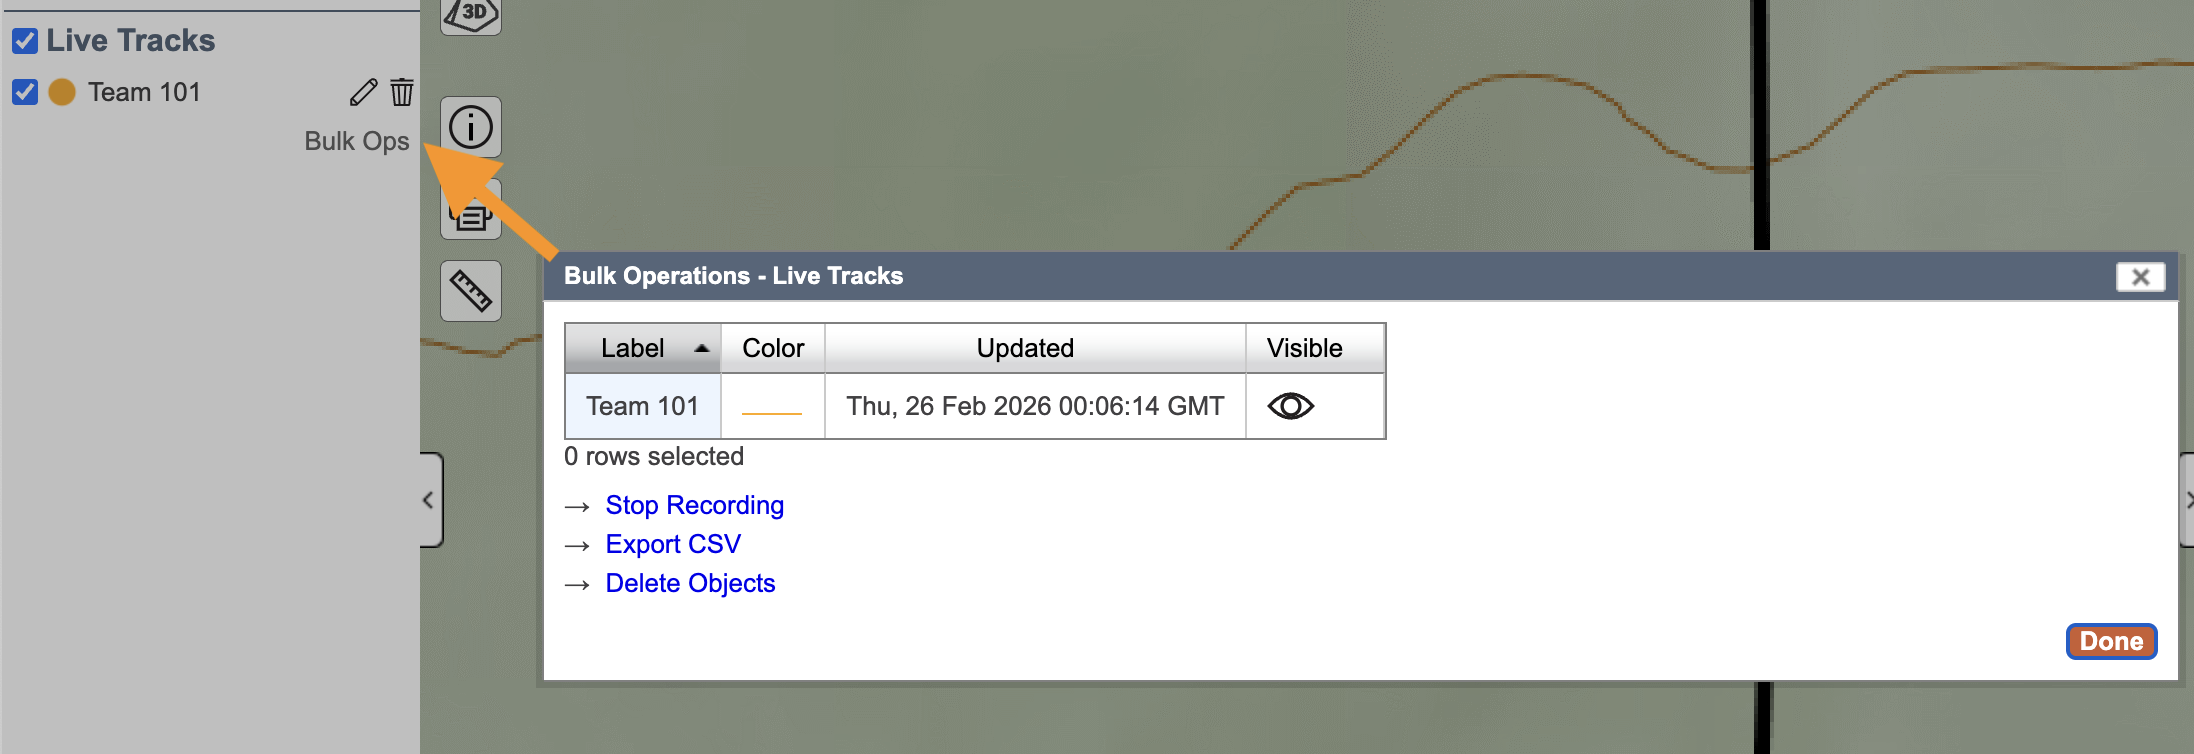
To stop tracks for multiple devices at once, click on Bulk Ops at the bottom of the folder with the devices. Select the appropriate device(s) from the list, then select “Stop Recording”.
If you don’t manually stop a recording, the recording will automatically stop 24 hours after the last location update is received or once the track consists of more than 3000 points. Once a recording ends, the live track will be converted to a line object on your map and automatically moved to the Lines & Polygons folder in the Map Objects menu.
Setting Up Other Trackable Devices
Now that we understand how to use the Share Location feature in the app and see that location in the Shared Locations overlay, we'll cover how to add inReaches, APRS, ADS-B, and Other Devices (custom system) to the team account. These devices will be used in the Shared Locations overlay.
When any team device is turned on and transmitting its location, the most recent position data for each device will be displayed on the map as part of the overlay. Instructions for how to record location updates to a map are covered in the previous section.
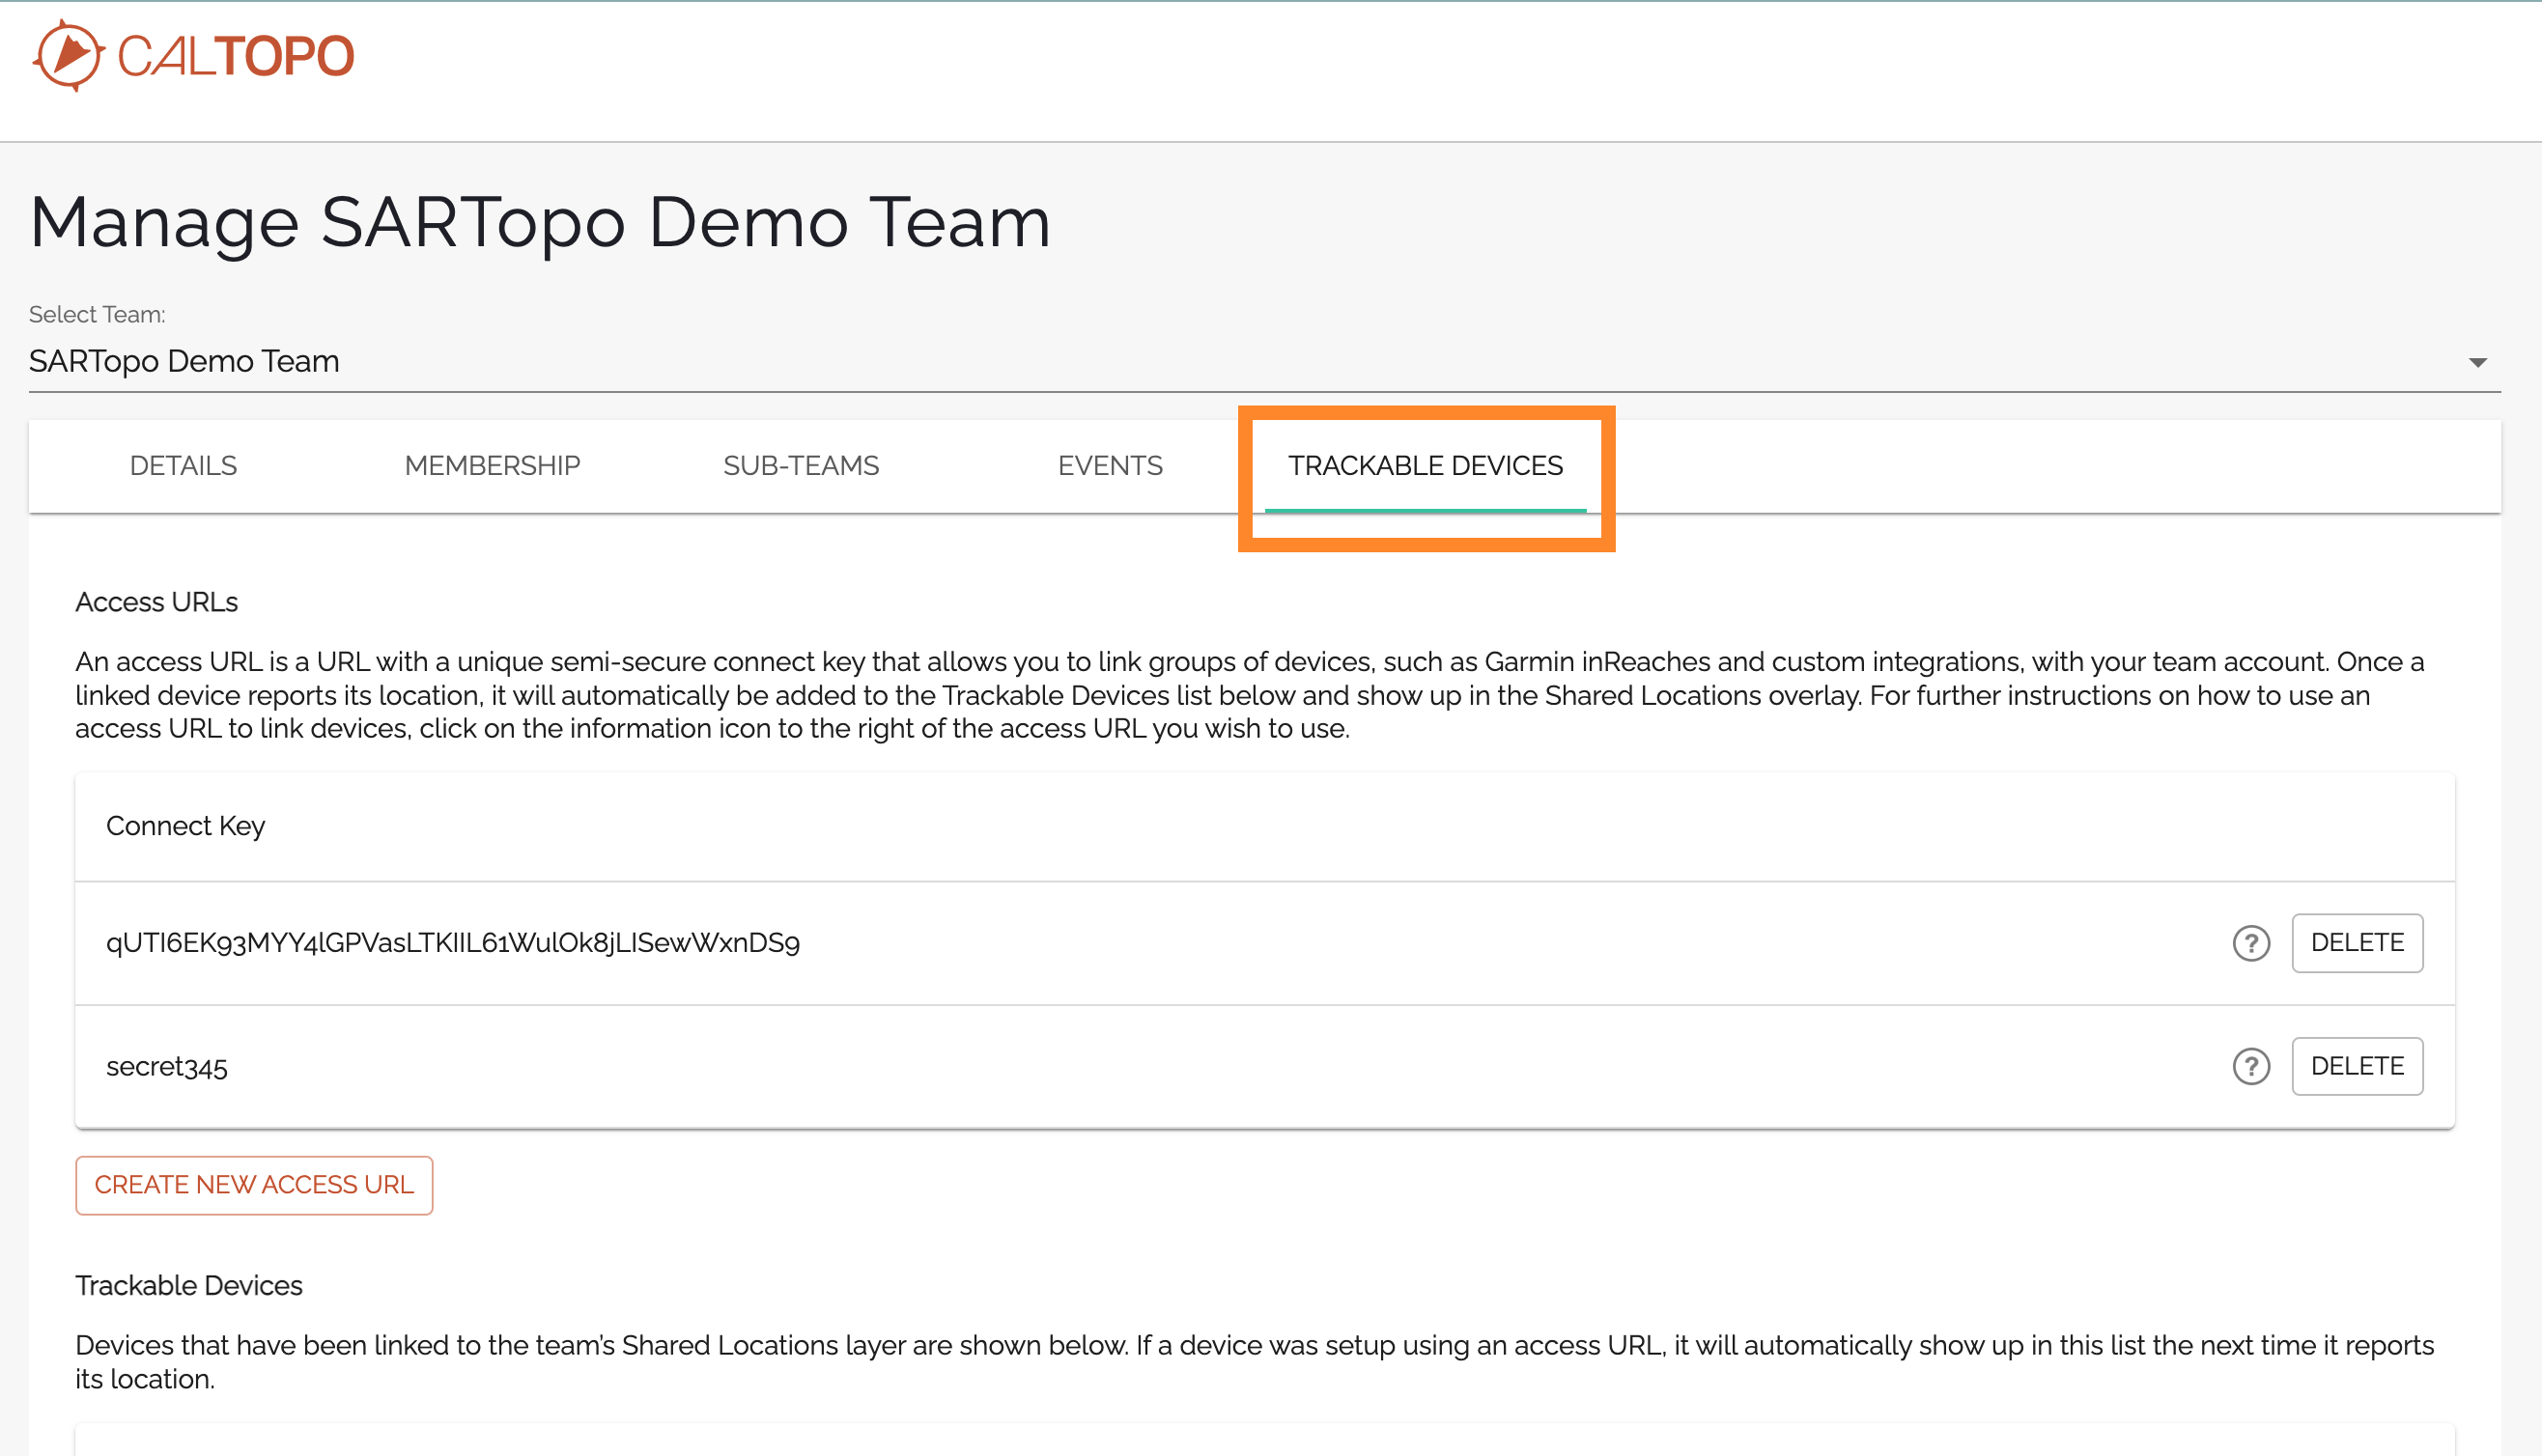
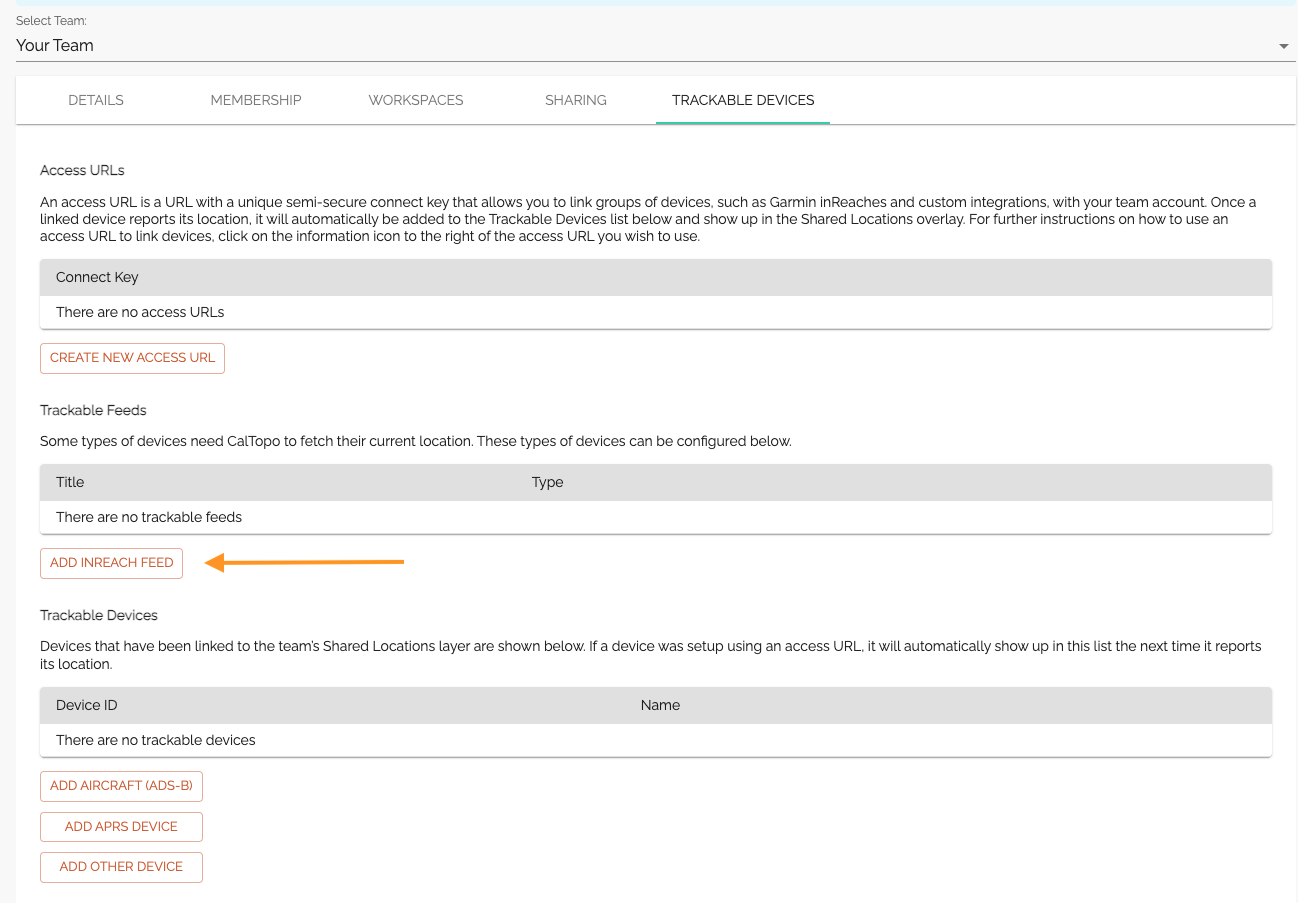
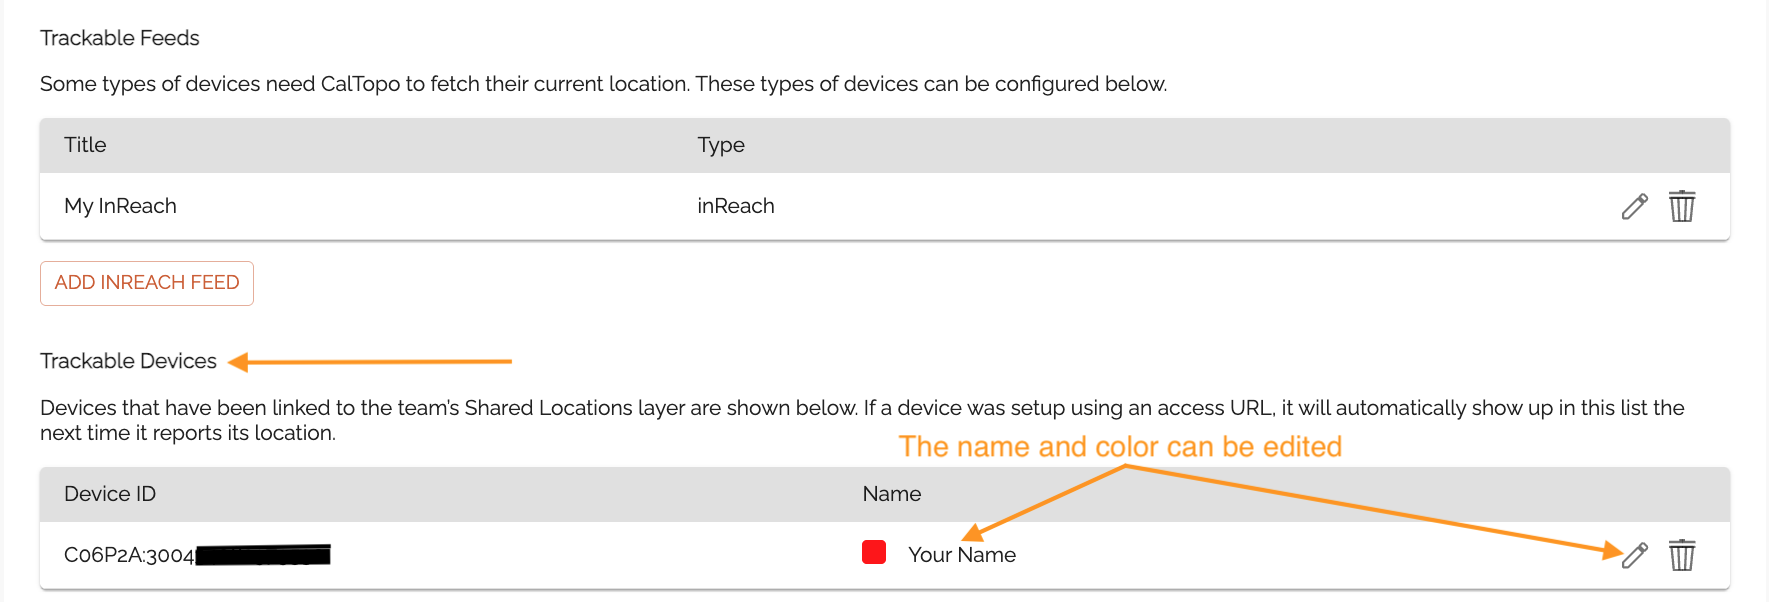
How to use: Only team members with admin or manage access can view, edit, or add trackable devices. To view, edit, or add a trackable device, navigate to the Team Admin page and select the Trackable Devices tab.
Added devices will be listed in the Trackable Devices section. Location reports with a device ID matching one of the devices in this list will be displayed as part of the Shared Locations overlay with the designated labels and color. To edit a device, click the “Edit” button next to the device’s name and make any desired changes (label, color etc) in the Edit Device dialog.

To add a device, click the appropriate button for that device (for example, choose “ADD ADS-B AIRCRAFT” to add an aircraft) and then complete the dialog.


Device specific instructions are shown below:
ADD AIRCRAFT (ADS-B):
- Tail/Flight Number: Enter the tail number (civil or military aircraft) or flight number (commercial aircraft). Double check this field because it cannot be edited once you complete the form.
- Enter a label and device color. This is how the aircraft will appear on the map.
- Click “Save” and the added device will appear in the Trackable Devices list.
- Aircraft will appear on the map as long as they have a ADS-B transceiver that is on and transmitting, and there are sufficient receivers in the area. Aircraft may not show up for a number of reasons including (but not limited to): the aircraft is on the ground and turned off, the aircraft is in an area without sufficient receivers or the aircraft is flying too low.
ADD APRS DEVICE
- Call Sign: Amateur radio callsigns will look something like this: KA1QP. However with APRS, one Amateur Radio Operator can have multiple stations so an SSID is often used. If that is the case it needs to be included in the Call Sign so you'll use something like KA1QP-7. Double check this field because it cannot be edited once you complete the form.
- Enter a label and device color. This is how the beacon will appear on the map.
- Click “Save” and the added device will appear in the Trackable Devices list.
- The APRS device will appear on the map as long as the device is within range (either directly, or through a digipeater) of an iGate so that it gets onto the internet. You can use sites like APRS.fi to verify your reports are being received by a gateway.
- If you need to receive radio traffic from a radio directly (not through an iGate), you will need to use the CalTopo Desktop's Local APRS feature which is covered on the Local APRS with Desktop page.
ADD OTHER DEVICE
- Call Sign: Enter a call sign, formatted as "{Connect Key}-{Device ID}" (ex: SARTRUCKS-14). Choosing a unique GROUP value will help ensure your reports are not confused with another user's.
- Configure your script or custom system to send position reports to our API endpoint: https://caltopo.com/api/v1/position/report/SARTRUCKS?id=14&lat=36.47375&lng=-118.85302 using the above "{Connect Key}-{Device ID}" example of SARTRUCKS-14. Using a connect key we generate will make it far more likely report's are not confused with another user.
- Enter a label and device color. This is how the beacon will appear on the map.
- Click “Save” and the added device will appear in the Trackable Devices list.
- NOTE: If you are not familiar with the custom system it may be better to use a connect key described below. This approach allows you to copy the URL and will only need to add the device ID to it.
Anytime a connected device is on and reporting its location, it will appear in the Shared Locations overlay.
Garmin, Everywhere Hub, Somewear, UAS Sentry and Custom System Access URL's
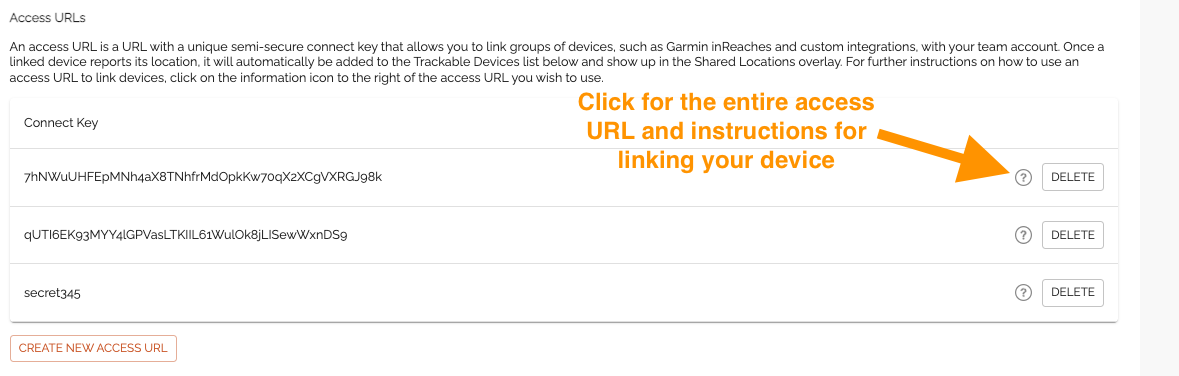
For Garmin inReach, Everywhere Hub, Somewear, UAS Sentry and the custom system, you need an access URL to link a device or group of devices to your team account. To link a device or group of devices using an Access URL, click the “Create New Access URL” button at the bottom of the Access URLs section. The “Create New Access URL” dialog will appear.
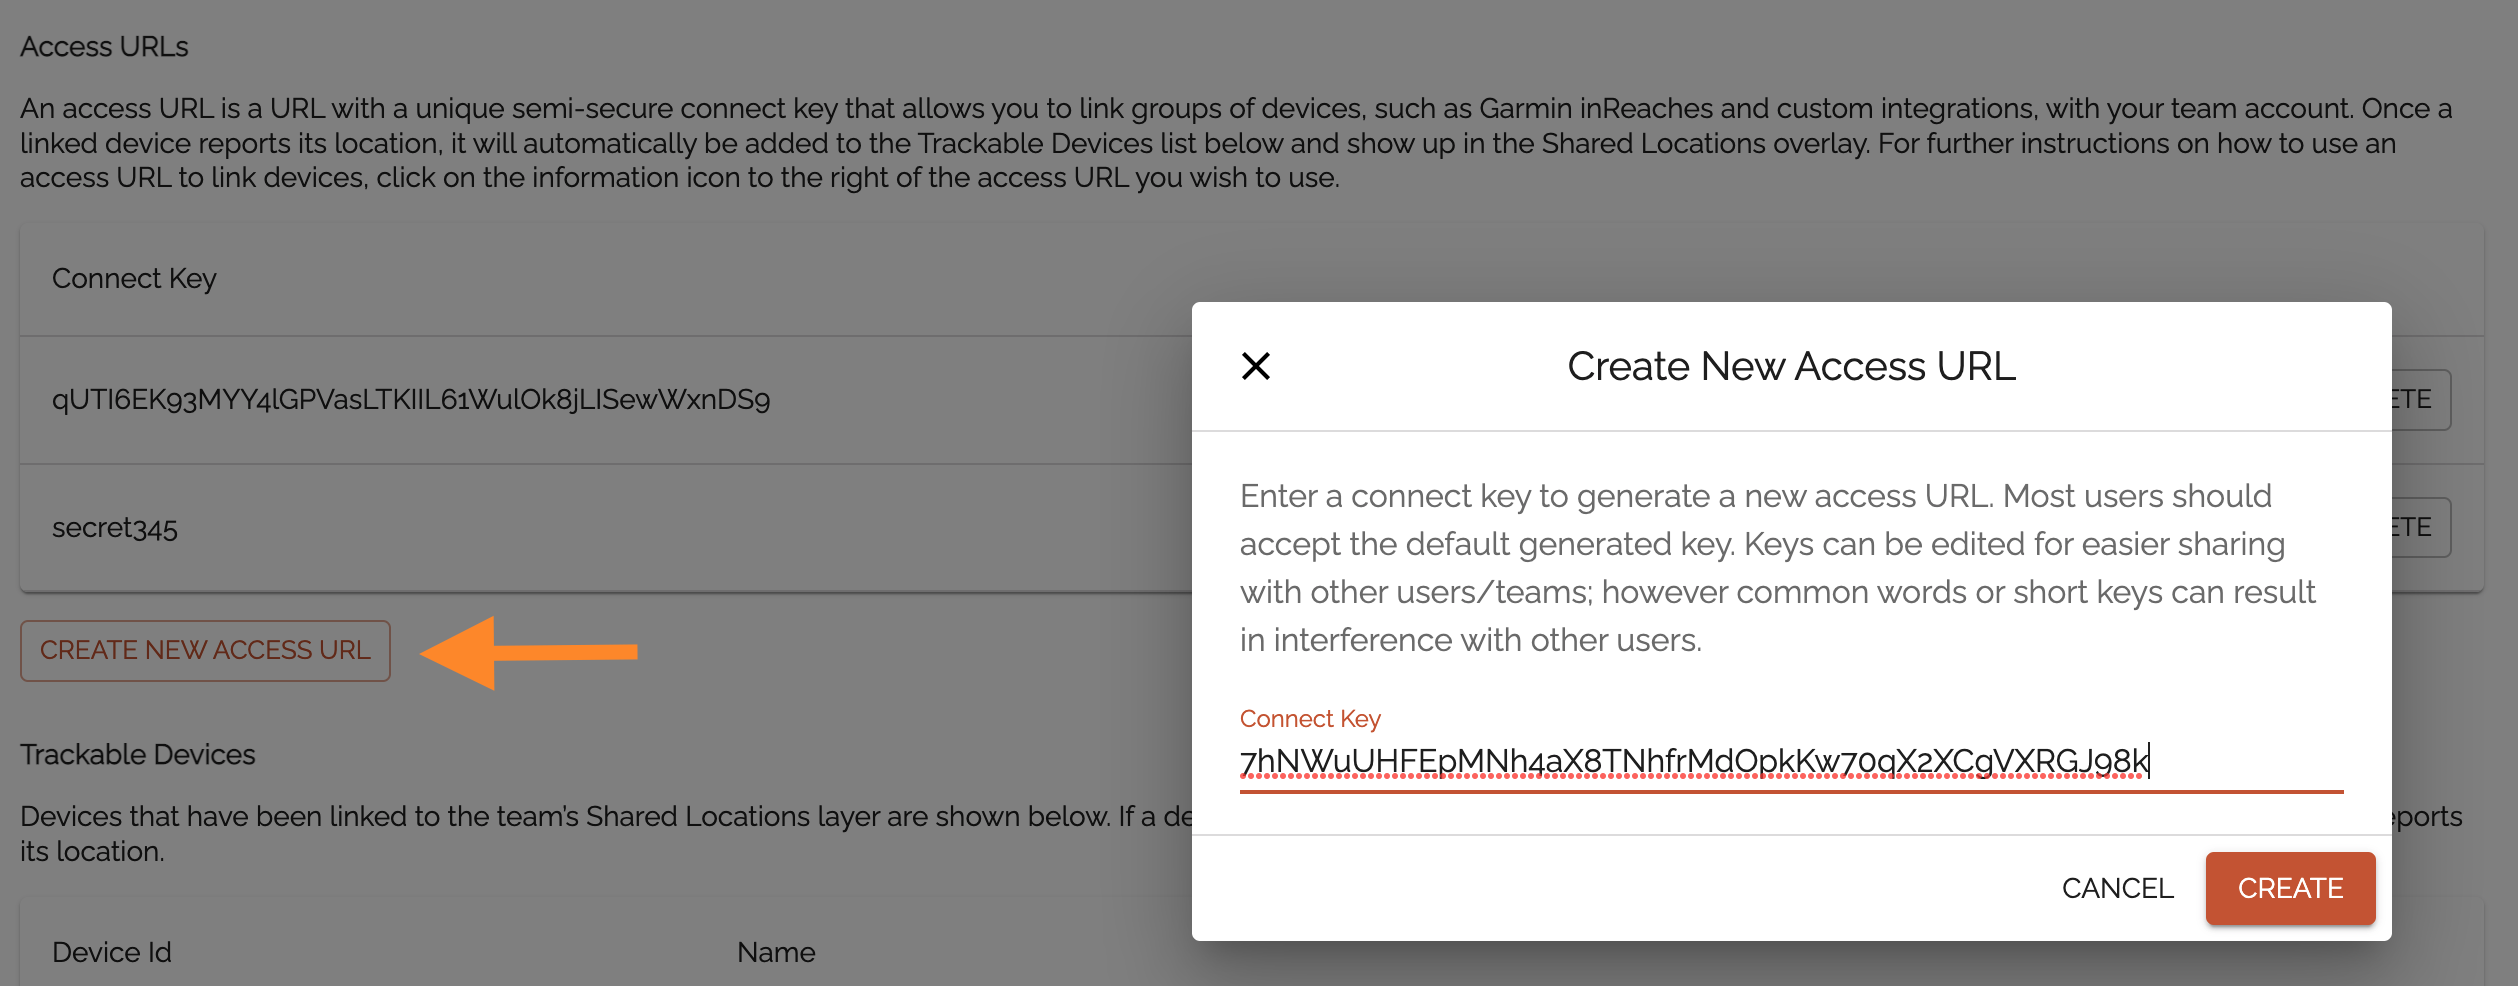
A default connect key will be displayed. The connect key is a unique semi-secure key that you will use to add trackable devices. In general, using the default access connect key will prevent others from listening to or spoofing (falsely reporting) your locations. You can edit the connect key to make it easier to either share your key with another team (allowing them to listen to your devices) or listen to their devices. However keep in mind that using common words or short keys can result in interference with other users; therefore it is recommended that most users use the default connect key.
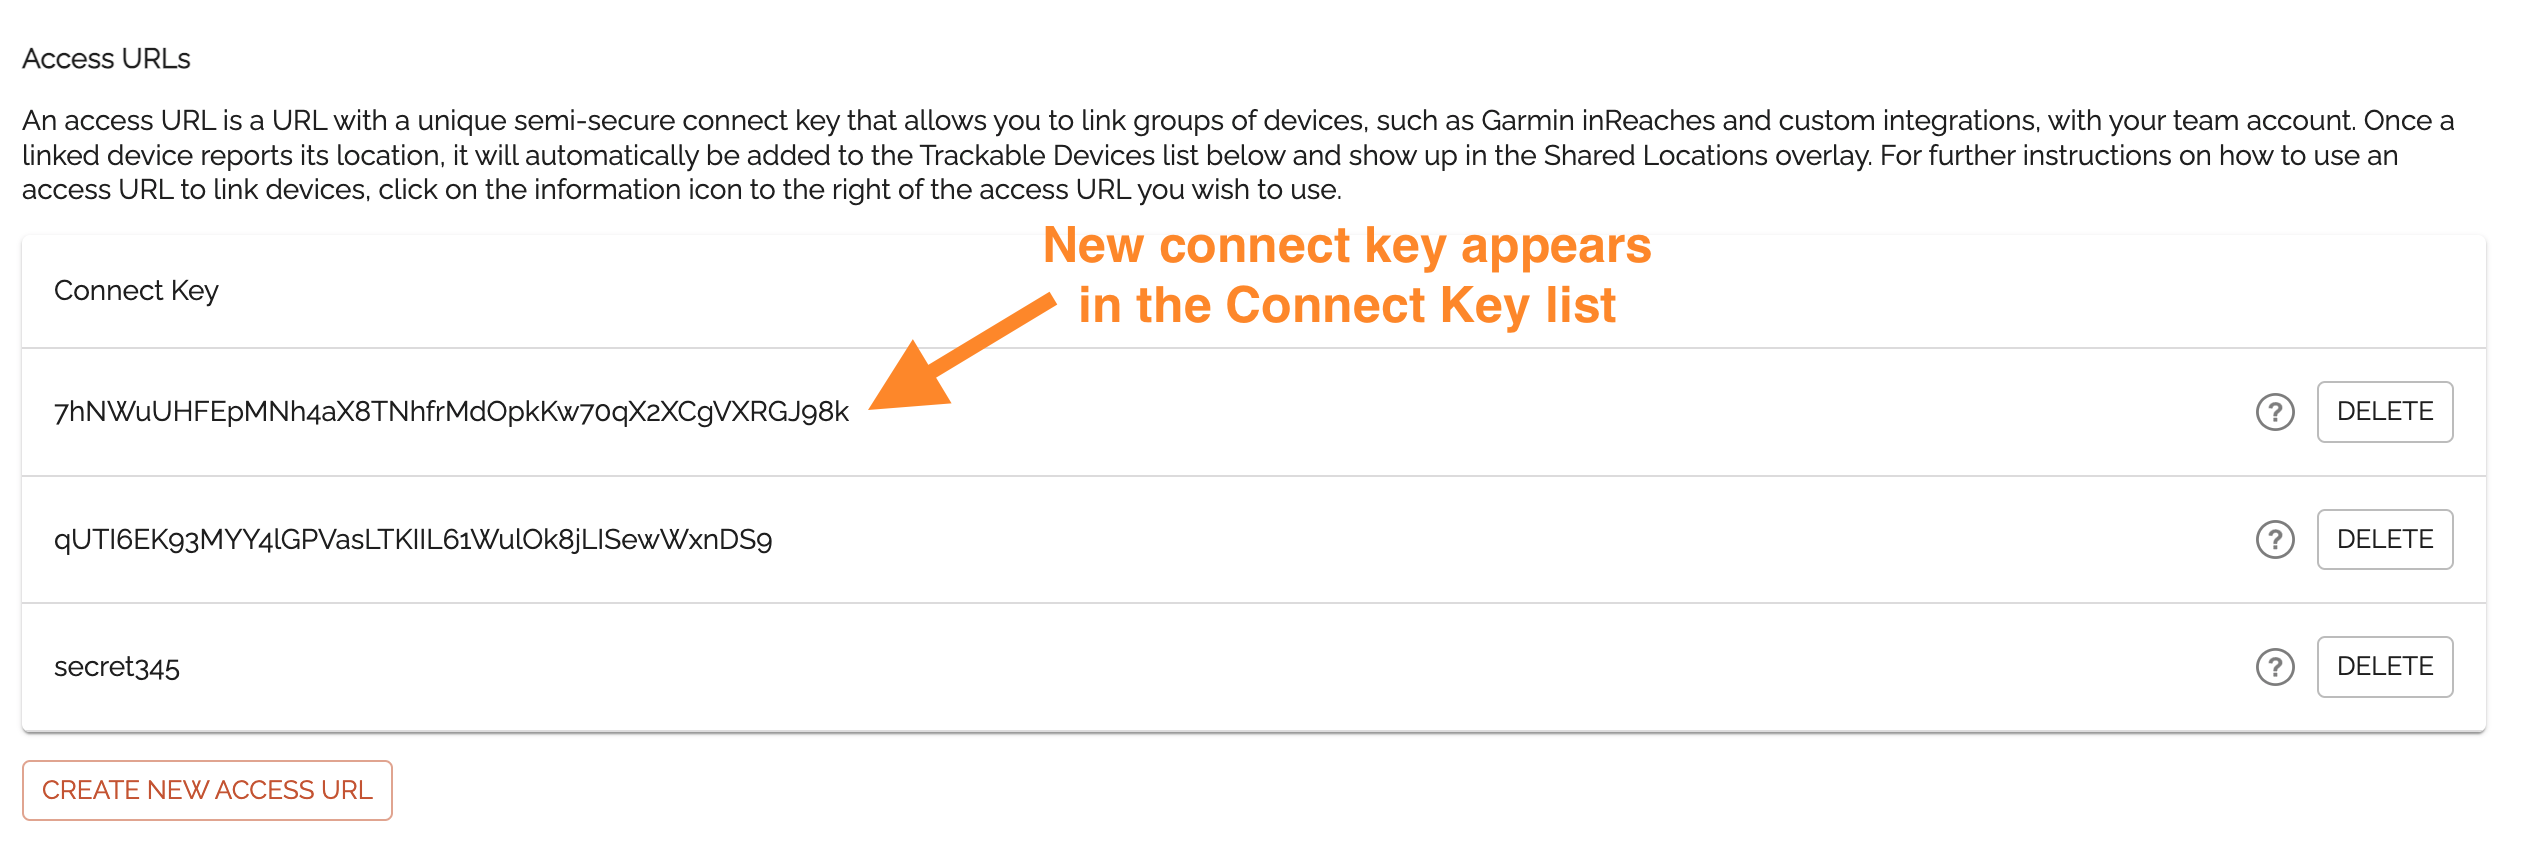
To generate the connect key, click “Create”. The connect key will be displayed in the Connect Key list.
Click on the information icon to the right of the connect key to view the entire access URL (including the unique connect key) as well as specific instructions on how to link Garmin inReaches and custom integrations. Follow those instructions to link your device(s).
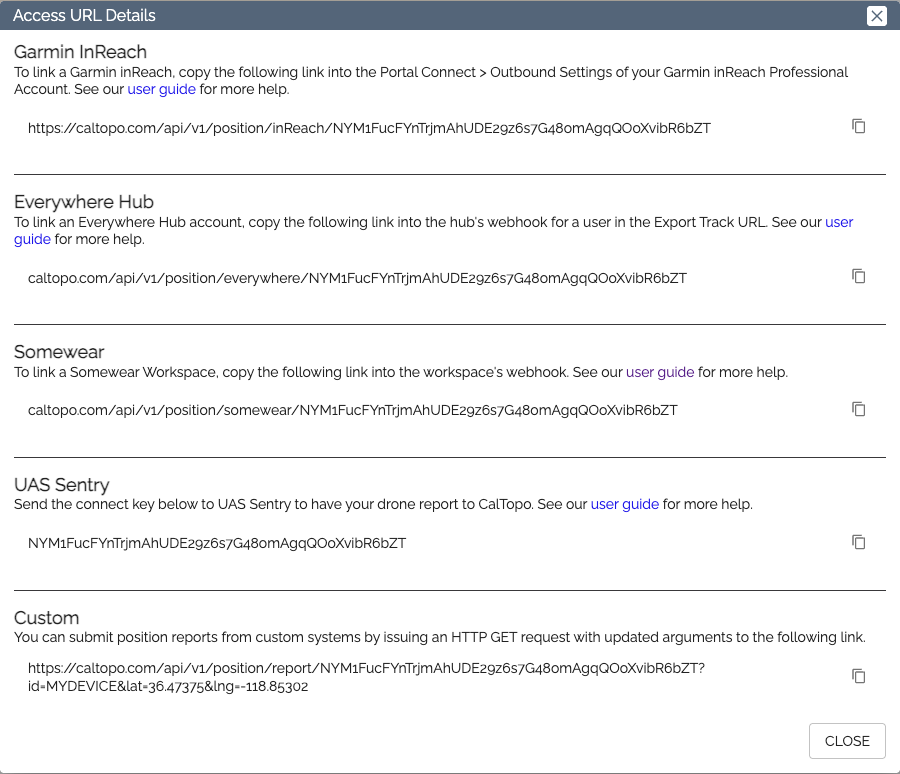
The next time that an inReach, Everywhere Hub, Somewear, your UAS Srentry drone or a custom system that is using a listed connect key reports its location, it will be automatically added to the Trackable Devices list and it will appear as part of the Shared Locations overlay in the map viewer. The label will default to the Device ID for the custom system, the IMEI number for the inReach, or the device name in the EveryWhere Hub and Somewear. The label can be changed along with the color by using the Edit button for that device in the list.
To remove a device from the Trackable Devices list and the Shared Locations overlay or to remove a connect key, click the “Delete” button next to the device or key, and then confirm.
Here is information on how to set up your Garmin inReach account your Everwhere Hub Somewear or your UAS Sentry account on our Location Integrations page.
InReach MapShare Integration
You can view the location of an inReach and record it to the map using the inReach MapShare system. This system does not require a Garmin Professional account. To use the system, you have to have MapShare enabled and set up on the Garmin site.
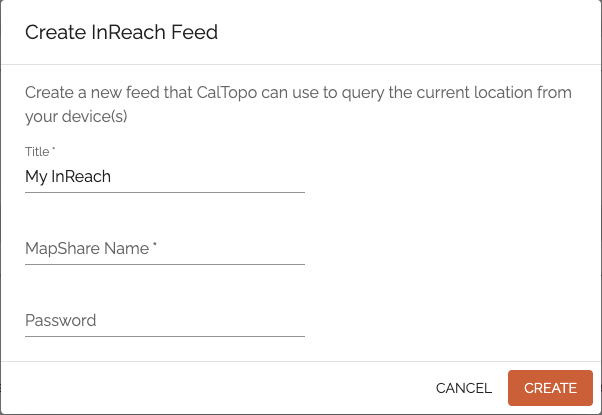
To fill out the required information, click the "Add inReach Feed" button in Trackable Feeds below the Create New Access URL section.
When you click that, you will get a form to fill out that requires your MapShare name and password (if you use a password).
When your inReach reports, the inReach will be added to the Shared Locations overlay like the other devices and show up in the list of trackable devices on the Team Admin page.
To get info on how to find your MapShare Name and Password on the Garmin Explore site, visit this guide.
Adding Locators To a Single Map
It is possible to add a locator to only one map. For most team devices the above described system is the best option because there is no need to repeat that set up once the initial set up is complete. However in some instances you may want to track an Amateur Radio operator, aircraft or even an inReach as a one off. In a circumstance where you are not likely to use that asset in the future and you only need to track it on one map, adding a locator to a map maybe the best alternative. Adding a locator to a map is described in Live Tracking and Locators in the User Guide.