Initial Response and the Hasty Period
getting started
As soon as the initial callout is received, the first operational period (OP 1) begins. The hasty portion of any incident is focused on gathering information quickly and sharing data within the team. Strucutred planning will come later as time and resources allow. If the incident is not resolved within this initial time period, the focus then shifts to using what you learned from OP 1 to effectively prepare and plan for the next operational period.
In this early Op1 timeframe, you can use CalTopo to learn about your search area, create a hasty search map, communicate that information to searchers quickly, and start planning for the next stage if the search is not resolved.
This chapter will cover how to use CalTopo to approach and manage the hasty search during OP 1. By the end of this chapter, you should be able to:
Create and Save Your Incident Map
The first step for every mission is to create an initial incident map. Even if you have only scant and unreliable information, create and save an incident map to your team account as early as possible. Doing this will
- provide crucial starting information to your team members about where the incident is taking place;
- allow you to start gathering real-time information about relevant conditions on the ground; and
- let responders begin tracking so you can see how far they are from the meeting point, among other things.
Your initial map could show the LKP, a vehicle location, the ICP location or some other meeting point.
This map needs to have a name that communicates its purpose and lets responders know without a doubt that they are opening the correct map. Many teams have standardized map naming conventions; consult your team’s protocols for how to properly name incident maps. Oftentimes the location, general information about the type of incident (i.e. missing hiker or injured skier) and/or the date may be used.
Exercise #1
Before you Begin, some reminders:
- There are quiz questions for each chapter on the NASAR Thinkific platform.
- Save your map in SAR mode.
Initial information from dispatch: You receive a call from dispatch that Wally Sinclair, a 28-year old male, has been reported overdue by his partner after he failed to return from a trail run in the Pecos Wilderness outside Santa Fe, NM, the previous evening. Wally’s partner reports that he had planned to park at Jacks Creek Campground and run a loop from there, although they are not sure of the exact route. They also mention that Wally is an experienced trail runner and he regularly does 20-25 mile solo trail runs on the weekends.
Exercise: Open a blank map and use the search function to find Jacks Creek campground near Santa Fe, NM. Add a marker indicating Wally's last known position. Add the relevant information from above to the marker description.
Throughout the course you will continue to update and work on this map in each exercise. Upon completion, you will turn in your search map for feedback from the CalTopo representative.
Save your map with your last name as the title and Sinclair Search. After it saves, press the info button on the left side of the map viewer to open the sharing dialog. y In this dialog, you can edit the map name and description, change the map location, set the mode, set sharing permissions (for outside your team account), and create shareable links.
Look for the 7-digit code that indicates the map ID. Add that 7-digit code to your map name, right after your last name. Your map title should read: YourLastName XXXXXXX Sinclair Search, where XXXXXXX is your 7-digit map ID.
Grading Criteria:
- Map Title follows format 'YourLastName XXXXX Sinclair Search'
- Marker exists on map for Wally's last known position, in Jacks Creek Campground
Reference Links:
Learn About Terrain Using Layers and Overlays
Layers and overlays are critical to getting the most out of your use of CalTopo. Throughout any mission, you will reference multiple layers and overlays to view terrain, travel paths, and hazards. You will scan several layers during the hasty portion of the mission to gain a quick overview of the terrain, plan initial ingress and egress, and assess the largest risks. You will also use them later for more in-depth planning of assignment areas, to identify landing zones, and to assess current conditions and forecasts.
Each base layer and overlay draws its data from a different source. Almost every mission will use more than one base layer, overlay, or combination of several. The type of mission, the general terrain type, and any potential hazards mean that a variety of layers will come into play.
CalTopo base layers include topographic styles as well as road maps, aerial imagery and satellites, relief shading, and some specialty types like marine and air charts. Overlays provide additional information to help add context. The layers you need to use may change for each mission. Do not get set in only using one layer or one combination. Try different layers and see what they can tell you.
To better illustrate this point, let’s compare how different base layers and overlays inform the planning for hasty searches in the three different demonstration scenarios.
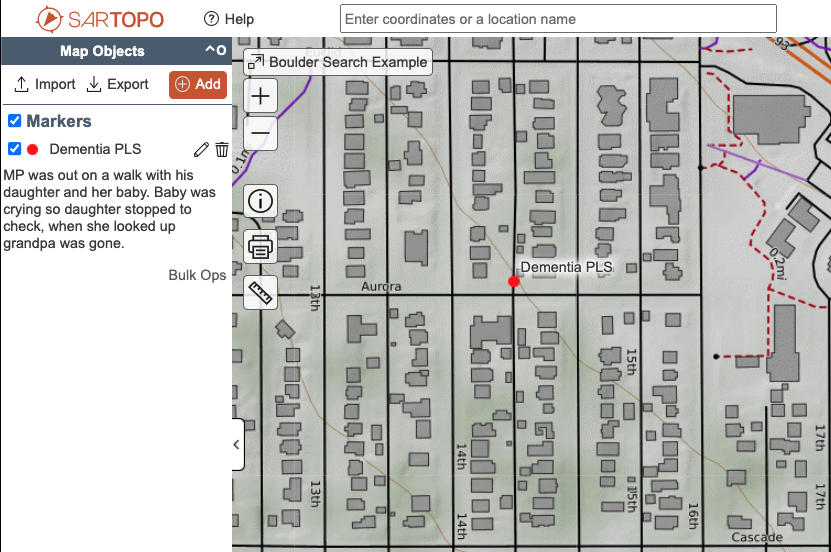
Scenario #1: Missing Dementia Patient in a Suburban Area
In the MapBuilder Topo layer here, there are numerous well developed streets with bike paths, parks and open space in the immediate vicinity of the PLK. What are some useful items we see on this map? What information is missing that is highly relevant for this search?
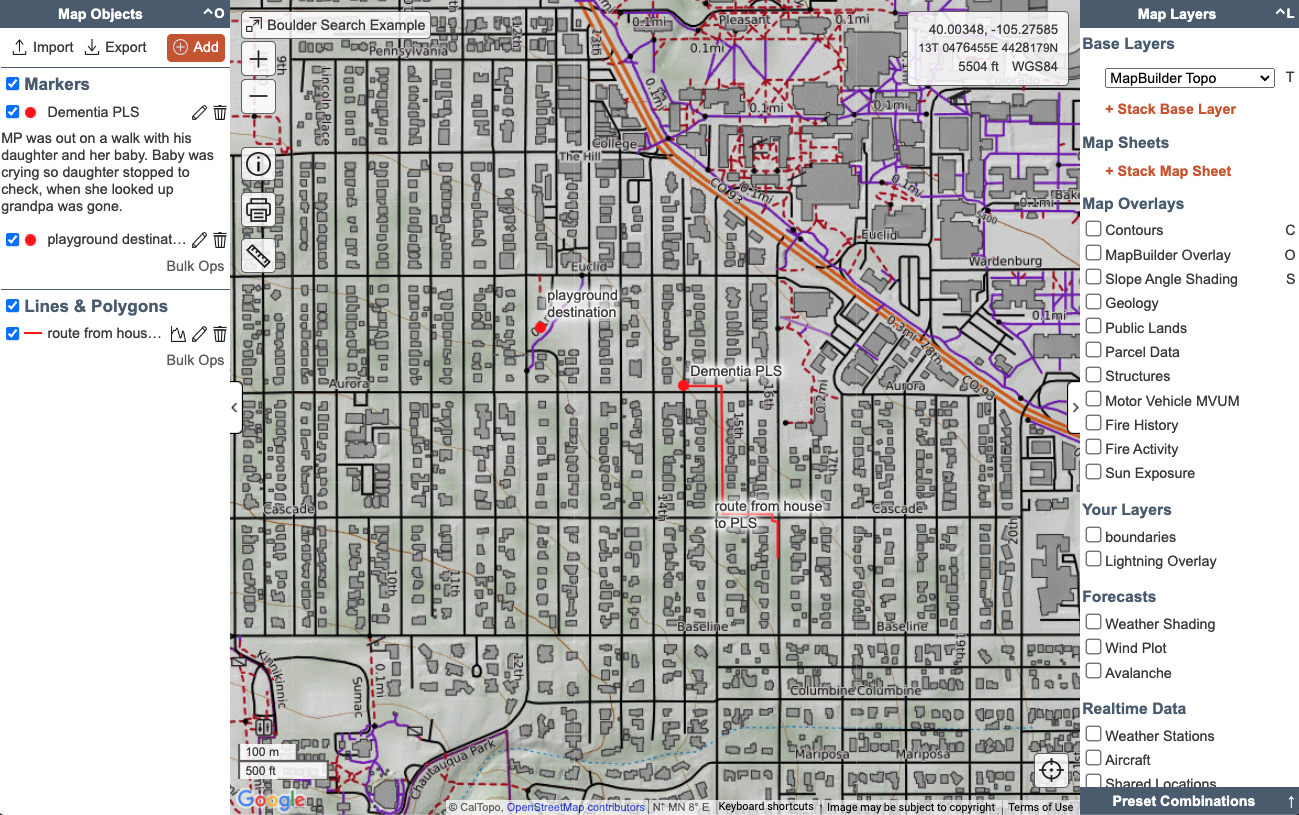
In this scenario, one question you may have is the name and relative locations of roads, parks, open space, and buildings in the area. MapBuilder Topo provides some of this information, although it can be limited in some suburban areas. A street map base layer such as OpenStreetMap (OSM) provides more urban context, emphasizing street and trail names, building and park locations as well as points of interest in populated areas.
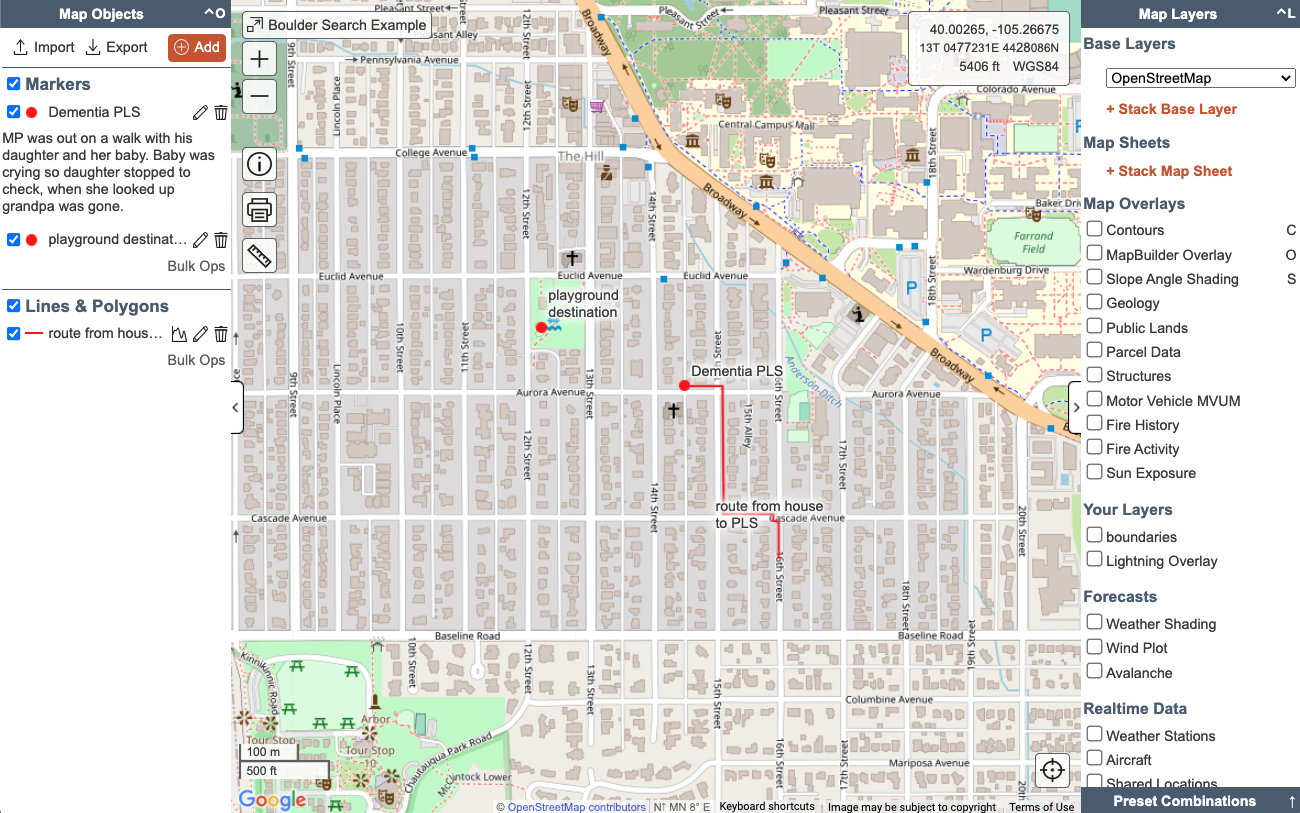
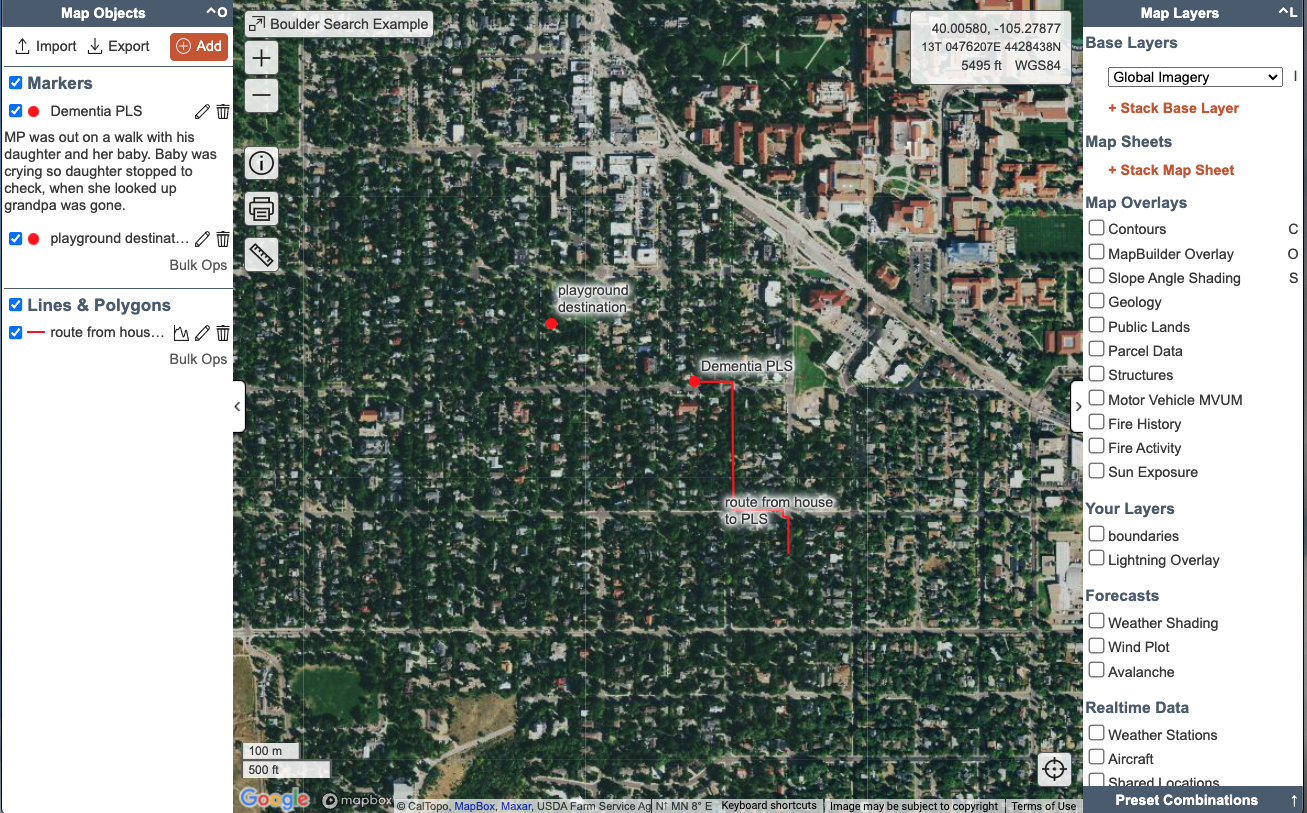
Another question you may have is what the surrounding area is actually like. What is the layout of the neighborhood? Is the open space nearby forested or rolling grasslands? Are there any bodies of water such as lakes, streams or rivers? Aerial imagery such as Global Imagery can provide insight into the terrain.
Stacking two layers and adjusting the opacity of the top layer is a tool to help you compare layers and gain context. For example, using aerial imagery on top of another layer like OSM for reference can provide even further information about an area.
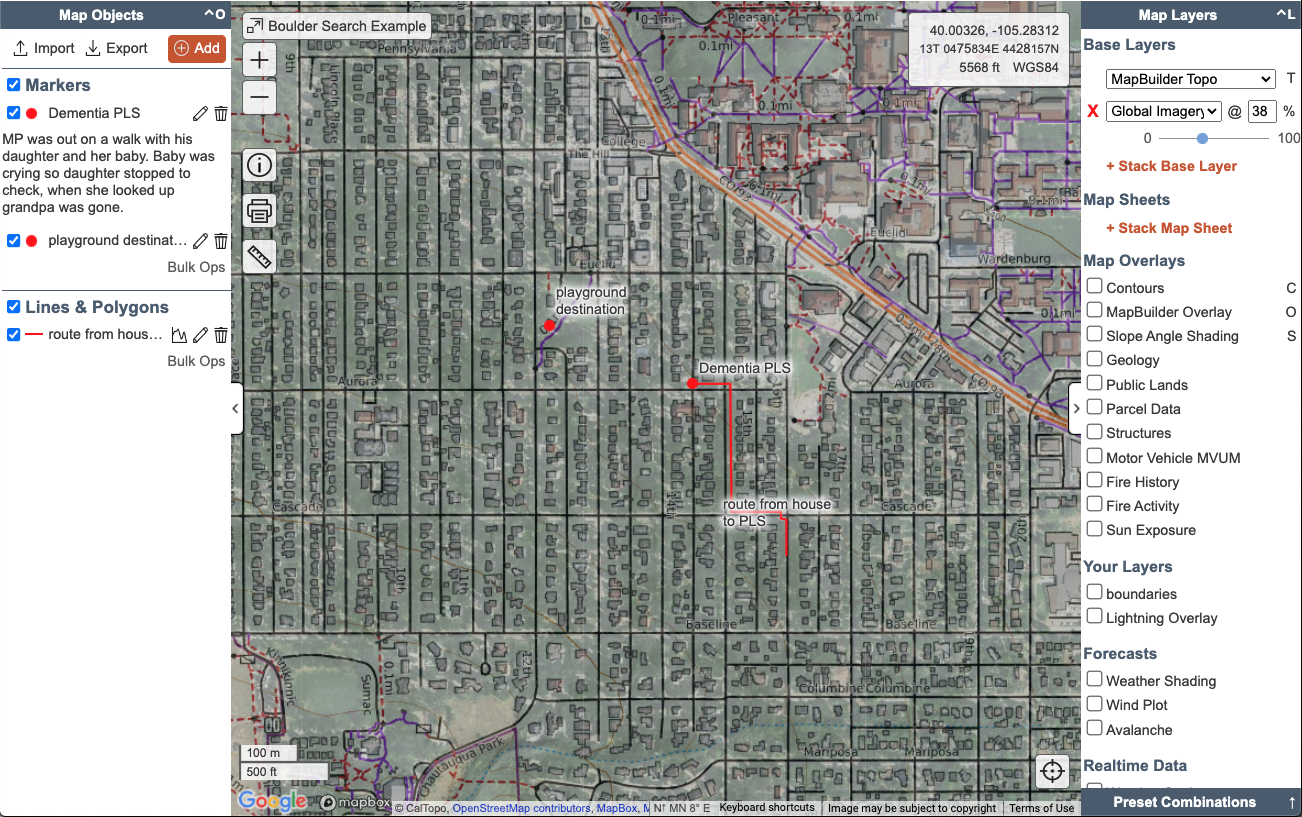
Overlays provide even more. In this example, parcel data could be useful here in case you need to contact homeowners.
Scenario #2: Missing Hiker in Rural Area
If we continue with the OSM Roads layer from the last example, it’s not going to give us much in this rural area. OSM tends to be more useful in heavily populated and well traveled areas where users continually contribute and update information (such as the first scenario). It may be less useful in sparsely populated rural areas. It also lacks any information about the topography of the terrain. Switching to MapBuilder Topo provides relief shading as well as more information about the landscape, such as the location of small creeks, vegetation cover, mountain peaks, trails and campsites.


Displaying the Public Lands overlay identifies the US land management agency for a given area and can provide insight into which base layers may be more informative than others. For this scenario, you can see that much of the land around where the hiker’s car was found is managed by the United States Forest Service (USFS), while private lands are nearby.
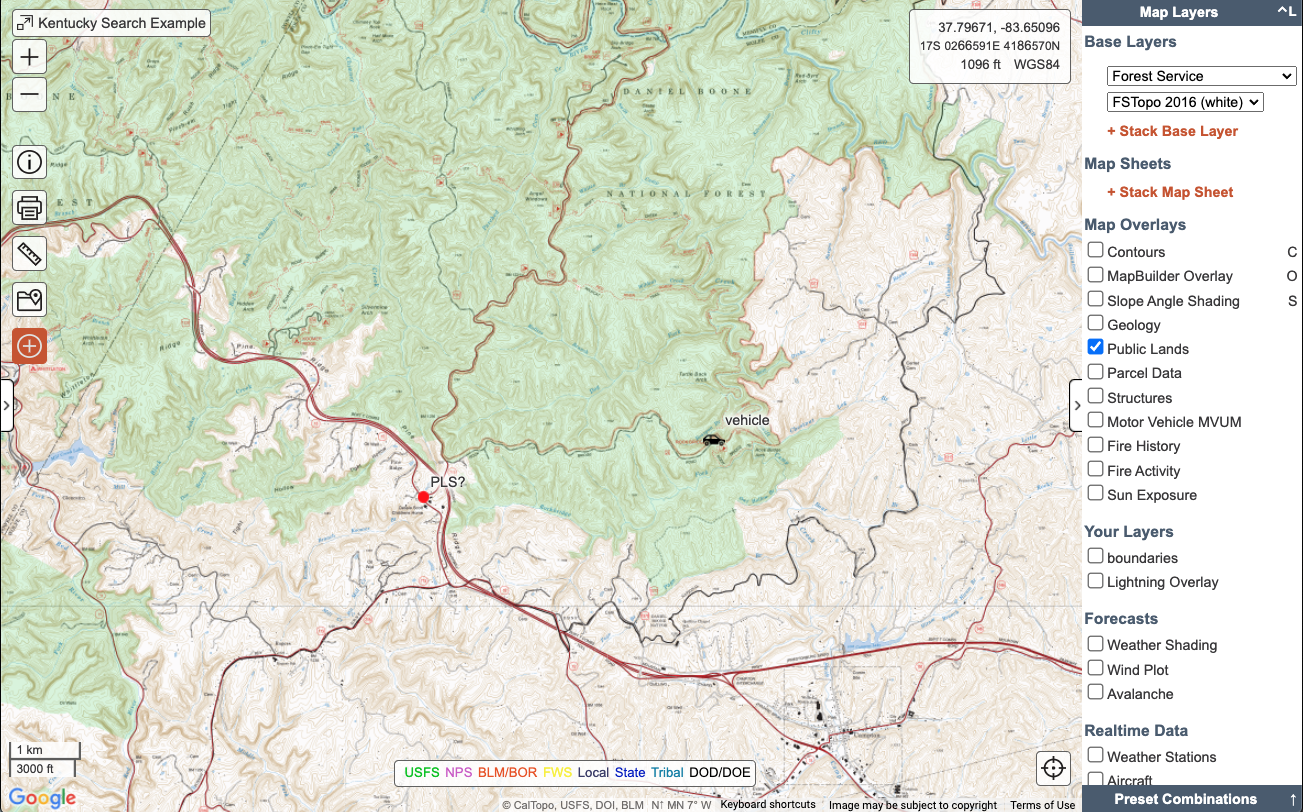
Given this information, let’s take a look at the Forest Service layer. Both the Forest Service and Scanned Topo base layers are often good choices for remote and less traveled areas because they draw their data from official USFS and USGS data sets, respectively.
This is another good time to use the layer stacking feature. USFS data is limited in geography. Where there are no USFS managed land areas, there are often no maps and you will get a gray background. If you start with Scanned Topos as the bottom layer, then USFS as the second layer at 100%, then any areas where USFS maps don’t exist will display the Scanned Topos instead.
Furthermore, stacking the Forest Service layer with relief shading can call more attention to terrain features such as peaks, valleys and ridges. You can also highlight the location of structures (which can be spaced relatively far apart in rural areas) by displaying the Structures overlay.
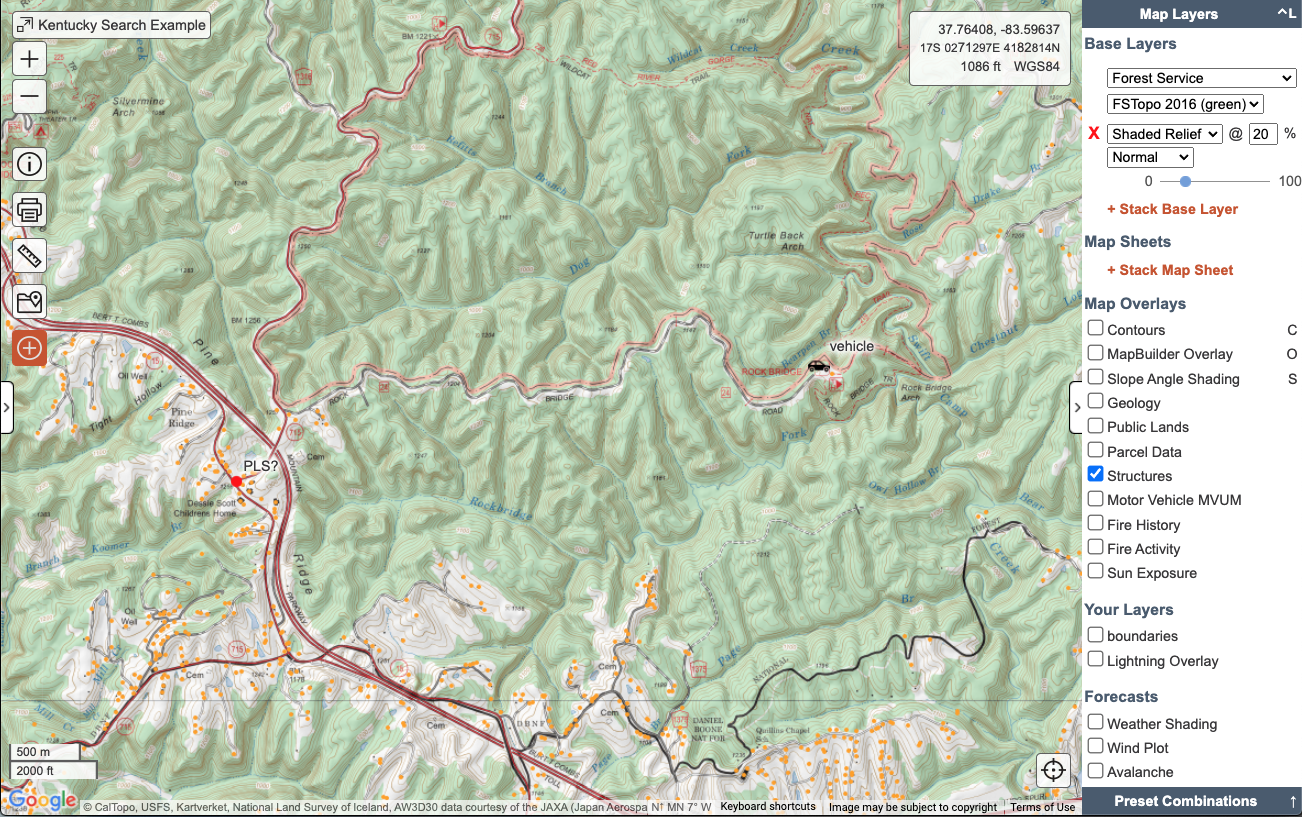
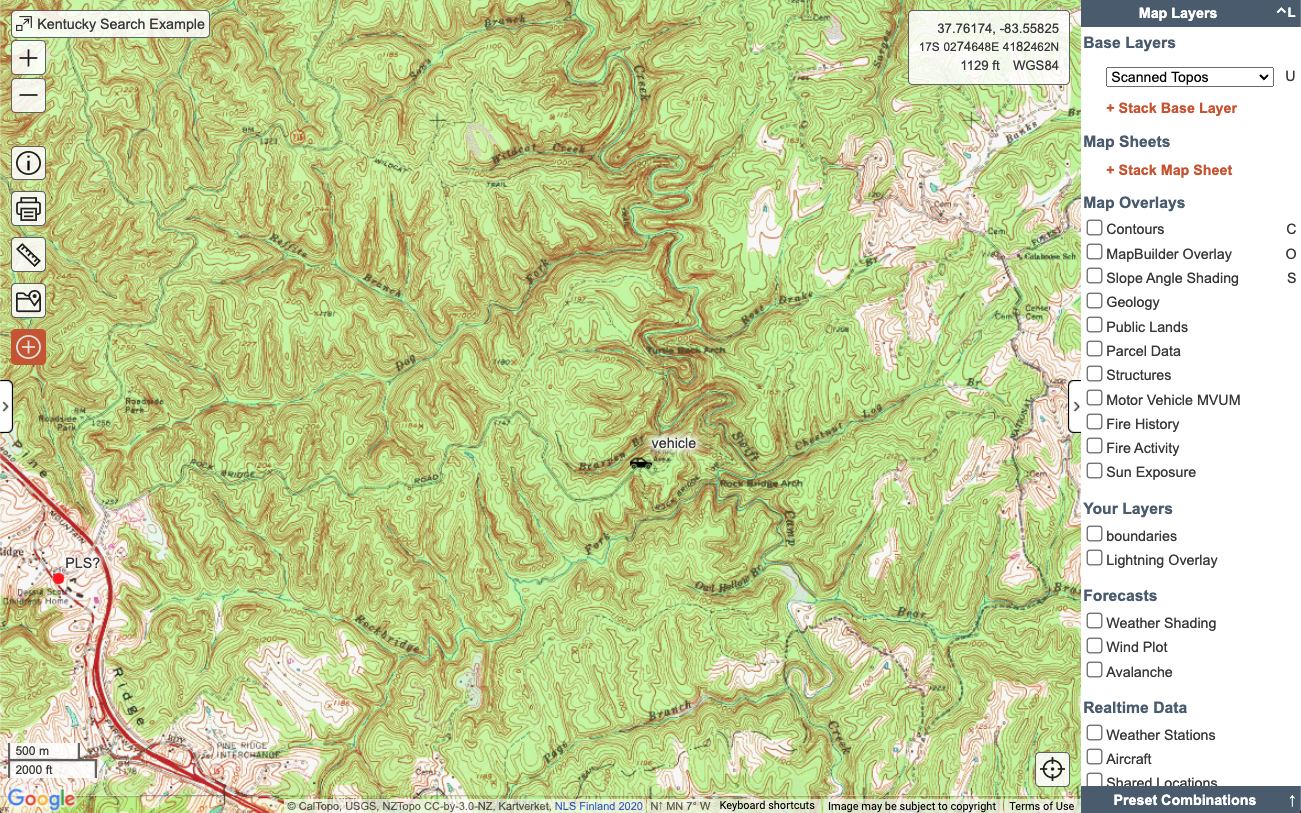
Even if you have decided that one layer is the best for the current mission, you should still reference others. Many layers, such as aerial imagery, are helpful across a wide variety of areas. For example, using Global Imagery in this scenario can provide a lot of great information, such as tree density and the location of houses, clearings and bodies of water.
Adding the mapbuilder topo overlay on top of the imagery can help you orient the map.
Scenario #3: Missing Climber in a Mountainous Area
Given the mountainous and challenging nature of the terrain, a topographic map will be vital for planning your hasty search. Even if you prefer to use one topo map versus another, we suggest taking a quick look at other ones and comparing them. Oftentimes one will provide some additional information that the others do not.

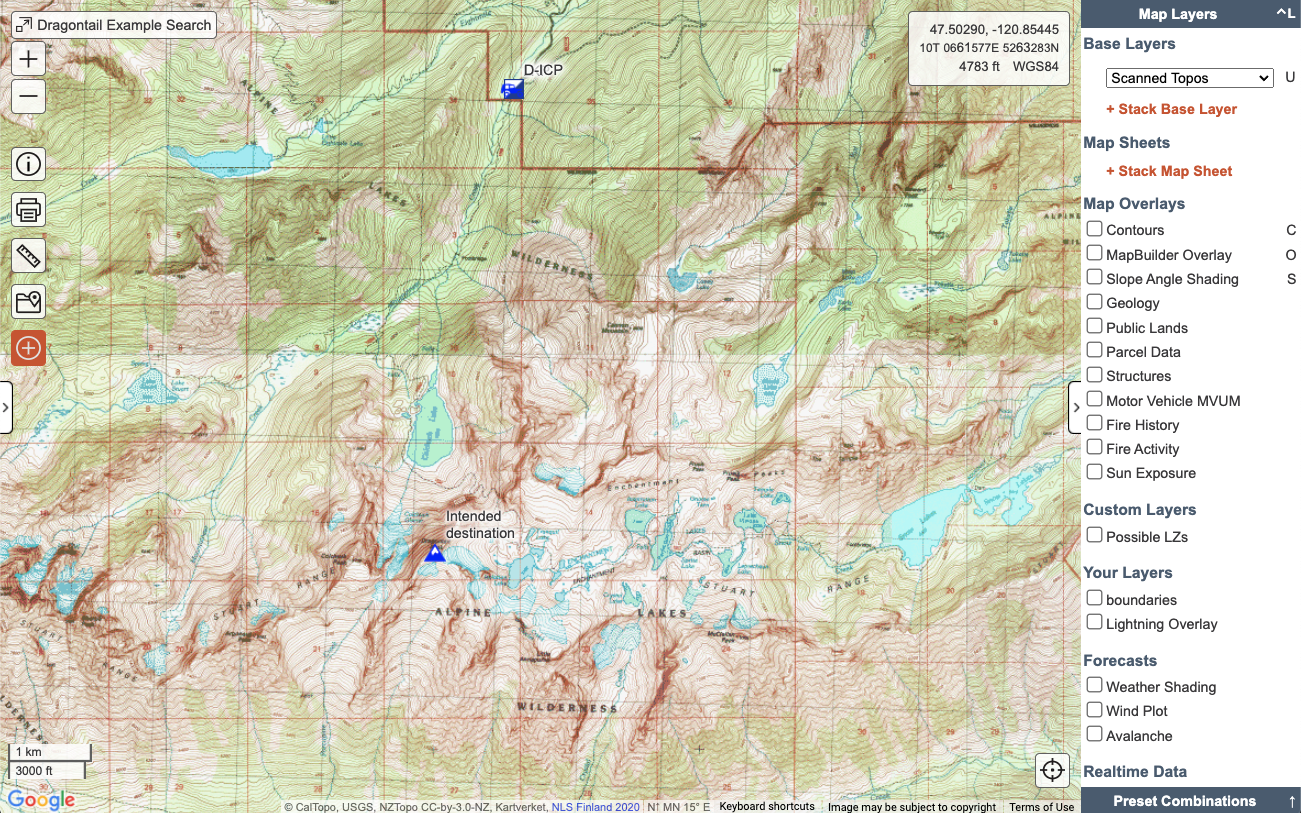
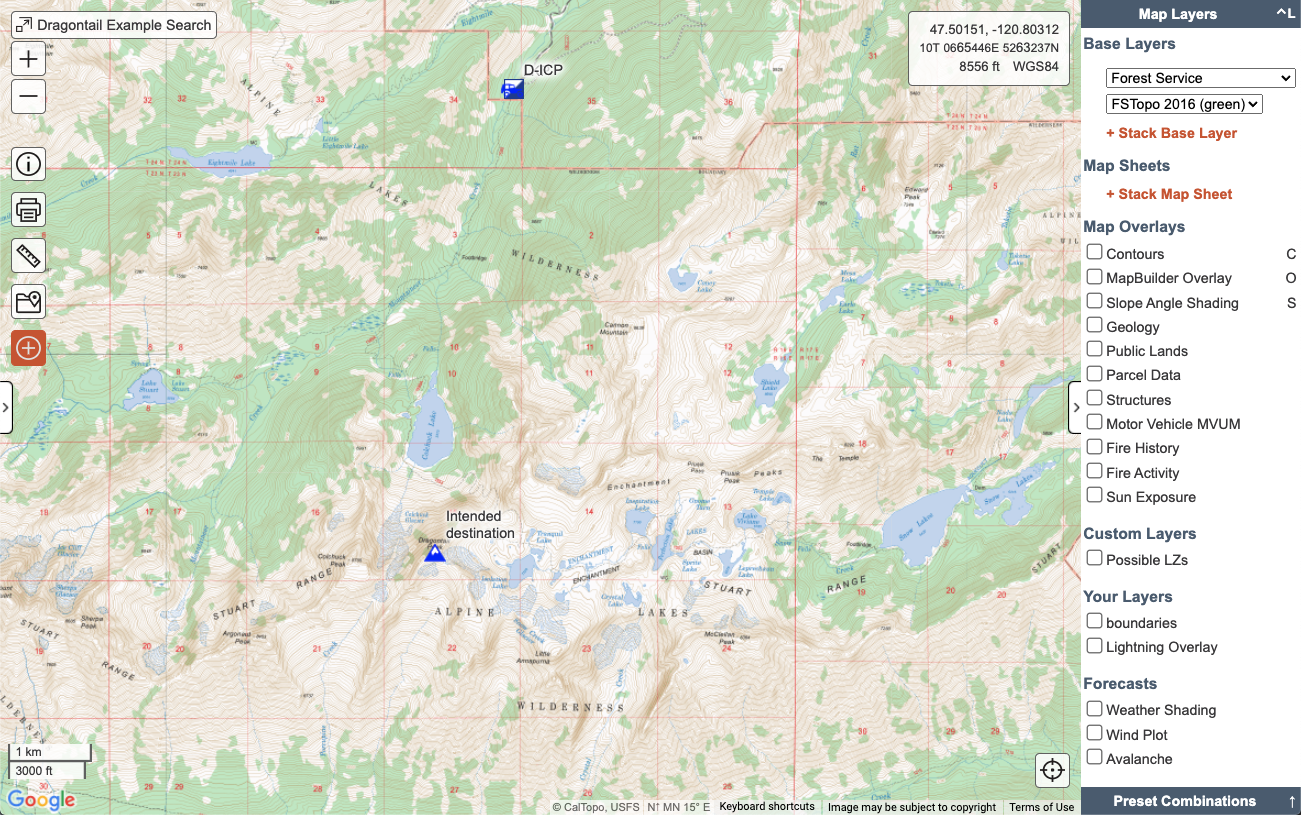

Scanned Topos and Forest Service offer similar key information for this particular area including the names and locations of terrain and manmade features such as glaciers, passes and footbridges; however they both also have relatively limited information about common hiking and climbing routes. On the other hand, MapBuilder Topo has crowdsourced route information and relief shading based on USGS data sets; however it sometimes lacks specific terrain and manmade features present on the other two base layers.
Mountainous terrain has additional considerations beyond what you might encounter in suburban or rural areas. What other information would you need to plan a hasty search in this type of terrain and keep your teams safe?
One question you may have is the steepness of the terrain: where are there possibly steep slopes and cliffs that you need to be aware of? The Slope Angle Shading overlay uses a color scheme to identify slope angle and can greatly aid your planning and hazard assessment any time that terrain steepness is a concern.

No matter the type, location or nature of an incident, make it a habit to adopt a curious mindset as you delve into your planning. We have barely scratched the surface of the many base layers and overlays available on SARTopo; we recommend taking the time to get to know what data each layer displays and which ones are useful for finding particular types of information.
Don’t be afraid to switch between different base layers and overlays often and try different combinations in order to learn as much as you can during your hasty search planning as well as throughout the entirety of the incident.
Exercise #2
Return to your map that you saved in Exercise 1. Switch between different base layers and overlays and compare the information they provide about the search area. Look through the various layers and consider what information each provides for your search area.
Within about one mile of the Jack's Creek Campground is a ranger station that is not indicated on MapBuilder Topo. Switch through layers until you find this ranger station, and add a marker to the map and label it with the name of the ranger station.
Grading Criteria:
- Marker on Map Indicating the name and location of the nearby ranger station.
Reference Links:
Add Hasty Plan Data to the Map
The first map object(s) on the hasty map will most likely be based on the initial information you receive, such as the LKP, PLS, or the missing party’s intended destination.
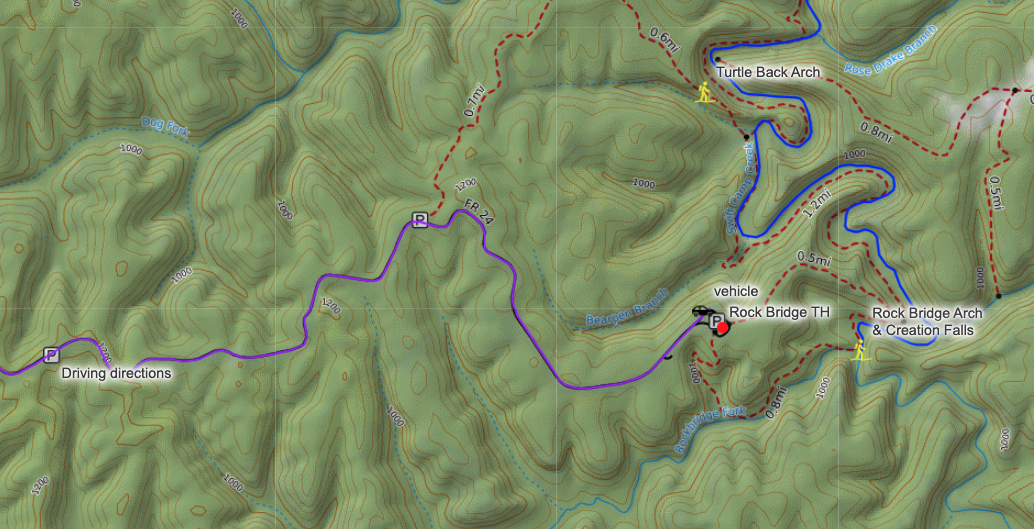
You can add map objects such as markers, lines and polygons to your map in order to highlight and communicate information such as the command post location, staging area, trailhead locations, points of interest, driving directions and hazardous areas.
For example, let’s consider the missing hiker in scenario #2. Based on the initial information, the first marker indicates the location of the car that was found by the sheriff’s deputy as the LKP. Using the base layers as a guide, consider adding markers for the trailhead and potential destinations in the area. You may also add other map objects to your map as well, such as a line to indicate driving directions to the trailhead for field teams.
As you learn more about the missing party and your search area, you’ll start to identify likely areas and add assignment-type objects (which include line assignments, buffer assignments and area assignments) to designate the hasty search assignments in those areas.
Assignment-type objects are drawn in the same manner as other map objects but, unlike other map objects, assignments have additional input fields that help to organize the plethora of information that goes along with searches.
Compare the dialogs for a line versus a line assignment below. Notice how the map objects themselves designate the same trail on the map but the line assignment (right) captures significantly more assignment information than the typical line (left).
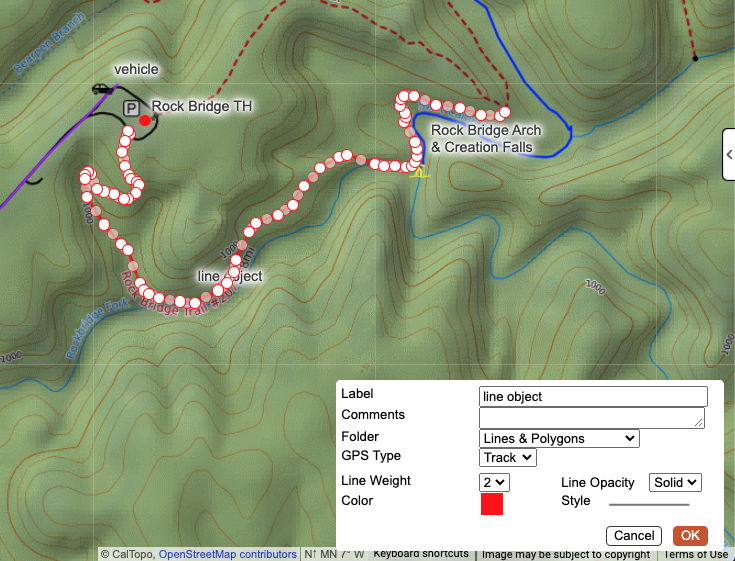
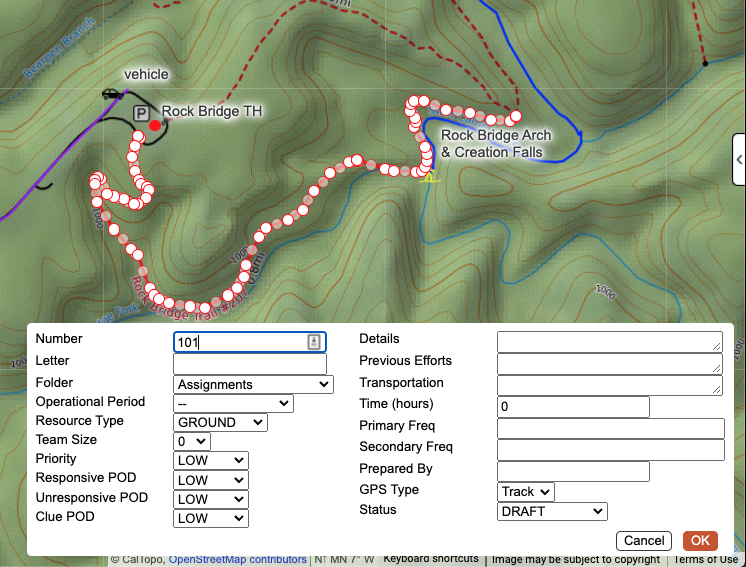
While mapping for the hasty search, you may not want to take the time to fill in all of the details of the assignment. Create your assignments, fill in any immediately relevant information, such as numbers to designate the team and a short description of the assignment, and leave out the rest.
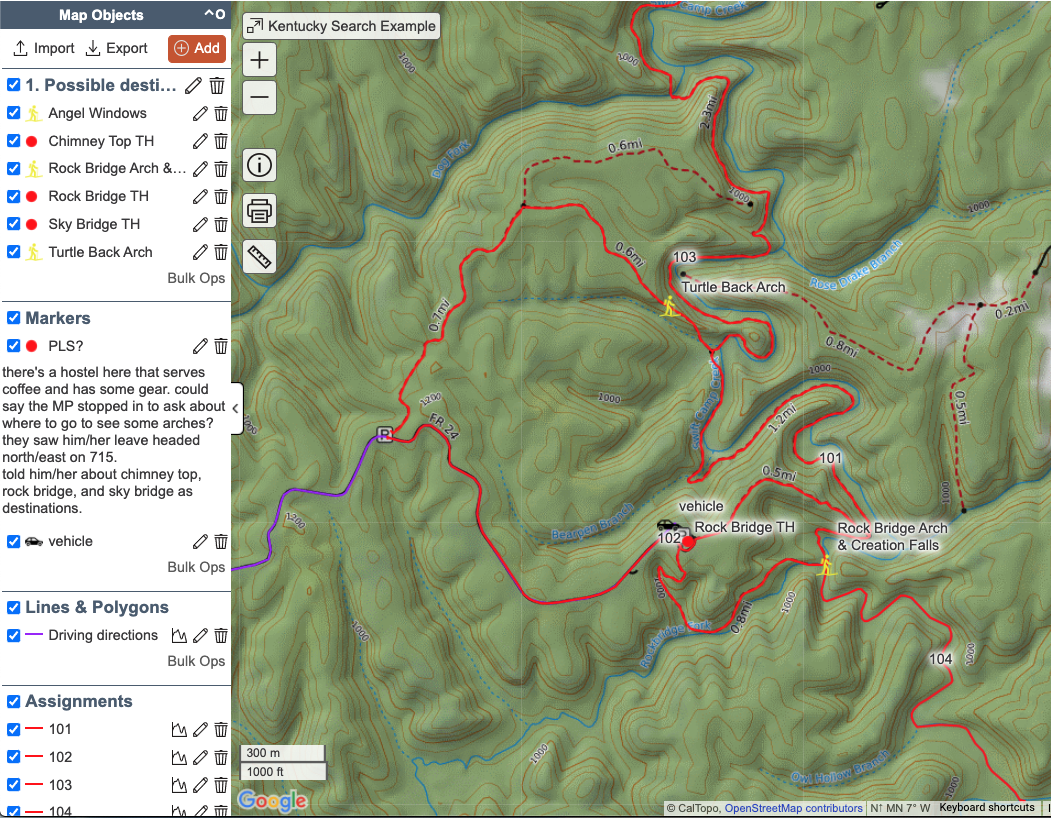
Let’s return to scenario #2 and look at how you might create assignments for this search area. Given that the missing party is a hiker and his car was found at the Rock Bridge trailhead, you may want to clear all of the nearby trails as your hasty objective. Quickly add line assignments using the snap-to function set to OSM or USFS, label them with team numbers for quick identification, and add a short assignment description.
For a hasty period, we assume that any assignments you draw are generally sloppy and will be thrown away when we start segmenting for the second operational period (OP2). Thus we can label them with a team number for the day or a single throw-away letter to distinguish one from the other.
The type(s) of assignment objects you choose will depend upon the nature of the assignment. You may use the same type of assignment object for all your assignments or you may use a combination of assignment objects. For example, if you want a field team to search a certain distance along the sides of a trail or creek drainage, a buffer assignment may be a good choice. However if you want a dog team to search an open meadow, you are probably better off using an area assignment. Choose the assignment object(s) that allows you to best communicate the particular assignment objective to your field teams.
Exercise #3
Add a command post location to your map using a marker and changing the icon to the ICP icon. Create a folder called 'Incident Facilities' and move the ICP marker to that folder.
As more information is gathered about Wally, you find out that he was interested in heading to "a place with some higher elevation" for his run. Find three locations that could be accessed during Wally's 20-25 mile loop run, and add MARKERS to indicate the area or peak that Wally might have chosen to go to. Label these as Areas of Interest, plus the name of the area. (Adding a marker makes it easy to navigate to an area, without crowding up that area with a big polygon. Markers also remain a relatively consistent size across zoom levels, so when you are zoomed out to view a large area, you can still easily find the marker.)
Finally, create at least 3 hasty search assignments starting from Wally's last known position. Create a Hasty Assignments folder and move these hasty assignments to it. We will cover lettering and numbering assignments in depth in a later chapter. For now you can label your hasty assignments as AA, AB, and AC.
Grading Criteria:
- Incident Facilities Folder Exists
- ICP marker with ICP icon is present in Incident Facilities Folder
- Markers labeled "[Location name]:Area of Interest" are in Markers Folder
- Hasty Assignments Folder Exists
- At least 3 hasty assignments are in the Hasty Assignments folder, lettered AA, AB, and AC.
Reference Links:
Conclusion
Before your hasty team deploys, it’s important to make sure you have reviewed hazards and developed a safety plan, which we cover in the next section. You also need to get your map to your searchers, and communicate what data they need to collect and how you will track them in the field.
For a search mission, you start planning for the next operational period as soon as possible. If the hasty operation does not result in a conclusion, then you have a head start on planning for the next OP. Any information that you gather during OP1, including clues and tracks, are integral to planning for the next operational period.
In this chapter we covered how to use CalTopo to approach and manage a hasty search. We looked at how to reference and utilize a variety of base layers and overlays to assess the search area and develop an initial hasty map. Next we expand upon these concepts to use layers and overlays for your safety plan.