Photo Waypoints
in this lesson
The ability to add or edit photo waypoints requires a pro, desktop, or team subscription.
Available on the web and mobile app, photo waypoints allow you to add media to map objects and maps. Supported file types include PNG, JPG, HEIC, PDF, HEIF, webP, and TIFF. You can directly attach media to map objects (such as lines, markers, and polygons) or you can attach photos to the map itself for future reference.
Whether you are adding beta photos to your route plan on the web or snapping a photo of a search clue with your phone, photo waypoints enable you to easily capture more information on a map.
Topics on this Page:
While you can add different file types (including PDF) to a map, we will refer to all of these types of media as “photos” from here on out for simplicity’s sake. Please note: while there is no photo waypoints quota at this time, we do plan to implement one at some point in the future.
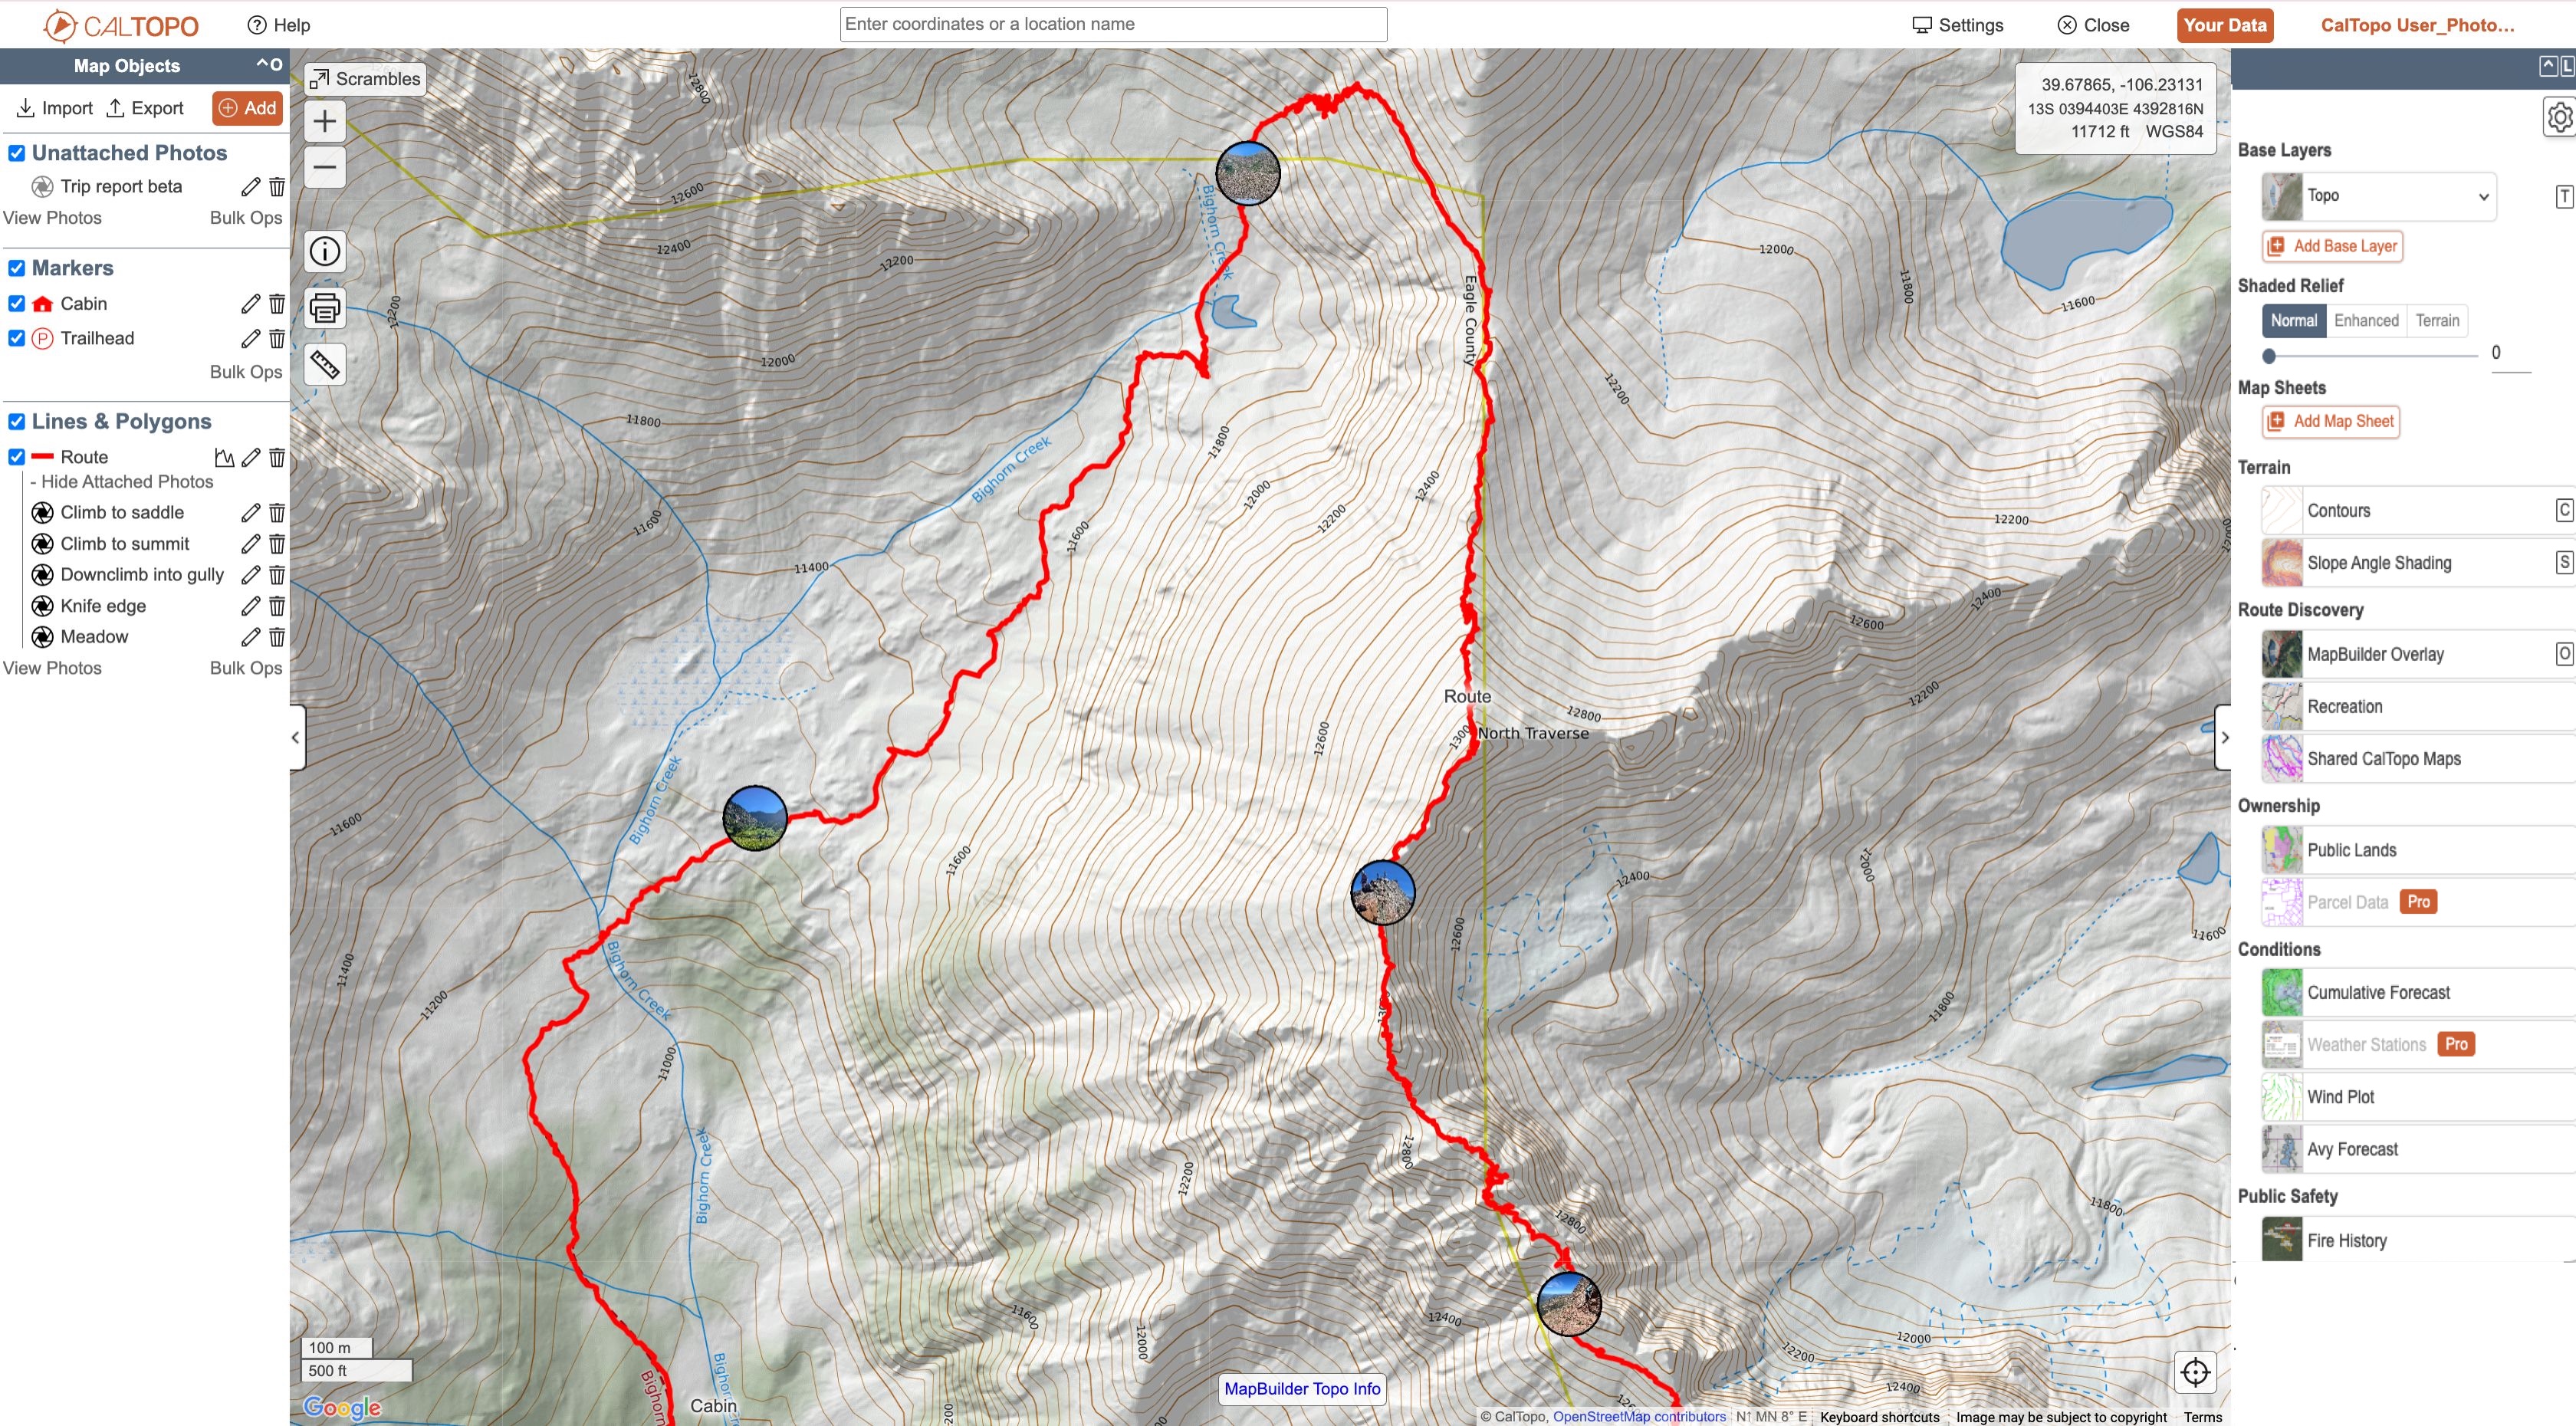
Photo Preview on a Map
You can use the Photo Preview drop down menu in the Settings menu on the web or mobile app to control how photos appear on a map:
- Thumbnail: displays a circular thumbnail preview of any photos with associated GPS data on the map.
- None: hides photo previews from the map. All photos will still appear in the Map Objects menu.

Adding Photos to a Map
GPS vs no GPS Data
When you add a photo to a map, CalTopo will include the location data embedded in the photo if available. This is most commonly the location where the photo was taken. However you can add photos to a map with or without associated GPS location data:
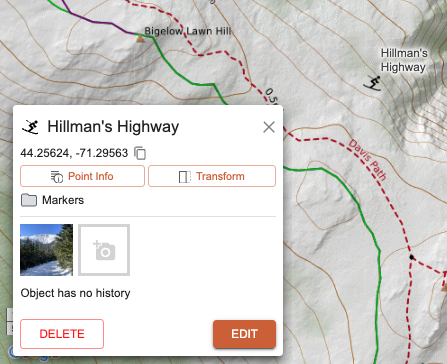
- A gray shutter icon next to the photo name in the Map Objects menu indicates that a photo does not have GPS data. The photo will appear in the Map Objects menu but it will not appear on the map.
- A black shutter icon next to the photo name in the Map Objects menu indicates that a photo does have GPS data. The photo will appear in the Map Objects menu and on the map at the specified coordinates as long as “Thumbnail” is turned on in Settings.
Note: When uploading photos using the Safari browser, location data is automatically stripped out. This is a built-in privacy feature in Safari and cannot be changed through browser settings.
Coordinates for a photo on the map can be added or edited at any time via the Coordinates field in the Edit Photo dialog. You can type coordinates into the coordinates field, manually move the photo on the map, or click the green plus sign next to the coordinates field to autofill the coordinates from the center of the map viewer. Please note that this only changes the coordinates for the photo on the map; it does not change the GPS data associated with the photo.
Attached vs Unattached Photos
When you add a photo to a map, you can either add it to the map itself or attach it to a specific map object on the map.
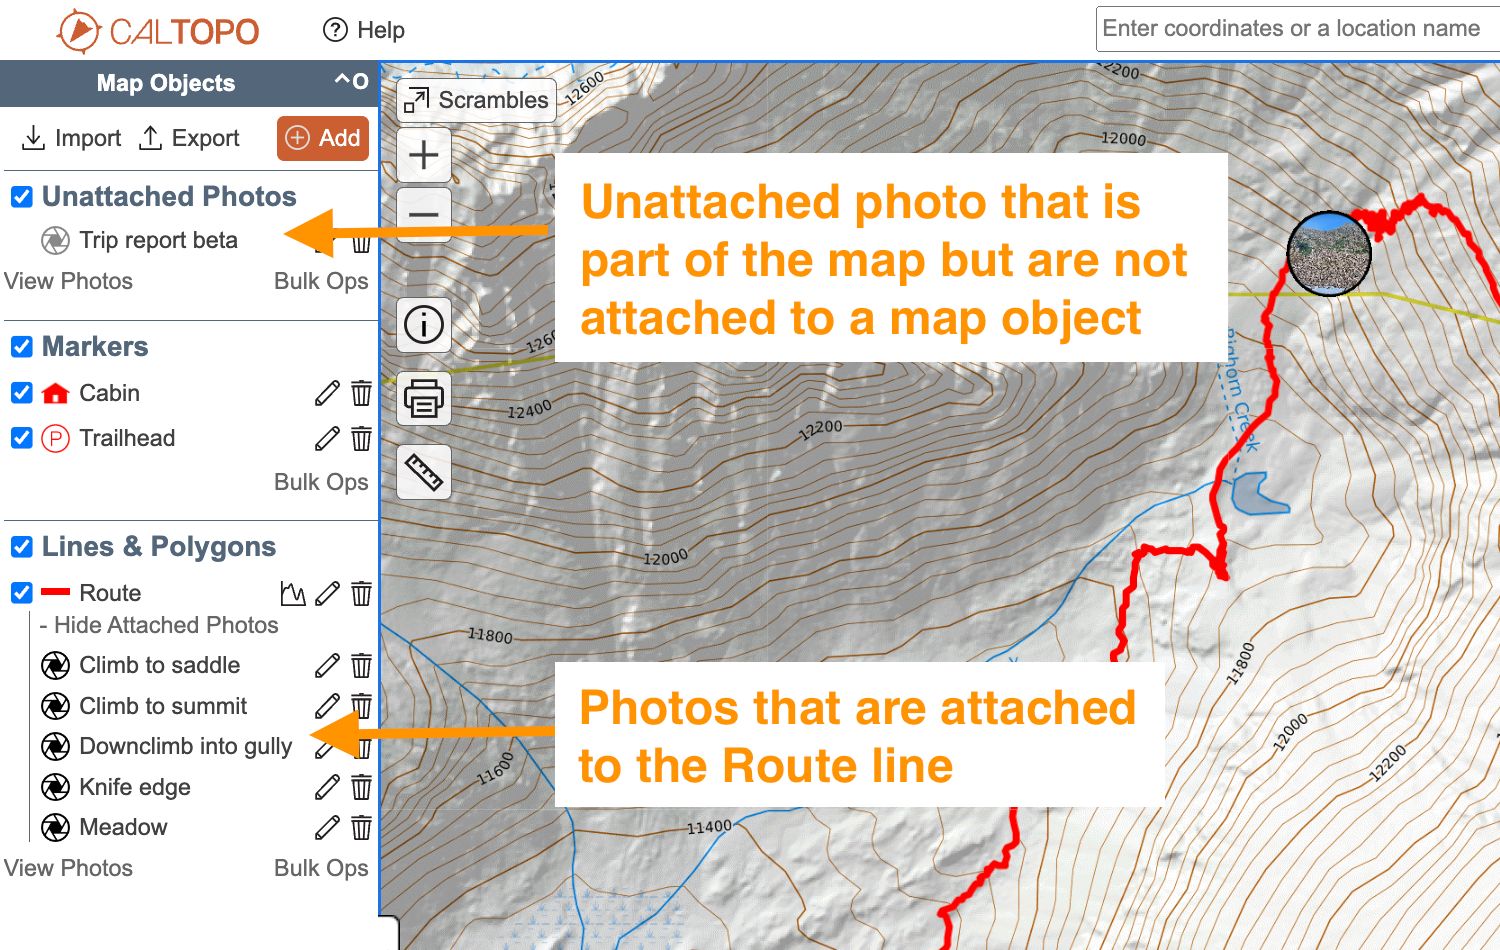
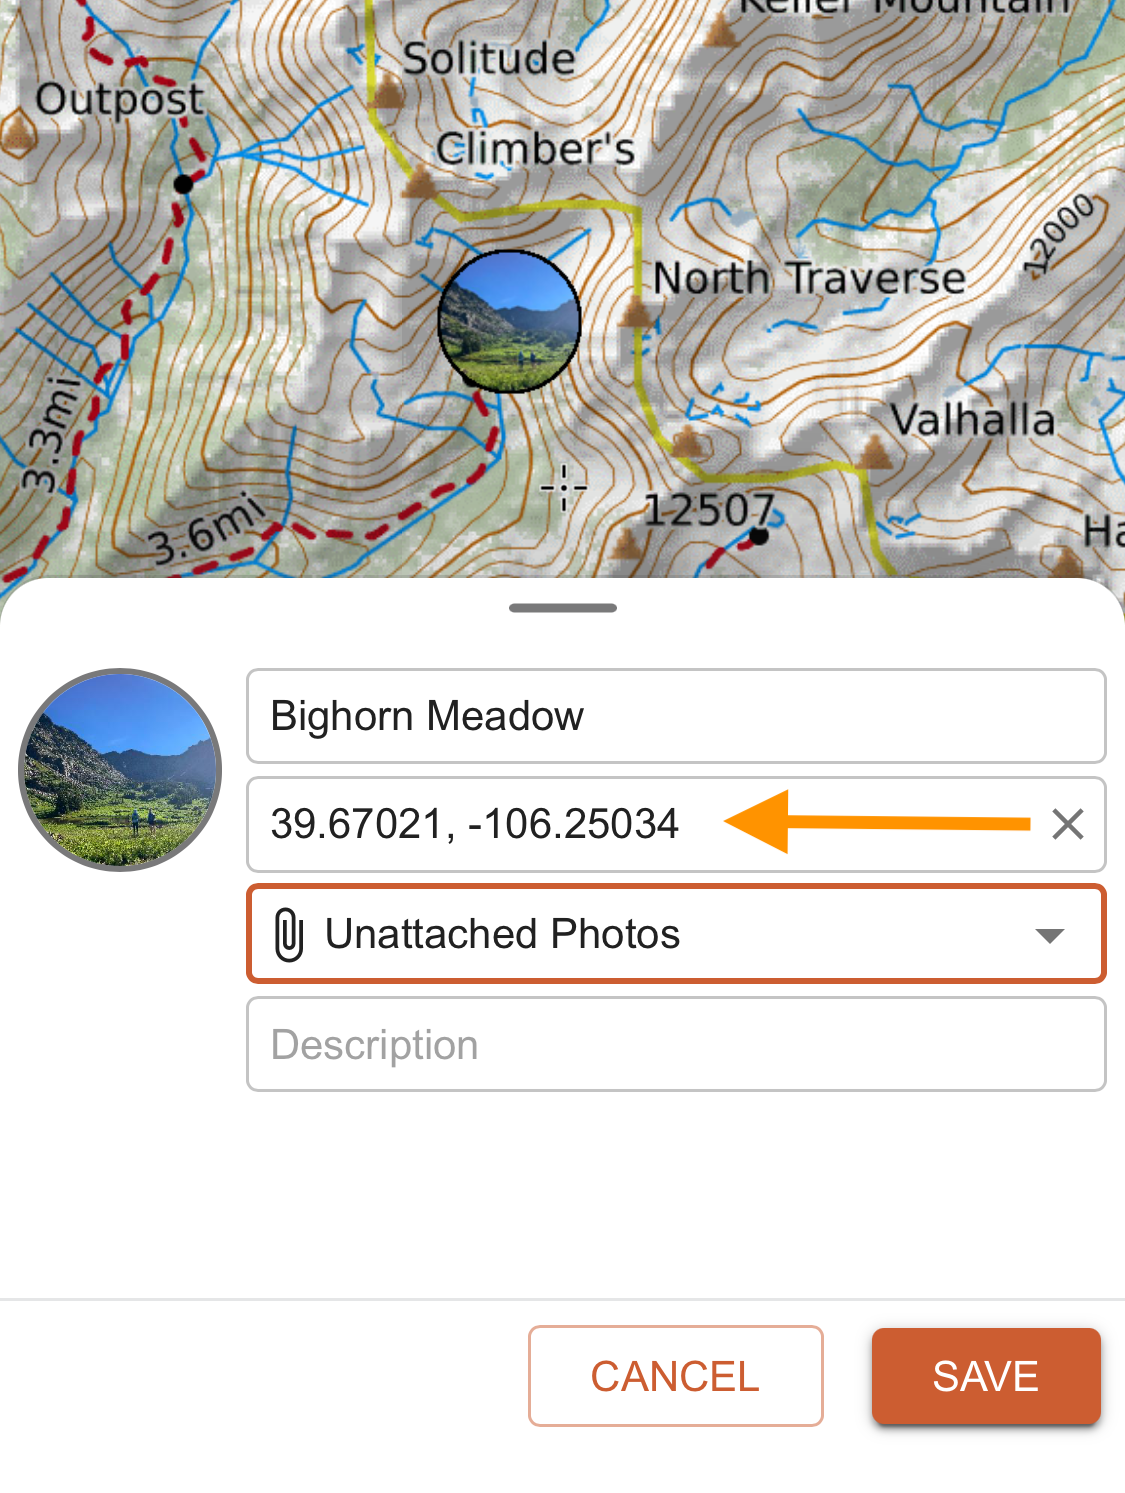
Unattached photos are saved to the map but are not attached to any specific map object. All unattached photos will appear in the Unattached Photos folder in the Map Objects menu. If an unattached photo has GPS data, it will also appear at those coordinates on the map.
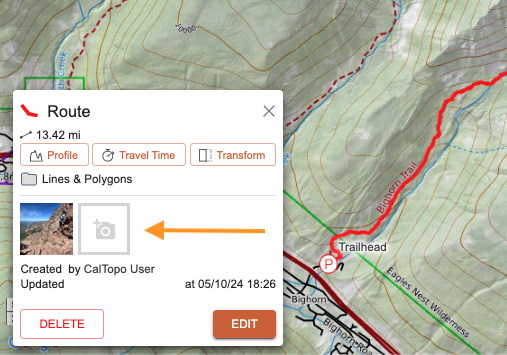
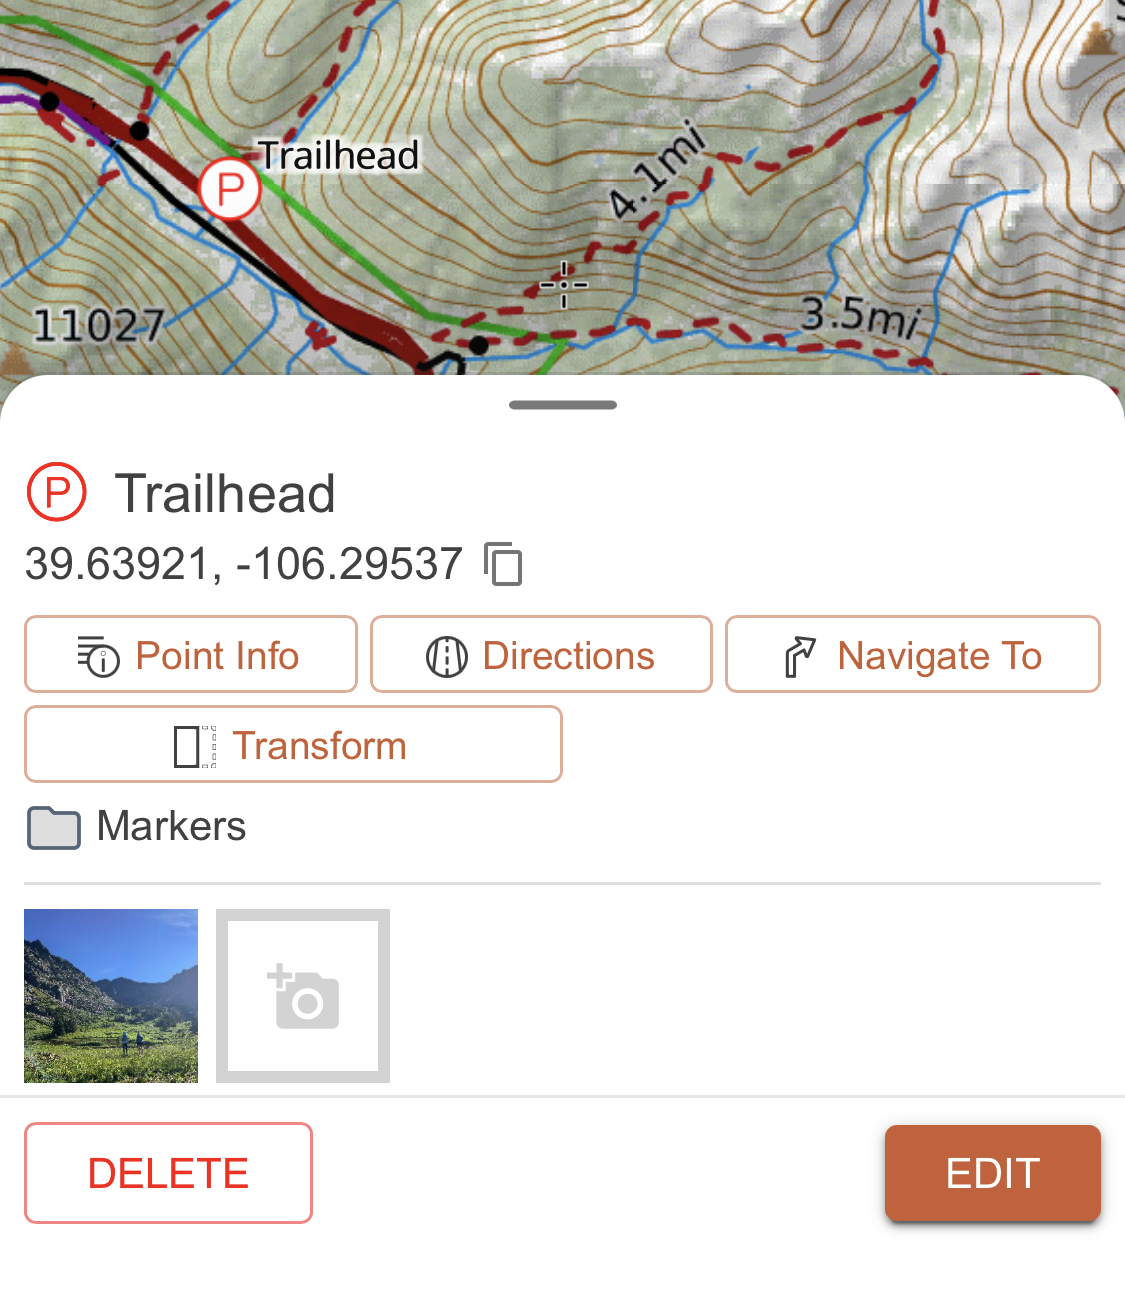
Attached photos are attached to a specific map object. Photos can be attached to markers, lines, polygons, buffers, folders, and recording tracks. If a map is in SAR mode, photos can also be attached to clues and assignment objects. Attached photos appear in the Map Objects menu under the object they are attached to, on the map if they have GPS data, and as thumbnails in the map object dialog.
How to Add a Photo to a Map
You need a pro, desktop, or team subscription to add photos to your own map or a shared map. If you are working with a shared map, you will need Update or higher permission to add photos to that map. Users with a free or mobile account who have access to a shared map will be able to view any photos that are attached to that map; however they will not be able to edit those photos or add their own, regardless of the permission level they have for the map.
You can add up to 10 photos at one time. There are three ways to add a photo to a map:
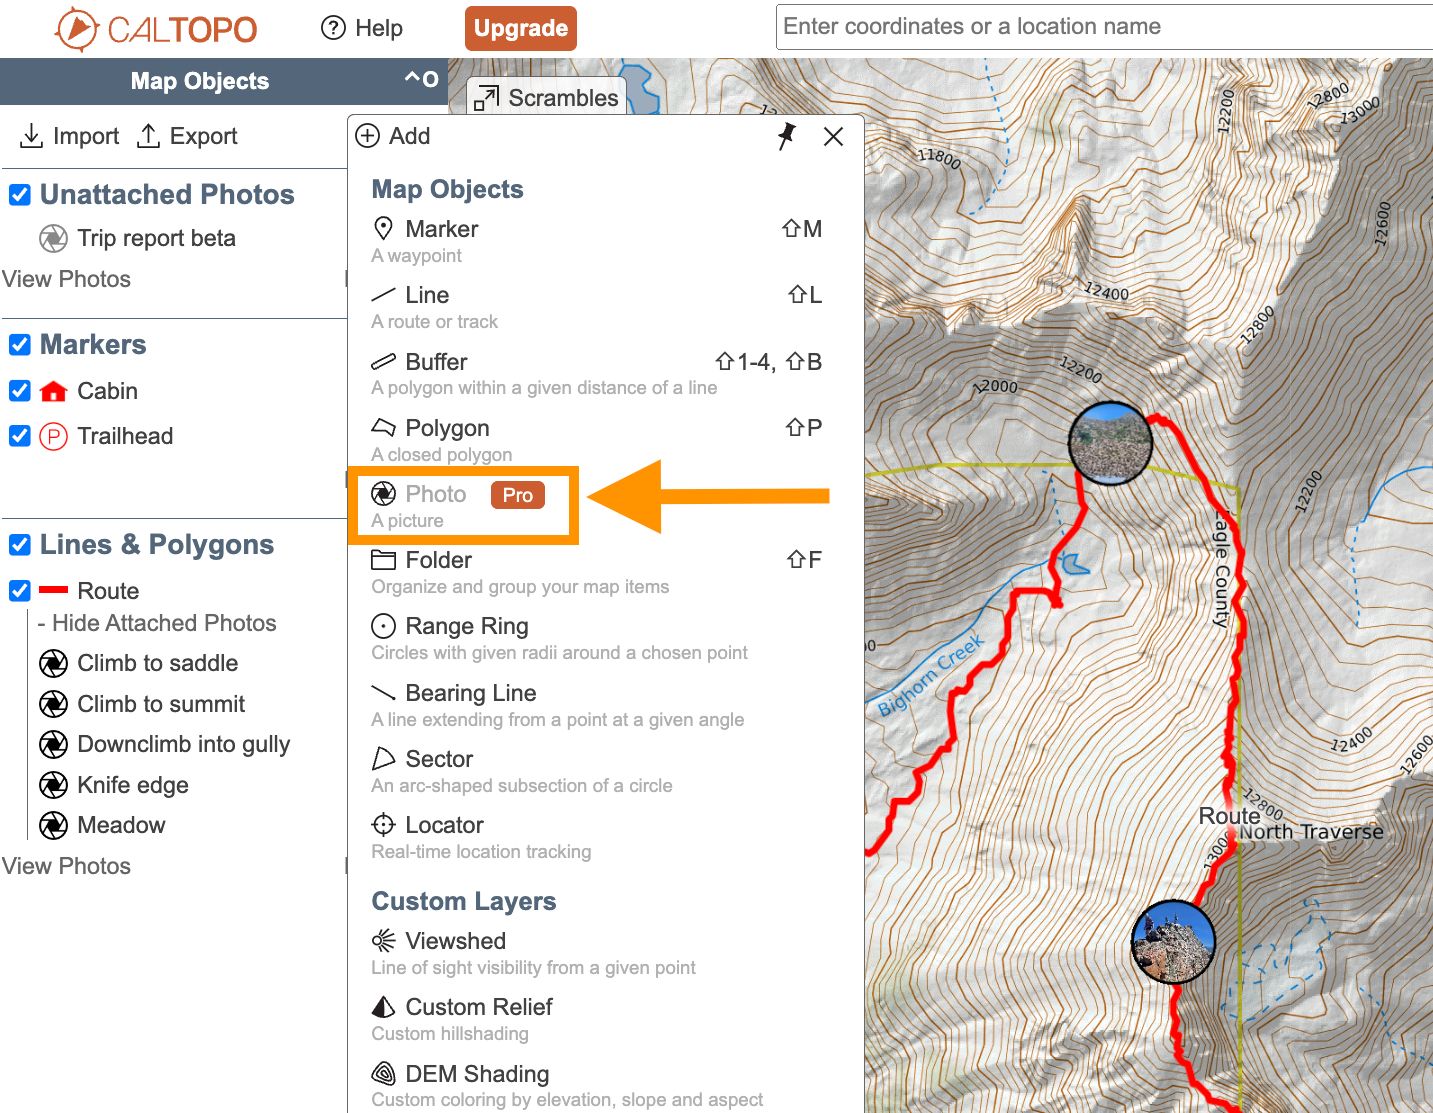
1. Add a photo to your map via the +Add menu. This is a great option if you want to add a photo to your map but do not want to attach it to a map object. To add a photo via the +Add menu, click the orange +Add menu button at the top of the Map Objects menu and choose Photo.
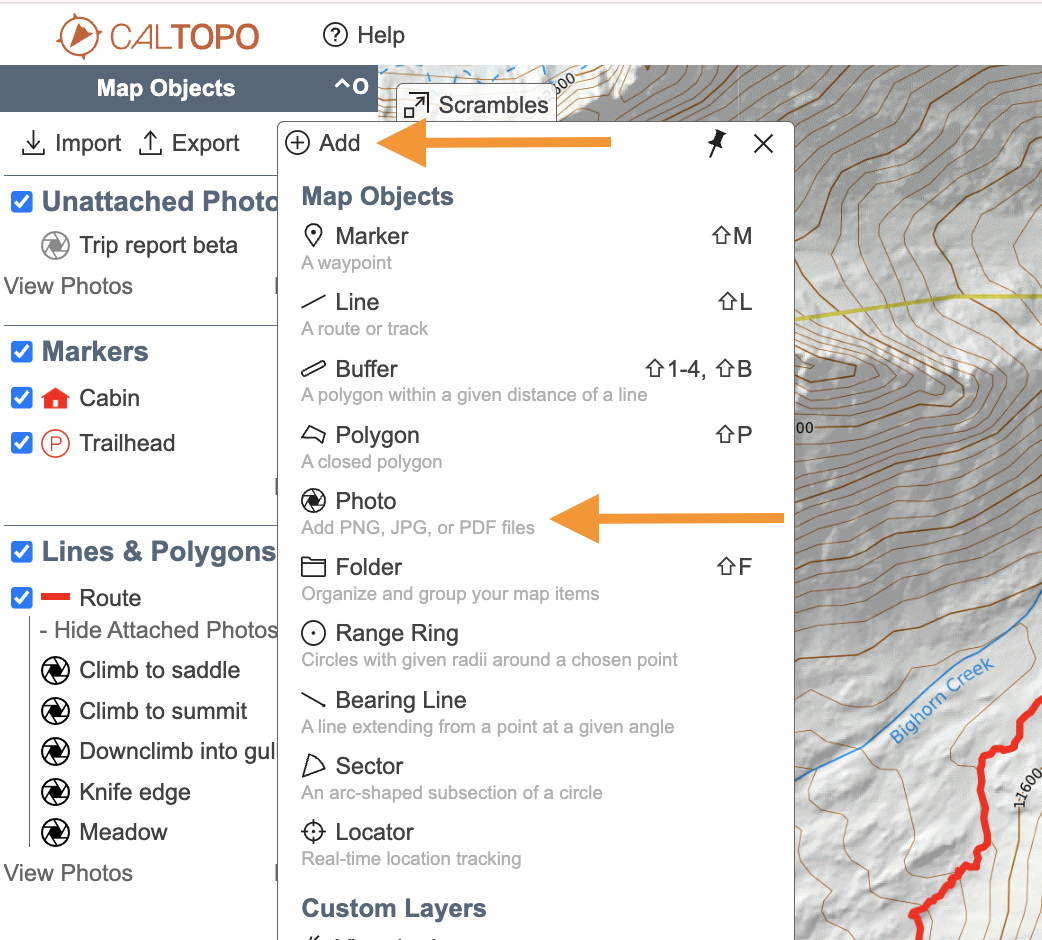
Select the file that you wish to add to your map and the edit photo dialog will appear with a thumbnail of the photo. Update the label, comments, and coordinates as desired. By default, photos added via the +Add menu will not be attached to any map object. If you wish to attach a photo to an existing map object, select the object from the Attached to dropdown menu.
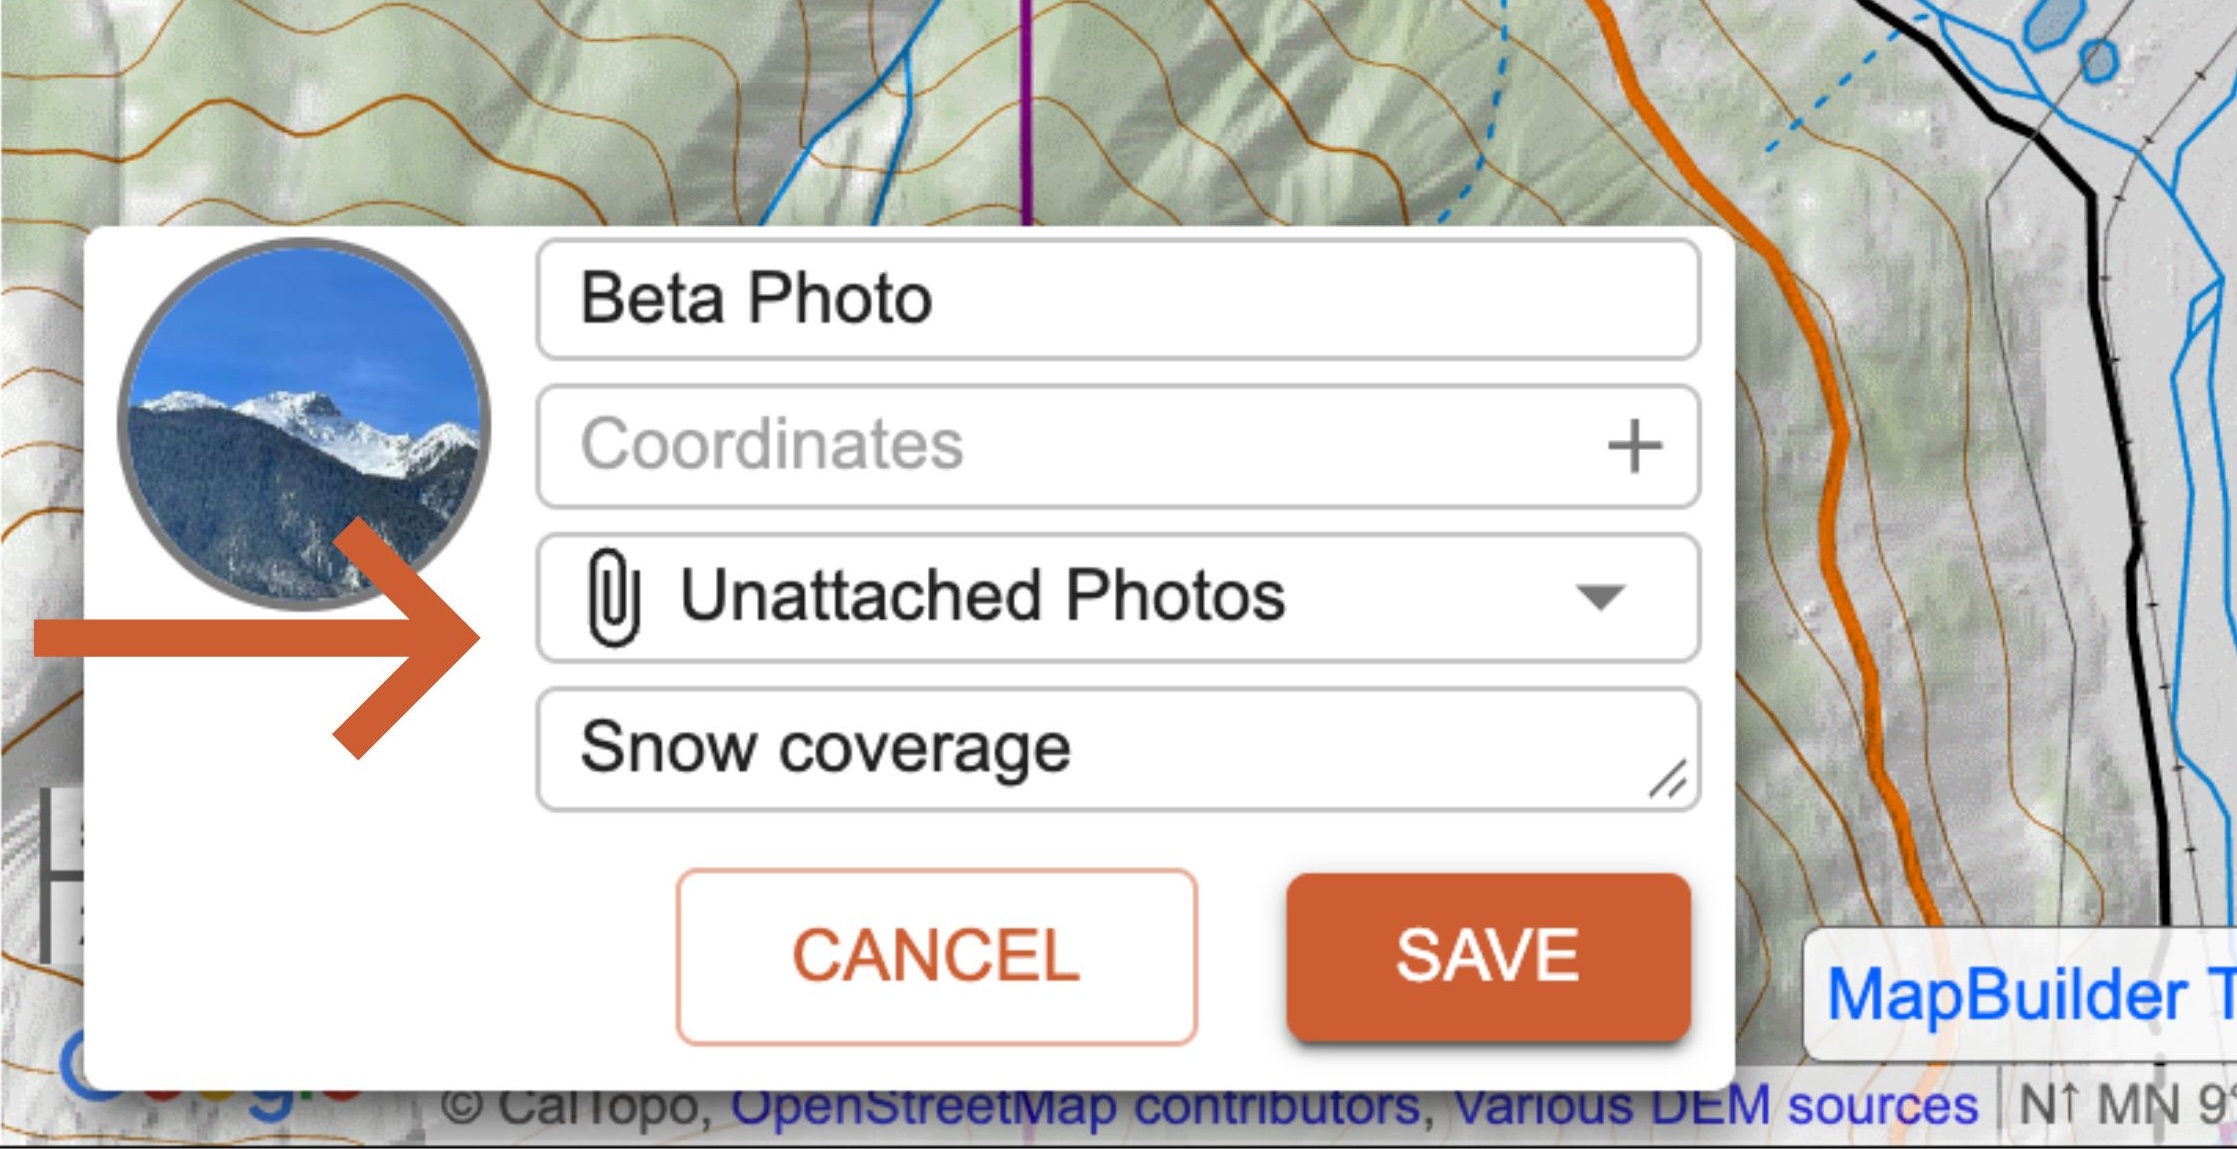
Click Save and your photo will be added to the map, Map Objects menu, and/or map object dialog depending on the settings you selected.
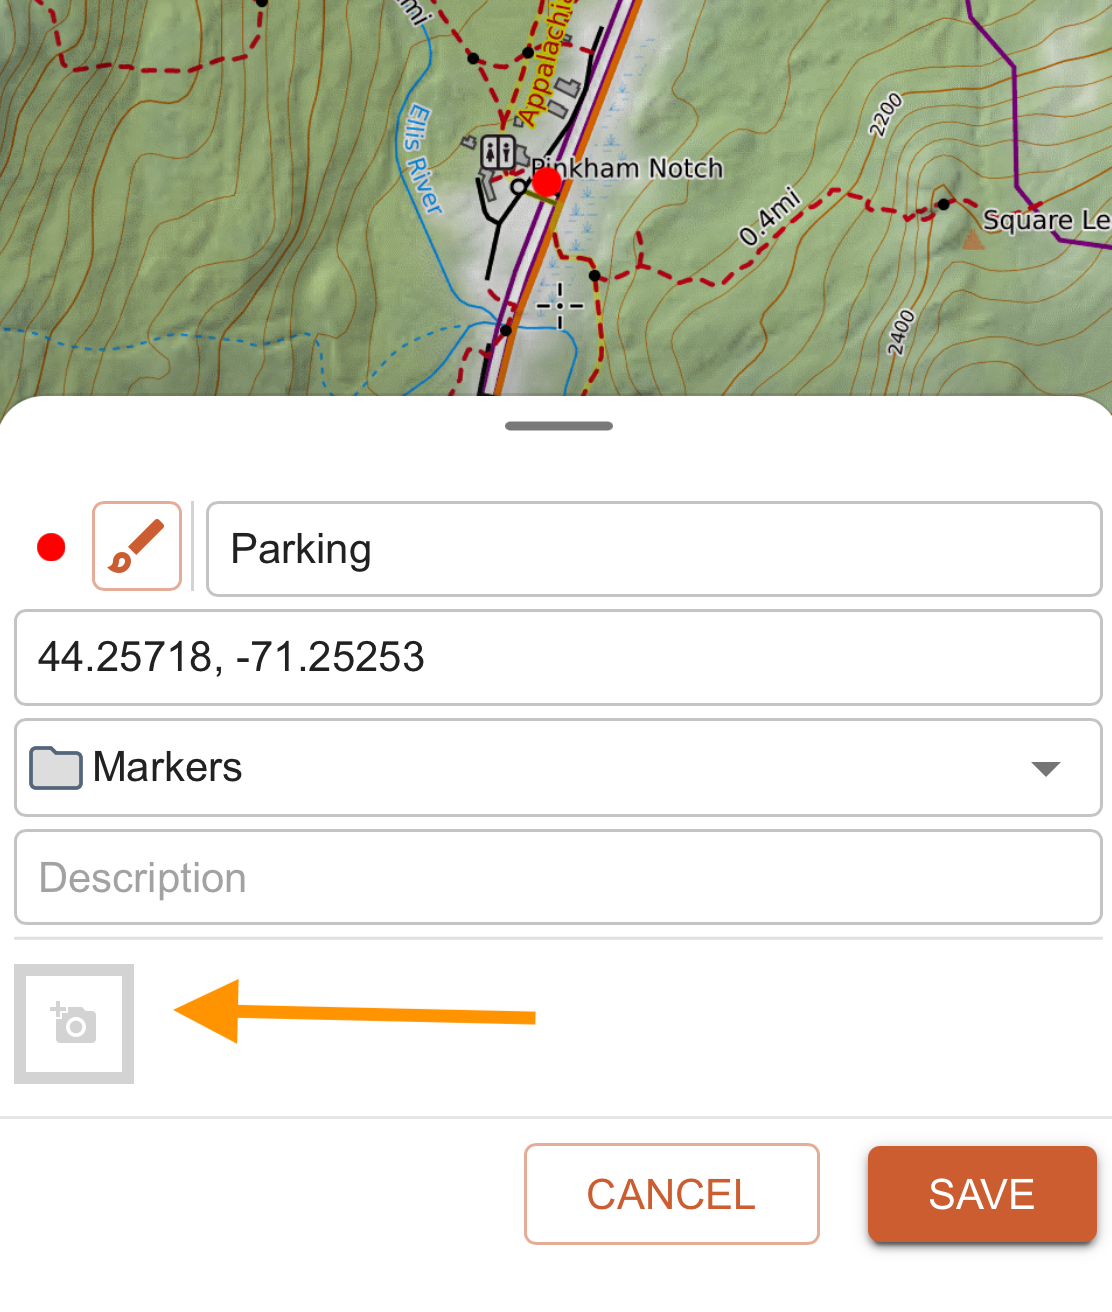
2. You can add a photo via the right click menu. This is a good choice if you want to upload a photo at a specific location but don’t want to attach it to a map object. To add a photo via this method, right click a point on the map and select Photo from under Add Object Here.
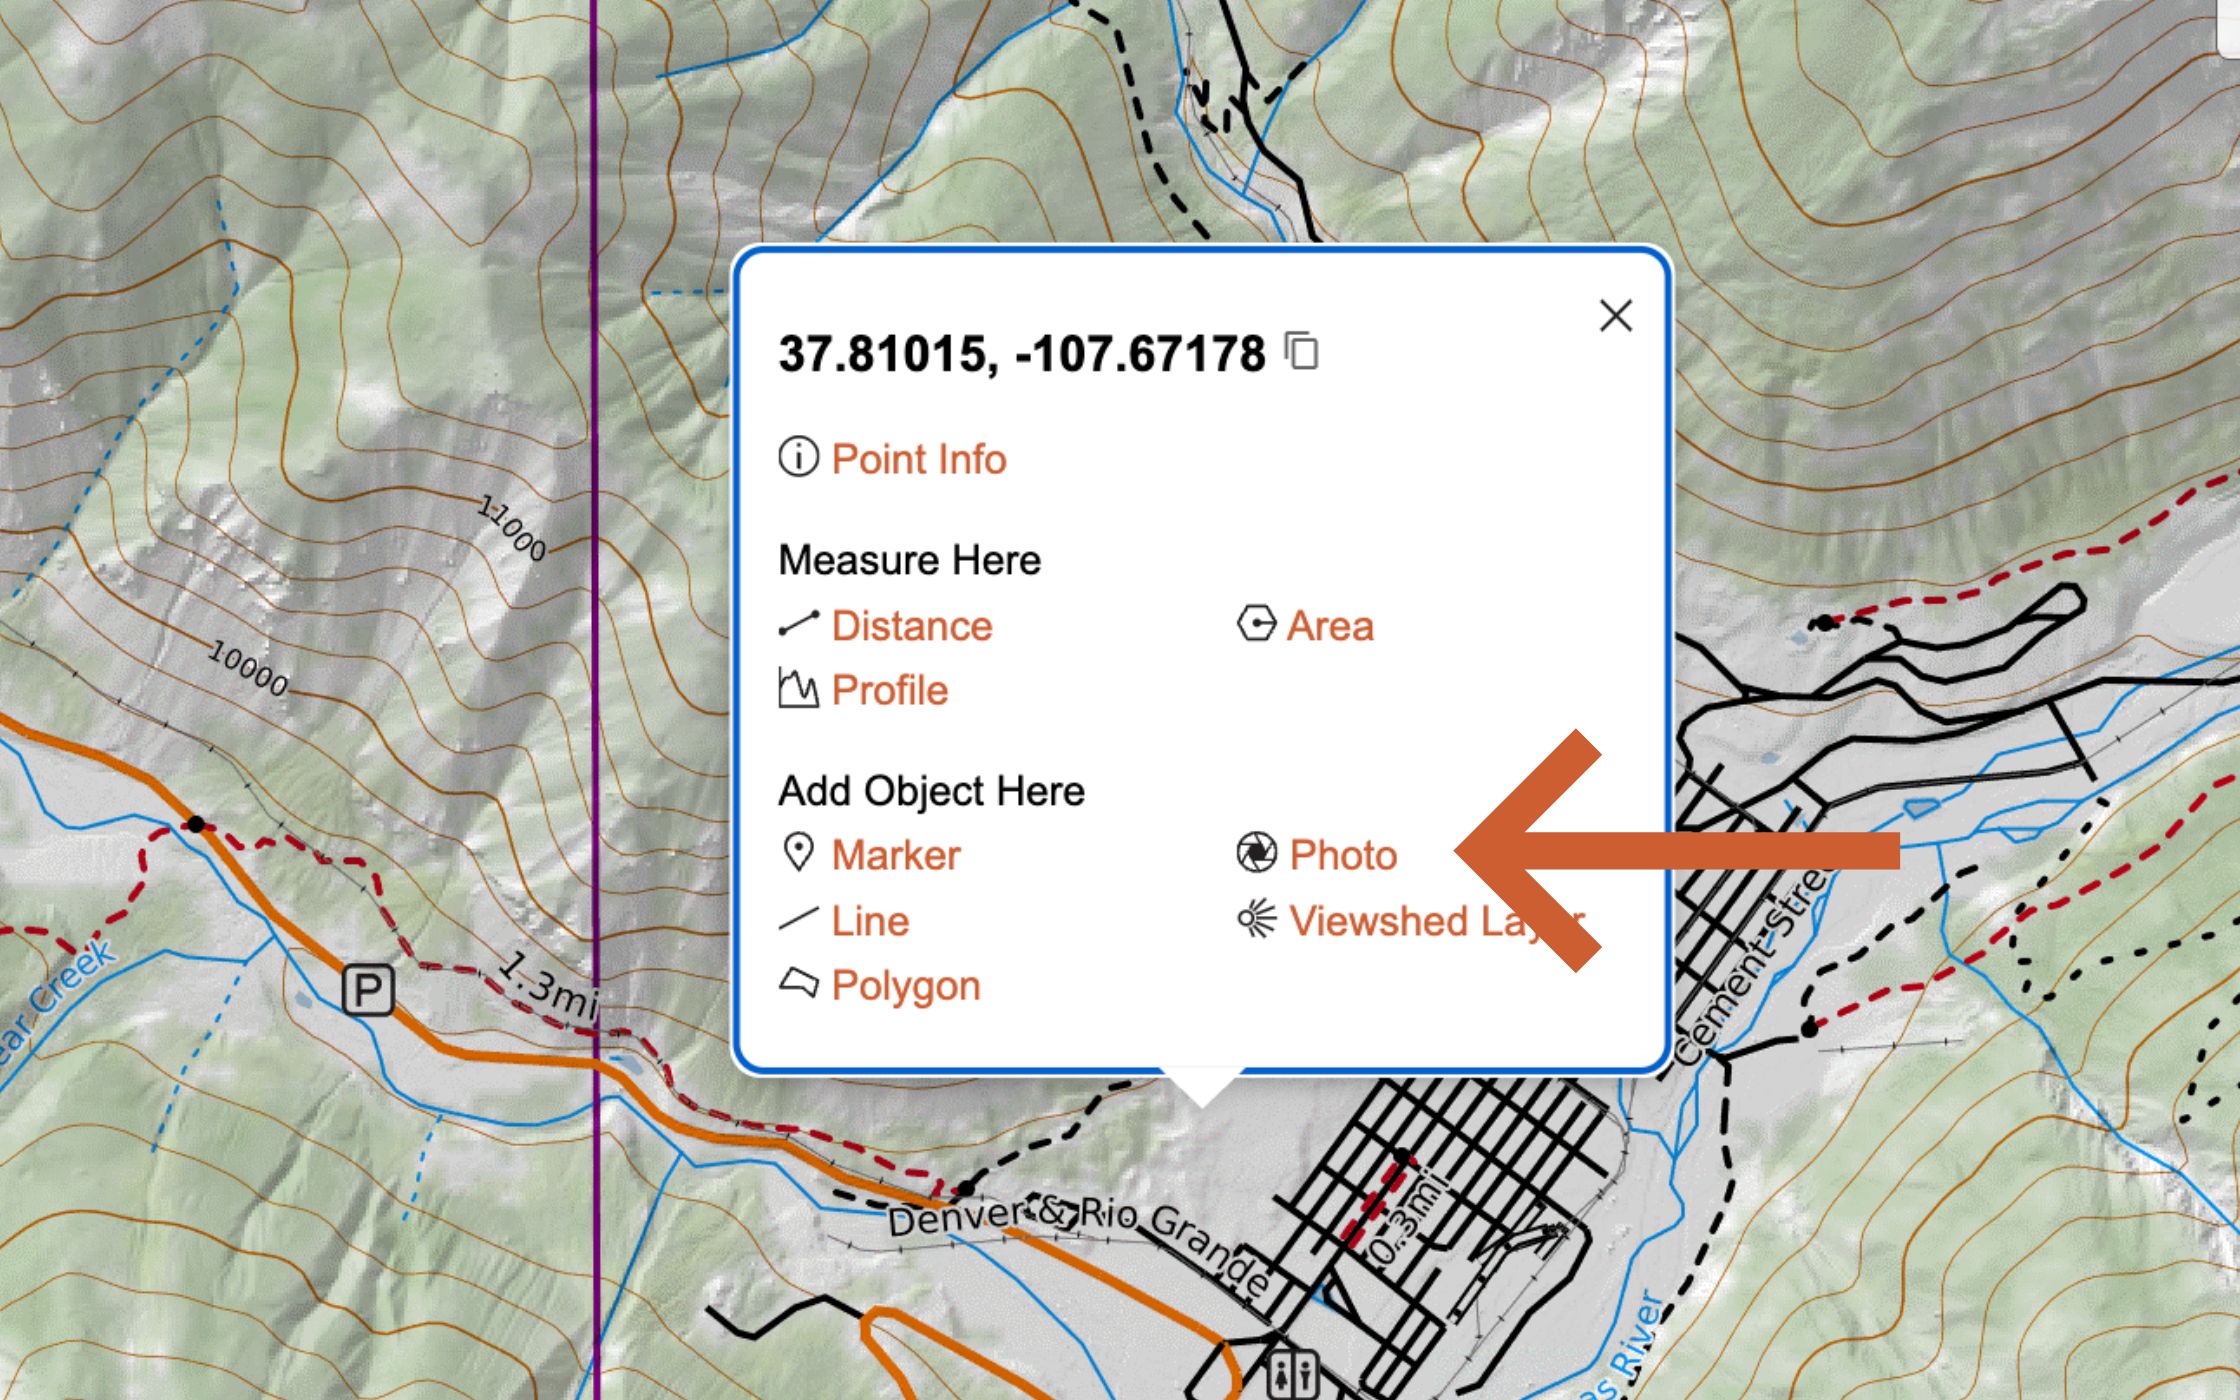
Select the file you wish to add to your map and the edit photo dialog will appear with the coordinates prefilled for the location that you right clicked. Update any of these fields and then click OK.

Your photo will be added to the map, Map Objects menu, and/or map object dialog depending on the settings you selected.
3. You can add photos by attaching them directly to a new or existing map object.
If you are adding a photo or existing map object, first create the map object via the +Add menu or right click menu. Then click the add photo icon in the edit object dialog.
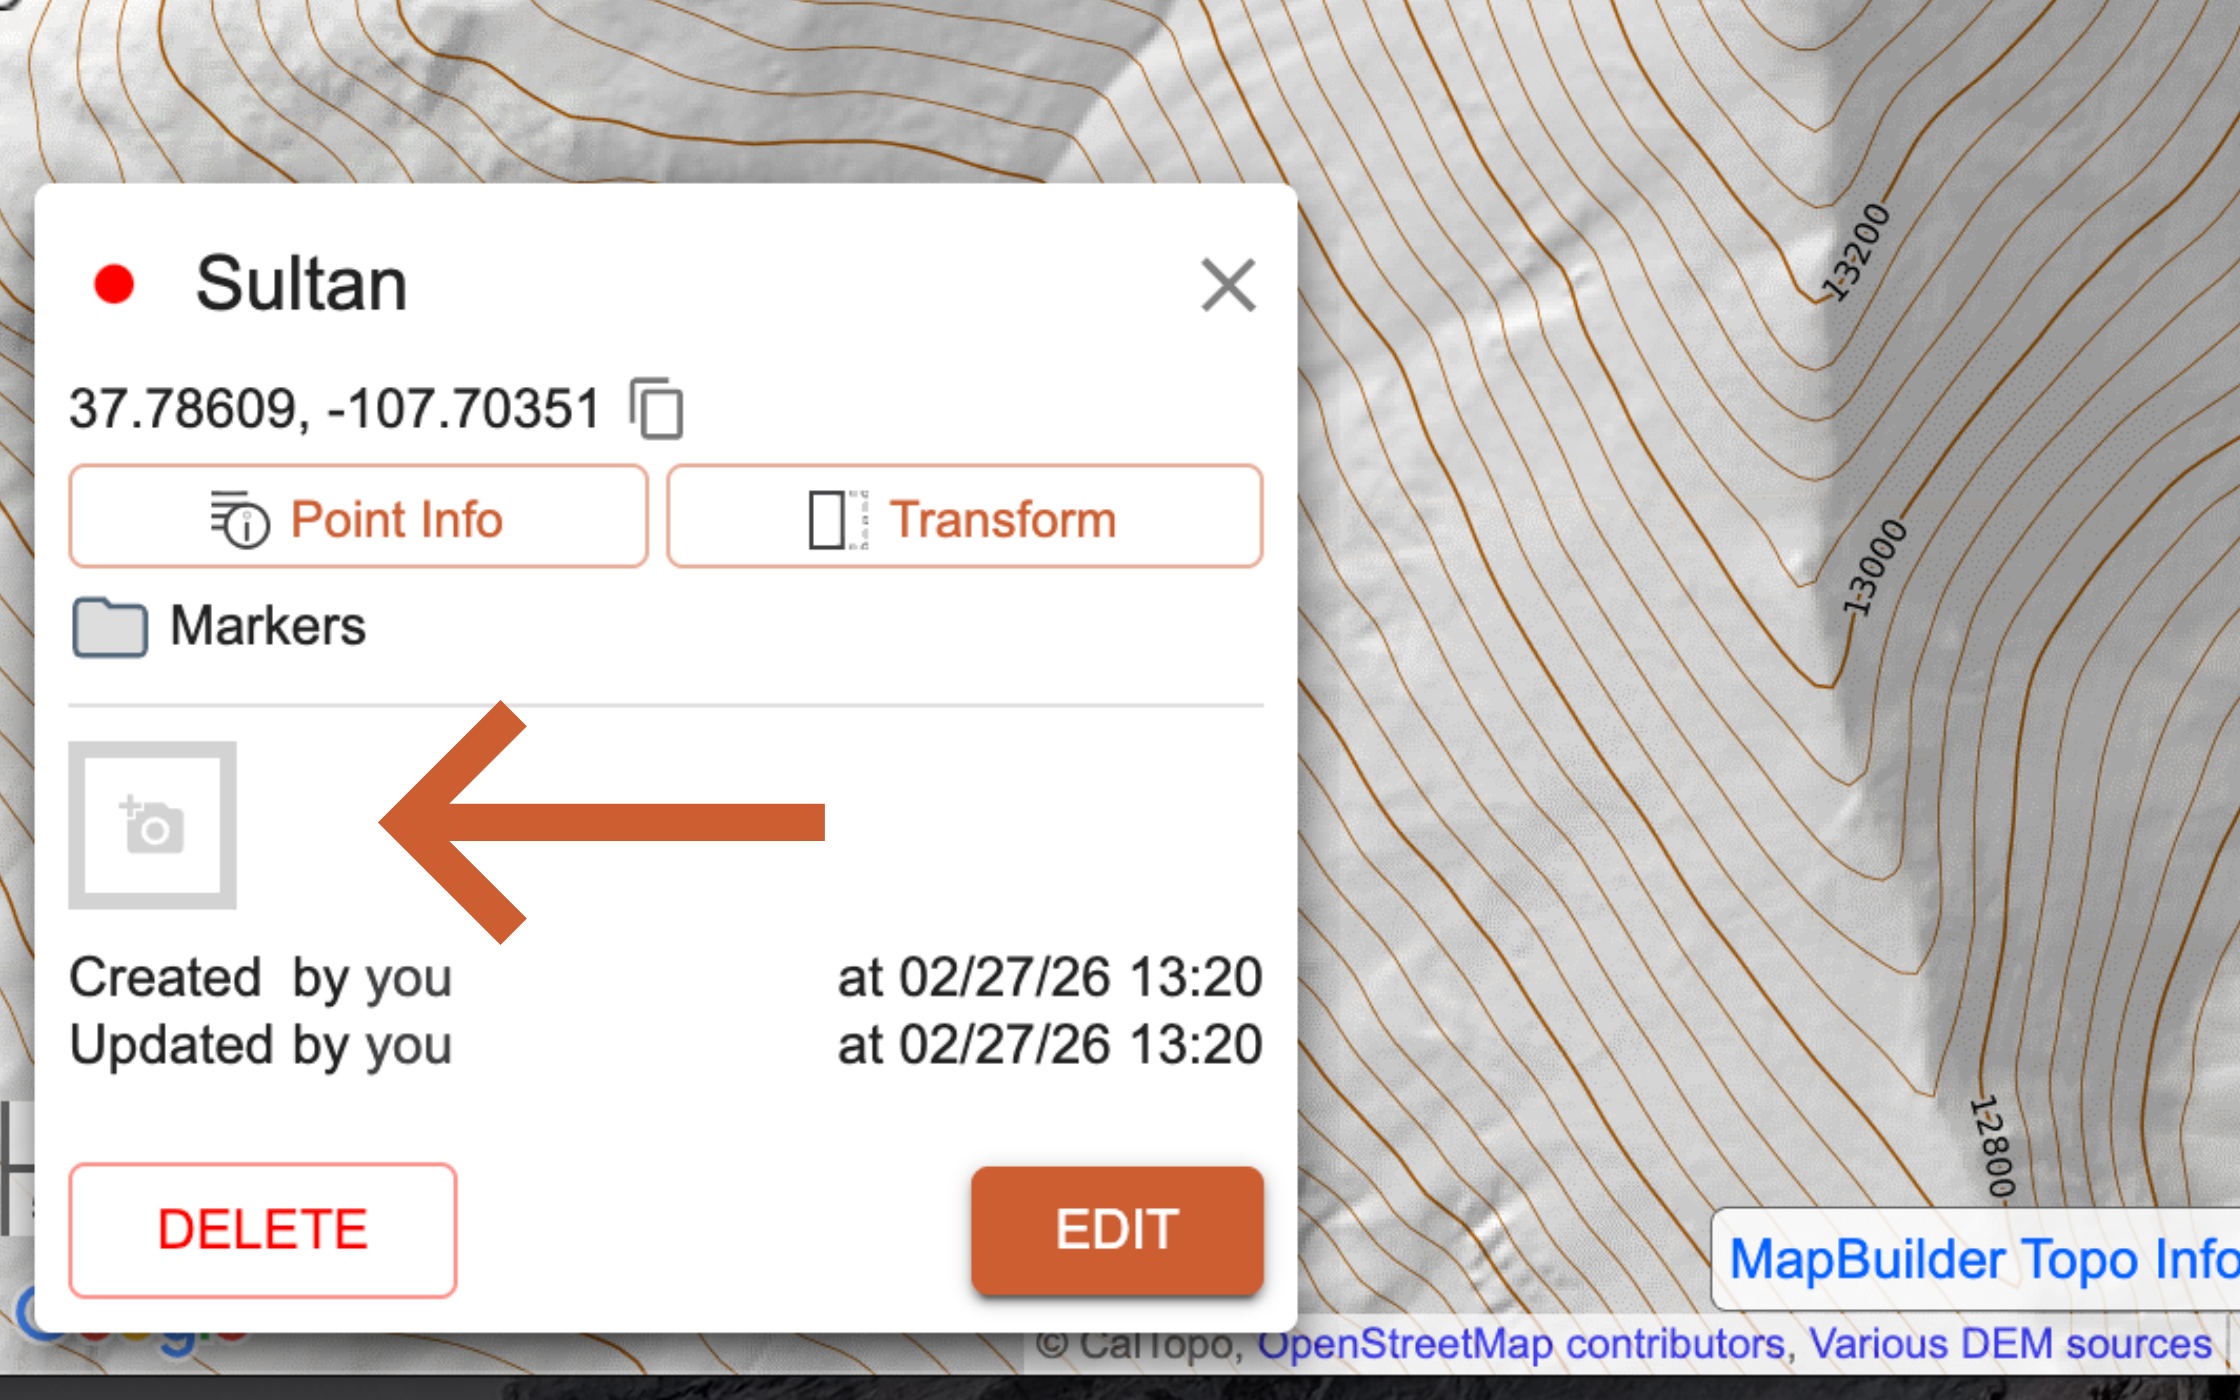
Select the file you wish to attach to the object and the attached media will be displayed at the bottom of the object dialog.
If you are adding a photo to an existing map object, click the object to open the map object dialog and select the add photo icon. Select the file you wish to attach to the object and the photo will be attached to the map object.
How to Add a Photo on the Mobile App
The first time you take a photo, you will be prompted to grant CalTopo camera permission and location permissions. Photos uploaded from a mobile device will contain GPS data as long as location settings are enabled and location permissions are granted. This access can be updated anytime in your device settings.
You can upload photos via the mobile app from three photo sources on your device:

Photos can be added to a map via the mobile app in five ways:
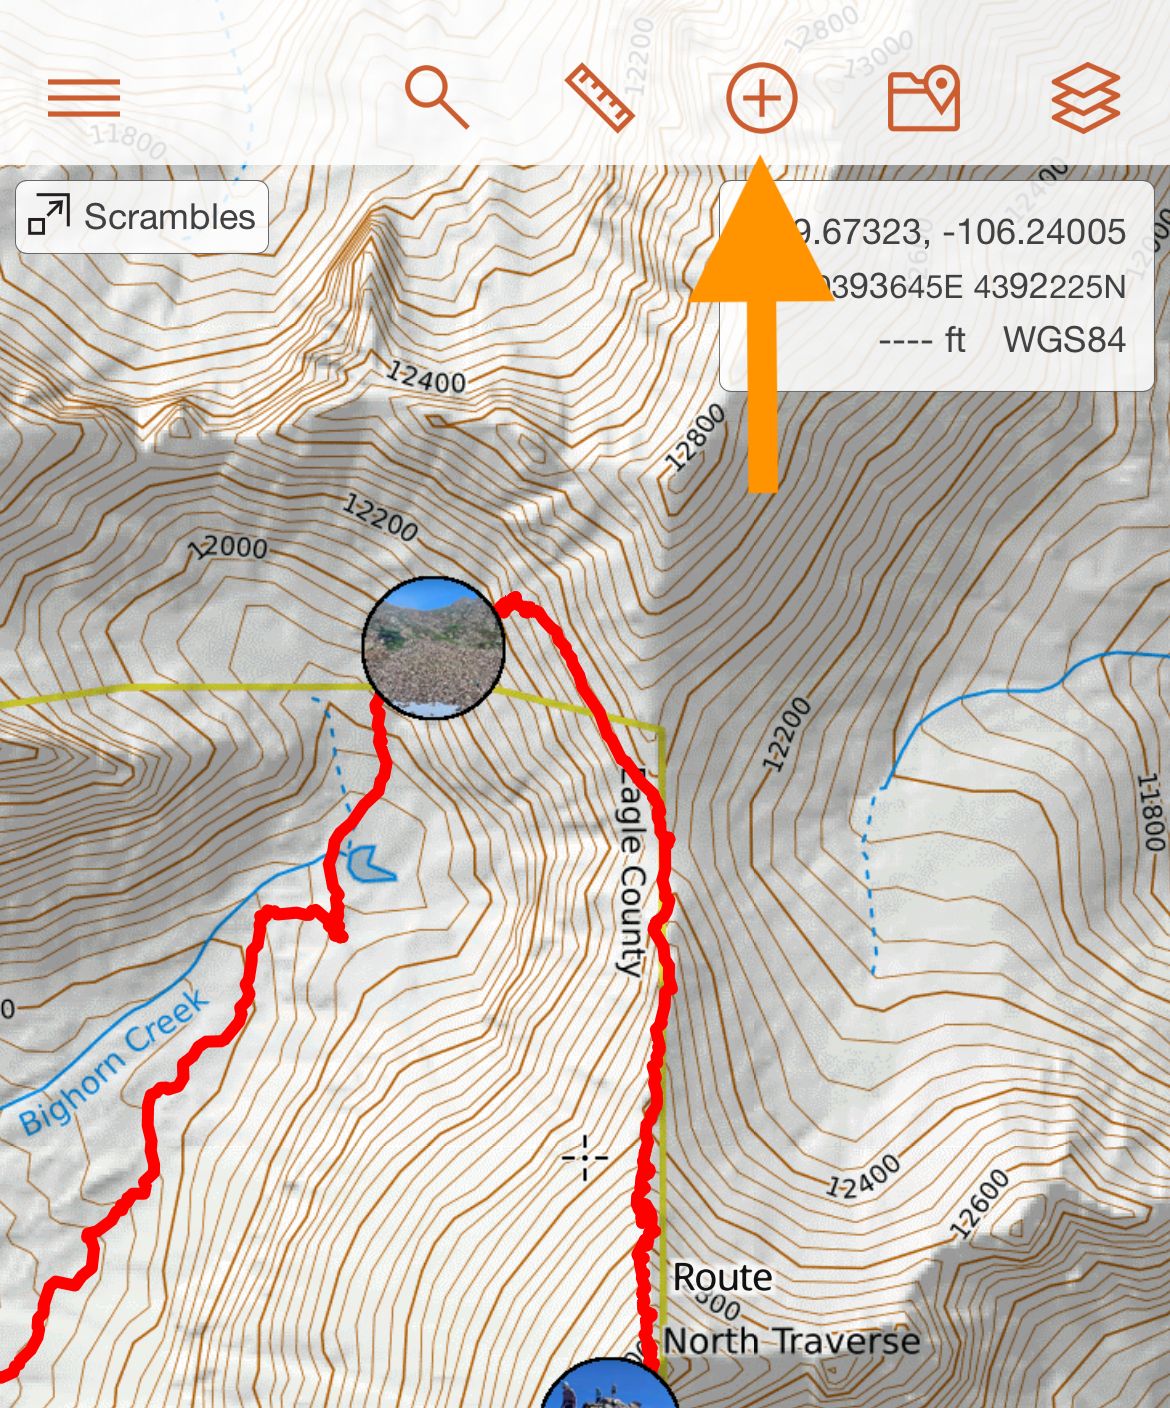
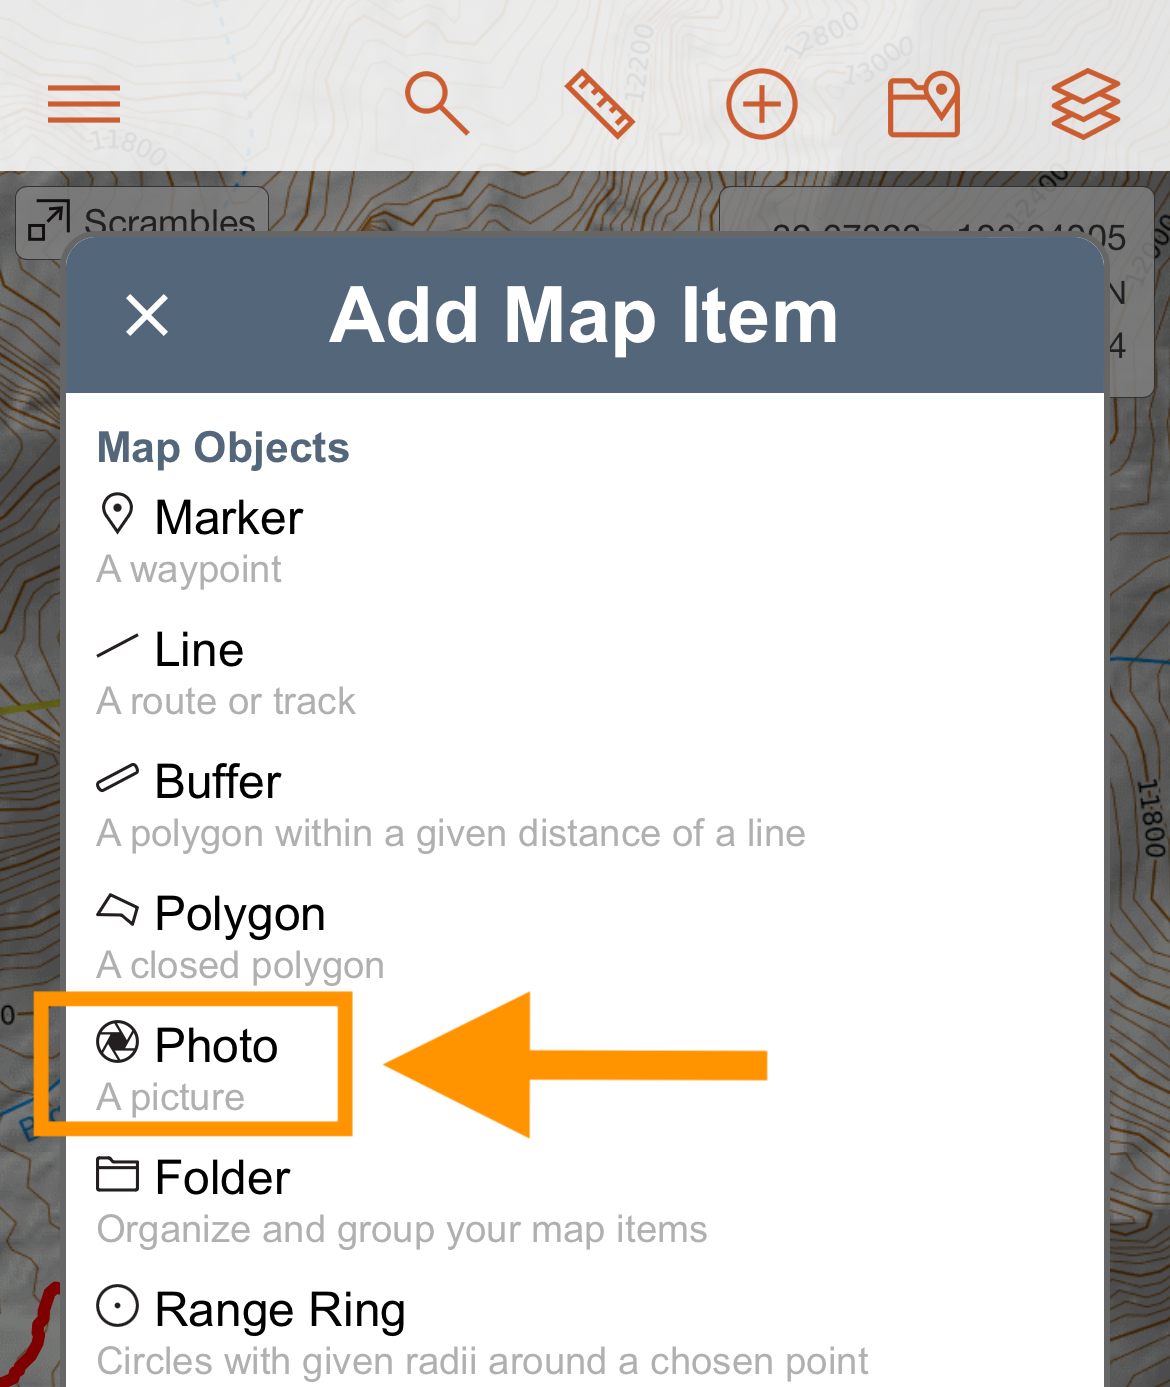
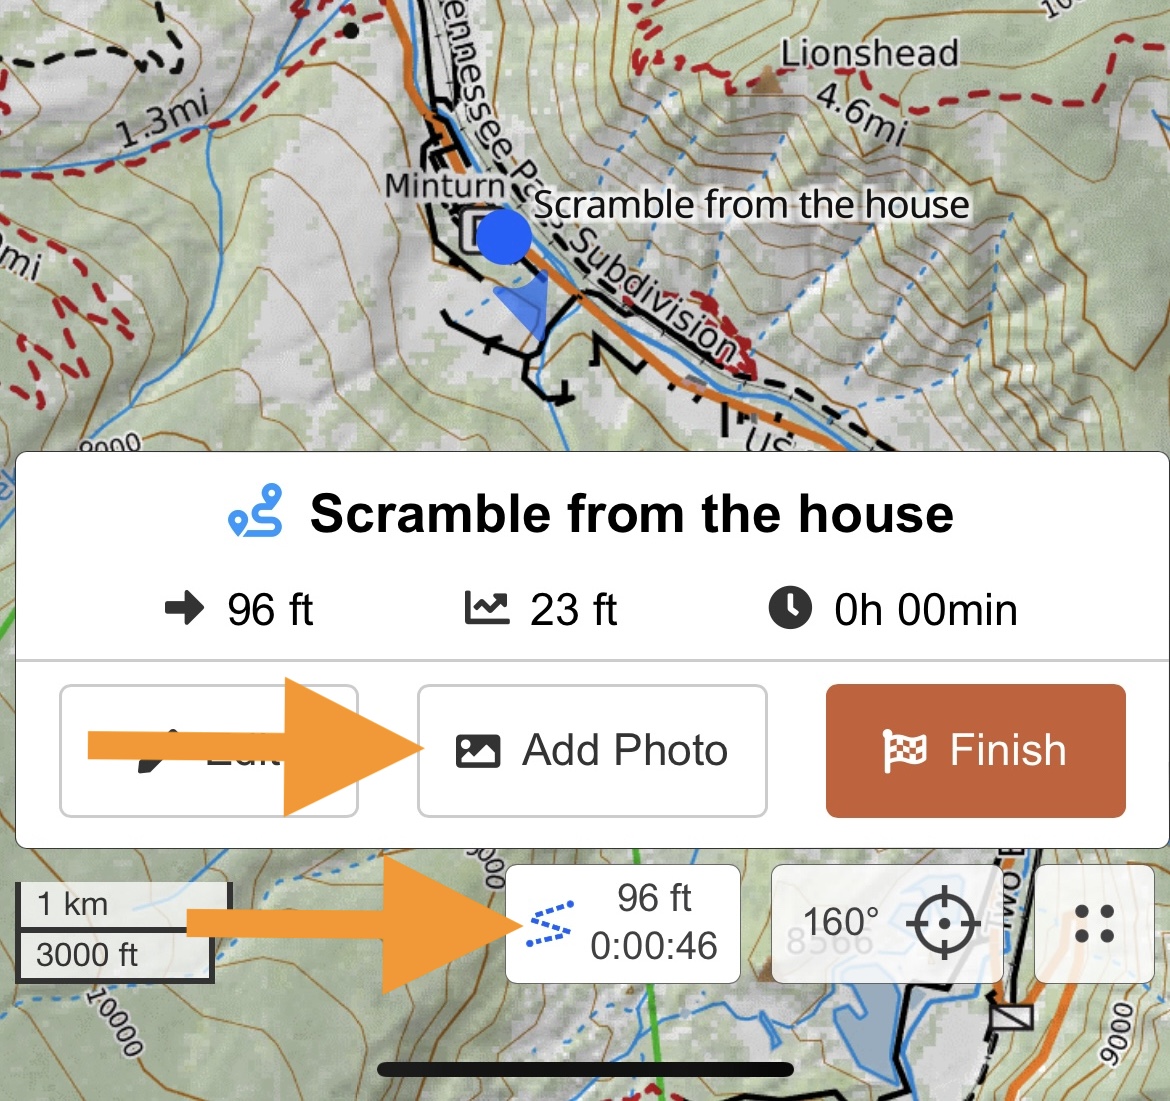
1. Add a photo to your map via the +Add Map Items menu. This is a great option if you want to add a photo to your map but do not want to attach it to a map object. To add a photo via this menu, tap on the orange + icon along the top of the mobile map viewer and select Photo. Select the desired photos source and upload your photo.
The edit photo dialog will appear with a thumbnail of the photo. Update the title, description, and coordinates as desired. By default, photos added via the +Add menu will not be attached to any map object. If you wish to attach a photo to an existing map object, select the object from the dropdown menu.
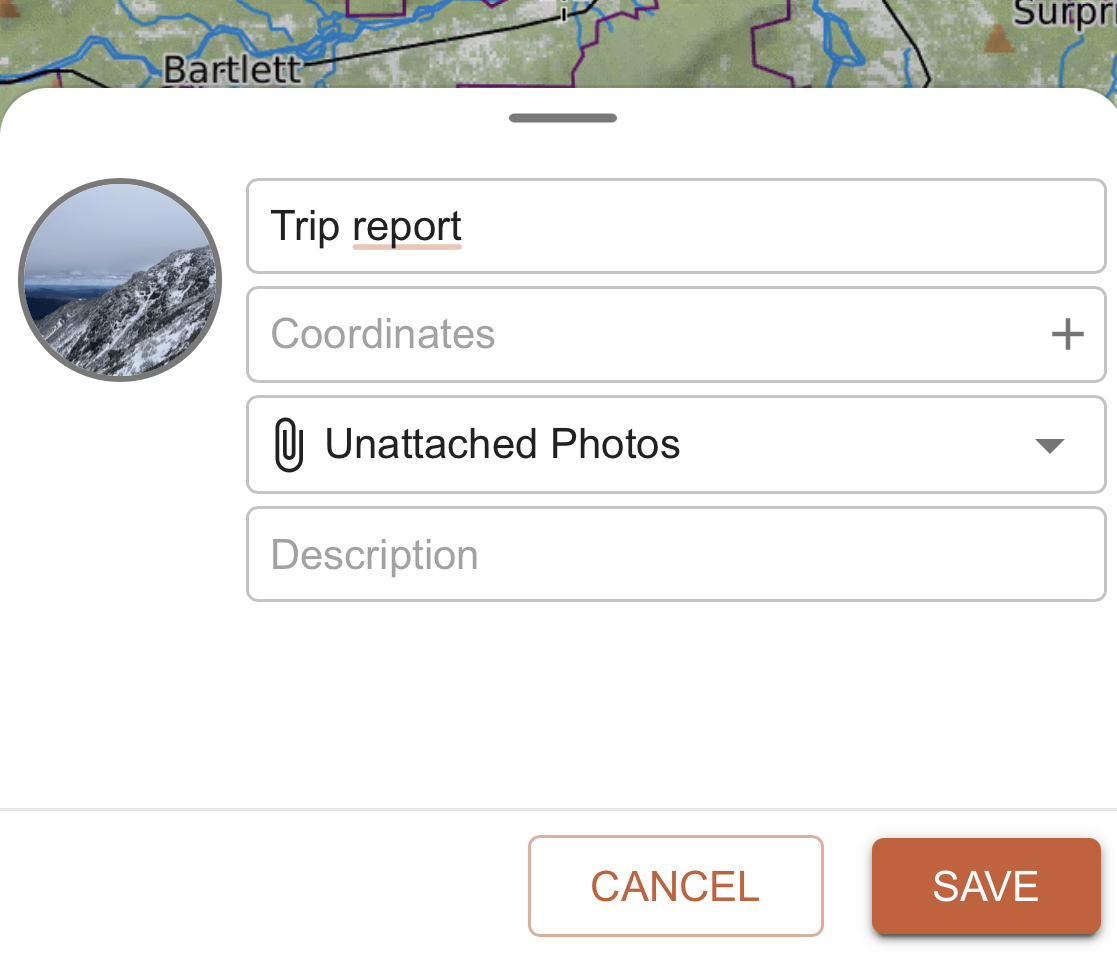
Tap Save and your photo will be added to the map, Map Objects menu, and/or map object dialog depending on the settings you selected.
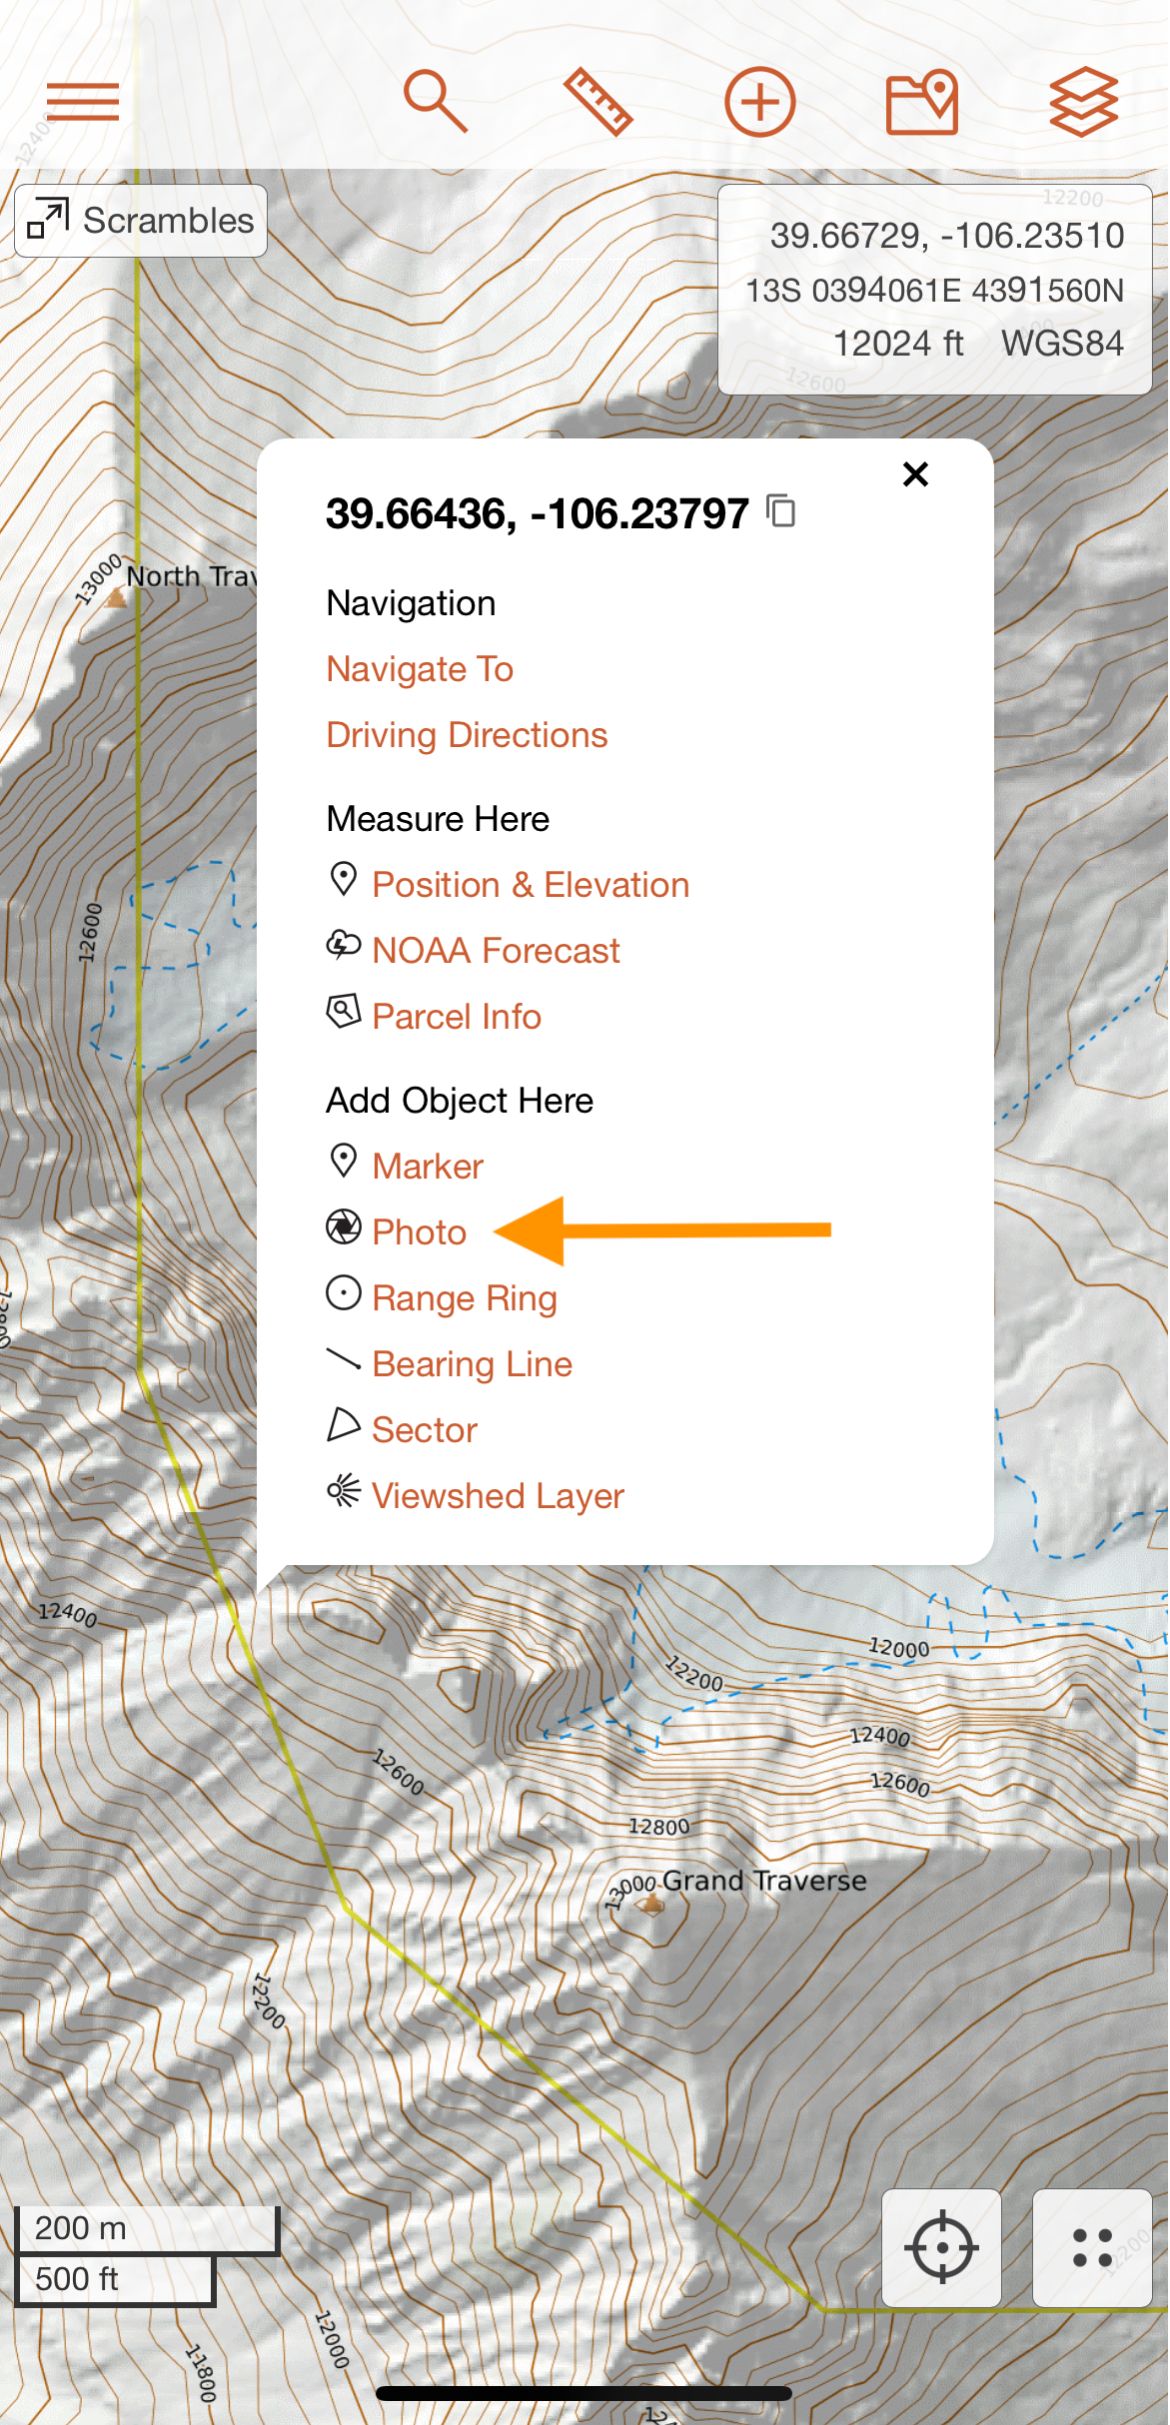
2. You can long press to add a photo. This is a good choice if you want to upload a photo at a specific location but don’t want to attach it to a map object. To use this option, long press on a point on the map and select Photo from under Add Object Here. Choose the desired photo source and upload your photo.
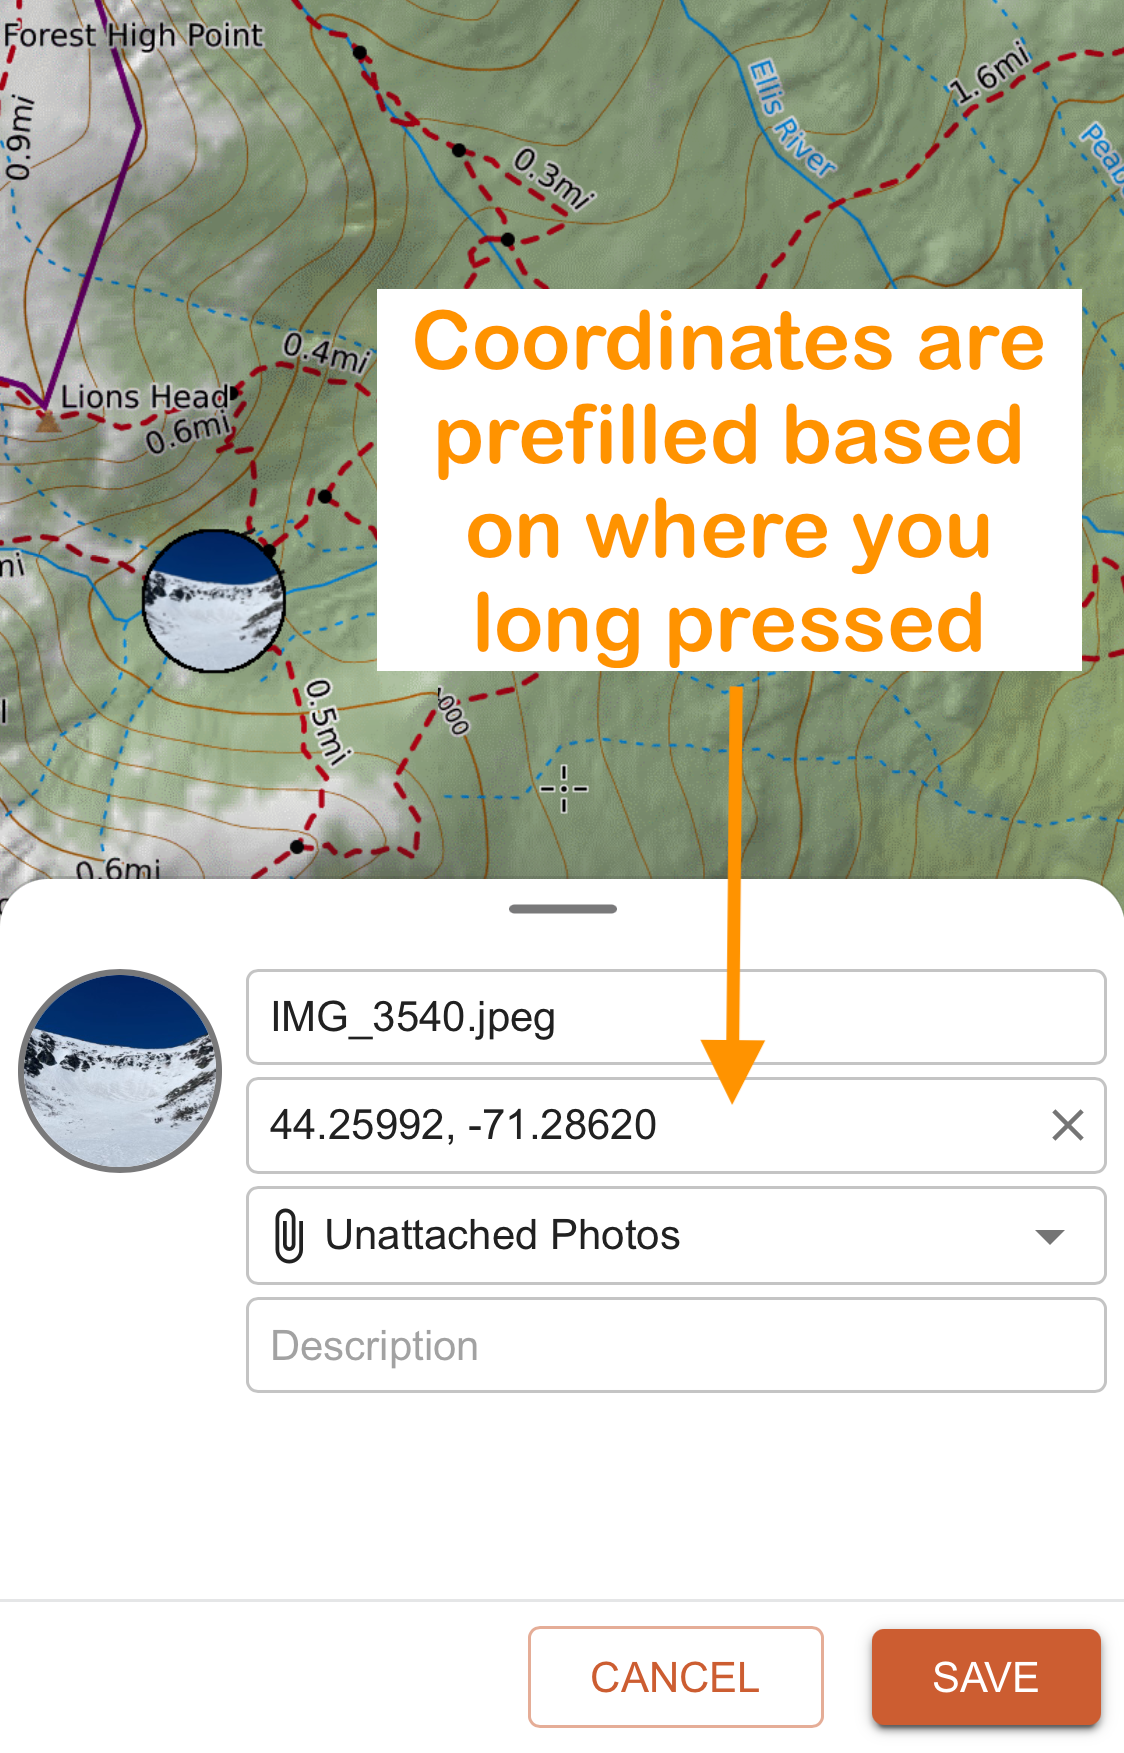
The edit photo dialog will appear with the coordinates prefilled for the location that you long pressed. Update any of these fields and then tap Save.
Your photo will be added to the map, Map Objects menu, and/or map object dialog depending on the settings you selected.
3. You can add photos by attaching them directly to a new or existing map object.
If you are adding a photo to a new map object, first create the map object via the +Add menu or long press menu. Then tap the add photo icon in the edit object dialog. Select the desired photo source and upload your photo.
The attached media will be displayed at the bottom of the object dialog. Tap Save to add the map object along with the attached photo to your map.
If you are adding a photo to an existing map object, tap the object to open the map object dialog and tap the add photo icon. Choose the desired photo source and upload your photo. The photo will be attached to the map object.

4. You can add a photo at your current GPS location. This is a great option if you want to quickly add an unattached photo to your map at your current position. To get started, tap on the 4 dot location menu in the lower right corner and select Photo at GPS.
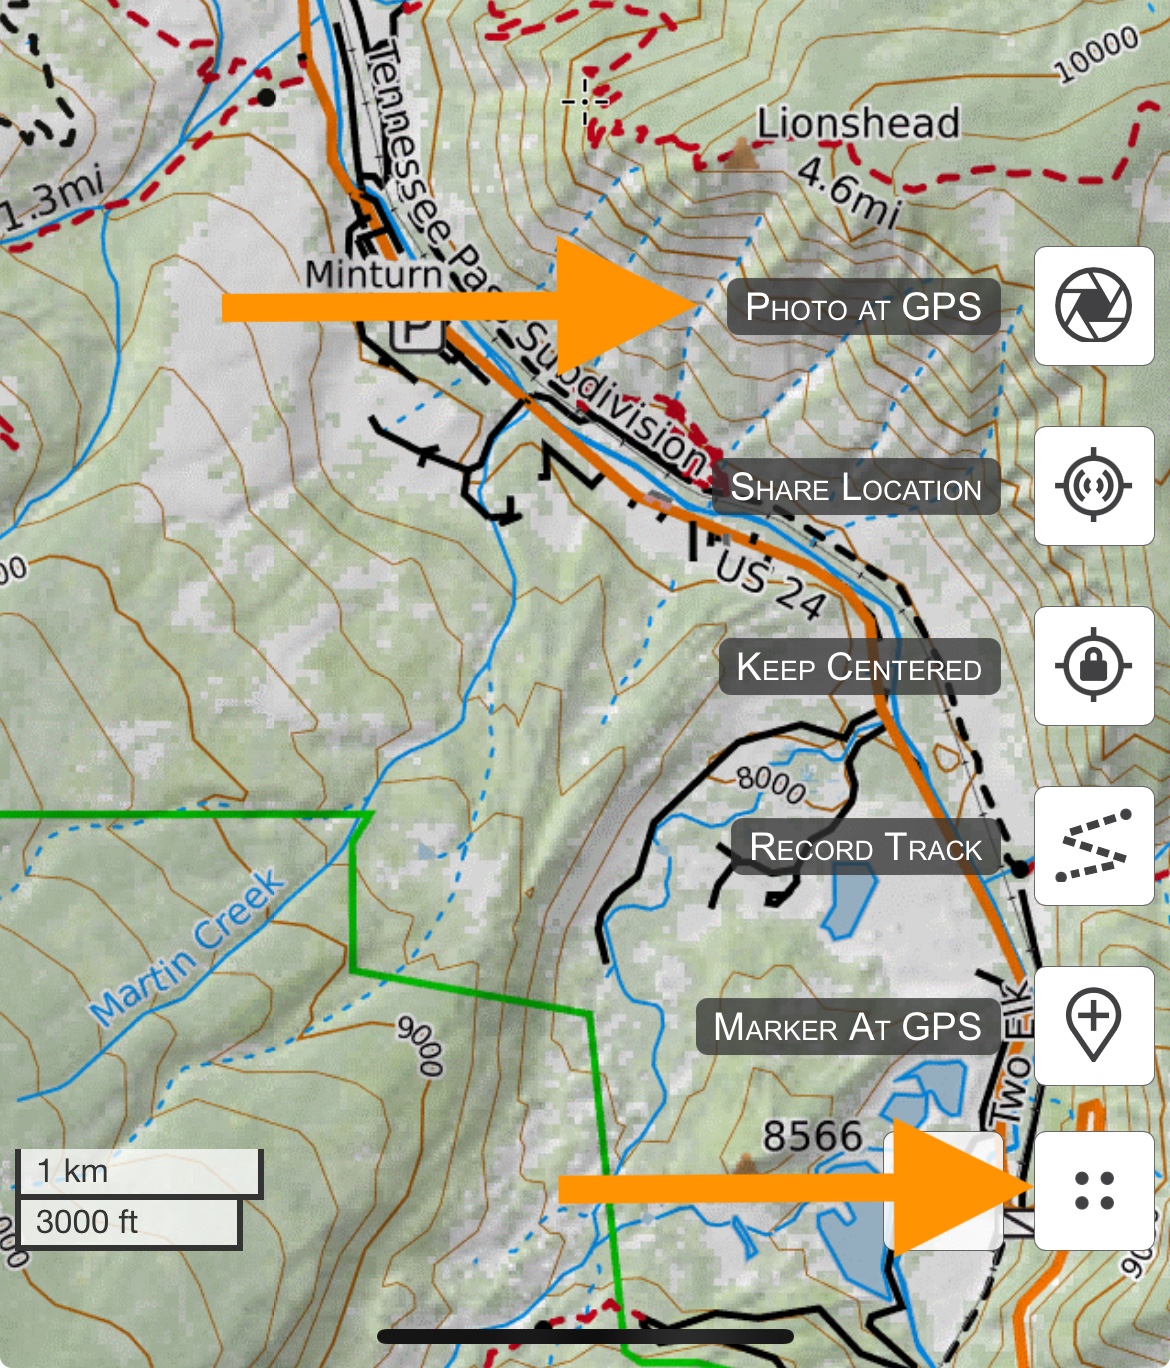
The camera will automatically launch. Take the desired photo. The edit photo dialog will appear with the coordinates prefilled with your current GPS location. Update any of these fields and then tap Save.
Your photo will be added to the map, Map Objects menu, and/or map object dialog depending on the settings you selected.
5. You can add a photo via the Track Information dialog. This is a good choice if you are actively recording a track and want to add photos along your track. You must be actively recording a track to use this option. See the Recording Tracks for instructions on how to record a track.
To use this method, tap the Recording dialog along the bottom of the map viewer to display the Track Information dialog. Select Add Photo.
Choose the desired photo source and upload your photo. The photo will be automatically attached to your track.
Photos in the Map Viewer
Once you’ve added photos to your map, you can interact with them in the map viewer.
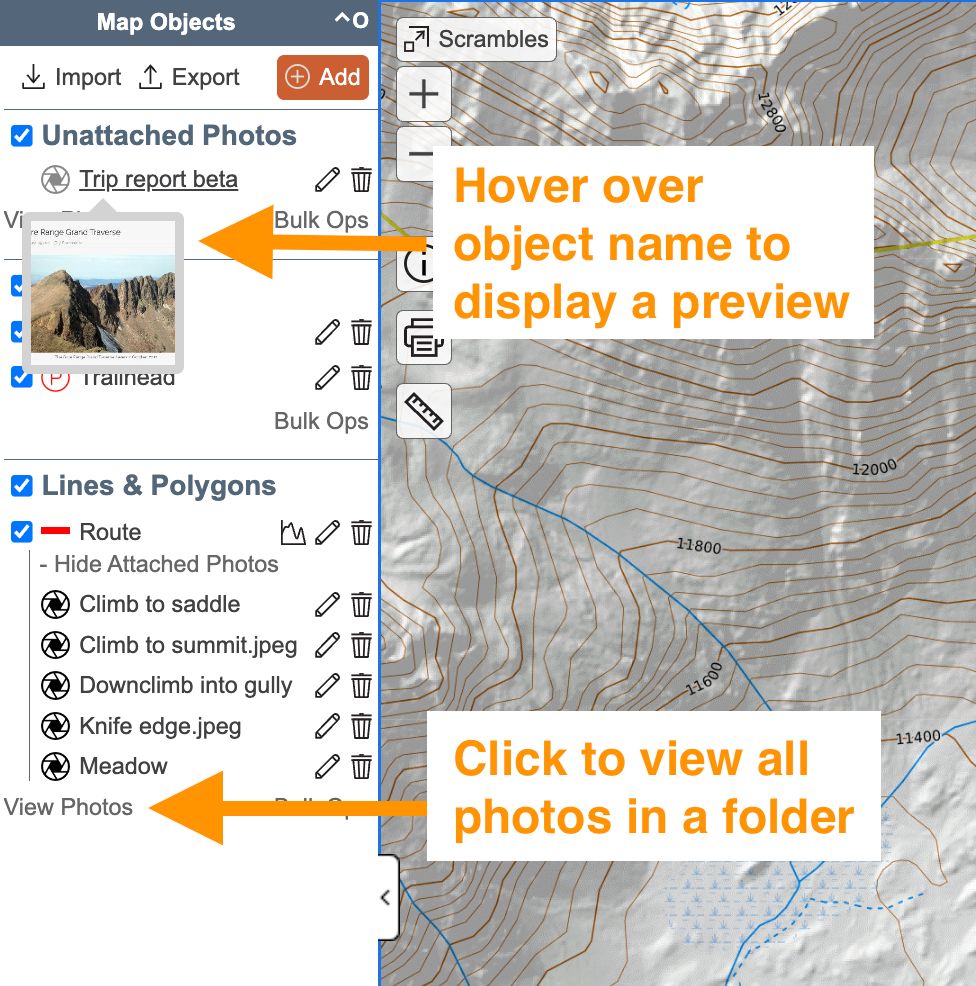
In the Map Objects menu, hover the mouse over the shutter icon and/or object name to display a thumbnail preview of the photo. Click on the View Photos link at the bottom of a folder in the Map Objects menu to display all the photos in that folder in the Media Viewer.
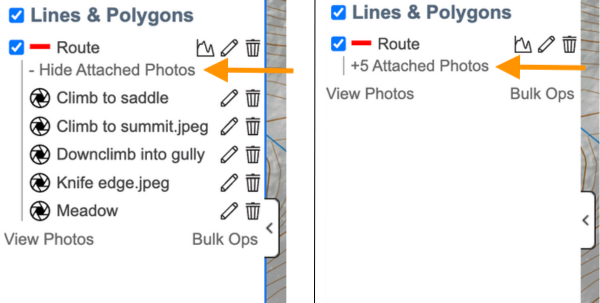
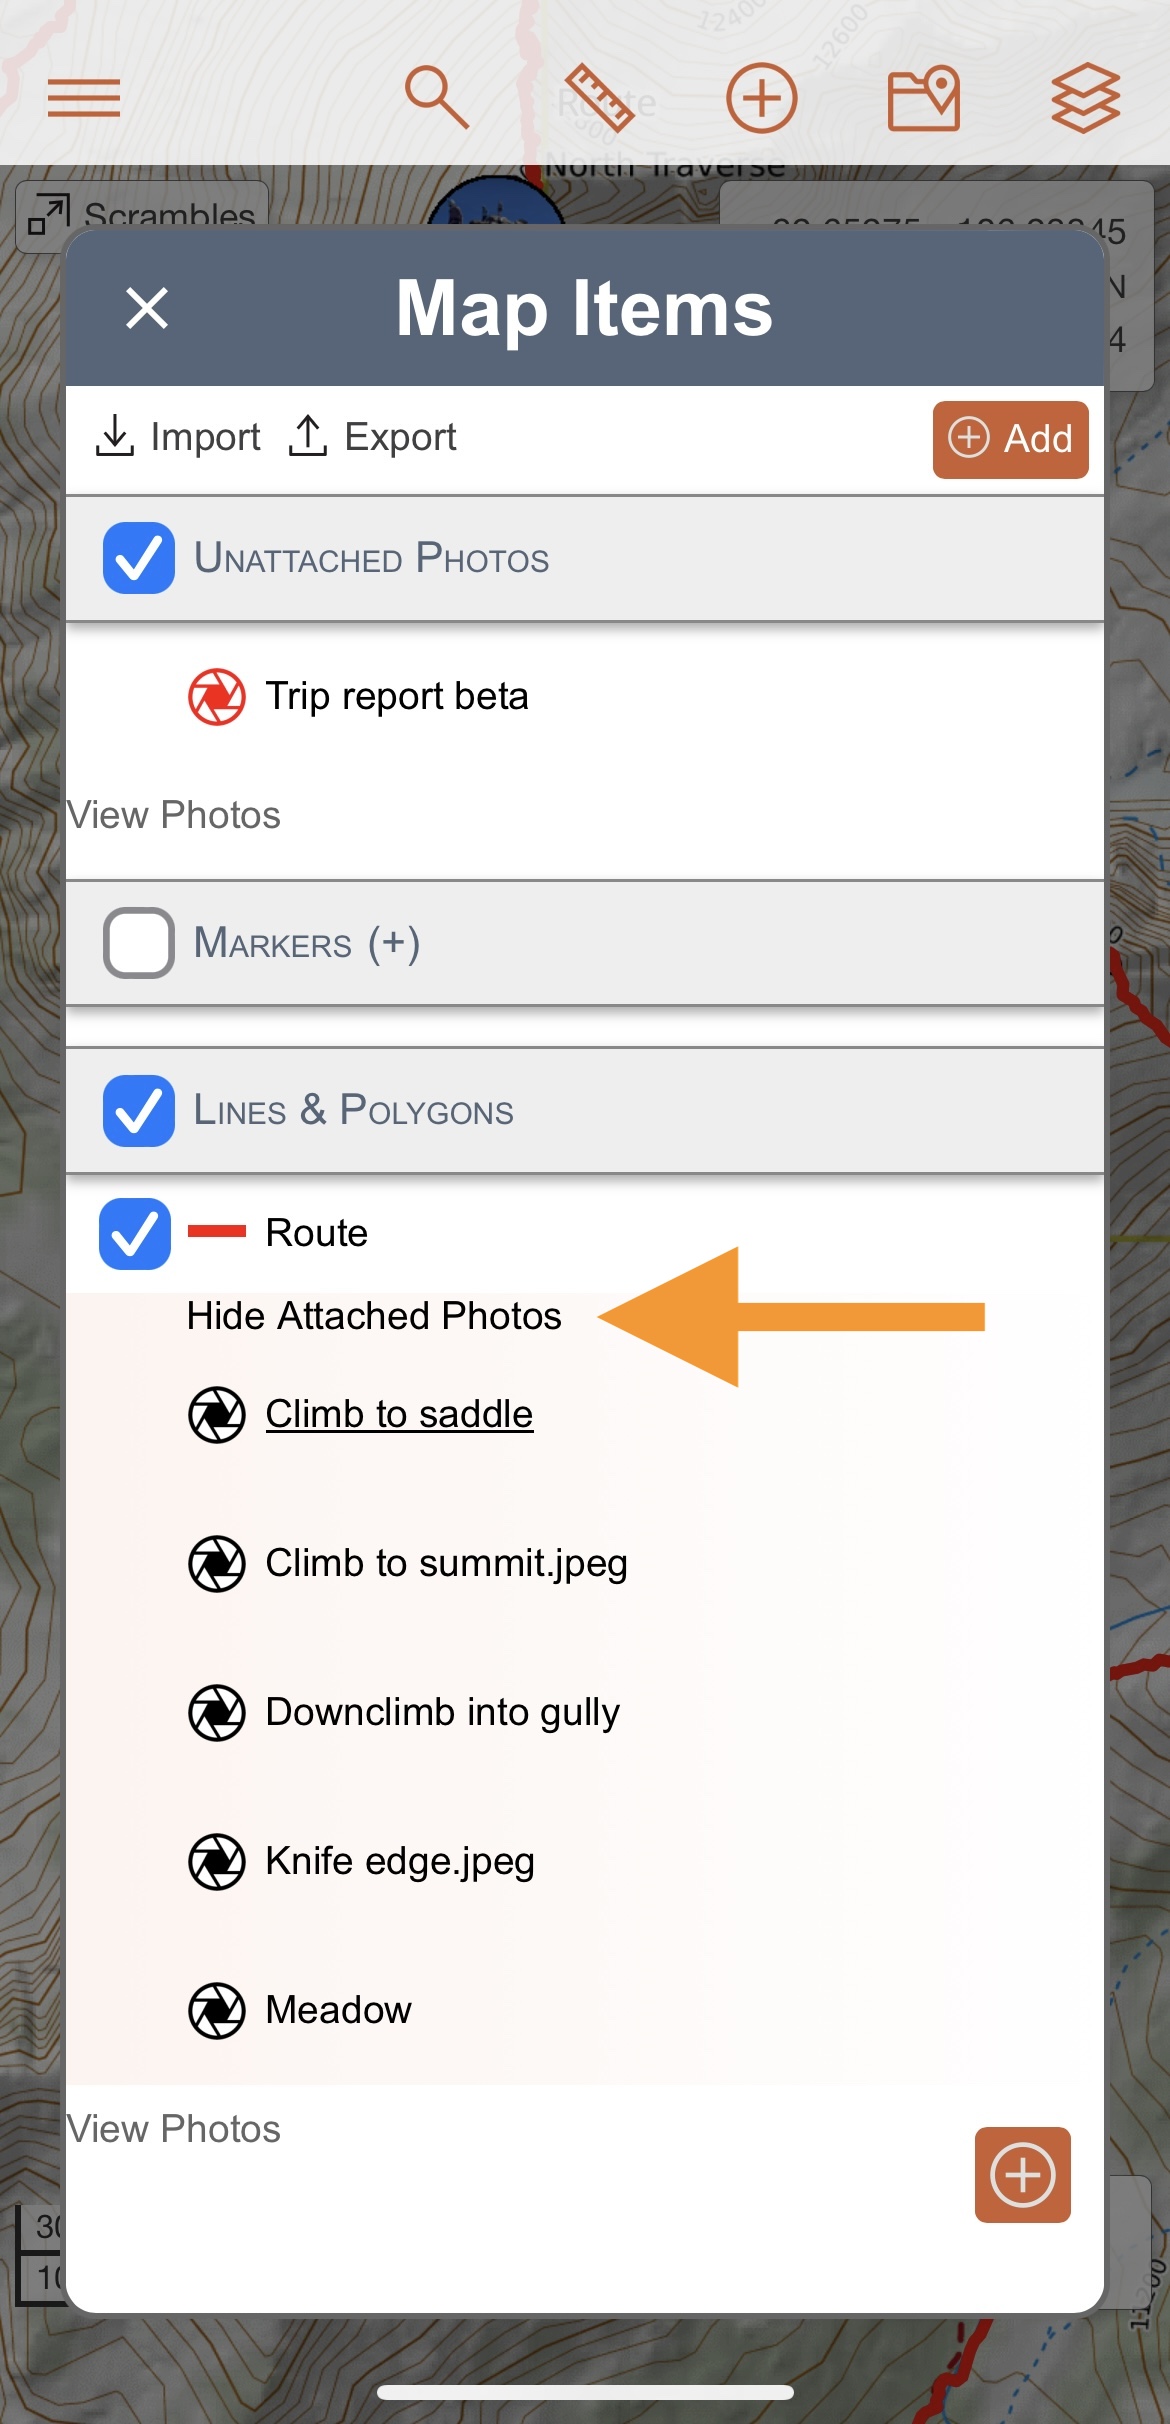
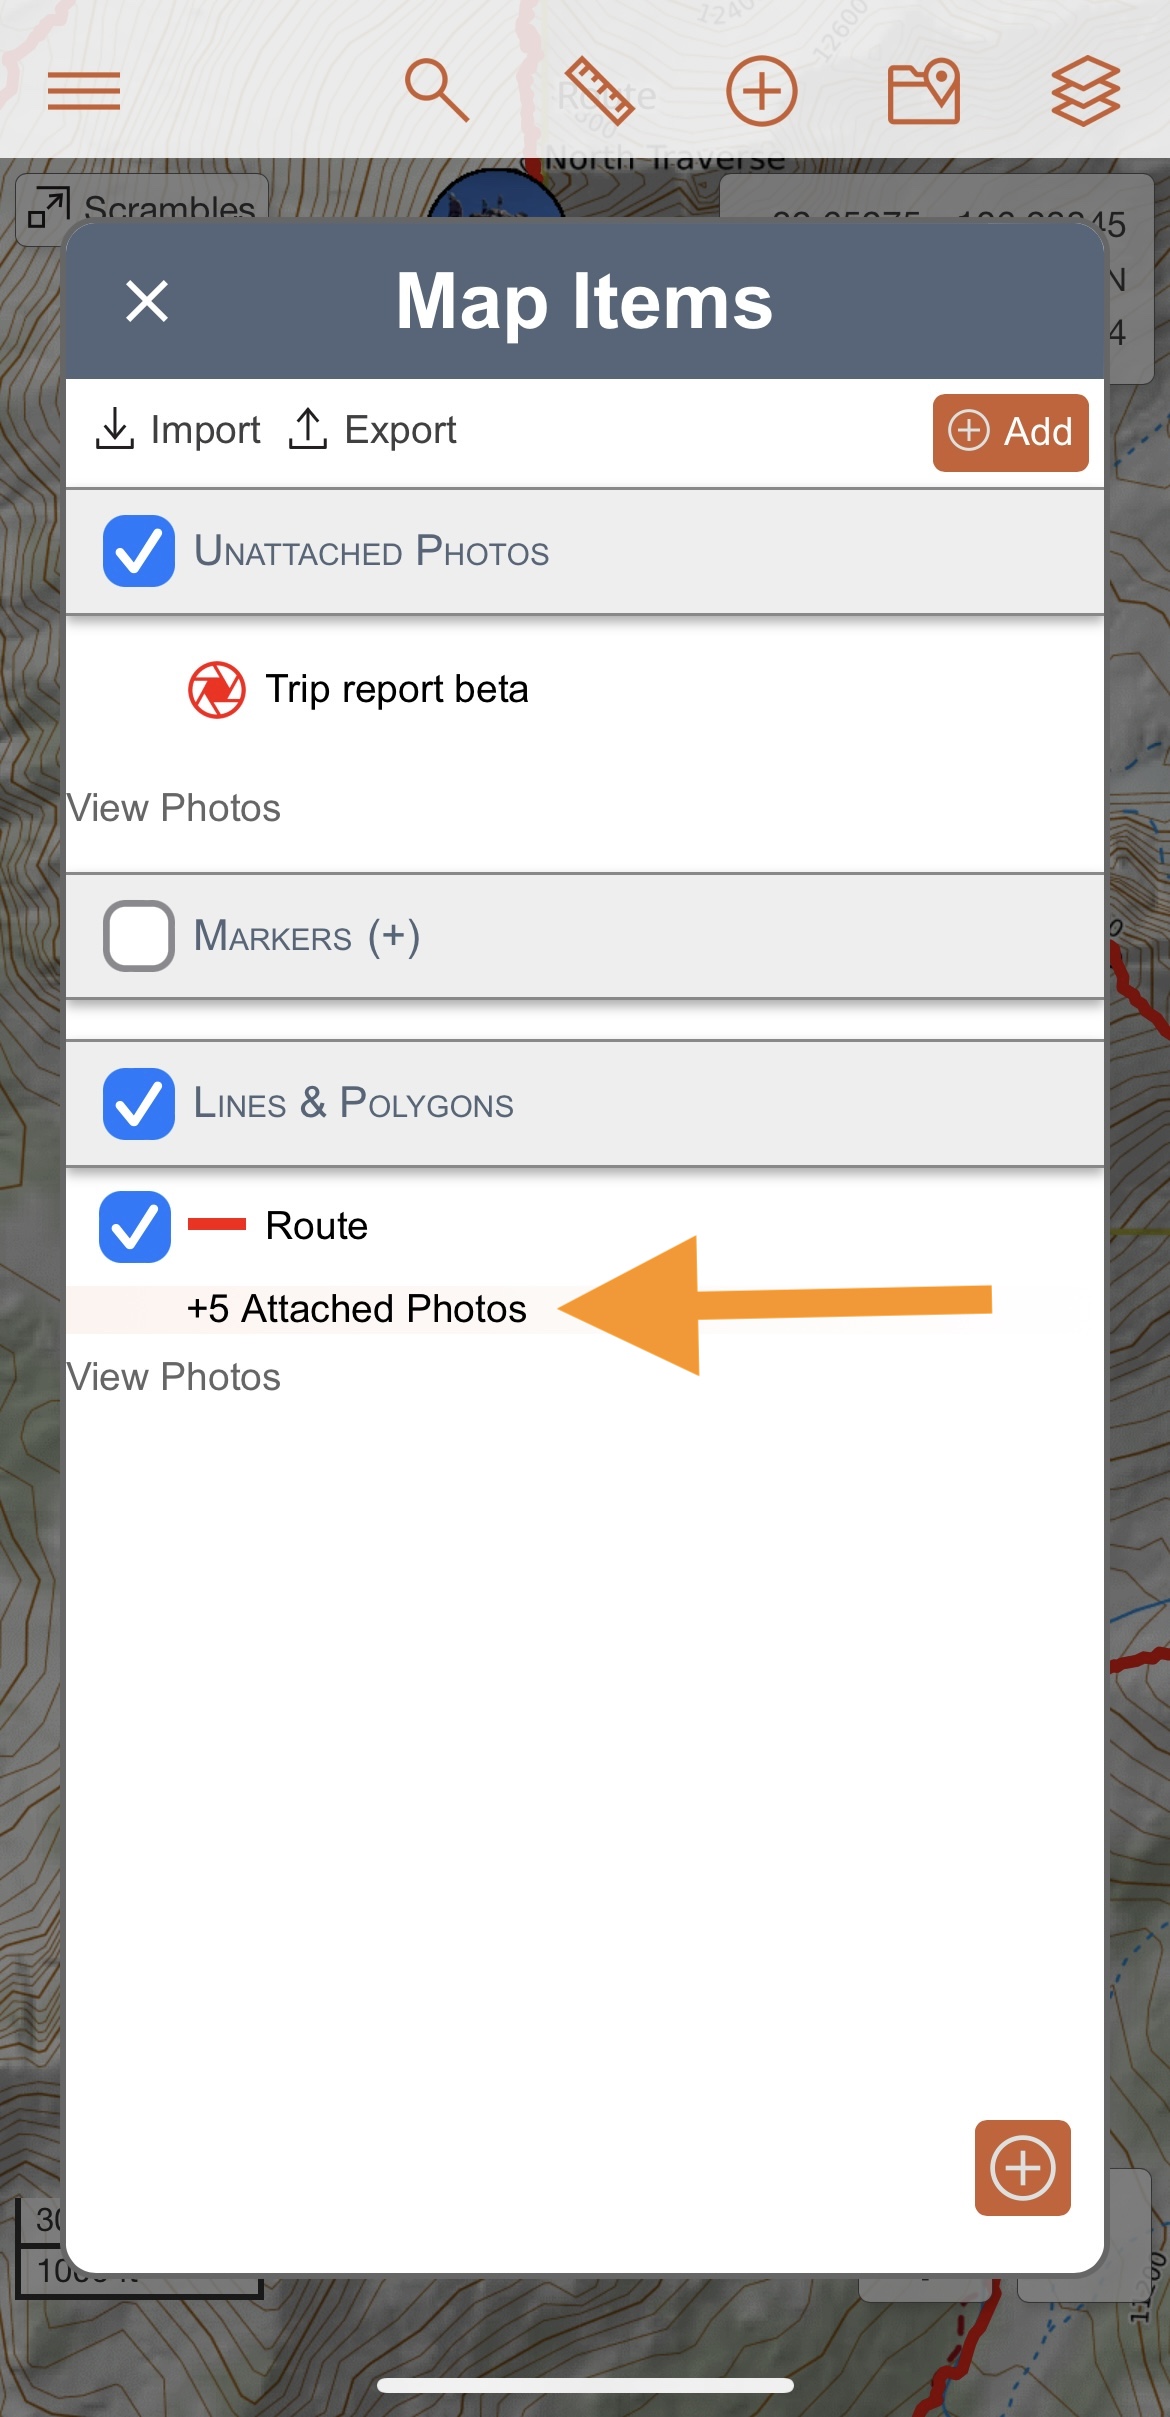
If multiple photos are attached to the same map object, you can hide or show the list of attached photos by using the link below the map object’s name. This only impacts the visibility of photos in the Map Objects menu; it does not change thumbnail visibility on the map.
Thumbnail previews of photos are displayed in the photo and object dialogs as well as in the edit photo and edit object dialogs. Click on a thumbnail to view a larger version of that photo in the Media Viewer.
Photos in the Mobile Map Viewer
You can also interact with photos that you’ve added to your map in the mobile map viewer.
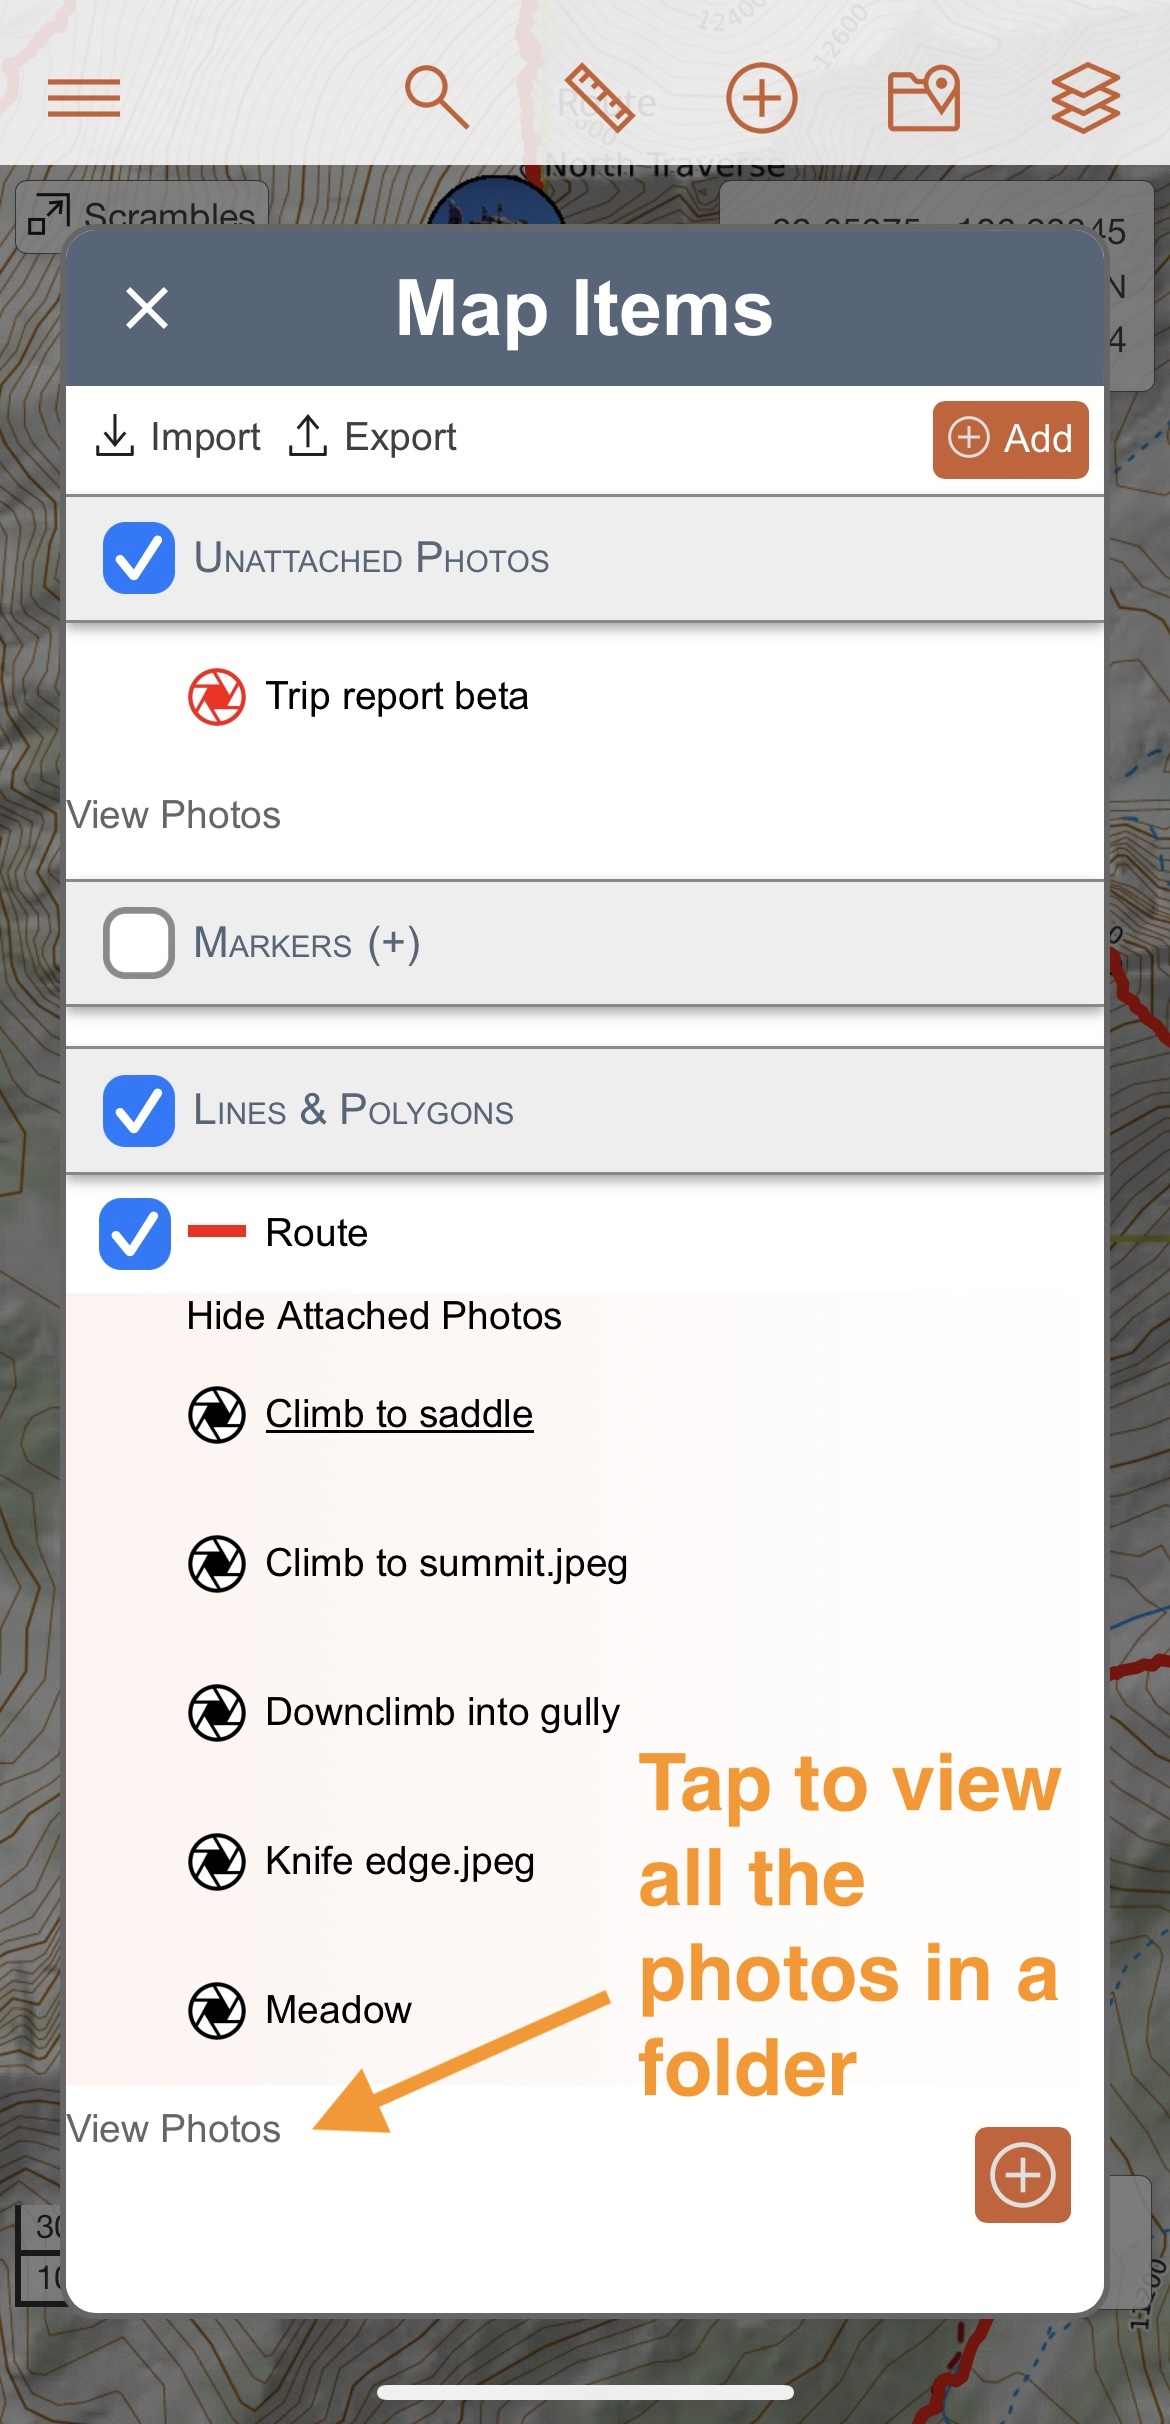
In the Map Items menu, tap on the View Photos link at the bottom of a folder to display all the photos in that folder in the Media Viewer. If multiple photos are attached to the same object, you can also hide or show the attached photos by using the link below the map object’s name. This only impacts the visibility of photos in the Map Objects menu; it does not change thumbnail visibility on the map.
Thumbnail previews of photos are displayed in the photo and object dialogs as well as in the edit photo and edit object dialogs. Tap on a thumbnail to view a larger version of that photo in the Media Viewer.
Managing Photos in the Media Viewer
The Media Viewer allows you to view a larger version of a photo as well as all the photos in the same folder.
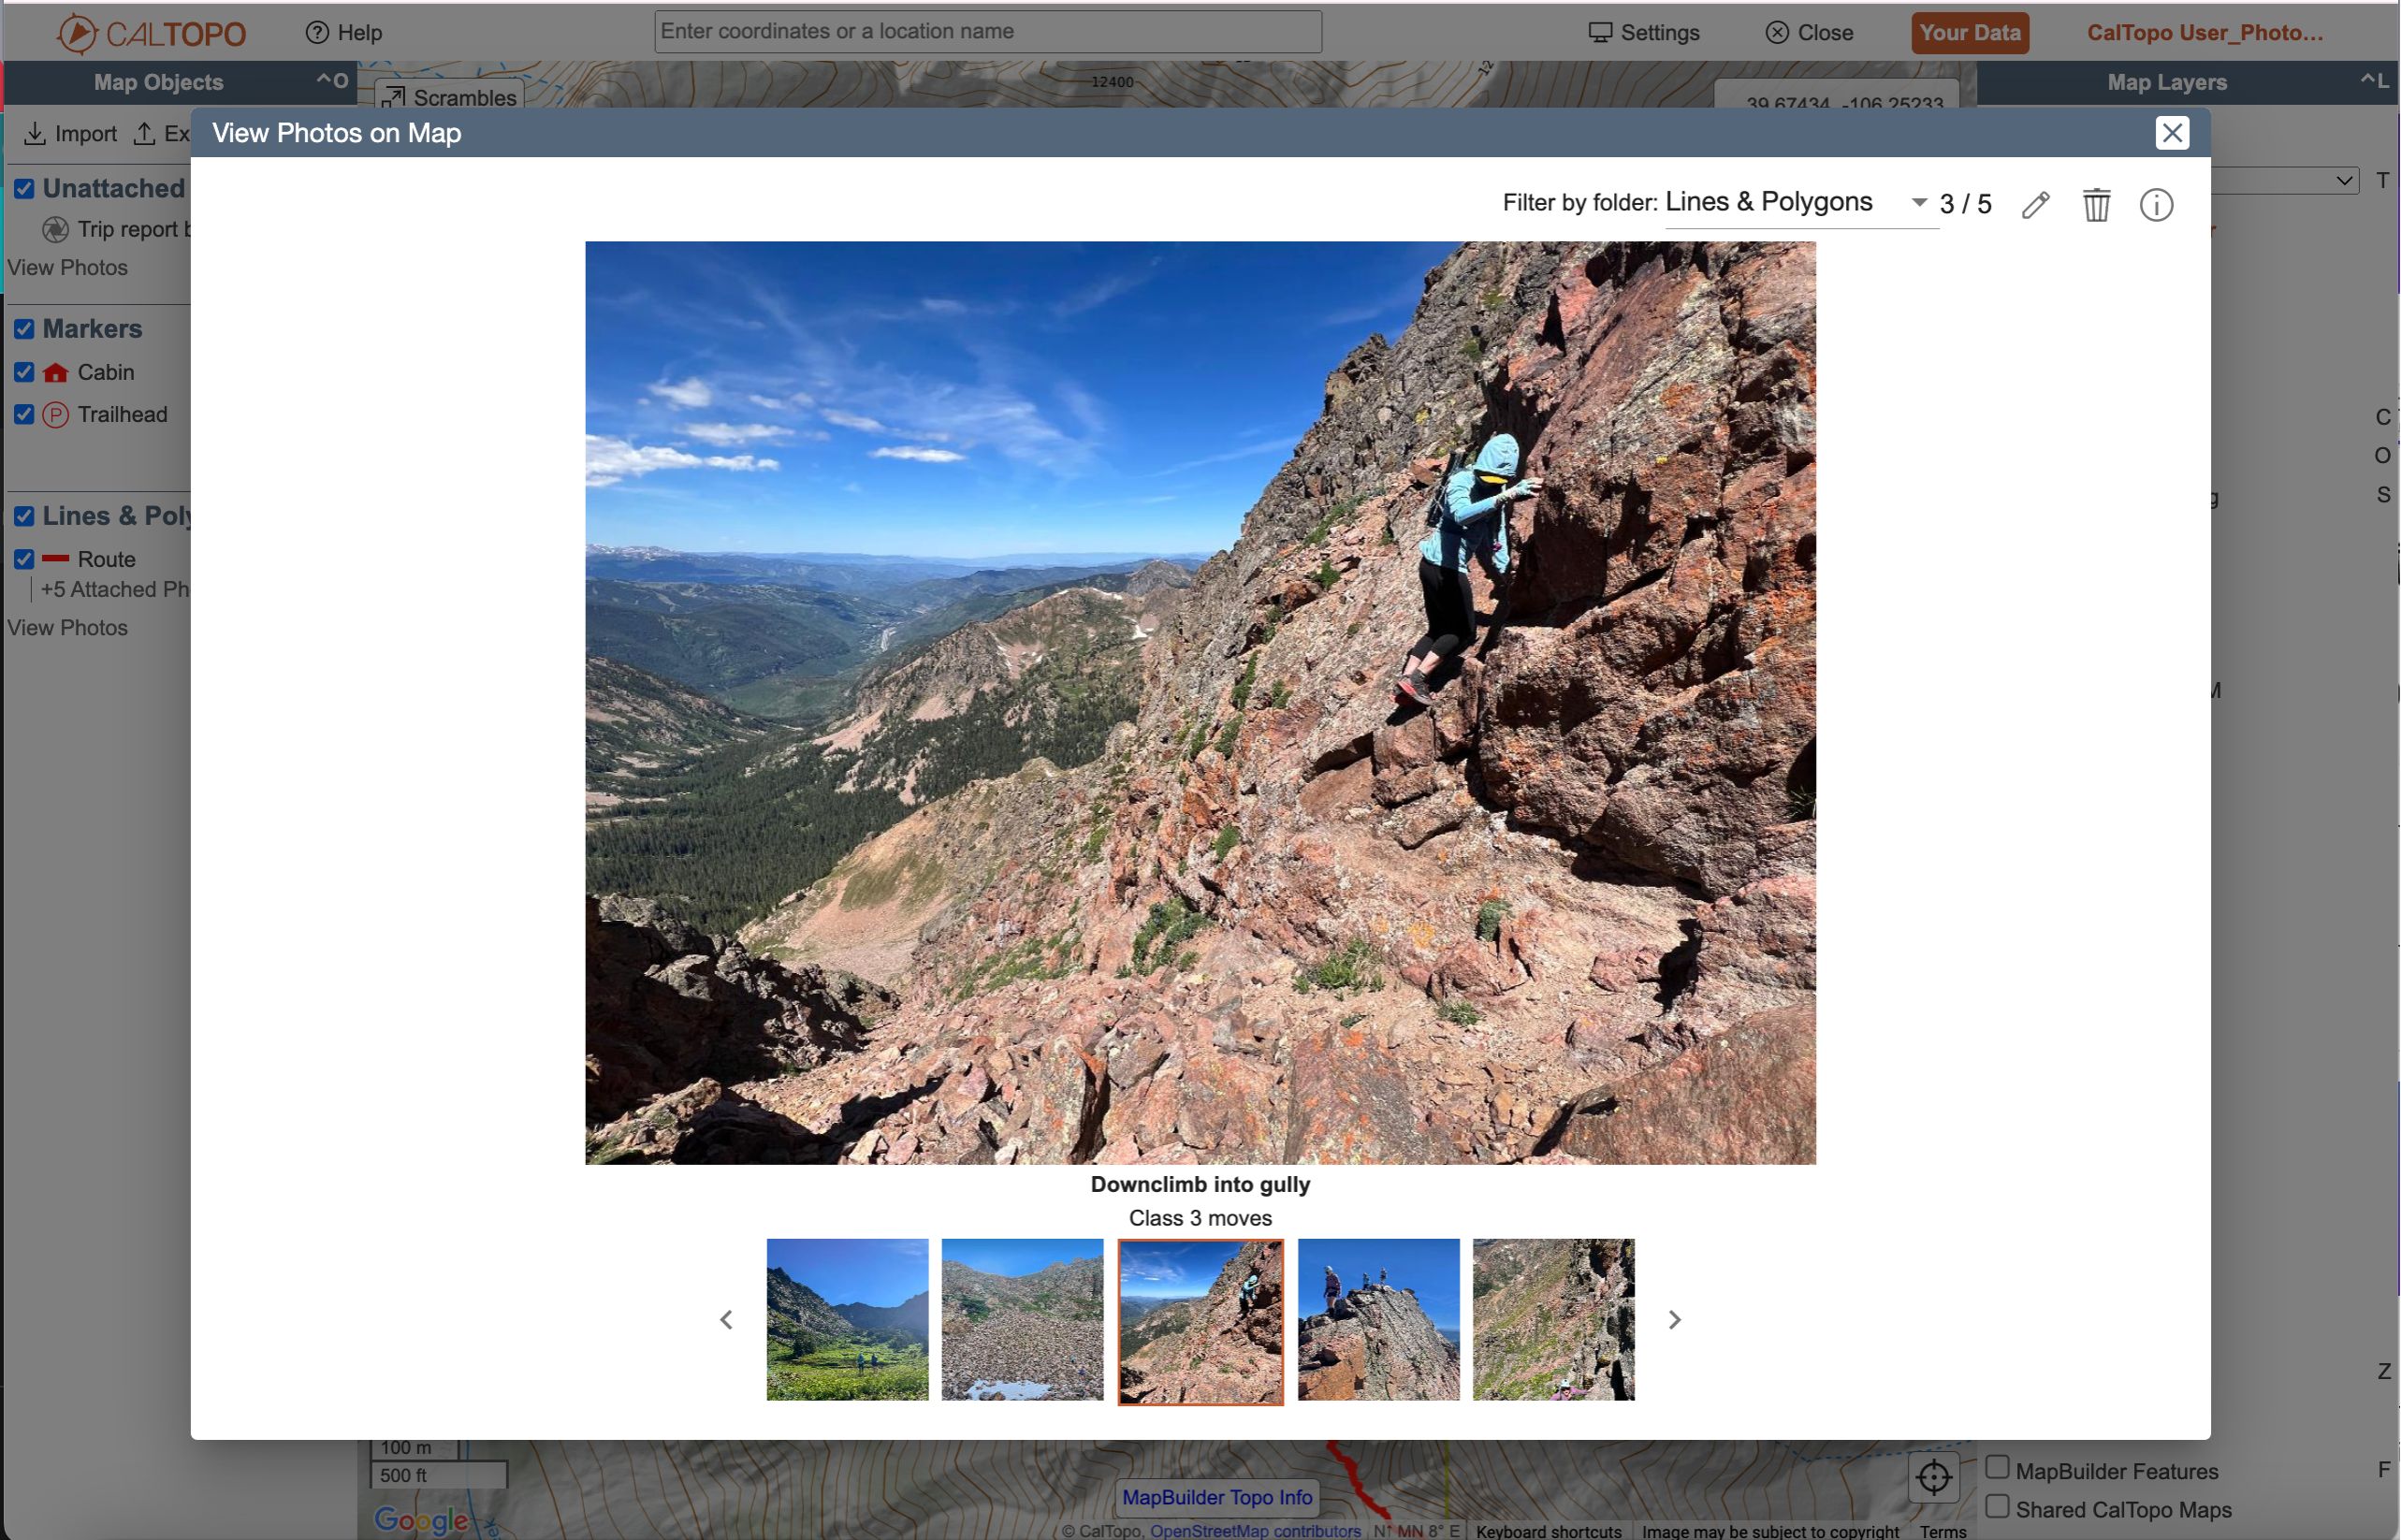
The photo you are currently viewing will appear in the center of the Media Viewer. Use the Filter by Folder dropdown menu to switch between folders with photos. If there are multiple unattached photos or multiple photos attached to the same object, they will be visible in a strip at the bottom of the Viewer. You can move between these photos by using the right/left arrows, the keyboard keys, or clicking on the thumbnail itself.

Clicking on the photo you are currently viewing will offer options for downloading the full size original photo or opening the photo in a new browser window.
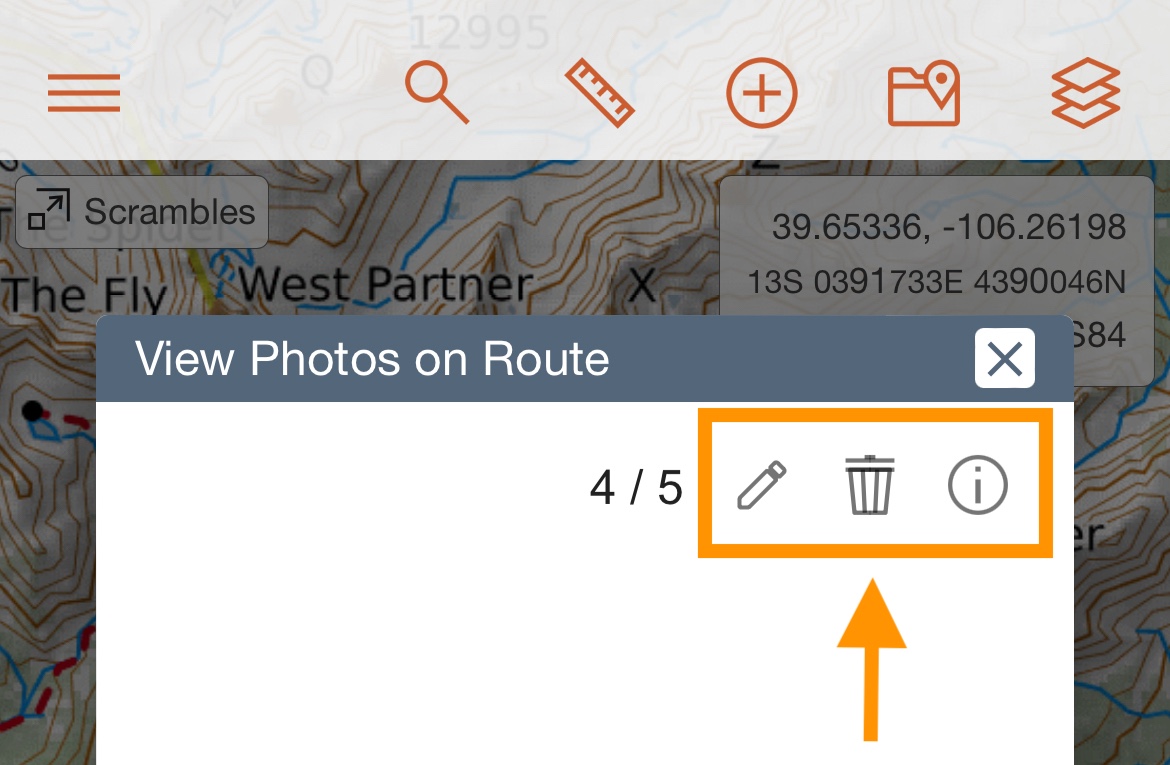
You can view more information about a photo as well as edit photos in the Media Viewer. Options for editing, deleting, or viewing information about the photo you are currently viewing appear in the top right corner of the Media Viewer:
- Pencil icon: opens the edit photo dialog
- Trash can icon: deletes the photo
- Information icon: view more information about the photo. The CalTopo Properties section reflects the information in the photo dialog and it can be edited using the pencil icon. The Raw Photos Properties reflect the photo’s metadata and cannot be edited.
Syncing Media Viewer Photos on the Mobile App
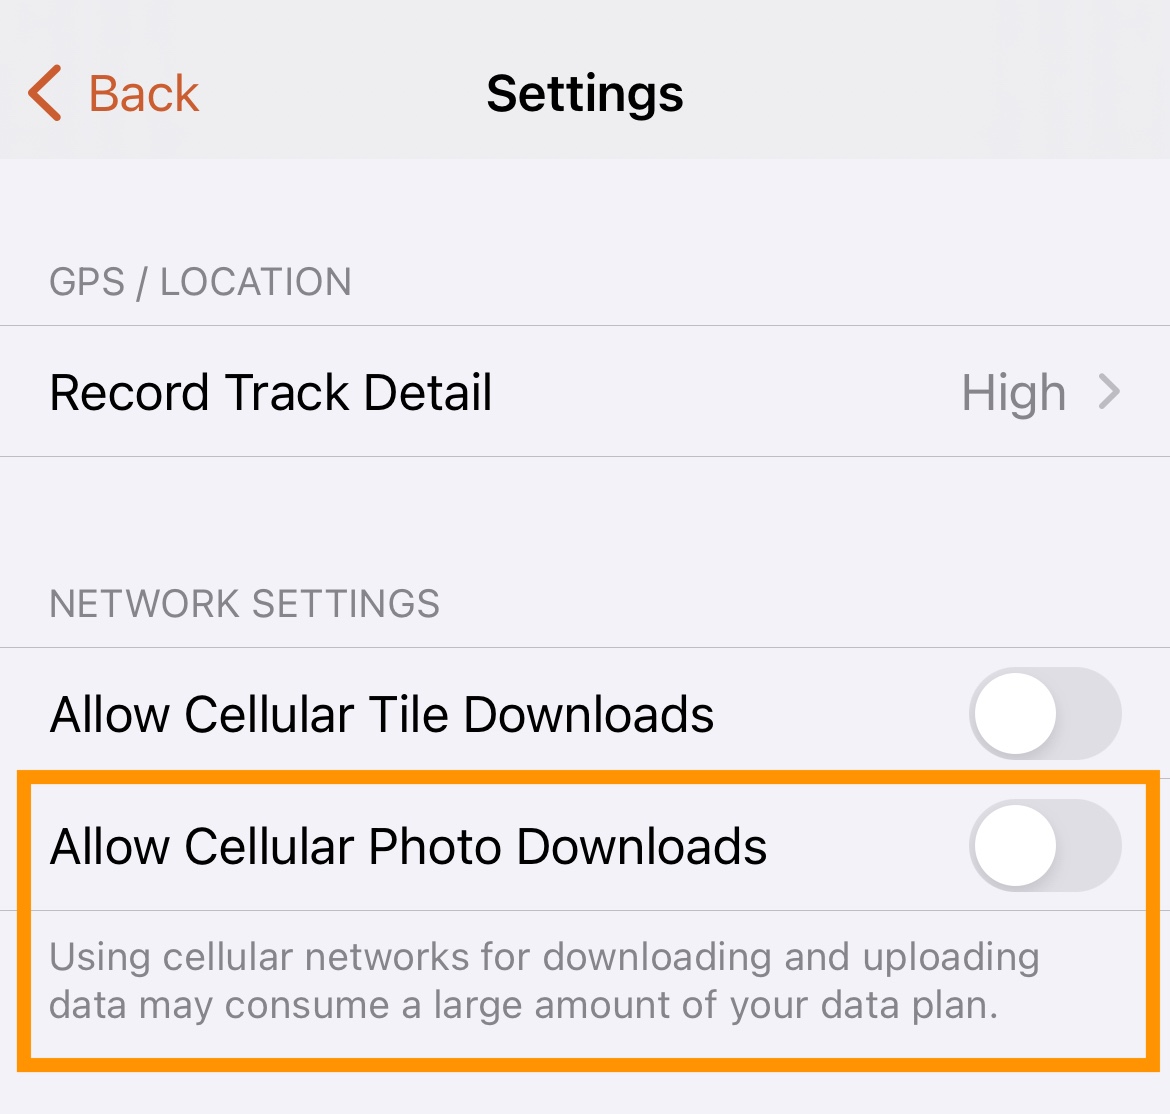
Thumbnail previews on the map and thumbnail previews in the photo and object dialogs will automatically sync whenever your device has a data connection (wifi or cellular). By default, photos in the mobile Media Viewer will only automatically sync when your mobile device is connected to wifi.
You can change your photo download settings in the Settings menu using the Allow Cellular Photo Downloads toggle. Toggling this on allows you to automatically sync Media Viewer photos using cellular data (such as when you have cell service in the backcountry) or wifi. If this is toggled off, Media Viewer photos will only automatically sync when you are connected to wifi. Please note: using cellular networks for downloading and uploading photos may consume a large amount of your data plan.
Managing Photos in the Mobile Media Viewer
You can perform many of the same functions in the Media Viewer on the mobile app as you can on the web.
Similar to the web, the photo you are currently viewing will appear in the center of the mobile Media Viewer. If there are multiple unattached photos or multiple photos attached to the same object, they will be visible in a strip at the bottom of the Media Viewer. You can move between these photos by swiping right or left, or tapping on the thumbnail itself. Tapping on the photo you are currently viewing will allow you to download the full size original photo to your device.
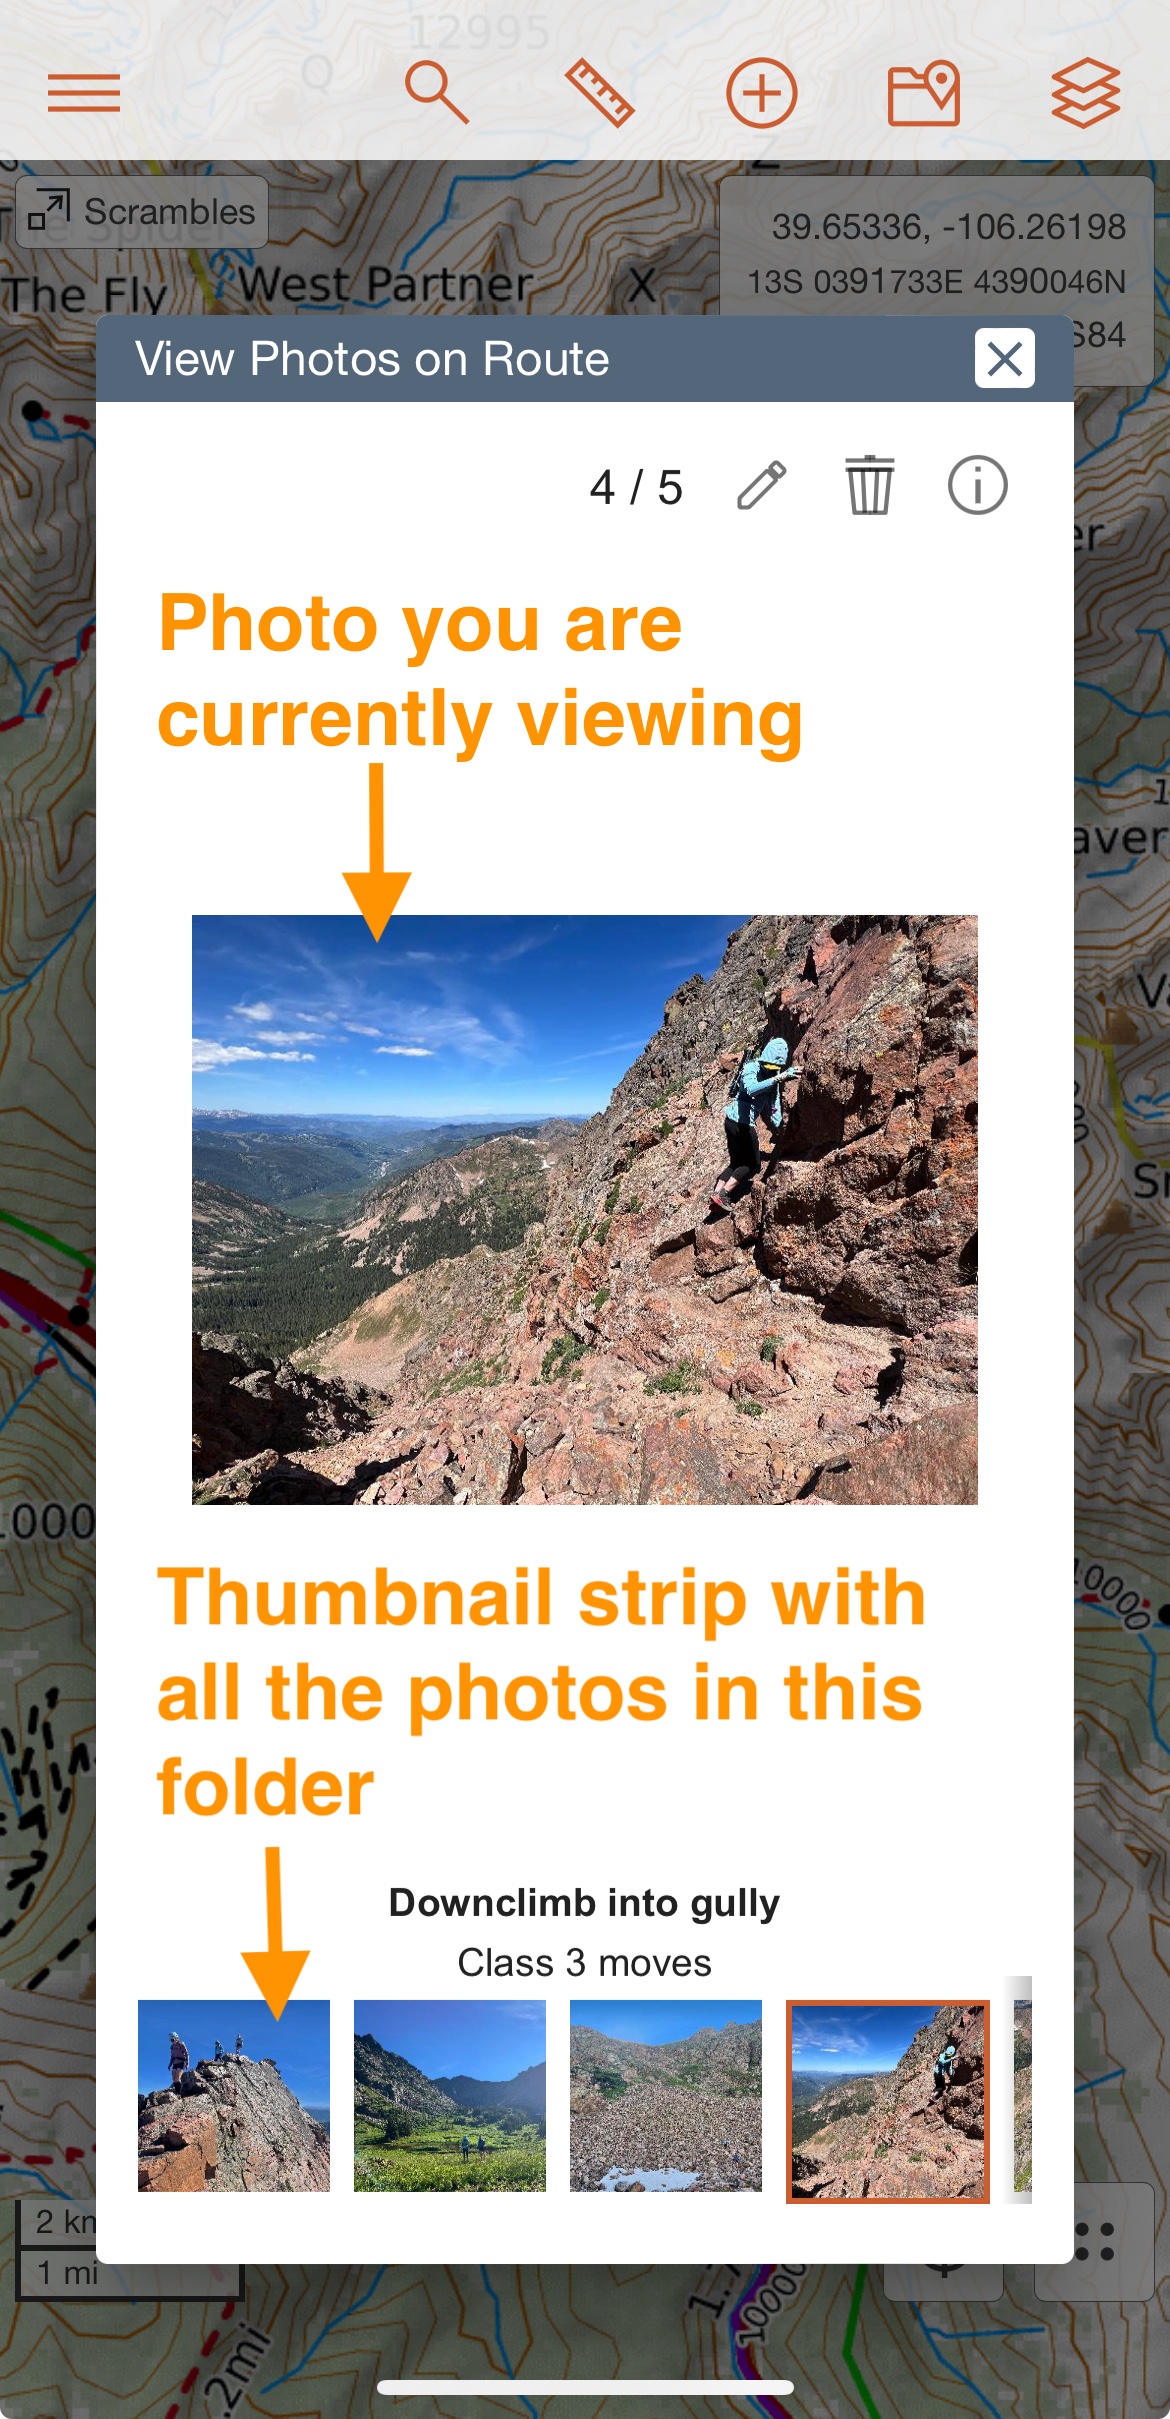
You can view more information about a photo as well as edit photos in the mobile Media Viewer. Options for editing, deleting, or viewing information about the photo you are currently viewing appear in the top right corner of the Media Viewer: